Academy F4U "Jolly Rogers"

User avatar
Nige201980
Captain
Captain
Posts: 4095
Joined: Wed Jun 05, 2013 9:30 am
Location: Doncaster South Yorkshire UK
Contact:

Academy F4U "Jolly Rogers"

Post by Nige201980 »

Hi guys so this will be my entry into this Sig

Image

and whats in the box

Image
Image
Image
Image
Image
Image
Image

looks a straight forward build so the weathering is where I'll go to town with some new techniques.

next post will be a bit of history on this amazing aircraft and some of the brave guys that flew her.
http://www.youtube.com/channel/UCy-TGcs5u_ZXSZ9kObNfsPg


On the go at the Mo

Quite a few :banana:
User avatar
Joesdad
Warrant Officer
Warrant Officer
Posts: 1519
Joined: Wed Aug 14, 2013 9:52 am
Location: Torquay UK
England

Re: Academy F4U "Jolly Rogers"

Post by Joesdad »

You'll enjoy this kit I reckon Nige :pop:
Yes.. It is supposed to look like that!

Tim (Ted)


British Aviation In Scale
https://www.facebook.com/groups/1185462564870290/
User avatar
RoscoRSA
Corporal
Corporal
Posts: 91
Joined: Thu Mar 12, 2015 11:08 am
Location: South Africa

Re: Academy F4U "Jolly Rogers"

Post by RoscoRSA »

I saw Academy F4U and thought, well this build should be nice if it wasn't for the decals, then I saw Jolly Rogers and I almost cringed because you want those decals to be good. Upon finer reviewing it seems that the Decal sheet you have is not the run of the mill Academy Sheet but a Crossdelta sheet (never used them but quick google search showed that they are not half bad) so I am really hoping those decals cooperate with you.

Best of luck and cant wait to see this one come together.
On the bench:

Tamiya 1:48 MIG-15

On Hold
Academy 1:48 F-86 Saber
User avatar
Nige201980
Captain
Captain
Posts: 4095
Joined: Wed Jun 05, 2013 9:30 am
Location: Doncaster South Yorkshire UK
Contact:

Re: Academy F4U "Jolly Rogers"

Post by Nige201980 »

RoscoRSA wrote:I saw Academy F4U and thought, well this build should be nice if it wasn't for the decals, then I saw Jolly Rogers and I almost cringed because you want those decals to be good. Upon finer reviewing it seems that the Decal sheet you have is not the run of the mill Academy Sheet but a Crossdelta sheet (never used them but quick google search showed that they are not half bad) so I am really hoping those decals cooperate with you.

Best of luck and cant wait to see this one come together.
Cheers for the heads up on the decals i was going to get some replacements but i think I'll go with with these now.
http://www.youtube.com/channel/UCy-TGcs5u_ZXSZ9kObNfsPg


On the go at the Mo

Quite a few :banana:
User avatar
Nige201980
Captain
Captain
Posts: 4095
Joined: Wed Jun 05, 2013 9:30 am
Location: Doncaster South Yorkshire UK
Contact:

Re: Academy F4U "Jolly Rogers"

Post by Nige201980 »

Just a bit of history on the Corsair for you to have a look at guys.

The Chance Vought F4U Corsair was an American fighter aircraft that saw service primarily in World War II and the Korean War. Demand for the aircraft soon overwhelmed Vought's manufacturing capability, resulting in production by Goodyear and Brewster: Goodyear-built Corsairs were designated FG and Brewster-built aircraft F3A. From the first prototype delivery to the U.S. Navy in 1940, to final delivery in 1953 to the French, 12,571 F4U Corsairs were manufactured by Vought, in 16 separate models, in the longest production run of any piston-engined fighter in U.S. history (1942–53).

The Corsair was designed as a carrier-based aircraft. However its difficult carrier landing performance rendered the Corsair unsuitable for Navy use until the carrier landing issues were overcome when used by the British Fleet Air Arm. The Corsair thus came to and retained prominence in its area of greatest deployment: land based use by the U.S. Marines. The role of the dominant U.S. carrier based fighter in the second part of the war was thus filled by the Grumman F6F Hellcat, powered by the same Double Wasp engine first flown on the Corsair's first prototype in 1940. The Corsair served to a lesser degree in the U.S. Navy. As well as the U.S. and British use the Corsair was also used by the Royal New Zealand Air Force, the French Navy Aéronavale and other, smaller, air forces until the 1960s. Some Japanese pilots regarded it as the most formidable American fighter of World War II, and the U.S. Navy counted an 11:1 kill ratio with the F4U Corsair.

After the carrier landing issues had been tackled it quickly became the most capable carrier-based fighter-bomber of World War II. The Corsair served almost exclusively as a fighter-bomber throughout the Korean War and during the French colonial wars in Indochina and Algeria.

Engine considerations
The F4U incorporated the largest engine available at the time: the 2,000 hp (1,500 kW) 18-cylinder Pratt & Whitney R-2800 Double Wasp radial. To extract as much power as possible a relatively large Hamilton Standard Hydromatic three-blade propeller of 13 feet 4 inches (4.06 m) was used.

Technical Issues
In part because of its advances in technology and a top speed greater than existing Navy aircraft, numerous technical problems had to be solved before the Corsair would enter service. Carrier suitability was a major development issue, prompting changes to the main landing gear, tail wheel and tailhook. Early F4U-1s had difficulty recovering from developed spins, since the inverted gull wing's shape interfered with elevator authority. It was also found that the Corsair's starboard wing could stall and drop rapidly and without warning during slow carrier landings. In addition, if the throttle were suddenly advanced (for example, during an aborted landing) the port wing could stall and drop so quickly that the fighter could flip over with the rapid increase in power. These potentially lethal characteristics were later solved through the addition of a small, 6 in (150 mm)-long stall strip to the leading edge of the outer starboard wing, just inboard of the gun ports. This allowed the starboard wing to stall at the same time as the port.


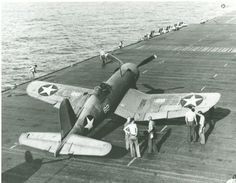
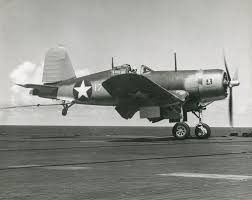
An early F4U-1 showing the "birdcage" canopy with rearwards production cockpit location. Compare with the XF4U-1.
Other problems were encountered during early carrier trials. The combination of an aft cockpit and the Corsair's long nose made landings hazardous for newly trained pilots. During landing approaches it was found that oil from the hydraulic cowl flaps could spatter onto the windscreen, badly reducing visibility, and the undercarriage oleo struts had bad rebound characteristics on landing, allowing the aircraft to bounce out of control down the carrier deck. The first problem was solved by locking the top cowl flap down permanently, then replacing it with a fixed panel. The undercarriage bounce took more time to solve but eventually a "bleed valve" incorporated in the legs allowed the hydraulic pressure to be released gradually as the aircraft landed. The Corsair was not considered fit for carrier use until the wing stall problems and the deck bounce could be solved.

Meanwhile the more docile and simpler to build F6F Hellcat had begun entering service in its intended carrier based use. Compared to the Hellcat the Navy regarded the Corsair as fundamentally flawed for their requirements. While slower than the Corsair, the Hellcat was much preferred by the Navy since the Hellcat was much simpler to land on a carrier. The Hellcat's great success combined with the Corsair's carrier landing issues meant the Navy released the Corsair to the U.S. Marine Corps. With no requirement for carrier landings, the Marine Corps deployed the Corsair to widespread and devastating effect from land bases.

Corsair deployment aboard U.S. carriers was delayed until late 1944, by which time the carrier landing problems had been tackled by the British.

Image

Design modifications
Production F4U-1s featured several major modifications compared with the XF4U-1. A change of armament to six wing-mounted .50 in (12.7 mm) M2 Browning machine guns (three in each outer wing panel) and their ammunition (400 rounds for the inner pair, 375 rounds for the outer) meant that the location of the wing fuel tanks had to be changed. In order to keep the fuel tank close to the center of gravity, the only available position was in the forward fuselage, ahead of the cockpit. Accordingly as a 237 gal (897 l) self-sealing fuel tank replaced the fuselage mounted armament, the cockpit had to be moved back by 32 in (810 mm) and the fuselage lengthened. In addition, 150 lb of armor plate was installed, along with a 1.5 in (38 mm) bullet-proof windscreen which was set internally, behind the curved Plexiglas windscreen. The canopy could be jettisoned in an emergency, and half-elliptical planform transparent panels, much like those of certain models of the Curtiss P-40, were inset into the sides of the fuselage's turtledeck structure behind the pilot's headrest, providing the pilot with a limited rear view over his shoulders. A rectangular Plexiglas panel was inset into the lower center section to allow the pilot to see directly beneath the aircraft and assist with deck landings. The engine used was the more powerful R-2800-8 (B series) Double Wasp which produced 2,000 hp (1,491 kW). On the wings the flaps were changed to a NACA slotted type and the ailerons were increased in span to increase the roll rate, with a consequent reduction in flap span. IFF transponder equipment was fitted in the rear fuselage. These changes increased the Corsair's weight by several hundred pounds.

Image

F4U-1A
General characteristics

Crew: 1 pilot
Length: 33 ft 4 in (10.1 m)
Wingspan: 41 ft 0 in (12.5 m)
Height: 16 ft 1 in (4.90 m)
Wing area: 314 ft2 (29.17 m2)
Empty weight: 8,982 lb (4,073 kg)
Loaded weight: 11,432 lb (5,185 kg)
Powerplant: 1 × Pratt & Whitney R-2800-8 radial engine, 2,000 hp (1,491 kW)
Performance

Maximum speed: 417 mph (362 kn, 671 km/h)
Range: 1,015 mi (882 nmi (1,633 km))
Service ceiling: 36,900 ft (11,247 m)
Rate of climb: 2,890 ft/min (15.2 m/s)
Armament

Guns:
4 × 0.50 in (12.7 mm) AN/M2 Browning machine guns, 400 rounds per gun
2 × 0.50 in AN/M2 Browning machine guns, 375 rounds per gun
Rockets: 4 × 5 in (12.7 cm) High Velocity Aircraft Rockets and/or
Bombs: 2,000 pounds (910 kg)
F4U-4

AU-1 Corsair Standard Aircraft Characteristics
General characteristics

Crew: 1 pilot
Length: 33 ft 8 in (10.2 m)
Wingspan: 41 ft 0 in (12.5 m)
WS Folded: 17 ft 0.5 in (5.2 m)
Height: 14 ft 9 in (4.50 m)
Empty weight: 9,205 lb (4,174 kg)
Loaded weight: 12,405 lb (5,626 kg)
Powerplant: 1 × Pratt & Whitney R-2800-18W radial engine, 2,325 hp (1,710 kW)
Performance

Maximum speed: 453 mph (395 kn, 731 km/h)
Range: 897 mi (602 nmi (1,115 km))
Service ceiling: 41,500ft (12,649 m)
Rate of climb: 3,870ft/min (19.7 m/s)
Armament

Guns:
6 × 0.50 in (12.7 mm) AN/M2 Browning machine guns, 400 rounds per gun or
4 × 0.79 in (20 mm) M2 cannon
Rockets: 8 × 5 in (12.7 cm) high velocity aircraft rockets and/or
Bombs: 4,000 pounds (1,800 kg)

F-17 Jolly Rogers (1943-1959)
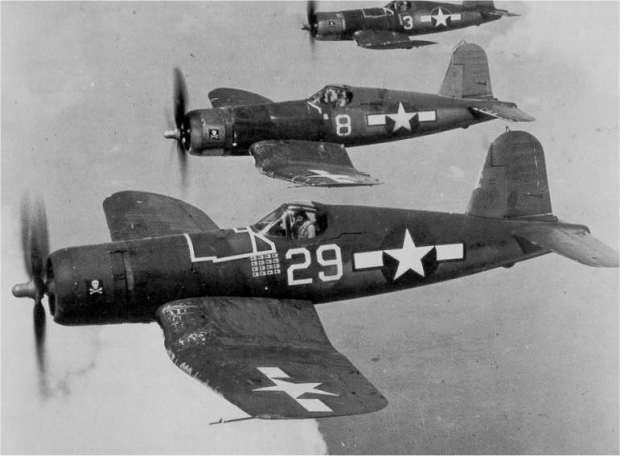
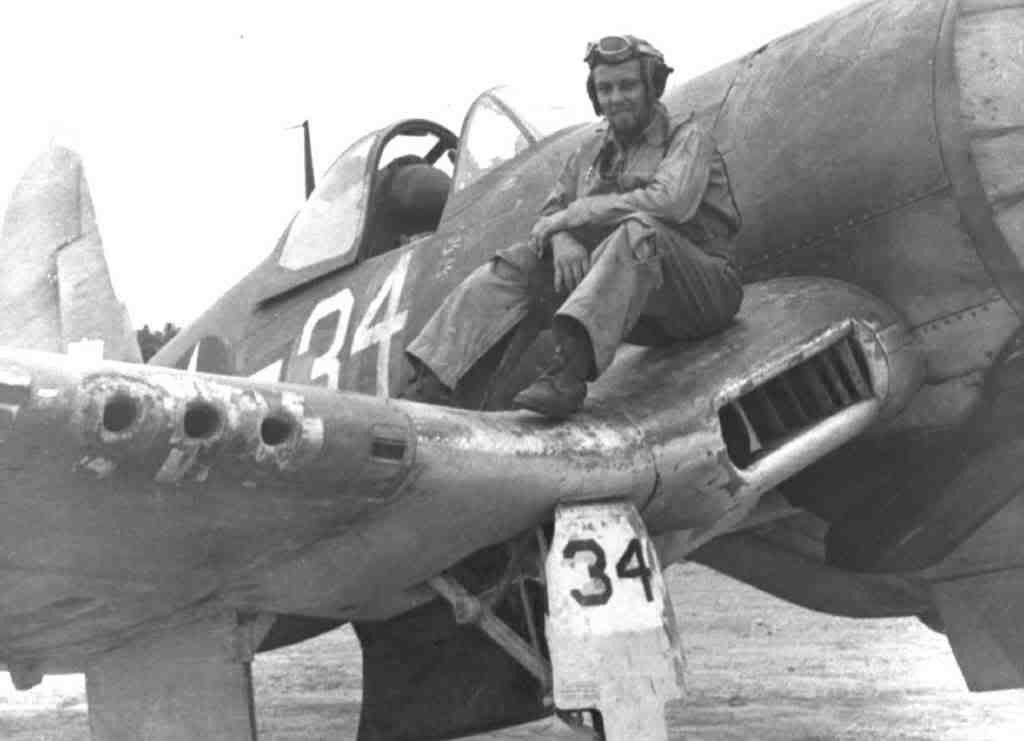
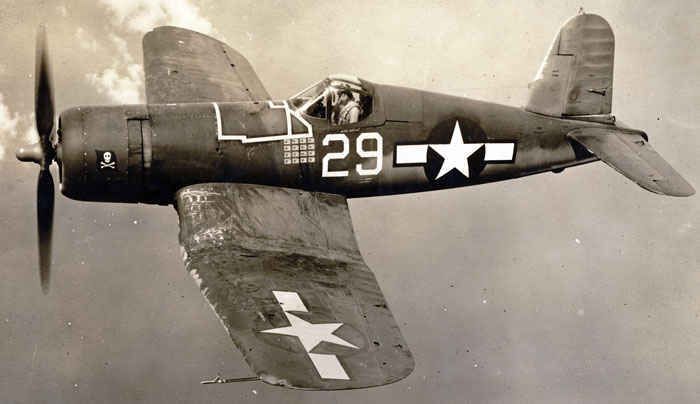
Image

F4U-1As of VF-17.
The first incarnation of the Jolly Rogers was established on 1 January 1943 at NAS Norfolk, as VF-17. Initially based on the USS Bunker Hill (CV-17), the unit saw combat as a land-based squadron in the Solomon Islands in 1943-44, flying the F4U Corsair. The squadron was broken up in April 1944, but a new unit, with new personnel and aircraft, was formed with the same squadron designation. This new VF-17 served aboard the USS Hornet (CV-12), and flew the F6F Hellcat in the final drive across the Pacific in 1945.

Image


The iconic squadron insignia of VF-17, which had a stark white skull and crossbones emblazoned over a sinister black flag, was born from the desire of VF-17 squadron commander Lt. Cdr Tom Blackburn to have an insignia that had a piratical theme to it to match the F4U's designation which was "Corsair"

Image

The first VF-17 had 11 aces and was credited with 152 victories; the second had 12 aces and 161 victories. Together VF-17 was the highest-scoring Navy squadron of World War II. In their five months of action in the Solomons, the Jolly Rogers shot down 8 Japanese planes for every Corsair lost. They flew 8,577 combat hours, destroyed 156 planes and 5 ships for a loss of 12 pilots. The squadron had 12 aces, more than any other naval unit. As the tide of the war in the Pacific turned, VF-17 was there.

Image

VF-17 was redesignated as VF-5B in 1946, and as VF-61 in 1948. It was disestablished on 15 April 1959.

(from Wiki and other sources)
http://www.youtube.com/channel/UCy-TGcs5u_ZXSZ9kObNfsPg


On the go at the Mo

Quite a few :banana:
User avatar
shortCummins
Chief Warrant Officer 2
Posts: 1643
Joined: Mon Aug 04, 2014 4:30 pm
Location: Cotgrave, Nottingham
Great Britain

Re: Academy F4U "Jolly Rogers"

Post by shortCummins »

love the Corsair and this looks like a nice kit, enjoy the build

rgds
John(shortCummins)
"I'm tall for my height" - "it looks like it was painted by a blind chimpanzee"
TonyCnyc
Staff Sergeant
Staff Sergeant
Posts: 195
Joined: Thu May 08, 2014 5:08 pm
Location: NYC
Contact:

Re: Academy F4U "Jolly Rogers"

Post by TonyCnyc »

Always look forward to Corsair builds!
User avatar
Nige201980
Captain
Captain
Posts: 4095
Joined: Wed Jun 05, 2013 9:30 am
Location: Doncaster South Yorkshire UK
Contact:

Re: Academy F4U "Jolly Rogers"

Post by Nige201980 »

Cheers guys im sure i will.

Right lets get started on this puppy.

The 1st step of this build is to get he engine together.
Image

There is no flash anywhere but there are some seam lines to clean up.
Image

Im thinking about adding some wires and what have you but we will see.

Next up is the cockpit and to say its basic is and understatement.
Image

Next up is the engine cowling.
Image

This an area i think i can approve on i was going to use plasty card but i would have to thin the nose to much. So i got out mt tamiya scriber and and cut away the plastic between the flaps.
Image
Image

because this area is quite weak i use some white tack to support it.
Image

so once that was done we are left with this.

before.
Image

and after.
Image
Image

and all complete.
Image
Image

there is still more work i want to do on this bit but I'll leave that for the next installment.

and all i did last night.
Image

Thats it for this installment until next time.
http://www.youtube.com/channel/UCy-TGcs5u_ZXSZ9kObNfsPg


On the go at the Mo

Quite a few :banana:
User avatar
nero
Private First Class
Private First Class
Posts: 49
Joined: Thu Aug 21, 2014 1:13 pm
Location: Germany

Re: Academy F4U "Jolly Rogers"

Post by nero »

:clap: :clap: Great start mate!!! I will have to keep checking your progress to see what I can copy in my own build :D

Jokes aside, good luck with the build, its looking great already!
- Alex

On the bench:
- Tamiya 1/48 F4U-1A Corsair
- Eduard 1/48 BF109 E3
- Trumpeter 1/35 SPW70 - NVA Version (BTR-70 Late)

Up-coming builds:
- Hasegawa 1/48 F-4EJ Kai Super Phantom (Sea Camouflage)
User avatar
Nige201980
Captain
Captain
Posts: 4095
Joined: Wed Jun 05, 2013 9:30 am
Location: Doncaster South Yorkshire UK
Contact:

Re: Academy F4U "Jolly Rogers"

Post by Nige201980 »

Cheers nero
http://www.youtube.com/channel/UCy-TGcs5u_ZXSZ9kObNfsPg


On the go at the Mo

Quite a few :banana:
User avatar
Nige201980
Captain
Captain
Posts: 4095
Joined: Wed Jun 05, 2013 9:30 am
Location: Doncaster South Yorkshire UK
Contact:

Re: Academy F4U "Jolly Rogers"

Post by Nige201980 »

Time for another update.

So in this update Ill be improving the engine as its a bit Basic.

So i started by getting the bits and bobs ready for the plumbing on the engine.
Image

It help some times when you work for a telecoms company
Image

And with the insulation removed.
Image

i started with the ring that goes round the hub of the engine with .5mm wire.
Image

i then cut down some .5 wire and put a little bend on it
Image

and started to super glue them in place.
Image

and here you can see the finished plumbing
Image

next it was time for the tubes coming from the ring and i used some really thin strands of copper wire.
Image

which i twisted together to give me a "Y" shape
Image

then glued into place at one end.
Image

i apply the glue with a cut down needle something i learnt form another member
Image

and once its all glued at both ends this is the finished engine.
Image

Again has always thanks for viewing guys.
http://www.youtube.com/channel/UCy-TGcs5u_ZXSZ9kObNfsPg


On the go at the Mo

Quite a few :banana:
User avatar
Nige201980
Captain
Captain
Posts: 4095
Joined: Wed Jun 05, 2013 9:30 am
Location: Doncaster South Yorkshire UK
Contact:

Re: Academy F4U "Jolly Rogers"

Post by Nige201980 »

so on with the next update im still working on the cowling for this build.

as you can see on the cowling there is a strip that stands proud and two of these sit right on the seam line so they got sanded of in the process of removing the seam line.

Image
Image

so i can some strip styrene to replace them with.
Image

and cut them into the correct shape.
Image

and glued them onto the cowling these will be sanded down to nearer the same width has the ones on the side.
Image

again in the process some of the rivet detail was lost has it was rather soft so using a old darning needle i put this detail back.
Image
Image
Image

a few more bits and bobs done.
Image

i also added some seatbelts with some 2mm tape to the cockpit.
Image

any way thansks for looking guys.
http://www.youtube.com/channel/UCy-TGcs5u_ZXSZ9kObNfsPg


On the go at the Mo

Quite a few :banana:
heel
Sergeant First Class
Posts: 285
Joined: Thu Nov 06, 2014 3:29 pm
Location: North Carolina, USA

Re: Academy F4U "Jolly Rogers"

Post by heel »

Hey Nige it's looking first rate. Do you cut the cowling flaps at the seams and then bend? Or do you remove completely and reinforce with strip styrene? I may attempt this technique on the Hellcat, but I've never done it before.
User avatar
Nige201980
Captain
Captain
Posts: 4095
Joined: Wed Jun 05, 2013 9:30 am
Location: Doncaster South Yorkshire UK
Contact:

Re: Academy F4U "Jolly Rogers"

Post by Nige201980 »

heel wrote:Hey Nige it's looking first rate. Do you cut the cowling flaps at the seams and then bend? Or do you remove completely and reinforce with strip styrene? I may attempt this technique on the Hellcat, but I've never done it before.
with this build mate the cowling flaps came in two choices open or closed so it was just a case of modifying the open ones. i did try and make some out of styrene but i couldnt mount it any where so this was my second option.
http://www.youtube.com/channel/UCy-TGcs5u_ZXSZ9kObNfsPg


On the go at the Mo

Quite a few :banana:
User avatar
UKguyInUSA
Second Lieutenant
Second Lieutenant
Posts: 3429
Joined: Sun Mar 30, 2014 10:19 pm
Location: New Hampshire, USA formerly Palm Beach, Florida, USA and Leicestershire, UK (until 1999)
Contact:

Re: Academy F4U "Jolly Rogers"

Post by UKguyInUSA »

Looks like a nice kit, and a great war plane to build! Greats start on the engine and cowling with the scratch-building and modifications! :) :thumb1:

Cheers :cheers2:

Martin
WIP:: Tamiya 1/48 F4U-1A Corsair

Non-WIP::Eduard 1/48 Fokker DVII, Revell 1/32 Arado AR196 and 1/32 BF109G10 Erla,
User avatar
Nige201980
Captain
Captain
Posts: 4095
Joined: Wed Jun 05, 2013 9:30 am
Location: Doncaster South Yorkshire UK
Contact:

Re: Academy F4U "Jolly Rogers"

Post by Nige201980 »

Cheers Martin. yeah its a nice kit just a bit basic.
http://www.youtube.com/channel/UCy-TGcs5u_ZXSZ9kObNfsPg


On the go at the Mo

Quite a few :banana:
User avatar
Nige201980
Captain
Captain
Posts: 4095
Joined: Wed Jun 05, 2013 9:30 am
Location: Doncaster South Yorkshire UK
Contact:

Re: Academy F4U "Jolly Rogers"

Post by Nige201980 »

Update time.

More work on the engine cowling flaps and its time to look at the actuator mechanisms.

I started by cutting small bits of sheet styrene for the actuators to sit on
Image

And added them to the the cowling.
Image

and there we are all glued in place.
Image

Next up the rods them selves im not going to be able to replicate them properly but i can still make it look something like i hope.
so with some thin styrene rod i cut 8 smaller bits then cut them in half giving me 16 short bits.
Image

I then bent them in half
Image

And glued them into place.
Image
Image

And with all of them in place.
Image

On the real aircraft there is a wire that links them all up so this is the next step. To do this i use some trusty .5mm copper wire.
Image

Then i just feed it around inside the "lugs" and this is what i have ended up with.
Image

I know most of this will not be seen but I'll know it there.

Next i move on to the undercarrage and again out with the wire to add some break pipes.
Image

To add the "P" clips i just cut some 2mm tamiya tape in half and took a little bit and put it place.
Image

So thats it for now next step will be primer for this lot and then some paint.
Again as always thanks for looking
http://www.youtube.com/channel/UCy-TGcs5u_ZXSZ9kObNfsPg


On the go at the Mo

Quite a few :banana:
User avatar
TheWeasel
Sergeant
Sergeant
Posts: 138
Joined: Sun Sep 07, 2014 7:24 pm
Austria

Re: Academy F4U "Jolly Rogers"

Post by TheWeasel »

Impressive work, nige! Love it!
"Never hire a ferret to do a weasels job" - Louie the Lizzard


projects:

Phantoms. Lots of them! and some other flying and tanking machines
User avatar
martin57
Command Sergeant Major
Posts: 897
Joined: Tue Apr 01, 2014 8:44 pm
Location: oundle, east northants.

Re: Academy F4U "Jolly Rogers"

Post by martin57 »

Nice work looking good like all the wire :th:
User avatar
Coen
General
General
Posts: 10136
Joined: Wed May 29, 2013 2:04 am
Location: Nova Scotia, Canada
Contact:
Canada

Re: Academy F4U "Jolly Rogers"

Post by Coen »

Freaking awesome bit of scratch!!!
User avatar
Nige201980
Captain
Captain
Posts: 4095
Joined: Wed Jun 05, 2013 9:30 am
Location: Doncaster South Yorkshire UK
Contact:

Re: Academy F4U "Jolly Rogers"

Post by Nige201980 »

Thanks Guys mean a lot you all stopping by.

Update time

So its time to get some paint on this puppy starting with of course primer
Image
Image
Image

Then its time to add some colour to the cockpit i used Vallejo interior green
Image
Image
and Vallejo hemp for the seat belts.

Silver to the wheel hubs
Image

and sprayed the prop tip in preparation for the yellow later on
Image

Again interior green for inside the cowling.
Image

Also gave the engine a coat of black then dry brushed with silver and the paint the tubing black again lol
Image

While that lot was drying i noticed the wing lights where solid plastic so i decided to try and fix that.
Image

I started to cut the "lights" out with my scriber which i forgot to take a photo off :bash: once that was done i found two pit of clear systrene and made sure they would fit then i drilled into them each and painted one "light bulb" orange and the other blue.
Image
Image

Once all that was done it was glued in place which i will show in the next update.

For the instrument panel i decided to use the decals because the panel had recess's for the dials and i thought i would be able to get them to bed down which i did :banana:
Image

After a coat of clear it was time for a wash with Ultimate's dark dirt.
then finially a coat of matt varnish.
Image
Image
Image
Image
Image

Ill be putting some crystal Klear on the dials when i get chance which will hopefully give the appearance of glass for them

Well that's it for now guys thanks for stopping by.
http://www.youtube.com/channel/UCy-TGcs5u_ZXSZ9kObNfsPg


On the go at the Mo

Quite a few :banana:
User avatar
Coen
General
General
Posts: 10136
Joined: Wed May 29, 2013 2:04 am
Location: Nova Scotia, Canada
Contact:
Canada

Re: Academy F4U "Jolly Rogers"

Post by Coen »

Nice work on those wing tip lights Nige. I never would have thought to do that. Very cool.
That cowling still looks wicked. :th:
User avatar
Nige201980
Captain
Captain
Posts: 4095
Joined: Wed Jun 05, 2013 9:30 am
Location: Doncaster South Yorkshire UK
Contact:

Re: Academy F4U "Jolly Rogers"

Post by Nige201980 »

Cheers Mike I'm really enjoying this build.
http://www.youtube.com/channel/UCy-TGcs5u_ZXSZ9kObNfsPg


On the go at the Mo

Quite a few :banana:
User avatar
Nige201980
Captain
Captain
Posts: 4095
Joined: Wed Jun 05, 2013 9:30 am
Location: Doncaster South Yorkshire UK
Contact:

Re: Academy F4U "Jolly Rogers"

Post by Nige201980 »

Update time.

So following on from the last update here is the dash board with the crystal clear on the dials.
Image

And both wing tips with the clear sprue in place ready to be sanded down.
Image
Image

My weapon of choice is the Ultimate sanders starting with the white sander and moving down to the buffer and polisher.
Image
after a bit of sanding
Image

And how they look when ive finshed
Image
Image

here is the engine in place. it will be added to the air-frame once if done all the painting
Image

i drilled out the gun port and i was thinking that i would put some metal tubing in for the guns themselves but after looking at some photos online i saw that they couldnt been seen so just left them drilled.
Image
Image

So with those drilled out it was time to fit them to the wings with the rad intakes at the wing roots. and the fits not great so some work will be need to get them seamless.
Image
Image
Image
Image

So it was out with the filler but has i needed to reshape bits i decided to use some "home made" filler Paul has mentioned it a few times and ive used it quite a few times and it dose a good job.
some old Liquid Poly with cut up styrene in it.
Image

and what you end up with is a grey gloppy mess that goes rock hard like the plastic once dry the only down side it can take a while to dry if applied too thick best put on in thin coats and build it up.
Image

so ill leave this to dry for a couple of days and sand it down.
Image

i also managed to ge the fuselage joined with the cockpit in.
Image
Image
Image

Anyway that's where im at at the mo.
As always thanks for looking.
http://www.youtube.com/channel/UCy-TGcs5u_ZXSZ9kObNfsPg


On the go at the Mo

Quite a few :banana:
User avatar
Coen
General
General
Posts: 10136
Joined: Wed May 29, 2013 2:04 am
Location: Nova Scotia, Canada
Contact:
Canada

Re: Academy F4U "Jolly Rogers"

Post by Coen »

Very very cool work Nige... especially those wing tip lights. Those are awesome!!!
heel
Sergeant First Class
Posts: 285
Joined: Thu Nov 06, 2014 3:29 pm
Location: North Carolina, USA

Re: Academy F4U "Jolly Rogers"

Post by heel »

This a killer build. Always look forward to these updates.
User avatar
UKguyInUSA
Second Lieutenant
Second Lieutenant
Posts: 3429
Joined: Sun Mar 30, 2014 10:19 pm
Location: New Hampshire, USA formerly Palm Beach, Florida, USA and Leicestershire, UK (until 1999)
Contact:

Re: Academy F4U "Jolly Rogers"

Post by UKguyInUSA »

Awesome work so far Nige, she's starting to come together nicely! Look forward to your next update! :)

Cheers :cheers2:

Martin
WIP:: Tamiya 1/48 F4U-1A Corsair

Non-WIP::Eduard 1/48 Fokker DVII, Revell 1/32 Arado AR196 and 1/32 BF109G10 Erla,
User avatar
Nige201980
Captain
Captain
Posts: 4095
Joined: Wed Jun 05, 2013 9:30 am
Location: Doncaster South Yorkshire UK
Contact:

Re: Academy F4U "Jolly Rogers"

Post by Nige201980 »

Much appreciated guys. and thanks for stopping by
http://www.youtube.com/channel/UCy-TGcs5u_ZXSZ9kObNfsPg


On the go at the Mo

Quite a few :banana:
User avatar
Nige201980
Captain
Captain
Posts: 4095
Joined: Wed Jun 05, 2013 9:30 am
Location: Doncaster South Yorkshire UK
Contact:

Re: Academy F4U "Jolly Rogers"

Post by Nige201980 »

Update time

Not alot done in this update but she is starting to come together.

I started with the exhausts they wernt great so i drilled and hollowed them out so they look a little better.
Image

I hope you you can see they look better.
Image

i sanded the bits down on the wings that needed it and attached the wings to the fuselage.
Image
Image
Image

there was a gap on the right side where the wing joins so i fill it with some plasti card.
Image
Image

the rest was filled the same way i did the wings
Image
Image
Image

Next up was the drop tank as it was a bit boring i decided to add a fuel cap and some bolts just to give it a little lift.
Image

so out came my pin vice with a needle.
Image

And my draftsman template with some plasti card taped to the back to keep it in place.
Image

and after a couple of seconds ringing it with the needle this is what im left with.
Image

for the bolts i took some styrene strips and cut small bits off for the bolts
Image
Image

and here we are before ive sanded them down a little
Image

and after
Image

Well thats it for this update see you on the next one guys
http://www.youtube.com/channel/UCy-TGcs5u_ZXSZ9kObNfsPg


On the go at the Mo

Quite a few :banana:
User avatar
Coen
General
General
Posts: 10136
Joined: Wed May 29, 2013 2:04 am
Location: Nova Scotia, Canada
Contact:
Canada

Re: Academy F4U "Jolly Rogers"

Post by Coen »

Most awesome and excellent update Nige.
Those little improvements really go a long way.
heel
Sergeant First Class
Posts: 285
Joined: Thu Nov 06, 2014 3:29 pm
Location: North Carolina, USA

Re: Academy F4U "Jolly Rogers"

Post by heel »

It just gets better. Thanks for the update Nige.
User avatar
Nige201980
Captain
Captain
Posts: 4095
Joined: Wed Jun 05, 2013 9:30 am
Location: Doncaster South Yorkshire UK
Contact:

Re: Academy F4U "Jolly Rogers"

Post by Nige201980 »

heel wrote:It just gets better. Thanks for the update Nige.
Cheers buddy hoping to get back to her soon (hoping this evening)
http://www.youtube.com/channel/UCy-TGcs5u_ZXSZ9kObNfsPg


On the go at the Mo

Quite a few :banana:
User avatar
chief5437
Major
Major
Posts: 4810
Joined: Fri May 31, 2013 1:25 pm
Location: England
England

Re: Academy F4U "Jolly Rogers"

Post by chief5437 »

Looking good Nige, nice work buddy :th: :cheers2:
Chief
User avatar
Joesdad
Warrant Officer
Warrant Officer
Posts: 1519
Joined: Wed Aug 14, 2013 9:52 am
Location: Torquay UK
England

Re: Academy F4U "Jolly Rogers"

Post by Joesdad »

It's all coming together nicely Nige. Coen's right it's the little things that make the difference :th:
Yes.. It is supposed to look like that!

Tim (Ted)


British Aviation In Scale
https://www.facebook.com/groups/1185462564870290/
User avatar
Kingdan
Warrant Officer
Warrant Officer
Posts: 1407
Joined: Thu Jun 05, 2014 11:42 pm
Location: Sutton in Ashfield nr Mansfield Nottinghamshire
Contact:
England

Re: Academy F4U "Jolly Rogers"

Post by Kingdan »

Awesome the lights and tank are mint lovin it :th: :th: :th:
User avatar
Nige201980
Captain
Captain
Posts: 4095
Joined: Wed Jun 05, 2013 9:30 am
Location: Doncaster South Yorkshire UK
Contact:

Re: Academy F4U "Jolly Rogers"

Post by Nige201980 »

Cheers guys.

right next update.

Time to mask up the canopy i dipped it in some klear ive had this bottle for about 5 years. I just pour it into the cap and dip the canopy in then wick the excess off before putting it in a sealed container on some kitchen paper. Then ill leave it over night to dry and harden.
Image
Image
Image
Image
once dry its nice and shinny.
Image

Then its time to mask it i use a cut down cocktail stick to burnish the tape down.
Image

Then using 2mm tape for the straight edges
Image

i lay it down and burnish it down and and where the frame is i gentle cut it with a brand new craft blade only using the weight of the blade and run it along the frame until it cuts through.
Image
Image

For the windscreen i use 10mm tape and do the same.
Image

And here it is all masked.
Image

And where i am now just needs a clean then mask the cockpit up and it will be ready for primer.
Image

As always guys thanks for looking
http://www.youtube.com/channel/UCy-TGcs5u_ZXSZ9kObNfsPg


On the go at the Mo

Quite a few :banana:
User avatar
Willem
Warrant Officer
Warrant Officer
Posts: 1556
Joined: Sun Apr 13, 2014 1:39 pm
Location: Leicestershire, UK.
Great Britain

Re: Academy F4U "Jolly Rogers"

Post by Willem »

Just catching up with your build mate. Great detail as always and loving the plastic poly filler, great tip.

:cheers2:
Will

"A thing of orchestrated hell- a terrible symphony of light and flame."

Edward R Murrow
heel
Sergeant First Class
Posts: 285
Joined: Thu Nov 06, 2014 3:29 pm
Location: North Carolina, USA

Re: Academy F4U "Jolly Rogers"

Post by heel »

No shortcuts in this build. Great tutorial on what you're doing.
User avatar
Nige201980
Captain
Captain
Posts: 4095
Joined: Wed Jun 05, 2013 9:30 am
Location: Doncaster South Yorkshire UK
Contact:

Re: Academy F4U "Jolly Rogers"

Post by Nige201980 »

cheers Guys

Update time

ive not been able to get much done on this as it in the paint stage (the wife has been ill)

what what i did get done was this.

here she is all primed. i normally use car primer from halford or somewhere like that has it give a nice tough finish.
Image

then its on with the aluminum from Vallejo
Image
Image

then some preshading
Image

once this was done the whole lot go a couple of thin coats of hair spray (just normal cheap stuff from tesco's) ill be using this and masking fluid for the chipping
Image

and that where i am at the mo hopefully has ive got some time off this week ill be able to get some paint on her.

thanks for stopping by
http://www.youtube.com/channel/UCy-TGcs5u_ZXSZ9kObNfsPg


On the go at the Mo

Quite a few :banana:
User avatar
Coen
General
General
Posts: 10136
Joined: Wed May 29, 2013 2:04 am
Location: Nova Scotia, Canada
Contact:
Canada

Re: Academy F4U "Jolly Rogers"

Post by Coen »

That's looking really cool now Nige.
I can't wait to see how that chipping looks. Should be interesting.
:th: :th: :th:
User avatar
Nige201980
Captain
Captain
Posts: 4095
Joined: Wed Jun 05, 2013 9:30 am
Location: Doncaster South Yorkshire UK
Contact:

Re: Academy F4U "Jolly Rogers"

Post by Nige201980 »

Coen wrote:That's looking really cool now Nige.
I can't wait to see how that chipping looks. Should be interesting.
:th: :th: :th:
cheers buddy you and me both lol
http://www.youtube.com/channel/UCy-TGcs5u_ZXSZ9kObNfsPg


On the go at the Mo

Quite a few :banana:
User avatar
ladip63
Staff Sergeant
Staff Sergeant
Posts: 170
Joined: Sat May 16, 2015 12:53 am

Re: Academy F4U "Jolly Rogers"

Post by ladip63 »

I just now got caught up with your build Nige. Love the little touches you are doing. WOW!! that is a great job you are doing. I hope I get to that level one day. I'll be watching this one :pop:
Lynn

On the table cause I don't have a bench :banana:
What to start working on now???? SMCG Phantastic Phantom Buddy Build 2017
Metal Earth R2D2
User avatar
Nige201980
Captain
Captain
Posts: 4095
Joined: Wed Jun 05, 2013 9:30 am
Location: Doncaster South Yorkshire UK
Contact:

Re: Academy F4U "Jolly Rogers"

Post by Nige201980 »

ladip63 wrote:I just now got caught up with your build Nige. Love the little touches you are doing. WOW!! that is a great job you are doing. I hope I get to that level one day. I'll be watching this one :pop:
Thanks mate
http://www.youtube.com/channel/UCy-TGcs5u_ZXSZ9kObNfsPg


On the go at the Mo

Quite a few :banana:
TonyCnyc
Staff Sergeant
Staff Sergeant
Posts: 195
Joined: Thu May 08, 2014 5:08 pm
Location: NYC
Contact:

Re: Academy F4U "Jolly Rogers"

Post by TonyCnyc »

Nice tips there with the canopy masking. Coming along great.
User avatar
Nige201980
Captain
Captain
Posts: 4095
Joined: Wed Jun 05, 2013 9:30 am
Location: Doncaster South Yorkshire UK
Contact:

Re: Academy F4U "Jolly Rogers"

Post by Nige201980 »

TonyCnyc wrote:Nice tips there with the canopy masking. Coming along great.
Thanks Tony.
http://www.youtube.com/channel/UCy-TGcs5u_ZXSZ9kObNfsPg


On the go at the Mo

Quite a few :banana:
User avatar
Nige201980
Captain
Captain
Posts: 4095
Joined: Wed Jun 05, 2013 9:30 am
Location: Doncaster South Yorkshire UK
Contact:

Re: Academy F4U "Jolly Rogers"

Post by Nige201980 »

Hi Guys

Update time and on with the painting.

I started by applying a couple of thin coats of hairspray.
Heres the one i use (nicked from the wife)
Image

After that i added some masking fluid with a cocktail stick
Image

I hope you can make out the masking
Image

So next was the paint im using these for this build
Image
they are a really nice paint but are quite thick so need thinning and can block up your nozzle quite easily i use Ultimate thinner which does the job but i tried using water and to be honest i think the sprayed a tad better.

I started with the white on the undersides.
Then moved on to the "Intermediate Blue" from the pack before moving on to the "semi gloss sea blue"
Image
Image
Image

and the engine cowling
Image
Image
Image

As you can see ive taken the masking off and added chipping with a damp brush and lifted some of the paint of with it. and because of the hairspray it
comes of really easily so be careful.

I also did the prop but i think i may tone it back a little.
Image

and where im at now.

Ive added some wear tear to just under where the pilot would get in by just taking so paint of with a sanding stick.
Image
Image
Image

So thats it for this update guys next up with be the decals before i move on tho the weathering.

Thanks for looking guys.
http://www.youtube.com/channel/UCy-TGcs5u_ZXSZ9kObNfsPg


On the go at the Mo

Quite a few :banana:
User avatar
Coen
General
General
Posts: 10136
Joined: Wed May 29, 2013 2:04 am
Location: Nova Scotia, Canada
Contact:
Canada

Re: Academy F4U "Jolly Rogers"

Post by Coen »

Really cool experimental stuff Nige. Lots to learn from.
I really like the look of that chipping. :th:
User avatar
Nige201980
Captain
Captain
Posts: 4095
Joined: Wed Jun 05, 2013 9:30 am
Location: Doncaster South Yorkshire UK
Contact:

Re: Academy F4U "Jolly Rogers"

Post by Nige201980 »

Coen wrote:Really cool experimental stuff Nige. Lots to learn from.
I really like the look of that chipping. :th:
Cheers Mike
http://www.youtube.com/channel/UCy-TGcs5u_ZXSZ9kObNfsPg


On the go at the Mo

Quite a few :banana:
User avatar
ladip63
Staff Sergeant
Staff Sergeant
Posts: 170
Joined: Sat May 16, 2015 12:53 am

Re: Academy F4U "Jolly Rogers"

Post by ladip63 »

Looking good Nige.
Lynn

On the table cause I don't have a bench :banana:
What to start working on now???? SMCG Phantastic Phantom Buddy Build 2017
Metal Earth R2D2
User avatar
Nige201980
Captain
Captain
Posts: 4095
Joined: Wed Jun 05, 2013 9:30 am
Location: Doncaster South Yorkshire UK
Contact:

Re: Academy F4U "Jolly Rogers"

Post by Nige201980 »

ladip63 wrote:Looking good Nige.
Thank you mate.
http://www.youtube.com/channel/UCy-TGcs5u_ZXSZ9kObNfsPg


On the go at the Mo

Quite a few :banana:
Post Reply

Return to “Jet Aircraft”