Corvette Grand Sport 005

Post Reply
User avatar
JonMW
Command Sergeant Major
Posts: 987
Joined: Sat Jan 18, 2014 2:45 pm
Location: Stockholm Sweden
Sweden

Corvette Grand Sport 005

Post by JonMW »

I started this build back in 2006, worked on it for a while until I ran out of talent. After that I have worked in it a few times but always had to stop when I thought I didn't have the skills needed. This time I will get it done. I did find all my old progress pictures so I will start by showing what I have done up till now. The plan with the build is to do a fully detailed Grand Sport, specifically the one that Jim Hall build for Roger Penske and both of them drove at 12h of Sebring in 1964.

Image
The box

Image
Inside

Image
Under the sprues

Image
Chrome, PE, decals, tires and instuctions

Image
PE for the hood

Image
Some more PE

Image
Decals, can't really use any of these for the version I'm building

Image

Image

Image
Sprues with some parts removed

Image
Frame

Image

Image
Body

Image
Engine glued together

Image
Also got this book for reference
User avatar
JonMW
Command Sergeant Major
Posts: 987
Joined: Sat Jan 18, 2014 2:45 pm
Location: Stockholm Sweden
Sweden

Re: Corvette Grand Sport 005

Post by JonMW »

So the first set of old build pictures. I started with the engine.

Image

Image

Image

Image

Image

Image

Image

This is the first version of the engine that I build, at a later stage I rebuild it using some aftermarket details as well as scratch build parts, but more on that later.
User avatar
JonMW
Command Sergeant Major
Posts: 987
Joined: Sat Jan 18, 2014 2:45 pm
Location: Stockholm Sweden
Sweden

Re: Corvette Grand Sport 005

Post by JonMW »

Some time after building the engine I found out that Model car garage made a PE and resin upgrade kit. So after ordering the set the engine where stripped down and the gearbox cut off. This was done to be able to add the resin gearbox with full PE linkage. The kit also came with throttle linkage and alternator bracket so these where also used. This was around the time I learned how to do some machining so I turned the pulleys for the front of the engine as well as the oil filler and crank case breather caps from aluminium. To finish it off I added some fuel lines and ignition cables.

Image

Image

Image

Image

Image

Image

Image

Image
User avatar
JonMW
Command Sergeant Major
Posts: 987
Joined: Sat Jan 18, 2014 2:45 pm
Location: Stockholm Sweden
Sweden

Re: Corvette Grand Sport 005

Post by JonMW »

The next step was to start on the frame. The frame that comes with the kit is ok but there is some mistakes like the placement of the battery. To fix this most of the mounting brackets where cut off and replaced with PE. The spare wheel where removed from the rear sub frame to be replaced with a separate and the battery moved. When this was done the frame was given a coat of red oxide primer followed by some gloss black just as the real ones where. The suspension was left pretty much as is. I turned new brake discs from steel, cut off the plastic ones and added a M2 thread for the nut. The plastic knock off nuts where drilled out and threaded to fit on the hubs. I also made some air jacks from aluminium and attached one of them to the battery in its new location. Finally brake lines and battery cables where added using thin solder.

Image

Image

Image

Image

Image

Image

Image

Image

Image

Image

Image

Image

Image

This is the way the model have been sitting for five or six years, only thing that has been done that is not on picture is that I've cut open the driver side door and the trunk. So it's maybe time to try to get this done now.
User avatar
AchtungPanzer
Chief Warrant Officer 3
Posts: 2299
Joined: Mon Oct 07, 2013 7:59 am
Location: Cracow PL

Re: Corvette Grand Sport 005

Post by AchtungPanzer »

Looks good . Engine awesome :th: Keep it up mate :cheers2:
User avatar
UKguyInUSA
Second Lieutenant
Second Lieutenant
Posts: 3429
Joined: Sun Mar 30, 2014 10:19 pm
Location: New Hampshire, USA formerly Palm Beach, Florida, USA and Leicestershire, UK (until 1999)
Contact:

Re: Corvette Grand Sport 005

Post by UKguyInUSA »

Another cracking build coming along from Jon! :) :thumb1: :thumb1:
WIP:: Tamiya 1/48 F4U-1A Corsair

Non-WIP::Eduard 1/48 Fokker DVII, Revell 1/32 Arado AR196 and 1/32 BF109G10 Erla,
User avatar
JonMW
Command Sergeant Major
Posts: 987
Joined: Sat Jan 18, 2014 2:45 pm
Location: Stockholm Sweden
Sweden

Re: Corvette Grand Sport 005

Post by JonMW »

Thanks! Not sure how good this will be it will require a few things I haven't done before so we'll see how it turns out.

So a bit of the story behind the Corvette in general and the Grand Sport in particular.

Corvette

The corvette is the first american sports car with the first model released in 1953. The original concept and later model where designed by Harley Earl who took inspiration from the sports cars that raced in post war Europe. For the first two years it had a straight 6-cylinder engine with 150 hp. This and the leaf sprung solid rear axle didn't give the car the sporting performance it should have. So for 1955 the engine was replaced with a V8 to gain some much needed power, at this time it became a true sports car. The first gen corvette revived some styling updates and increased engine displacement until the final year 1962.

Image
1953 Corvette

The second generation (C2) Corvette, which introduced Sting Ray to the model, continued with fiberglass body panels, and overall, was smaller than the first generation. The C2 was later referred to as mid-years. The car was designed by Larry Shinoda with major inspiration from a previous concept design called the "Q Corvette," which was created by Peter Brock and Chuck Pohlmann under the styling direction of Bill Mitchell. Earlier, Mitchell had sponsored a car known as the "Mitchell Sting Ray" in 1959 because Chevrolet no longer participated in factory racing. This vehicle had the largest impact on the styling of this generation, although it had no top and did not give away what the final version of the C2 would look like. The third inspiration was a Mako Shark Mitchell had caught while deep-sea fishing. This is the model that the Grand Sport was based on.

Image
1963 Corvette Sting Ray

For a bit more history on the corvette http://en.wikipedia.org/wiki/Chevrolet_Corvette

Zora Arkus-Duntov

Zora is considered as the "father of the Corvette" but before joining Chevrolet in 1953 he was more known for the company Ardun that he and his brother had. They where making overhead valve heads for Ford flat head V8 engines that where popular among hot rodders and racers. Coming from this background and being a armature racer himself, he among other things held the record at Pikes Peak, he thought that Corvette needed to be raced to prove it was a "proper" sports car. But as GM had signed a agreement not to have a factory racing program this proved to be a problem. So Zora set up a sort of skunk works with a few trusted engineers and mechanics to build racing cars that where then lent to private teams, like Mitchel's Sting Ray and Cunningham's LeMans racers. One of the bigger project where the Grand Sport.

Image
Zora in his prototype Corvette race car

Image
1959 Mitchel's Sting Ray

Image
Cunningham's LeMans Corvette at LeMans in 2013

Grand Sport

The GS was Zoras answer to Shelby's Cobras and the plan was to build 125 cars to get it homologated by the FIA. To start off five prototypes where build, big focus where put on saving weight compared to the street car. To achive this the body was made from one layer fiber glass and a lot of the steel where replaced by aluminium and magnesium. For a full list of difference between the street car and the GS go here http://www.racingicons.com/gs/gsdiff.htm.

Zora took Grand Sport #001 to Sebring in December of 1962 for testing. Since the 377 cubic inch engines being developed for the Grand Sports were not yet ready the car used a modified production L84, fuel-injected 327 engine. The disc brakes proved to be a problem (larger, vented rotors would ultimately be fitted) but, having run within seconds of the track record, the testing program was deemed a success.

News of the Sebring test reached GM’s Chairman Frederic Donner and in January of 1963 word came down that all racing efforts were to be stopped. The FIA application was hastily withdrawn when GM canceled all racing programs, having decided to follow the 1957 AMA anti-racing resolution to the letter.

While all factory racing efforts were officially dead, Grand Sport #003 was loaned to Díck Doane and G. S. #004 to Grady Davis for racing in SCCA events. Lacking factory support, their results were mixed, but, after many modifications, Davis, with Dr. Díck Thompson at the wheel, was able to take #004 to an overall victory at the August, 1963 SCCA Nationals at Watkins Glen. Since both cars resembled production Corvettes and were fitted with production engines, little notice was taken. Both cars were returned to Chevrolet in October, 1963.

Image
004 in its first version

After their return, Grand Sports #003 & #004 and un-raced sibling #005 were reworked to reflect lessons learned on the track. Slots and vents were opened up in the bodywork for increased cooling of the brakes and differential. New, wider 9½ inch wheels and tires were fitted resulting in the addition of the Grand Sport "trademark" fender flares.

Most significantly, the engine that Zora had originally planned for the Grand Sports was finally ready...
This 377 cubic inch small block was fed by four 58mm Weber carburetors through a special aluminum cross-ram manifold. The engine was said to produce 485 horsepower at 6000 rpm.

In December, 1963, three of the Grand Sport Coupes (#'s 003, 004 & 005) were shipped to Nassau for the annual Speed Week. Texan John Mecom fronted the "private" team entry. Co-incidentally, several Chevrolet engineers were noted as taking vacations in the Bahamas that year.
The two Grand Sports entered in the Tourist Trophy race on Sunday at Nassau qualified well, second & third on the grid, but both dropped out during the race with over-heated differentials. Differential coolers were provided by one of the "vacationing" engineers who just happened to be carrying some in his luggage and were fitted to the three coupes in time for the Governor's Cup race on Friday.

With the modifications, race results blossomed. In Friday's race the Grand Sports finished third, fourth & sixth, well ahead of the Cobras. The two Grand Sports entered in the final race of the week, Sunday's Nassau Trophy, finished fourth and eighth, again leaving the Shelbys far behind.

Image
005 at Nassau

Back in their Warren shop, the engineers began work to solve the remaining problems uncovered in the Nassau Speed Week events. Air pressure build-up in the engine compartment of the Grand Sports had required the hoods be taped to prevent their departure. This pressure combined with the large frontal area and high profile of the coupe body to aggravate the alarming tendency of the Grand Sport to lift the front end at speed.

In preparation for the Daytona endurance race in February of 1964, Zora’s engineers converted Grand Sport coupe #’s 001 & 002 to roadsters by amputating their roofs to reduce their profile and frontal area. Special louvered hoods were also fitted to relieve the engine compartment pressure problem.

Unfortunately, these modifications proved to be the last applied to the Grand Sports by Chevrolet Engineering. The Nassau successes and their attendant publicity again brought the Grand Sport project to the attention of General Motors’ corporate brass. And again, the bosses disclaimed any corporate involvement in racing and ordered the cars destroyed. Insiders at Chevrolet immediately whisked the three coupes off to private hands, where they met with modest racing success in subsequent years. The two roadsters remained hidden inside the Chevy labyrinth in Warren, Michigan. They surfaced only for rare car show appearances before being sold to Penske in early 1966.

Jim Hall, Roger Penske and #005
When the GSs where given away to protect them from being destroyed chassis number 005 where given to Roger Penske. Penske has become a American racing legend, mostly as a team owner. With running teams in NASCAR, F1, CanAm, sport cars and Indycar with record such as the most Indy 500 titles of any team, 15. But in the late fifties and early sixties he was more known as a driver. His plan for the car was to compete in the 12 of Sebring in March 1964.

Image
Roger Penske

But as the car wasn't ready to race he decided to send it to Jim Hall and Chaparral cars. Hall is another of the big American racing legends as an engineer. He was one of the first to really take advantage of aerodynamic down force, both from wings and from ground effects as well as composite chassis and hydraulic semi automatic shifting. And all of these at least a few years ahead of any body else, and in some cases more then ten years.

Image
Jim Hall

Hall set to work modifying the GS first by adding air jacks to make tire changes quicker, high pressure oil filler to be able to quilcky refill oil in case of a leak. He also added an extra oil cooler for the differential and a bigger pump for the diff oil and made some small aerodynamic upgrades to try to get the front end a bit more stable. He then finished the car in the signature Chaparral white. Penske and Hall finished 18th in the race and 4th in class 37 laps behind the winning Ferrari 275 P driven by Parkes and Maglioli. A lot of that time where lost when Penske broke a half shaft and the team had to find a Corvette in the parking lot and borrow a half shaft from. Penske had to walk back to the pit to get the shaft and then back to the car and replace it by himself.

Image

Image
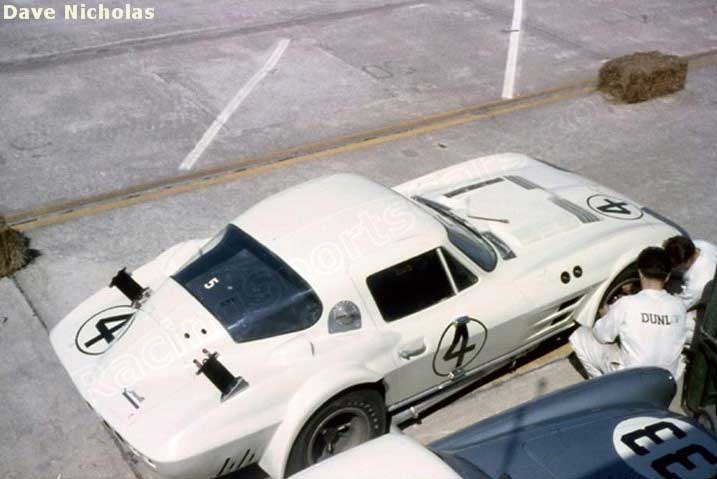
Chassis 005 at Sebring in 1964

Image
The five GSs as they look today

Specification
Frame: Tubular steel frame
Body: Extra thin fiber glass
Engine: 377 cui cast iron block aluminium head V8
Induction: Four 58 mm dual port Weber carburetors
Power: 550 hp at 6400 rpm
Weight: 1162 kg
Wheelbase: 2489 mm
Length: 4554 mm
Width: 1768 mm

[youtube]BeDdXceXH0M[/youtube]
Recap of Sebring 1964
Last edited by JonMW on Thu Dec 25, 2014 11:36 pm, edited 1 time in total.
robertw
First Sergeant
First Sergeant
Posts: 509
Joined: Mon Mar 03, 2014 6:36 am
Location: West Virginia, USA

Re: Corvette Grand Sport 005

Post by robertw »

After your McLaren I have no doubt that this will be an epic build!
I build bad models so you can feel good about yourself! :th:
User avatar
JonMW
Command Sergeant Major
Posts: 987
Joined: Sat Jan 18, 2014 2:45 pm
Location: Stockholm Sweden
Sweden

Re: Corvette Grand Sport 005

Post by JonMW »

robertw wrote:After your McLaren I have no doubt that this will be an epic build!
Thanks, I wouldn't be too sure of that, but I hope.

Have done a slight bit of work on this. The model has a oil cooler for the differential molded in to the body, not very detailed.

Image

The Model Car Garage aftermarket kit includes a resin version that is pretty good. But as Jim Hall modified the car for the race that I'm building with two oil coolers, one either side of the rear window.

Image

So the idea was to have two new ones 3d printed and maybe do some other parts for the car. I made a quick cad of a oil cooler adding a bit more detail then the resin one. At the moment the plates are 0.25 mm thick and the pipe 0.5 mm, I think I need to make the plates a bit thicker, Shapeways says the plates are "suspect" so I think 0.3-0.35 mm should be fine.

Image
User avatar
Hillbilly
Command Sergeant Major
Posts: 858
Joined: Sun Mar 23, 2014 9:15 pm
Location: Missouri,USA

Re: Corvette Grand Sport 005

Post by Hillbilly »

Absolutely stunning build so far :jd: Being an auto modeller for years I have to say this is one of the best built GS's I have ever seen!
Steve

Make something idiot proof and someone will come along and make a better idiot.
User avatar
JonMW
Command Sergeant Major
Posts: 987
Joined: Sat Jan 18, 2014 2:45 pm
Location: Stockholm Sweden
Sweden

Re: Corvette Grand Sport 005

Post by JonMW »

It's high time I start doing some work on the Corvette. First off I ordered a second kit, found this on e-bay and as it's the race version I'm doing I bought it. It will save me some time as I don't have to print my own decals. So the only things that will be used from the new kit is the decals and the body, the reason for the body is that I made a mistake when I started this build all those years ago. Before I decided to build the '64 Sebring version I was planing on building the version that came in the box, this one didn't have air-jacks as the '64 Sebring car had, so I had filled the holes in the front right fender where the quick connector goes. But with using the new body means that I had to cut out the trunk lid again. I did this using Tamiyas PE Fine craft saws, the half round was used to start the by running it in the panel line back and forth until I broke through. I then used one of the more pointed ones and just sawed along the panel lines until the trunk lid snapped off. The nice thing with the PE saws is that the cut is super fine and the part will fit with almost no gap at all.

Image
The new kit

Image
Started cutting

Image
Done

Image
And with the lid back in place.

Image

Image
What will be seen when it's done.

I was thinking of cutting out the driver side door as well, but I'm starting to rethink that to make sure I get this done in time. There is quite a bit of work to scratch build the door frame and I think it will take to much time, there will be enough work to build up the missing panels around the trunk area. Which will be the next thing to do .
User avatar
JonMW
Command Sergeant Major
Posts: 987
Joined: Sat Jan 18, 2014 2:45 pm
Location: Stockholm Sweden
Sweden

Re: Corvette Grand Sport 005

Post by JonMW »

Have started working on the trunk area.

Image
This is what it looks like in the kit.

Image
The rear wall don't have the best fit.

Image
And the side walls are missing and you can see the light coming from the brake cooling duct.

Image
The rear wall was cut off and will later be replaced with some sheet styrene.

Image
The cover for the filler neck don't match the side of the body work and needs to be fixed.

Image
The cover.

Image
I used milliput to fix this.

Image
Mix equal amount of the two parts. Since milliput is a epoxy based putty use gloves, epoxy doesn't smell or at least smells very little, and it's not to dangerous to breath but skin contact can be really bad and can cause allergies. So use gloves.

Image
Added a small piece to the cover.

Image
The inside of the body was covered with a piece of Tamiya tape to prevent the milliput from sticking to the body.

Image
Then the interior was placed in the body so the milliput could take the shape of the body.

Image
Waited a day and sanded it to shape.

Image
And finally covered everything with Tamiya white putty thinned with cellulose thinner to smooth out everything.

Image
Also removed all the details from the trunk lid and the molded in oil cooler as all this will be replaced with PE and new oil coolers.

Image

Image

Image

Image
User avatar
Hillbilly
Command Sergeant Major
Posts: 858
Joined: Sun Mar 23, 2014 9:15 pm
Location: Missouri,USA

Re: Corvette Grand Sport 005

Post by Hillbilly »

Nice work on the filler neck and nice tip on the PE saws :thumb2: I like the Accurate Miniatures kits.I built the McLaren M8B years ago when it first came out,but never had a chance to build the Corvette.
Steve

Make something idiot proof and someone will come along and make a better idiot.
User avatar
Desertfish
Sergeant First Class
Posts: 267
Joined: Tue Apr 29, 2014 4:25 pm
Location: West Vlaanderen - Belgium

Re: Corvette Grand Sport 005

Post by Desertfish »

Nice build. Some really good and detailed info on your build updates too. I've been trying to cut out doors, bonnets and boot lids, but with very little success. Probably because I was trying to use the wrong tools. So thanks for the tip on the Tamiya PE saws. Will need to get a set of those myself.

Haven't used the milliput, but if I can get my hands on some, I definitely need to do some experimenting.
User avatar
JonMW
Command Sergeant Major
Posts: 987
Joined: Sat Jan 18, 2014 2:45 pm
Location: Stockholm Sweden
Sweden

Re: Corvette Grand Sport 005

Post by JonMW »

This thing is going a bit too slow if I want to get it done before the end of the year. Have started doing some prep work on the interior, I hope to get it painted this weekend and with a bit of luck finish the interior next week. This is the only real progress so far, started with cutting off the switches and fuses on the dashboard and then sanding it smooth (still need a bit more) and drilling holes where the switches will go. The fuses should not be there as those where only fitted to GS 004 in that location.

Image

Image

Image

Also did a bit of work on the brake master cylinder and the booster that for some reason is not complete.

Image

So I machined a new booster from aluminium at work today. Really not the most complex or nicest part I have machined in my life, or even today.

Image

Really not the most complex or nicest part I have machined in my life, or even today. I also made one of these today, side plate for the motor for our electric motorcycle project.

Image

Well enough OT. Used a Tamiya craft saw to rough cut the bell crank and master cylinder off the booster.

Image

Sanded off the remaining parts of the booster while leaving the flanges.

Image

And gluing everything together.

Image
User avatar
JonMW
Command Sergeant Major
Posts: 987
Joined: Sat Jan 18, 2014 2:45 pm
Location: Stockholm Sweden
Sweden

Re: Corvette Grand Sport 005

Post by JonMW »

So a bit more work done. The interior is all painted and only missing some details. Everything was first painted in a mix of Vallejo model color #051 and #063 and the dark parts of the seats is #51 with a coat of Alclad aqua gloss to get some sheen as the vinyl would have.

Image

To get the right color for the carpet I mixed some Model car garage light blue flocking with medium blue, the normal blue might have been good but I didn't have that so a mix was needed.

Image

Image

Normal white wood glue was used for gluing the flocking, just applied to a small area.

Image

As the flocking can be a bit lumpy I used a sifter to spread it more evenly.

Image

Image

One layer added to the whole floor.

Image

This isn't enough as you could see the paint through the flocking. So I added one more layer the same way to cover everything.

Image

Glued the seats, gear stick and rollbar in place.

Image

Image

This is the decal that comes with the kit for the instruments, not very detailed.

Image

Luckily the Model car garage detail kit comes with a piece of clear sheet with the instruments printed on, you just need to add some red and white paint to the back and it's ready.

Image

Image

Cut it out and glue to the back of the PE part and attach to the dashboard.

Image

Image

Next up will be start working on the engine compartment and finish the trunk area. Will also need to get some new seat belt hardware as the one in the kit is only a lap belt for the driver side and it should be lap belt on the passenger side and lap and shoulder belt on the driver side.
Tomtom12
Sergeant First Class
Posts: 298
Joined: Thu Jan 16, 2014 5:57 pm

Re: Corvette Grand Sport 005

Post by Tomtom12 »

Looking good keep up the great work
.
Yevgeny
Sergeant Major
Sergeant Major
Posts: 730
Joined: Tue Sep 30, 2014 10:37 am
Location: Worthing, UK

Re: Corvette Grand Sport 005

Post by Yevgeny »

Gorgeous car and the carpet looks fantastic!
Sir, we're surrounded!
Excellent! Now we can attack in any direction!
------------------------------------------------
Model N1 DONE! - Tamiya 1:35 Panzerkampfwagen V Panther Sd.kfz.171 Ausf.A
Model N2 DONE! - Academy 1:72 M1126 Stryker
Working on:Trumpeter (00204)
Waiting: Meng (SS-004), Airfix (A50125), Tamiya (35068)
User avatar
JonMW
Command Sergeant Major
Posts: 987
Joined: Sat Jan 18, 2014 2:45 pm
Location: Stockholm Sweden
Sweden

Re: Corvette Grand Sport 005

Post by JonMW »

Thanks!

Work has been a bit slow for some time but finally got some stuff done the last couple of days.

Got the 3D printed oil coolers, looks a bit more in scale then the resin one.

Image

Also got the the new PE for the seat belts from Detail Master.

Image

Had to modify the buckles a bit.

Image

Image

Image

The interior is pretty much done, just missing a few small details like the horn button.

Image

Image

Image

Image

This is a pretty big milestone, the engine is in the chassis and the interior is ready to be glued on as well.

Image

Image

Image

Image

Since I removed the molded in oil cooler from the back of the body the small raised line the runs down the middle of the car got lost as well.

Image

I didn't want to replace it with just putty, I wanted to have some plastic to make sure the putty would shrink too much over time or get chipped. To do this I taped two #11 blades together as the width between the two points happened to be pretty much the same width as the line.

Image

I used the blades to cut out a thin strip of a 0.5 mm thick sheet of styreen and glued it to the body using a piece of tape to line it with the rest of the body.

Image

Image

So with just under two weeks to go, I really need to keep going on this now to get it done in time. Next up will be the engine compartment and then start painting the body. With a bit of luck it should be doable.
jbellos1
Master Sergeant
Master Sergeant
Posts: 429
Joined: Tue Mar 18, 2014 5:23 pm
Location: Scottsville, NY, USA
United States of America

Re: Corvette Grand Sport 005

Post by jbellos1 »

:jd:

I am absolutely blown away...brilliant work. Love it!
User avatar
JonMW
Command Sergeant Major
Posts: 987
Joined: Sat Jan 18, 2014 2:45 pm
Location: Stockholm Sweden
Sweden

Re: Corvette Grand Sport 005

Post by JonMW »

Thanks for the comment!

Time is starting to run out, but I think I can still make it. Have done a bit of work on the radiator and added a few details.

Image

Image
The radiator from the kit, not very detailed, the oil cooler is nice.

Image
So I looked around among my spare parts and found this from a AMT '66 Buick Riviera.

Image

Image
It's a bit longer but same height and thickness.

Image
So a cut here

Image
and a cut here

Image
The car also needs a horn so this was taken from the parts box.

Image
And cut apart.

Image

Image
All painted and assembled, paint is flat and semi gloss black and AK true metal brass for the oil cooler, also added two 0.15mm metal rods. Still need to add some hoses when it's in the car.

Image

Image
Have also done a bit of work on the body.

Image

Image
Grills where cut out using PE saws and a #11 blade.

Image
The hood has three large cut outs that needs some grills that where build from PE.

Image
Installed

Image
There is a sheet of "sticker" material included in the kit, this is to cover the vents in the hood as they where at times during the race.

Image
I didn't like the look of it and wanted something that looked more like white tape. So I cut this strips of BMF and covered the two holes over the intakes.

Image
I'm building this as it was at some point right before the race because I want to have some artistic license with some of the details. For the final practice session the car ran with two holes on the hood covered, no scoops on the rear oil coolers and no sponsor decals. At the start of the race it had all the holes covered, scoops for the oil coolers and sponsor decals. What I want to do is as it was in practice but with the sponsor decals, so that means it's at some time between the final practice and the race.

Image
I had the body painted and read for decals but then I saw I had forgotten to put the scoops for the rear brakes on.

Image
Not the best fit

Image
But after a bit of sanding they fit pretty well. Now I will need to repaint the body then decals, final clear coat and put everything together and do the final details.
User avatar
Hillbilly
Command Sergeant Major
Posts: 858
Joined: Sun Mar 23, 2014 9:15 pm
Location: Missouri,USA

Re: Corvette Grand Sport 005

Post by Hillbilly »

This thing is gonna be great...now back to work :whip:
Steve

Make something idiot proof and someone will come along and make a better idiot.
User avatar
JonMW
Command Sergeant Major
Posts: 987
Joined: Sat Jan 18, 2014 2:45 pm
Location: Stockholm Sweden
Sweden

Re: Corvette Grand Sport 005

Post by JonMW »

Thanks!

rubegoldberg: The parts are 11x5x2 mm with the "pipe" 0.5 mm in diameter and the plates 0.15 mm thick. I think the details a pretty crisp, might be the picture that's a bit blurry. I also had to round off some of the corners to be able to print it and it was still borderline in terms of detail size. The price from Shapeways using their "Frosted ultra detail" was €4.31, the downside was that the shipping (cheapest one they had) with UPS was €8.

Just a small update for now, I repainted the body and managed to get the decals on. I was a bit worried about the decals as the kit is from 95 and the decals looked like they could be brittle. But no problems at all, they went on really well and conformed to the surface. The color for the headlight covers where a bit of a guess as I could only find two color photos of the car and one of them was from the back. In the other the covers looks a bit darker then the color I used, but that photo looks a bit dark overall. So I used a color that was close to the color used on chassis 002 which is the only chassis that stayed at GM and was never raced. So my guess was that the other cars where painted the same color before they where given away and Jim Hall repainted it in Chaparral white and that he just didn't paint the headlight covers. The color is a mix of about 60% Tamiya X-14 sky blue and 40% X-11 chrome silver, it could maybe be a tad darker but I'm calling it good.

Image

Next up a coat of clear and then final details and assembly.
User avatar
Twokidsnosleep
General
General
Posts: 18293
Joined: Thu Aug 07, 2014 4:07 pm
Location: BC,Canada
Canada

Re: Corvette Grand Sport 005

Post by Twokidsnosleep »

Ya body and all that, but look at that ENGINE :eeek:
A Gorgeous Beast of Machinery
Scott

On, Under or near the desk
Brewster Buffalo ..buddy build
Rockford Firebird
1/72 Black Pearl Pirate Ship in dry dock
User avatar
JonMW
Command Sergeant Major
Posts: 987
Joined: Sat Jan 18, 2014 2:45 pm
Location: Stockholm Sweden
Sweden

Re: Corvette Grand Sport 005

Post by JonMW »

Thanks!

Need some wheels for the car, the kit supplied ones are nice but are chromed so that needs to be removed.
Image

with some oven cleaner
Image

Just placed in a zip-lock bag and sprayed, wait around 20 minutes and rinse in water-
Image

and they are back to clean plastic
Image

The small lump on the rim is supposed to be the air valve
Image

Decided to cut it off and drill a 0.5 mm hole
Image

So I could replace it with one from Model Factory Hiro
Image

Painted the rims in Alclad magnesium followed by some flat clear.
Image

Image

For the logos on the tires I used some tire decals that I had left over from some other kit.
Image

These decals works a bit different from the normal ones, they are printed back to front. So you start by cutting out the decal and peeling off the backing paper.
Image

Placing the decal on the tire with the backing paper up.
Image

Applying some water with a damp cotton bud.
Image

Making sure the backing paper is soaked.
Image

Letting it sit for a minute or so and peeling off the backing paper.
Image

Let it dry and all done.
Image

Image

I used some smoke pigments to tone done the decals a bit as the white was a bit too clean.
Image
User avatar
MarkVerploeg
Major
Major
Posts: 4837
Joined: Wed Oct 16, 2013 12:21 am
Location: Oss, Noord Braband The Netherlands
Netherlands

Re: Corvette Grand Sport 005

Post by MarkVerploeg »

That is one insane ride
Wow this looks great
Keep up the good work
On the bench
GB builds
1/35 Trumpeter M1132 ESV

Personal builds
1/35 Hobby Boss M1070 tractor with M1000 semi trailer and Meng M1A2 TUSK II Abrams
1/35 Takom V2 rocket with the Meillerwagen and SS100 tractor
User avatar
JonMW
Command Sergeant Major
Posts: 987
Joined: Sat Jan 18, 2014 2:45 pm
Location: Stockholm Sweden
Sweden

Re: Corvette Grand Sport 005

Post by JonMW »

Thanks for the comments!

Yea bleach works well for stripping chrome as well, but I didn't have any.
User avatar
JonMW
Command Sergeant Major
Posts: 987
Joined: Sat Jan 18, 2014 2:45 pm
Location: Stockholm Sweden
Sweden

Re: Corvette Grand Sport 005

Post by JonMW »

Small update for today. I started test fitting the exhaust headers and found out that they don't fit at all, not even close!

Image
The pipe for the most forward cylinder fits but the other three not so much.

Image
To solve this I had to remove the engine and start carving in the transmission cross member to get the rear of the engine to sit lower. This made it better but not perfect, but as you can't see the headers when everything is in place so it's all good.

Image
Wanted to add some simple details to the oil filter holder.

Image
Using the Top Studio hose clamp set, which includes PE bolt heads.

Image
Using two drops of clear as glue,

Image
to attach two bolt heads to the mount.

Image
Finally did a mock up of everything. I plan to do a small base depicting the pit lane at Sebring with the car on the air jacks with the wheels off.

Image
Pretty simple test to see how it would look, just three aluminium tubes that fit over the ends of the air jacks. Will need to go down to the hobby shop and get a plate for the base and it would be good with a size smaller tubes if they have it.
User avatar
JonMW
Command Sergeant Major
Posts: 987
Joined: Sat Jan 18, 2014 2:45 pm
Location: Stockholm Sweden
Sweden

Re: Corvette Grand Sport 005

Post by JonMW »

That's great to hear. I've used shapeways a few times now and are pretty pleased with them, good service and quick delivery. Freecad looks like it could be a good alternative if you don't have access to one of the bigger CAD software, luckily I work with solid works pretty much all day so I have a legal copy on my computer at work as well as on my laptop.

The car is almost done, just missing the final parts like door handles and radiator hoses and then some touch up paint and a panel line wash.

Image
Have installed the oil coolers using the brackets from model car garage.

Image
Most things made by Top Studio is really nice, as are these AN fittings.

Image
I used them for the oil lines for the engine.

Image
Have also started doing some work on the base, the plan is to do something like this. The pit lane at Sebring is just made of concrete slabs and a stone pit wall. This will be really simple base with no figures or extra parts.

Image
First thing I did was cut a thick sheet of styrene and then glued thinner sheets on top, there is a 0.5 mm gap between the thinner sheets.

Image
Drilled some holes to hold the tubes for the air jacks and then placed it in a cheep picture frame. Will need to go down to the hobby shop tomorrow and get some stuff to build the pit wall and some paints for the concrete.

Image

Image
User avatar
JonMW
Command Sergeant Major
Posts: 987
Joined: Sat Jan 18, 2014 2:45 pm
Location: Stockholm Sweden
Sweden

Re: Corvette Grand Sport 005

Post by JonMW »

Finished the construction of the base and the details for it tonight. Started with making a pit wall. The wall at Sebring around that time was made of blocks of some material painted red.

Image
So I started with making a frame the size I wanted the wall, the dimensions are just what I think looks about right.

Image
Next one side was covered with a sheet.

Image
Made a bunch of block sized sheets.

Image
And glued it to the wall using a piece of 0.5 mm sheet as spacing.

Image
All pieces in place, it's not perfect and straight. Maybe it should be, I first tried that and it didn't look right to me, it was too good. Now it's a bit random but if you look at it from say 30 cm it's really hard to tell that it's not straight and it has a natural look to it.

Image
Next up was to try something new for me, started with mixing some white glue with water to the consistency of milk.

Image
And took a piece of kitchen roll and separated the three layers. Cut one of the sheets to size and coated it in the glue water mix.

Image
Draped it over the wall and folded it like a rag that someone had thrown there. I used some plastic wrap between the wall and the rag to make sure it wouldn't get stuck on the wall when the glue dried.

Image
Next thing to do, started with cutting some small pieces of 0.5 mm sheet.

Image
Glued together, also added a piece of 0.5 mm rod. All the sides of the box was scraped with a razor saw blade to get some wood texture.

Image
For the last detail I dug out a random sprue from some kit.

Image
Cut off one of the runners where one of the parts where attached as this has a half round end. Also cut a 3 mm long piece of 3 mm aluminium tube.

Image
Glued them together.

Image
Sanded the top flat and added a piece of 1.6 mm rod.

Image
Dug out some random PE frets. Not because I needed the PE, but the actual fret itself.

Image
Cut two parts of the fret and bend to shape.

Image
And finally added a piano wire to the top. This is most likely a bit too big, but I was a bit restricted with the size of the sprue gate, but I'm happy with it.

Image

Image
Mock up of what it will look like, tomorrow it's time for some paint.
User avatar
Twokidsnosleep
General
General
Posts: 18293
Joined: Thu Aug 07, 2014 4:07 pm
Location: BC,Canada
Canada

Re: Corvette Grand Sport 005

Post by Twokidsnosleep »

Awesome build and display, love how you are going to complete it
Scott

On, Under or near the desk
Brewster Buffalo ..buddy build
Rockford Firebird
1/72 Black Pearl Pirate Ship in dry dock
User avatar
JonMW
Command Sergeant Major
Posts: 987
Joined: Sat Jan 18, 2014 2:45 pm
Location: Stockholm Sweden
Sweden

Re: Corvette Grand Sport 005

Post by JonMW »

Thanks!

The Corvette is done! Just need to do a bit more weathering on the base and add the last bits of details and it's ready for the reveal.

Image
Started today with painting the base, first some grey primer followed by black pre-shading. I used Tamiya XF-55 Deck tan where the cars would run, XF-75 between and next to the wall and used some XF-19 between those.

Image
This was then given a new light coat of XF-55 to blend everything. Also added some random lines of Vallejo Model Air 71.121 that can hardly be seen.

Image
Made a simple masking template from one sheet of the instruction.

Image
And used it to paint some tire marks. The wall was painted Tamiya XF-7 over grey primer and black preshading. I also added some random earth and mud colors to the gaps between the concrete slabs, also added a small fuel stain. The plan is to add a few oil stains as well and some grass turfs in the gaps and along the wall. The rag is just shot in X-14 and given a wash of AK engine grime.

Image

Image

Image

Image

Image
The finished Corvette, just added the small chrome parts that where done in Alclad, final PE parts. The panel lines where given a dark dirt wash and also added thin stripes of masking tape around the headlight covers.

Image

Image

Image
Getting really close now.
User avatar
JonMW
Command Sergeant Major
Posts: 987
Joined: Sat Jan 18, 2014 2:45 pm
Location: Stockholm Sweden
Sweden

Re: Corvette Grand Sport 005

Post by JonMW »

Thanks! I'm not too happy with the tire marks, i redid them a couple of times. Not sure what it is that I don't like about the, but overall I think the base turned out a lot better then I had expected being the first time I have done anything like it.

Image
Final bit of details on the base, some grass, both long and short. I ended up cutting the long one in half as it was too long.

Image
Started by adding small amount of white glue in the gaps in some random places.

Image
And added some of the short grass and pushed it in to the gap. I only used the long at a place along the wall.

Image
All the grass added to the base.

Image
Base is done. Added a few oil stains using MIG engine grease oil paint and some PE wrenches on the wall and in the toolbox.

Now I just need to put everything on and take some reveal shots.
Tomtom12
Sergeant First Class
Posts: 298
Joined: Thu Jan 16, 2014 5:57 pm

Re: Corvette Grand Sport 005

Post by Tomtom12 »

Looking good, I like how your doing the dio, very sixties, you won't see any grass in a f1 pit lane or a oily rag. Any chance of seeing the car with the wheels on.
.
User avatar
Homerlovesbeer
Command Sergeant Major
Posts: 804
Joined: Wed Feb 04, 2015 11:50 am
Location: Brisbane, Australia
Australia

Re: Corvette Grand Sport 005

Post by Homerlovesbeer »

I LOVED reading this thread......AMAZING work :th: .....but....where is the end result? :think:
User avatar
JonMW
Command Sergeant Major
Posts: 987
Joined: Sat Jan 18, 2014 2:45 pm
Location: Stockholm Sweden
Sweden

Re: Corvette Grand Sport 005

Post by JonMW »

Homerlovesbeer wrote:I LOVED reading this thread......AMAZING work :th: .....but....where is the end result? :think:
Thanks!, it's right here http://intscalemodeller.com/viewtopic.php?f=345&t=10523
Post Reply

Return to “Builds”