Thanks, friends!
Homer: Me neither! Most of the time? No idea at all!
Backfire: Why do we do that to ourselves? We know it's gonna be troublesome, but still we go for it!
A bit more:
Cleaned some more parts:

The filling of the wing root didn't come out that bad..

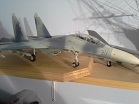
Placed them in their position:

Since the resin came out little distorted, carefull placement of the parts help to make it look more aligned...

A little plasticard to fill the gap left because the original canopy is much narrow than the M4 version...

The clear resin attack the cast much faster than the beige one, hence, it loses clearness much sooner... Since the clear resin also (in the casting amount) never totally cure, it is hard to polish up, so some Future has to come and help... Not fantastic, but...

Some details just to say we did them inside...


In the ground attack version, there´s a tv screen for the targeting acquisittion. The Nestlé products that come in cans here in Brazil are protected by an alluminum leaf that is just a bit thicker than the kitchen one, local modellers refer to it as "nescaluminium", we never, ever throw one away...
The screen:


The cover:


the pair:

In place:


Starting a wash and some little black and red dots to busy the space up...


The dude is IN!


Now, to make the decals and colours...
Choose this one, and have two profile references: Eduard and Karaia. The undercolor blue and the green is depicted in both as the same FS code, but both brown have different in each profile...


These are the tools i need for the colours & decals, both from google images and low definition...

To find your colour you can do the following:
Go to encycolorpedia,
Enter the code of the needed FS colour and press search...

Click on the name of the colour at the side of the preview:

It will open the scale window, in the right, the colour parameters in several scales. I choose CMYK for it is the scale used in home printers. Take note on the percentages of C (ciano), M (magenta), Y (yellow) and K (key-level of black)

Back in the program, open the colour choser and (bottom right of this window) write the the percentages of your notes:

Draw a square in this colour:

Do that for each color (above are the Eduard colours, below the Karaia):

Treat the original image and choose the decals you want:

Now print both...
I choose to print the colours in "max dpi", the best the printer can handle, even so, the printing is dotted. Also, i used regular paper, if you want to use photo paper, even better. The truth is that very fast you get used to the printing and the real colour differences. For instance: The lighter colours are closer to the real ones than the darker, because the printer contrast is not that great. But checking your references get you fastly used to what it should look like. The decal print is just to cut the stencils and paint the white for the decals...
Punch or make wholes in the printing...

While choosing/mixing the paints, do not look at them from much close, leave the paper at least at arm's lenght, to avoid the dotting of the printed colour...
Too blue:

Too red/gray:

Better... and this is the ammount i need...

There they are... I choose the Karaia browns, and darkened the green just a bit, just to my liking. At the end, choose what you like, for you never match reality, you'll have to fight the differences in cameras, in light at the moment of the picture, in the printing/screens you see the pic, darn, to match reality, even if you where present at the moment of the subject's painting and saved a little bit of the original paint, it wouldn´t match the real, by effects of scale, or the fact that 1 week in the sun and it is all different. So... Have fun! Do as you like! If try hard to match the real thing is your way to have fun, of course, do it! Full respect! One way or another, just know that other people will see it differently than you do, and it doesn't disqualify your work a bit!
Although i have some 6 Tamiya colours and 3 or four enamels, these are my main paints. Car paints. I do all from them. And for high mettalics, i have the Clad II chrome and change it's background/shade to achieve what i need, so... Who i'm i to complain about other people's colour??

Last thing, i swear i'll stop annoy you now!
Attached the clear, filled the gap with the light curing putty (chinese LED lantern dries the thing in about 5 seconds), sanded and applyed the MONSTER: HPC-15 clear cote:


Thanks for reading!
Eduardo