How to deal with seams inside jet aircraft air intakes
-
BPC
- Private First Class

- Posts: 32
- Joined: Sun Jan 04, 2015 9:30 am
How to deal with seams inside jet aircraft air intakes
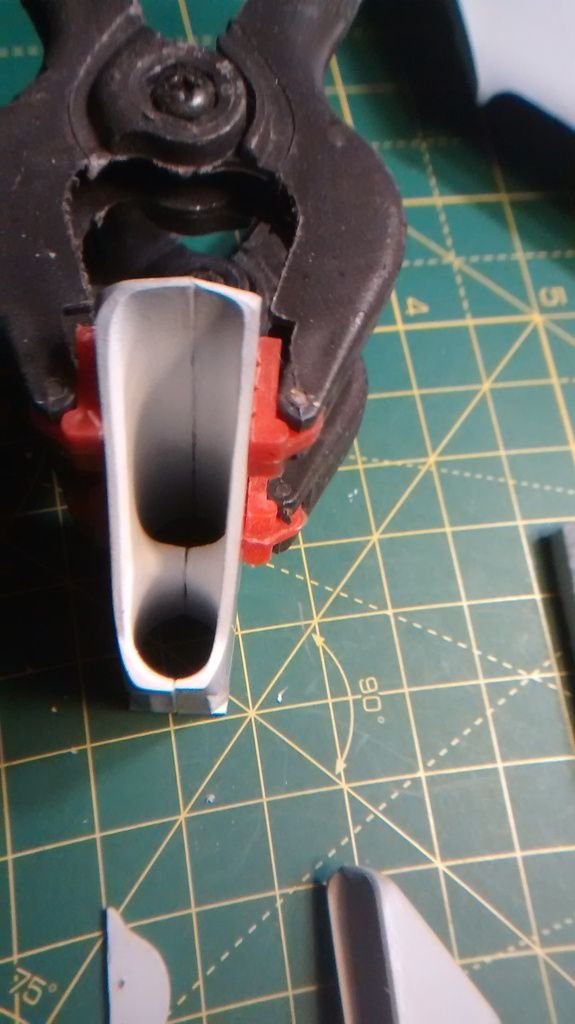
Can anyone help me with those visible seams inside air intakes. I was going to feel them cyano and talc, but it will be a bit of a job trying to sand it, and then re spray it. I have defo seen something on the forum about adding styrene sheet inside. Any advice welcome.
On the bench - Revell Junkers JU88 1/32
-
chief5437

- Major

- Posts: 4810
- Joined: Fri May 31, 2013 1:25 pm
- Location: England

Re: How to deal with seams inside jet aircraft air intakes
They can be a pain to sand! I use Vallejo filler as it's quite easy to sand and with a thin sanding stick it's a little easier. Another thing I heard of but haven't tried yet, is to run some unthinned paint down the seam. You should be able to 'swirl' it around and get a good finish. Sounds good in theory, but like I say, I've yet to try it.
Chief


-
BPC
- Private First Class
- Posts: 32
- Joined: Sun Jan 04, 2015 9:30 am
Re: How to deal with seams inside jet aircraft air intakes
Thanks Chief, I will give the Vallejo a try.
On the bench - Revell Junkers JU88 1/32
-
chief5437
- Major
- Posts: 4810
- Joined: Fri May 31, 2013 1:25 pm
- Location: England
Re: How to deal with seams inside jet aircraft air intakes
Just remembered, when you put your Vallejo filler on, you can get a good start by wiping it with a damp cotton bud. Sometimes there's no need to sand. I does shrink a little when dry, so you may need a couple of applications. HTHBPC wrote:Thanks Chief, I will give the Vallejo a try.
Chief
-
Spook

- Master Sergeant

- Posts: 419
- Joined: Thu Mar 20, 2014 10:32 pm
- Location: Lancaster uk
Re: How to deal with seams inside jet aircraft air intakes
I've only just come across your post but something else you can try is emulsion just tape up one end pour in pour out.
simon
On the bench
In the stash
Lots and lots of phantoms
On the bench
In the stash
Lots and lots of phantoms
-
BPC
- Private First Class
- Posts: 32
- Joined: Sun Jan 04, 2015 9:30 am
Re: How to deal with seams inside jet aircraft air intakes
Cracking idea, thanks Spook.
On the bench - Revell Junkers JU88 1/32
-
digger303

- General

- Posts: 16305
- Joined: Mon Mar 16, 2015 10:01 am
- Location: Western Australia

Re: How to deal with seams inside jet aircraft air intakes
If you use deluxe materials PERFECT PLASTIC putty then you can use a wet (water)brush to smooth. May have to apply twice depending on the gap.


-
BPC
- Private First Class
- Posts: 32
- Joined: Sun Jan 04, 2015 9:30 am
Re: How to deal with seams inside jet aircraft air intakes
Tried the emulsion paint technique, works a treat, bit messy, and takes a few days to dry, but a good result. Cheers Spook.
Before
After
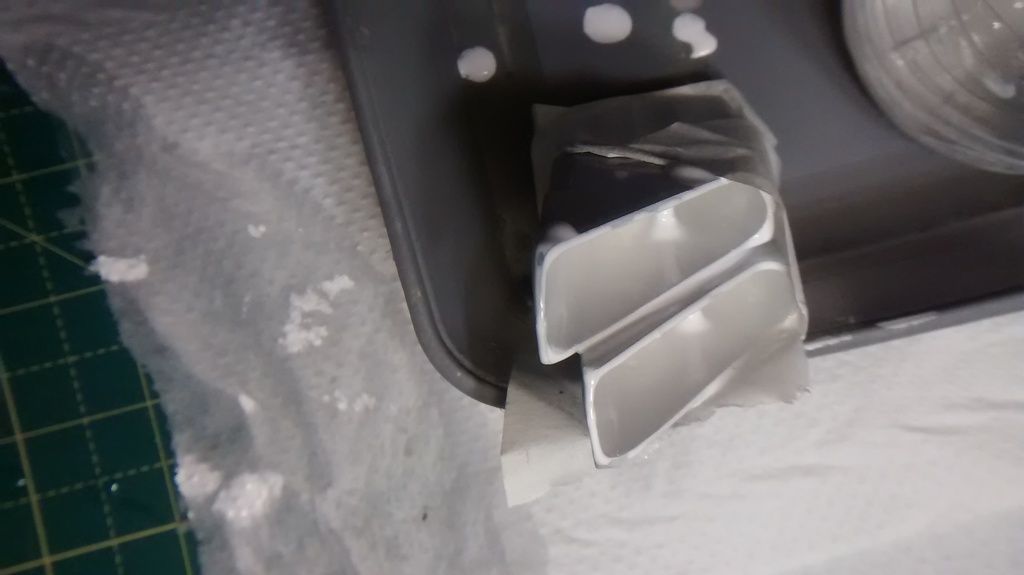

Before

After

On the bench - Revell Junkers JU88 1/32
-
digger303
- General
- Posts: 16305
- Joined: Mon Mar 16, 2015 10:01 am
- Location: Western Australia
Re: How to deal with seams inside jet aircraft air intakes
what is this emulsion. Is it undiluted paint or something elseSpook wrote:I've only just come across your post but something else you can try is emulsion just tape up one end pour in pour out.
-
BPC
- Private First Class
- Posts: 32
- Joined: Sun Jan 04, 2015 9:30 am
Re: How to deal with seams inside jet aircraft air intakes
White silk emulsion undiluted.
On the bench - Revell Junkers JU88 1/32
-
digger303
- General
- Posts: 16305
- Joined: Mon Mar 16, 2015 10:01 am
- Location: Western Australia
Re: How to deal with seams inside jet aircraft air intakes
does look polished and molded like one piece....best solution by the looks
-
BPC
- Private First Class
- Posts: 32
- Joined: Sun Jan 04, 2015 9:30 am
Re: How to deal with seams inside jet aircraft air intakes
Just to note, white emulsion paint sorted the seam lines, looked good when first done, however after three days of drying, the finish was not as smooth as would have liked
. This may have been due to the quality of the paint, few years old. On a plus side, the intakes looked rather worn
. This may have been due to the quality of the paint, few years old. On a plus side, the intakes looked rather worn
On the bench - Revell Junkers JU88 1/32
-
Spook
- Master Sergeant
- Posts: 419
- Joined: Thu Mar 20, 2014 10:32 pm
- Location: Lancaster uk
Re: How to deal with seams inside jet aircraft air intakes
I'm glad it worked for you pal,sorry I forgot to mention its abit messy
simon
On the bench
In the stash
Lots and lots of phantoms
On the bench
In the stash
Lots and lots of phantoms
-
Vleugelmoer

- Sergeant Major of the Army

- Posts: 1011
- Joined: Mon Mar 21, 2016 3:06 pm
- Location: Geleen, Limburg, The Netherlands
- Contact:
Re: How to deal with seams inside jet aircraft air intakes
The end result is nice enough BPC, would have taken a bit different approach myself in this instance. Looking at that gap I would have opted for something like a Mr. Dissolved putty or recycled prue in Tamiya extra thin to fill the gap. Apply liberally to the offending area. Remove any excess with a damp round generic cotton bud (acetone would be my liquide of choice here). once dry I would give it a thin layer of primer. Any remnance of the gap repeat if it was big enough or go Vallejo and damp cotton bud or water brush with water and paint with brush to get the smallest imperfections out with an immersion paint job if needed. This wil give you a more solid bond and smoother surface. It would also reduce the drying time required if you ask me. Waiting on paint to dry is like watching hair grow for me, and would therefor like to keep the pace up.
Damm the glue is getting to me 
On the Bench:
1:35 Italeri Jeep Follow Me Jeep for the PTO GB
1:32 Revell F-4 Phantom for the Phantom Freaks SIG
On the Bench:
1:35 Italeri Jeep Follow Me Jeep for the PTO GB
1:32 Revell F-4 Phantom for the Phantom Freaks SIG
-
MAZ62

- Private

- Posts: 18
- Joined: Sat Jul 29, 2017 12:15 am
- Location: Lancashire in the UK
Re: How to deal with seams inside jet aircraft air intakes
Will need to give this a try. Good tip.
