martins mig 21mf

Post Reply
User avatar
martin57
Command Sergeant Major
Posts: 897
Joined: Tue Apr 01, 2014 8:44 pm
Location: oundle, east northants.

martins mig 21mf

Post by martin57 »

Right new year and a new load of group and sig builds .
my first one of the year a eduard pro pack mig 21 mf, not the only one i see .
ok the sprue photos

Image

this is the one i will be doing .

Image

Image

Image

Image

Image

thats a lot of stencals

Image

Image

Image

Image

Image

Image

Image

Image

Image

Image

Image

Image

Image

Image

well thats your lot, looks good , this will be my first eduard kit a bit up market for me as iam still in training
hoping it goes ok . :D
User avatar
patrickroos
Sergeant Major of the Army
Posts: 1181
Joined: Sat Jul 20, 2013 9:38 pm
Location: Sweden
Sweden

Re: martins mig 21mf

Post by patrickroos »

Cool and good luck! :th:

:cheers2:
-----------------------
In progress:
A long list of stuff to finish...

Finished stuff (I have actually managed to finish something :dance: ):
http://intscalemodeller.com/viewtopic.p ... 88&start=0
User avatar
Homerlovesbeer
Command Sergeant Major
Posts: 804
Joined: Wed Feb 04, 2015 11:50 am
Location: Brisbane, Australia
Australia

Re: martins mig 21mf

Post by Homerlovesbeer »

Sweet bird this......bring it on!
User avatar
martin57
Command Sergeant Major
Posts: 897
Joined: Tue Apr 01, 2014 8:44 pm
Location: oundle, east northants.

Re: martins mig 21mf

Post by martin57 »

OK on with making a start, first up sort the sprues out and put them in the rack and put the letters were i can see them quickly .

Image

Then carefully followed the plan, made up the cockpit floor and insterment panel with the P E .

Image

and the underside .

Image

this went well, witch i was pleased with the p e for the pedal straps was a diferent story had about 4 goes at it got in the end :crazy:
Next up was the engine, painted the inside and the outer ring,

Image

Image

All good so far, taking my time with this as it my first eduard kit.
next up was this part of the undercart.
some i did notice was the seat assembly is near the back of the instuctions :scratch::

Image

Still going well, so moved on to the side panels in the cockpit ,leaving the p e parts till its painted .

Image

And to end the first part is a coat of primer .

Image

Here are a few cockpit pictures that i found ,

Image

Image

Well that wraps it up for this time, thanks for coming :cheers2:
User avatar
Paul
Site Admin
Site Admin
Posts: 12622
Joined: Thu May 23, 2013 4:47 pm
Location: Merseyside, England, UK
Contact:
England

Re: martins mig 21mf

Post by Paul »

Nice work so far, its a nice kit mines conning together really nicely :cheers2:
User avatar
Nige201980
Captain
Captain
Posts: 4095
Joined: Wed Jun 05, 2013 9:30 am
Location: Doncaster South Yorkshire UK
Contact:

Re: martins mig 21mf

Post by Nige201980 »

Great start Martin I'll be starting mine soon hopefully. Good luck with the rest of the build.
http://www.youtube.com/channel/UCy-TGcs5u_ZXSZ9kObNfsPg


On the go at the Mo

Quite a few :banana:
User avatar
martin57
Command Sergeant Major
Posts: 897
Joined: Tue Apr 01, 2014 8:44 pm
Location: oundle, east northants.

Re: martins mig 21mf

Post by martin57 »

RIGHT part 2 , started by painting the cockpit walls and floor.

Image

when these were dry i glued in the panel and the painted joy stick .
Then did the side panels , it is a joy to work on, everything fits together well.

Image


Image

Then dry fitted the assembly together , great fit .

Image

Next on the list, added the formers and engine another dry fit to make sure its all lined up,then in with the glue.

Image

And last for today, painted the nose cone , and found my spare led to sort out the nose weight .

Image

Iam well pleased with this eduard kit , i hope all there kits go together this well, because i will be buying more .

thanks for coming :cheers2:
User avatar
Paul
Site Admin
Site Admin
Posts: 12622
Joined: Thu May 23, 2013 4:47 pm
Location: Merseyside, England, UK
Contact:
England

Re: martins mig 21mf

Post by Paul »

They don't all go together like this, and eduard have a habit of reboxing other kits too, research is key with these.


Nice progress so far :cheers2:
User avatar
MassterOzymandias
Corporal
Corporal
Posts: 81
Joined: Tue May 12, 2015 5:22 am
Location: México
Contact:

Re: martins mig 21mf

Post by MassterOzymandias »

I look this kit in my local store and liked me. Keep it up Martin.
User avatar
Avgas
Chief Warrant Officer 5
Posts: 2819
Joined: Mon May 18, 2015 8:45 pm
Location: Englandshire
Equatorial Guinea

Re: martins mig 21mf

Post by Avgas »

Top job so far. Loving the Sprue holder, I'm sure I've got an old toast rack somewhere in the kitchen.
Regards, Dave.
User avatar
martin57
Command Sergeant Major
Posts: 897
Joined: Tue Apr 01, 2014 8:44 pm
Location: oundle, east northants.

Re: martins mig 21mf

Post by martin57 »

Paul wrote:They don't all go together like this, and eduard have a habit of reboxing other kits too, research is key with these.


Nice progress so far :cheers2:
thanks paul , will check before i buy :cheers2:
User avatar
martin57
Command Sergeant Major
Posts: 897
Joined: Tue Apr 01, 2014 8:44 pm
Location: oundle, east northants.

Re: martins mig 21mf

Post by martin57 »

Avgas wrote:Top job so far. Loving the Sprue holder, I'm sure I've got an old toast rack somewhere in the kitchen.
Cheers , its part of a plate drainer that goes on the draining board, the wife was going to bin it . :cheers2:
User avatar
martin57
Command Sergeant Major
Posts: 897
Joined: Tue Apr 01, 2014 8:44 pm
Location: oundle, east northants.

Re: martins mig 21mf

Post by martin57 »

Right ok back with part 3.
Had to have a break the wife wanted to give the kitchen a make over , lucky for me its only a small one .
so moving on , i cut up some led for the nose weight , was not to sure how much i needed so i filled it up and sealed it with blue tack.

Image

Image

feels about right.
Next part was to glue the two sides together , tried my best to get the joint as flush as poss, and some tape to hold it.

Image

Then when it was dry , tape removed and not to bad a fit :banana:

Image

Image

Image

Pleased with that .
so after a walk down to the house and a nice cup of tea (my man cave is at the bottom of my garden a good 30yrds ) and back again armed with a bacon sandwitch ,i made a start on the lower part the wings .

Image

a few fiddle bits here , being carefull not to lose any parts .
i chose to leave the air breaks closed .

Image

the picture shows one side completed plus the drilled holes , and the masked off clear parts .
when both sides were finished i gave the parts a primer coat .

Image

Well thats it for this part, so far so good .
thanks for coming :cheers2:
User avatar
rodrant
Chief Warrant Officer 2
Posts: 1774
Joined: Wed Feb 19, 2014 9:22 pm
Location: Maia - Portugal
Portugal

Re: martins mig 21mf

Post by rodrant »

This one looking good , like the way as the cockpit turn out , good luck with your build buddy !

:cheers2:
Cheers ,
António

On the Bench
a lot of stuff right now :-)
User avatar
martin57
Command Sergeant Major
Posts: 897
Joined: Tue Apr 01, 2014 8:44 pm
Location: oundle, east northants.

Re: martins mig 21mf

Post by martin57 »

rodrant wrote:This one looking good , like the way as the cockpit turn out , good luck with your build buddy !

:cheers2:
thanks , iam pleased with the way its going so far .
Smiffy
Sergeant Major
Sergeant Major
Posts: 647
Joined: Sun Dec 20, 2015 11:45 am

Re: martins mig 21mf

Post by Smiffy »

Great looking Fishbed so far. I look forward to seeing it complete.
User avatar
martin57
Command Sergeant Major
Posts: 897
Joined: Tue Apr 01, 2014 8:44 pm
Location: oundle, east northants.

Re: martins mig 21mf

Post by martin57 »

Hi just a short up date today , i like to say this G B is huge loads of people on board .
Well what i have done today was to paint the wheel wells and pick out some of the details .
i sprayed two greens to get some contrast but not to in your face ,

Image

Then moved on to attaching the wings .

Image

no problem there, a few pegs to keep it tight whist drying.

then moved on to the back end and attached some bits an pieces then on with tail fins .

Image

and underneath .

Image


there you go thanks for coming :cheers2:
User avatar
NonProlificModeler
Master Sergeant
Master Sergeant
Posts: 393
Joined: Sat Dec 19, 2015 12:48 pm
Location: Konstanz, Germany

Re: martins mig 21mf

Post by NonProlificModeler »

That was the first Soviet jet I ever saw and I loved her ever since! There's something about her! That's a hell of a kit. Times have changed a lot since I built my last aircraft in 1978. Three years later I started with 1/35th, but a kit like this makes me itchy! Great job so far, Martin. Enjoy the build. Jens :)
Jens

My YouTube channel: https://www.youtube.com/channel/UCmhxv6 ... 6zm2jQPD8g

On my bench:
Dio "Vidette Is Coming To Town", Normandy -Day + 2, Tamiya Brit. Centaur and scratch built farm wall
Italeri GMC CCKW 2.5 ton "Water Tank Truck to Fuel Tanker conversion" - scratch built
JudgeDredd
Master Sergeant
Master Sergeant
Posts: 405
Joined: Tue Jul 15, 2014 9:12 pm
Location: Colchester, England

Re: martins mig 21mf

Post by JudgeDredd »

Good looking kit and coming along nicely.
I AM the Law
User avatar
OliveDrab
Command Sergeant Major
Posts: 823
Joined: Thu Dec 25, 2014 4:48 am
Location: Missouri, USA
United States of America

Re: martins mig 21mf

Post by OliveDrab »

Your making building aircraft look easy, and I'll be the first to admit building aircraft is NOT easy! Keep up the very nice work :thumb2:
Curt :cheers2:
User avatar
chief5437
Major
Major
Posts: 4810
Joined: Fri May 31, 2013 1:25 pm
Location: England
England

Re: martins mig 21mf

Post by chief5437 »

Looking good so far :th: :th: I've done one of these, a real joy to build. Good luck with the rest of it :thumb2:
Chief
User avatar
gaz45
Chief Warrant Officer 3
Posts: 1971
Joined: Mon Jan 06, 2014 3:35 pm
Location: Nottingham uk
Great Britain

Re: martins mig 21mf

Post by gaz45 »

Very very nice work so far mate
User avatar
martin57
Command Sergeant Major
Posts: 897
Joined: Tue Apr 01, 2014 8:44 pm
Location: oundle, east northants.

Re: martins mig 21mf

Post by martin57 »

hi all, this post is very late ,i know :ooops:.
But i had a few problems witch has prevented me from getting in the man cave, so this may seem a bit hurried but it was a pleasure to finish it.

so to pick up were we left of , the seat was put together and then primed and then painted,
after drying the p e was sorted out ,this went on fine then gave it a wash,all pretty standard stuff really,have a look see.

Image

Image

Image

then the seat was put in place , nice fit .

Image

Image

Yep pleased with that .

Ok there is one thing i have forgot all about is the history part of this project.
This is a well used old girl and has been around a while .

The MiG-21 jet fighter was a continuation of Soviet jet fighters, starting with the subsonic MiG-15 and MiG-17, and the supersonic MiG-19. A number of experimental Mach 2 Soviet designs were based on nose intakes with either swept-back wings, such as the Sukhoi Su-7, or tailed deltas, of which the MiG-21 would be the most successful.

Development of what would become the MiG-21 began in the early 1950s, when Mikoyan OKB finished a preliminary design study for a prototype designated Ye-1 in 1954. This project was very quickly reworked when it was determined that the planned engine was underpowered; the redesign led to the second prototype, the Ye-2. Both these and other early prototypes featured swept wings—the first prototype with delta wings as found on production variants was the Ye-4. The Ye-4 made its maiden flight on 16 June 1955 and made its first public appearance during the Soviet Aviation Day display at Moscow's Tushino airfield in July 1956.

In the West, due to the lack of available information, early details of the MiG-21 often were confused with those of similar Soviet fighters of the era. In one instance, Jane's All the World's Aircraft 1960–1961 listed the "Fishbed" as a Sukhoi design and used an illustration of the Su-9 'Fishpot'.

The MiG-21 has a delta wing. The sweep angle on the leading edge is 57° with a TsAGI S-12 airfoil. The angle of incidence is 0° while the dihedral angle is −2°. On the trailing edge there are ailerons with an area of 1.18 m², and flaps with an area of 1.87 m². In front of the ailerons there are small wing fences.

The fuselage is semi-monocoque with an elliptical profile and a maximum width of 1.24 m (4 ft 1 in). The air flow to the engine is regulated by an inlet cone in the air intake. On early model MiG-21s, the cone has three positions. For speeds up to Mach 1.5 the cone is fully retracted to the maximum aft position. For speeds between Mach 1.5 and Mach 1.9 the cone moves to the middle position. For speeds higher than Mach 1.9 the cone moves to the maximum forward position. On the later model MiG-21PF, the intake cone moves to a position based on the actual speed. The cone position for a given speed is calculated by the UVD-2M system using air pressures from in front and behind the compressor of the engine. On both sides of the nose there are gills to supply the engine with more air while on the ground and during takeoff. In the first variant of the MiG-21, the pitot tube is attached to the bottom of the nose. After the MiG-21P variant, this tube is attached to the top of the air intake.


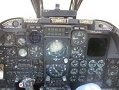
MiG-21F-13 cockpit at the Aviation Museum in Bucharest, Romania
The cabin is pressurized and air conditioned. On variants prior to the MiG-21PFM, the cabin canopy is hinged at the front. When ejecting, the SK-1 ejection seat connects with the canopy to make a capsule that encloses the pilot. The capsule protects the pilot from the high-speed airflow encountered during high-speed ejections. After ejection, the capsule opens to allow the pilot to parachute to the ground. However, ejecting at low altitudes can cause the canopy to take too long to separate, sometimes having resulted in the death of the pilot. Starting from the MiG-21PFM, the canopy is hinged on the right side of the cockpit.


MiG-21F-13 view from behind
On the under side of the aircraft there are three air brakes, two at the front and one at the back. The front air brakes have an area of 0.76 m², and a deflection angle of 35°. The back air brake has an area of 0.46 m² and a deflection angle of 40°. The back air brake is blocked if the airplane carries an external fuel tank. Behind the air brakes are the bays for the main landing gear. Also on the under side of the airplane, just behind the trailing edge of the wing are attachment points for two JATO rockets. The front section of the fuselage ends at former #28. The back section of the fuselage starts at former #28a and is removable for engine maintenance.

The empennage of the MiG-21 consists of a vertical stabilizer, a stabilator and a small fin on the bottom of the tail to improve yaw control. The vertical stabilizer has a sweep angle of 60° and an area of 5.32 m² (on earlier version 3.8 m²) and a rudder. The stabilator has a sweep angle of 57°, an area of 3.94 m² and a span of 2.6 m.

The MiG-21 uses a tricycle type undercarriage. On most variants the main landing gear uses tires that are 800 mm in diameter and 200 mm in width. Only the MiG-21F variants use tires with the size 660x200 mm. The wheels of the main landing gear retract into the fuselage after rotating 87° and the shock absorbers retract into the wing. The nose gear retracts forward into the fuselage under the radar.

Known MiG-21 aces[edit]
SolsticeMiGsmall (7633859414).jpg
Several pilots have attained ace status (five or more aerial victories/kills) while flying the MiG-21. Nguyễn Văn Cốc of the Vietnam People's Air Force (VPAF; also referred to as the NVAF), who scored nine kills in MiG-21s is regarded as the most successful.[89] Twelve other VPAF pilots were credited with five or more aerial victories while flying the MiG-21: Phạm Thanh Ngân,[1] Nguyễn Hồng Nhị and Mai Văn Cường (both eight kills); Đặng Ngọc Ngự[1] (seven kills), Vũ Ngọc Đỉnh,[1] Nguyễn Ngọc Độ,[1] Nguyễn Nhật Chiêu,[1] Lê Thanh Đạo,[1] Nguyễn Đăng Kỉnh,[1] Nguyễn Đức Soát,[1] and Nguyễn Tiến Sâm[1] (six kills each), and Nguyễn Văn Nghĩa[1] (five kills).

Additionally, three Syrian pilots are known to have attained ace status while flying the MiG-21. Syrian airmen: M. Mansour[90] recorded five solo kills (with one additional probable), B. Hamshu[90] scored five solo kills, and A. el-Gar[90] tallied four solo and one shared kill, all three during the 1973–1974 engagements against Israel.

Due to the incomplete nature of available records, there are several pilots who have un-confirmed aerial victories (probable kills), which when confirmed would award them "Ace" Status: S. A. Razak[91] of the Iraqi Air Force with four known kills scored during the Iran–Iraq War (until 1991; sometimes referred to as the Persian Gulf War), A. Wafai[92] of the Egyptian Air Force with four known kills against Israel.

For specific information on kills scored by and against MiG-21s sorted by country see the Mikoyan-Gurevich MiG-21

Right after doing the cockpit it was time to mask up and prime it, the weapons will be done as well but not on the plane .

Image

the canopy was masked and the opening part was white glued in place for removal latter.

Image

Image

Image

After the primer was dry i rubbed it down with some 2500 wet and dry to get here smoooooth.
then added the main under color .

Image

moving on now to the upper part witch is mid stone semi gloss from guns.
i marked out the camo pattern with a pencil and spray the green on free hand with a point 2 needle in my air brush .

Image

camo all done ready for the gloss coat and decals.

Image

gloss coat done , ready for the decals.

Image

decals done all except the real tiny ones and there all loads .

Image

After this was dry , i did the weapons and all the small decals and under cart , i must admit i forgot to take photos of these ,running out of time .

so having said that if you would like to go over to the revel section you can see it in all its glory .
thanks for dropping bye :cheers2:
User avatar
NonProlificModeler
Master Sergeant
Master Sergeant
Posts: 393
Joined: Sat Dec 19, 2015 12:48 pm
Location: Konstanz, Germany

Re: martins mig 21mf

Post by NonProlificModeler »

Wow! That's a cool bird, mate! The seat and the camo pattern! Outstanding! :) Jens
Jens

My YouTube channel: https://www.youtube.com/channel/UCmhxv6 ... 6zm2jQPD8g

On my bench:
Dio "Vidette Is Coming To Town", Normandy -Day + 2, Tamiya Brit. Centaur and scratch built farm wall
Italeri GMC CCKW 2.5 ton "Water Tank Truck to Fuel Tanker conversion" - scratch built
Post Reply

Return to “Builds”