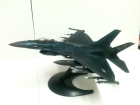
I built this F-16F after I finished the Tomcat. The Markings are UAE. Here are some thoughts of the experience:
1. This is a great offering from Hasegawa in 1/48. While Tamiya's stuff is still a little better IMO particularly in the instructions, this a nicely detailed kit in it's own right.
2. The nice thing is that it actually comes with ordinance. Most Hasegawa kits don't. However, the detail on the ordinance was raised and so I sanded and re-scribed panel lines. I also added a couple of spare MK 82's from another kit.
3. The general fit of the kit is great. I did have to use a little bit of filler in 4 places. Mainly, the nose where the fuselage halves meet, the wing roots, and the where the exhaust unit joins the main fuselage. Also, the intake takes a bit of work and is where I spent the most time. But, in general, it was minor.
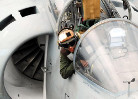
4. I used the Aires cockpit which was made for the Hasegawa "D" version. It requires some work and preparation. But, it fits pretty well. I didn't have much trouble joining the two fuselage halves. It requires a little bit of clamping and filler. But, I was surprised at how well it went. Just understand it's going to take a little bit of work and patience and it will fit nicely. My guess is that modeller's who try to use it with the kinetic sufa are struggling because it wasn't made for that kit. I didn't use the aires "HUD." The kit version is just plain easier to use and fits better.
5. The decals worked great. It's a newer kit. But I think that if you use Japanese decals, Mark Setter will make the job much easier because the decals will stick better before using Mark softer. I still prefer Cartograf. But these worked great.
6. I use Mr. Surfacer 1000 for most priming jobs. When airbrushing the base coat, I free handed the camouflage with Light and neutral gray. The nose and the drop tanks are aircraft gray. I pre-shaded it with flat black. I used Paul's clear coat mix of Tamiya clear and leveling thinner. It works well. But I didn't see much difference or advantage to using future. But, to each his own. Later I lightly post-shaded it with Tamiya smoke. Aqueous flat was then applied. I like aqueous flat because it's more of a satin or slightly semi-gloss and you don't lose the color tone as much with it. The exhaust was done with Mr. Metal color dark iron shaded with clear blue and orange.
One other note: Tamiya's bendable stripe masking tape came in very handy for masking the front of the canopy as well as rescribing panel lines on the ordinance. Great stuff!!! I used it on the Tomcat as well in a couple of spots.
In conclusion, this is a great kit even without the resin cockpit. If I ever build it again, I would probably add resin wheel wells and the exhaust. But, for the price, this is a fun and detailed build. This is a great kit to add a lot of aftermarket to. It's one I would love to see Eduard produce one of it's special editions with.
Thanks for looking and I hope you enjoy the photos!!!