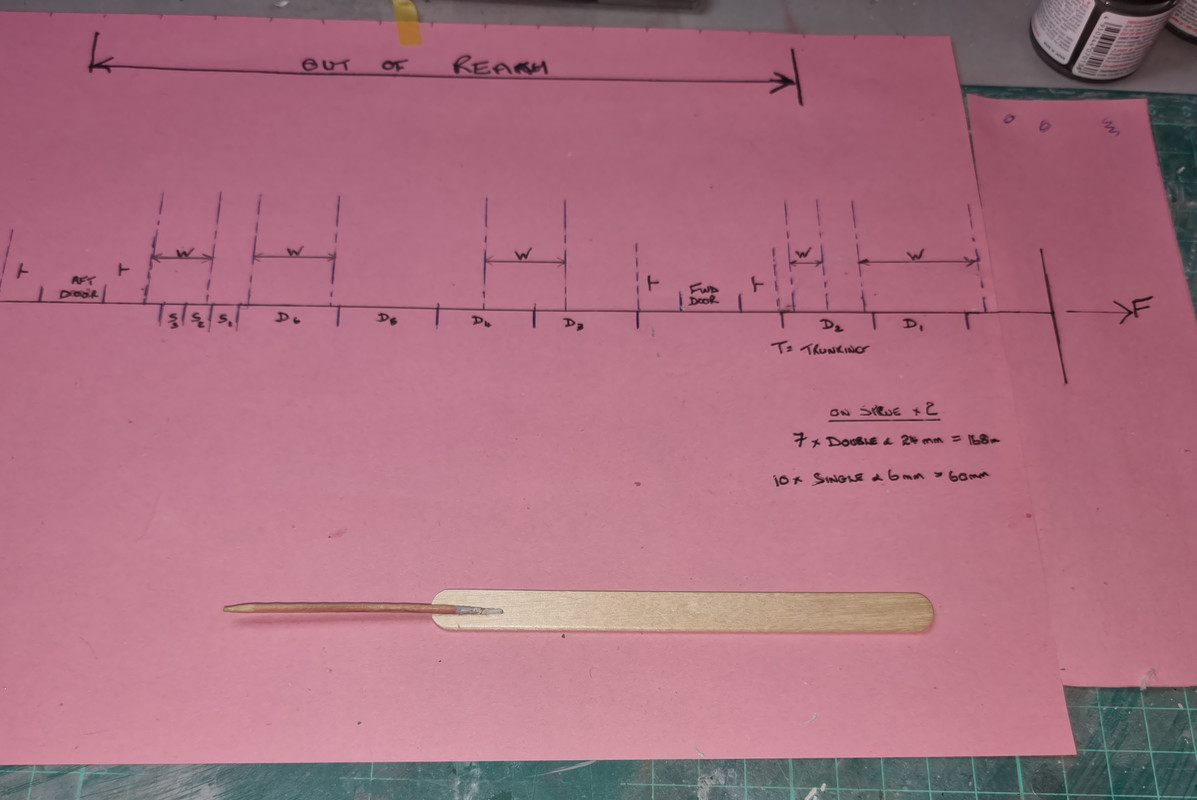
Page 4 of 7
Re: Mil Mi-V-12 - the BIG one!!
Posted: Mon Oct 23, 2023 1:09 am
by RangerNeil
digger303 wrote: Mon Oct 23, 2023 12:38 am
The cargo doors look like they mate well together.....well done.
Wasn't one of the issues with the seats being the the frame work way out of scale ? Is the new sprue any different ?
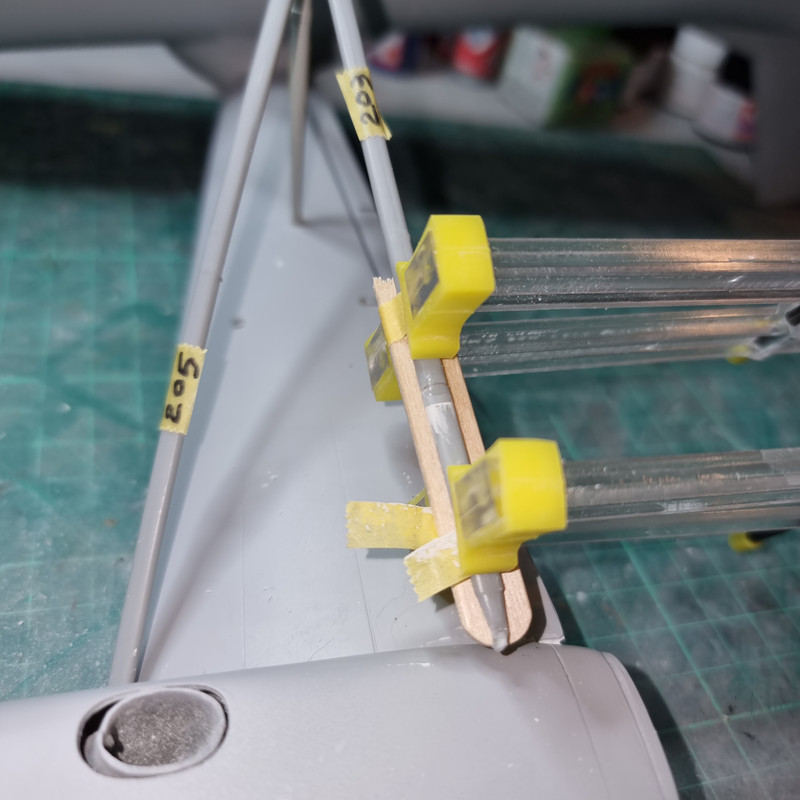
Good decision to keep adding the round rod to the spars. Over all visually it gives more depth at least in my eye's.


Thanks Digger. Right now I am thinking a dark wash to accentuate the line between rib and skin as well as raised section and rib. But this may change.....

Turned out most of the issue with the seats was when I cut the upright frame from the sprue it looked like a locating leg at each end. As there were no instructions/illustration in the -12's instruction therewas nothing to reference against. However the -6's booklet DOES show them so.I had a guide and it turns out the frames are flat top and bottom. Once they were cut off and the frame base smoothed on a sanding stick they are an acceptable fit. Should have taken a photo - oh well, a job for tomorrow!
What do you think about only fitting them where they can be seen??
Re: Mil Mi-V-12 - the BIG one!!
Posted: Mon Oct 23, 2023 3:00 am
by digger303
RangerNeil wrote: Mon Oct 23, 2023 1:09 am
digger303 wrote: Mon Oct 23, 2023 12:38 am
The cargo doors look like they mate well together.....well done.
Wasn't one of the issues with the seats being the the frame work way out of scale ? Is the new sprue any different ?
Good decision to keep adding the round rod to the spars. Over all visually it gives more depth at least in my eye's.
Thanks Digger. Right now I am thinking a dark wash to accentuate the line between rib and skin as well as raised section and rib. But this may change.....
Turned out most of the issue with the seats was when I cut the upright frame from the sprue it looked like a locating leg at each end. As there were no instructions/illustration in the -12's instruction therewas nothing to reference against. However the -6's booklet DOES show them so.I had a guide and it turns out the frames are flat top and bottom. Once they were cut off and the frame base smoothed on a sanding stick they are an acceptable fit. Should have taken a photo - oh well, a job for tomorrow!
What do you think about only fitting them where they can be seen??
That's what I would do. What's the point other wise after all we make these things to look at.
Re: Mil Mi-V-12 - the BIG one!!
Posted: Mon Oct 23, 2023 4:47 am
by BigWall
The door seams came out great! I was going to vote for no rod but, seeing it with the rod makes me change my vote. They add a good dimensionality (?) to the strips
Re: Mil Mi-V-12 - the BIG one!!
Posted: Mon Oct 23, 2023 2:05 pm
by DRUMS01
I agree with digger and Joe, good call on the rod and fixing the clamshell doors. The rod helps tie it in with the ribs in the doors better too. And remember, those seats were bolt in or take out depending on the load configuration (at least they are in production haulers), so it should not be an issue to only add them where they are seen. As far as seated soldiers, do you really think anyone could tell the difference of the uniforms in 1/72 while sitting inside the aircraft? It would reason that you could use figures from another period, paint them in the correct period colors, and nobody would think twice. That's my take on it at least....
Re: Mil Mi-V-12 - the BIG one!!
Posted: Mon Oct 23, 2023 3:01 pm
by LudvigN
I agree with DRUMS01 about the figures. Figures add so much life if you have any availible and its hard to notice differencies in this scale as long as they are the same category civilians, soldiers, pilots etc. Cant believe that launcher is going to fit in that cargo hold, it must be huge!
Re: Mil Mi-V-12 - the BIG one!!
Posted: Mon Oct 23, 2023 10:05 pm
by RangerNeil
BigWall wrote: Mon Oct 23, 2023 4:47 am
The door seams came out great! I was going to vote for no rod but, seeing it with the rod makes me change my vote. They add a good dimensionality (?) to the strips
Many thanks.
I must be honest at first I thought I had wasted a lot of time doing it - but its growing on me. As I said to Digger - I think a dark wash along the edges will serve to bring them out. I just need to gather the courage to do it!
DRUMS01 wrote: Mon Oct 23, 2023 2:05 pm
I agree with digger and Joe, good call on the rod and fixing the clamshell doors. The rod helps tie it in with the ribs in the doors better too. And remember, those seats were bolt in or take out depending on the load configuration (at least they are in production haulers), so it should not be an issue to only add them where they are seen. As far as seated soldiers, do you really think anyone could tell the difference of the uniforms in 1/72 while sitting inside the aircraft? It would reason that you could use figures from another period, paint them in the correct period colors, and nobody would think twice. That's my take on it at least....
Again - many thanks.
Problem with Soviet kit is it changes drastically . Where NATO kit looks much the same apart from colouring across the years this is the variation on the other side:
This is the Obr-69 worn up until the early days of the Aghanistan campaign. Usually referred to as the "full colour" uniform with coloured collar tabs and shoulder boards plus bright badges and buttons:

This is the M88, nicknamed "Afghanka" introduced during that campaign. The actual uniform is different, the only thing in common are the Sapogi (high boots). The bright colours are gone replaced by subdued insignia
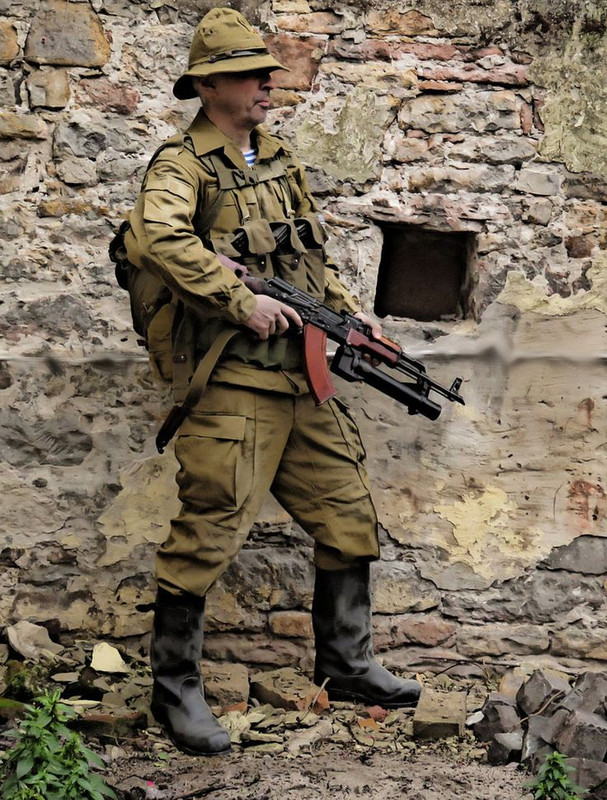
And this is the TtSko, one of the early DPM pattern uniforms introduced during the fall of the Soviet Union and rise of the Russian Federation (think 1st Chechen war). Again the pattern is different, the high boots are replaced by ankle boots, the subdued insignia are retained - but - a coloured Rus-Fed patch appears on the right arm.
As you can see - all 3 are markedly different, enough that even in 1/72 scale it will be apparent. To make it worse for the era of the Mi-V-12 it would be the Obr-69, the most distinctive of them all..... I keep on looking though, maybe an enterprising person may be printing them!
LudvigN wrote: Mon Oct 23, 2023 3:01 pm
I agree with DRUMS01 about the figures. Figures add so much life if you have any availible and its hard to notice differencies in this scale as long as they are the same category civilians, soldiers, pilots etc. Cant believe that launcher is going to fit in that cargo hold, it must be huge!
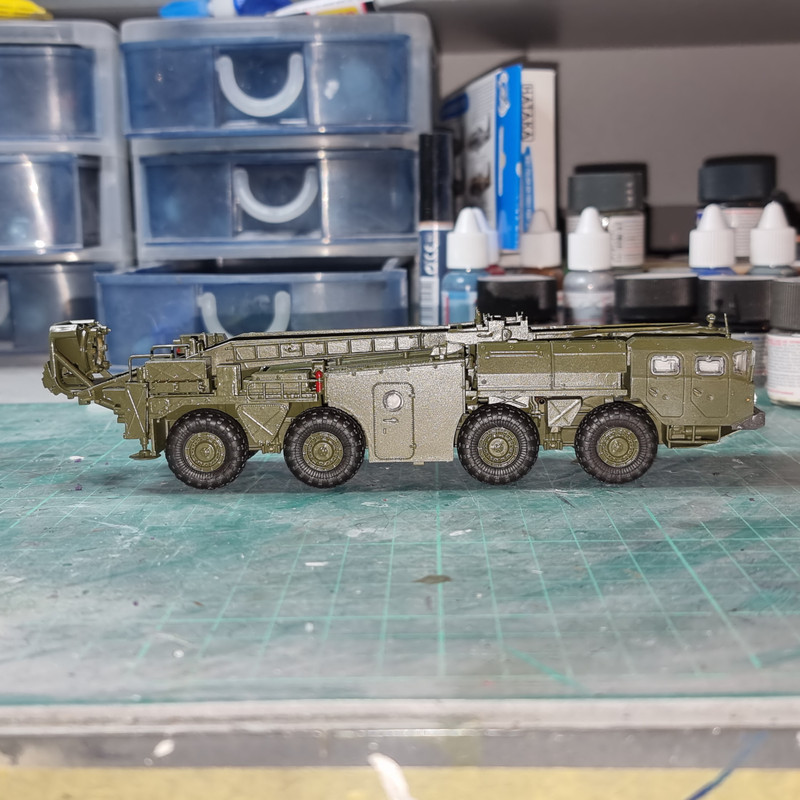
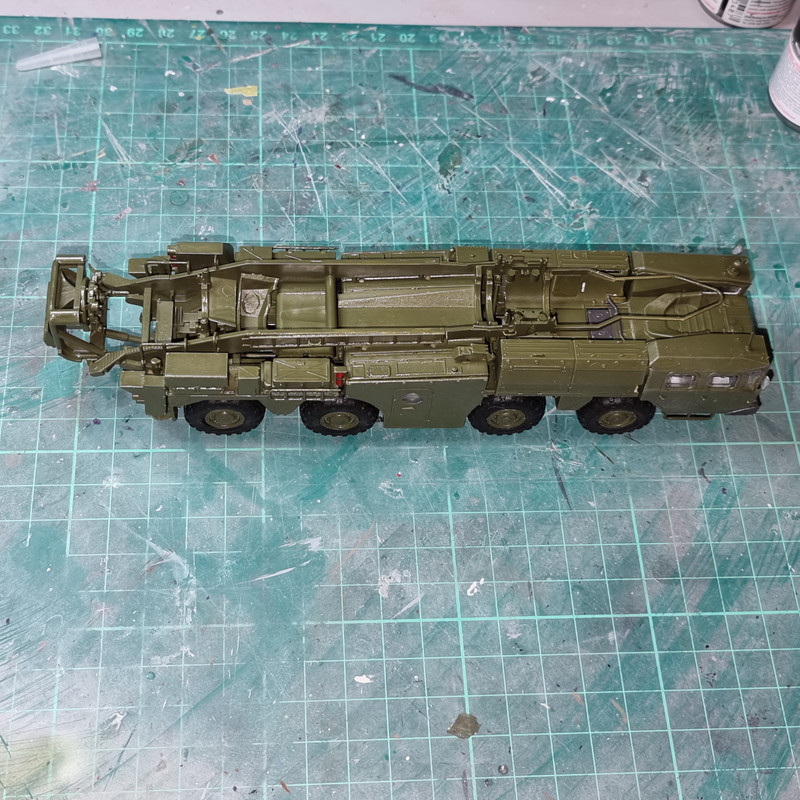
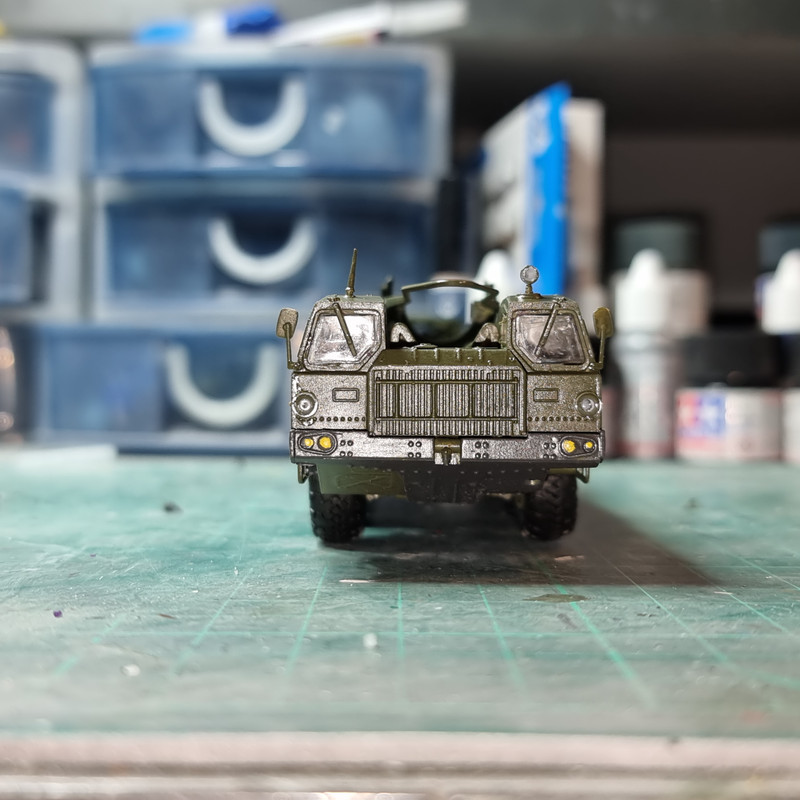
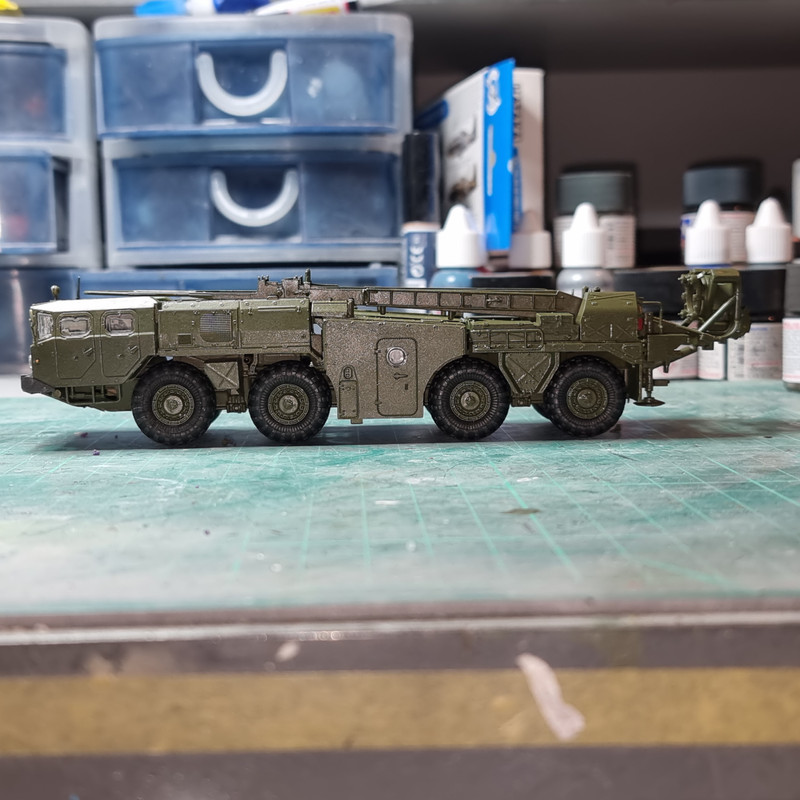
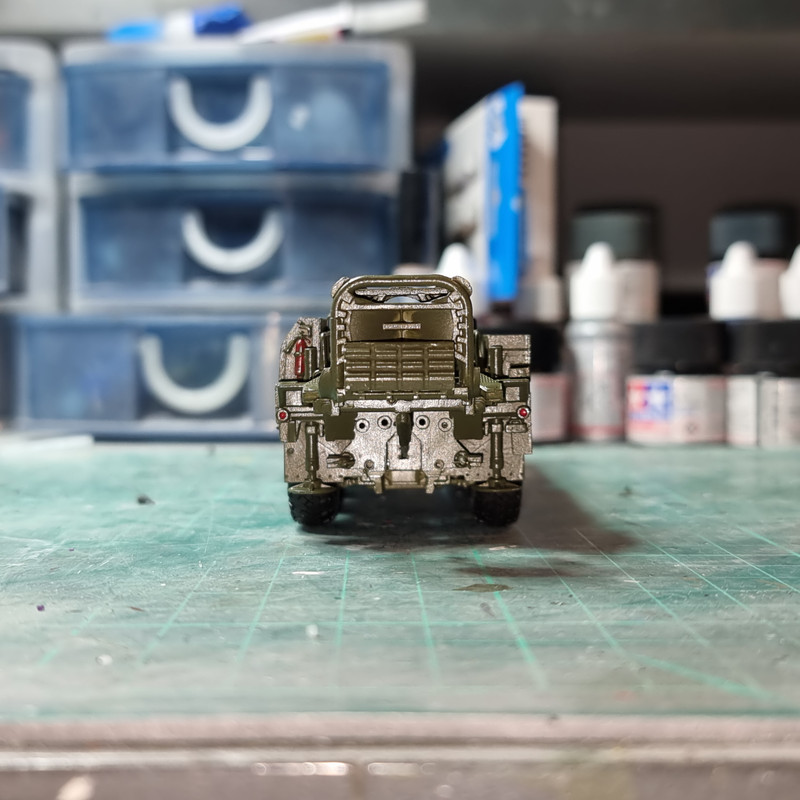
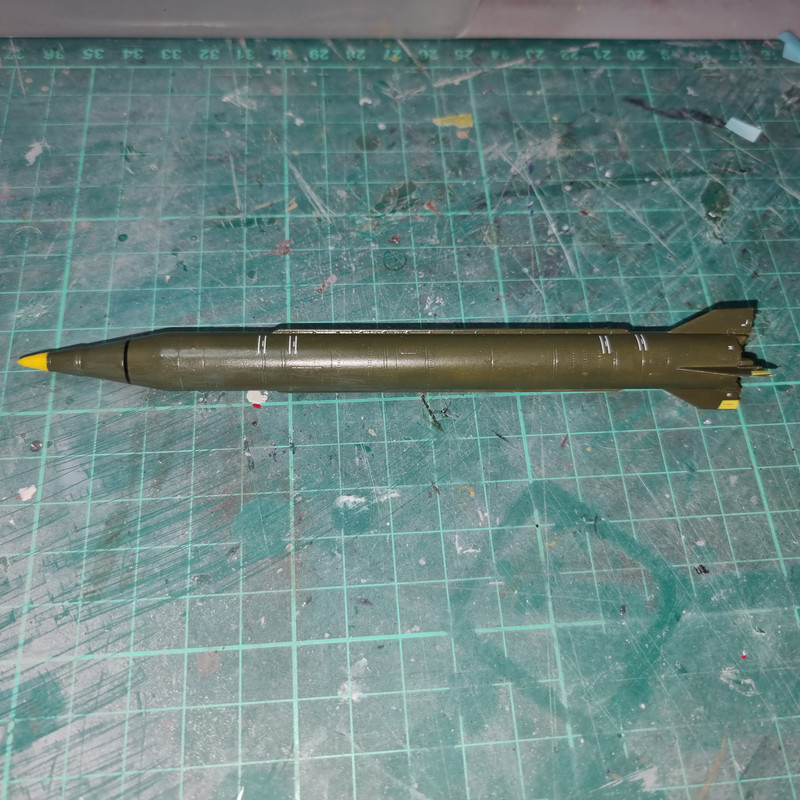
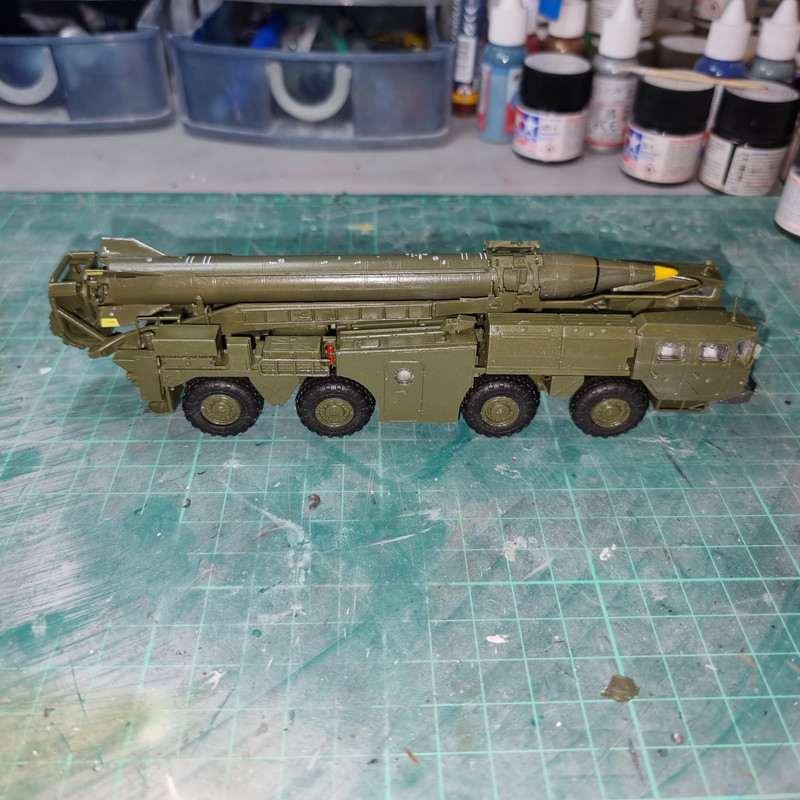
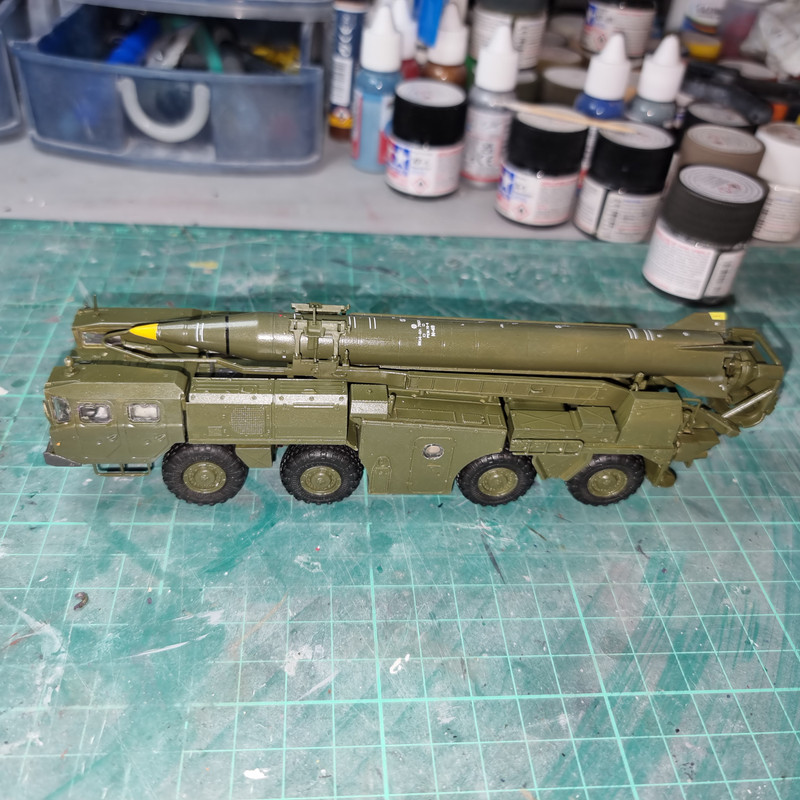
Well - to prove a point - here is the Scud TEL - with Scud on board sat in the fuselage:
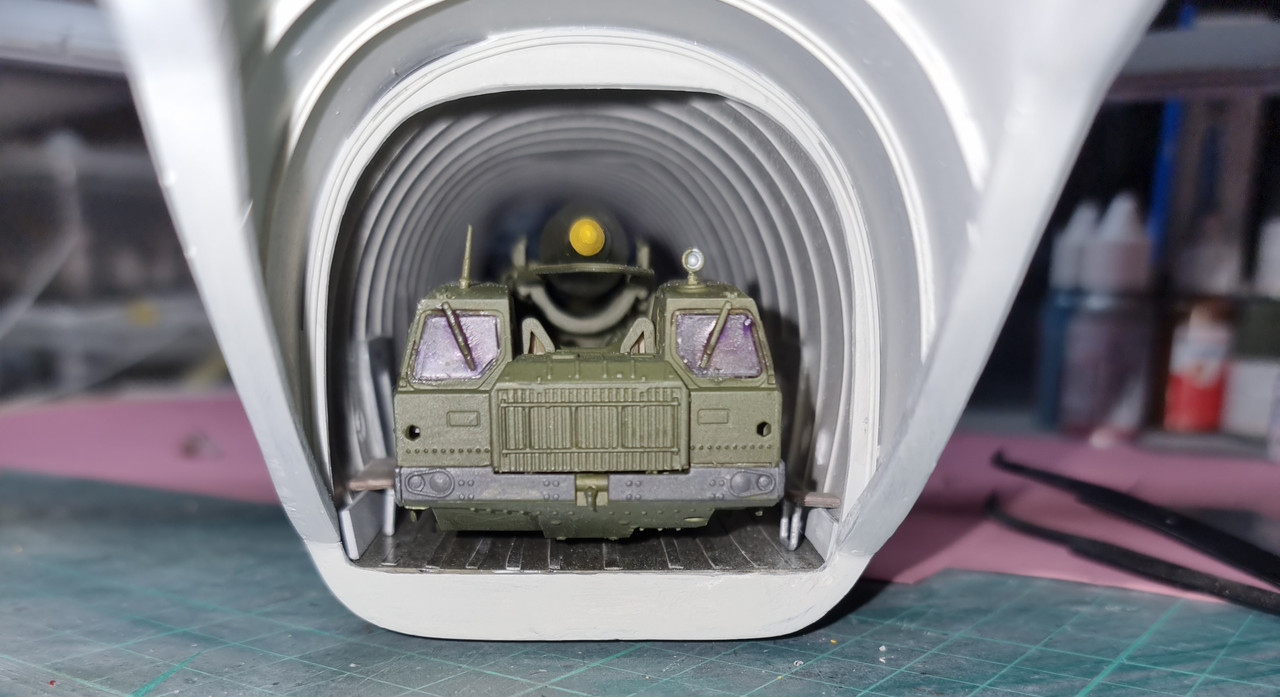
Now - progress report! The seats are in now, where I think they need to be for visual effect:
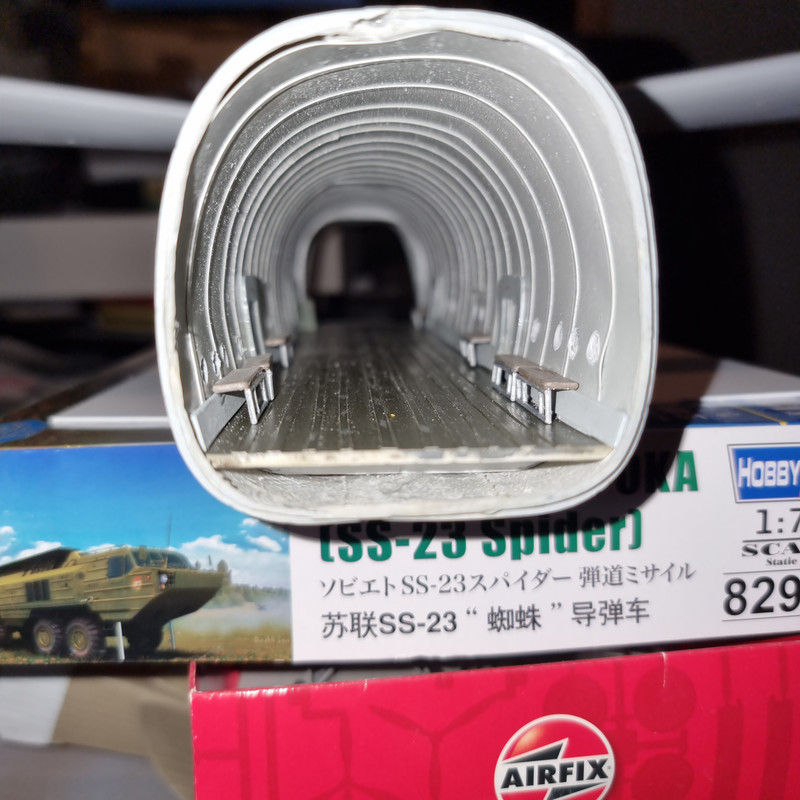
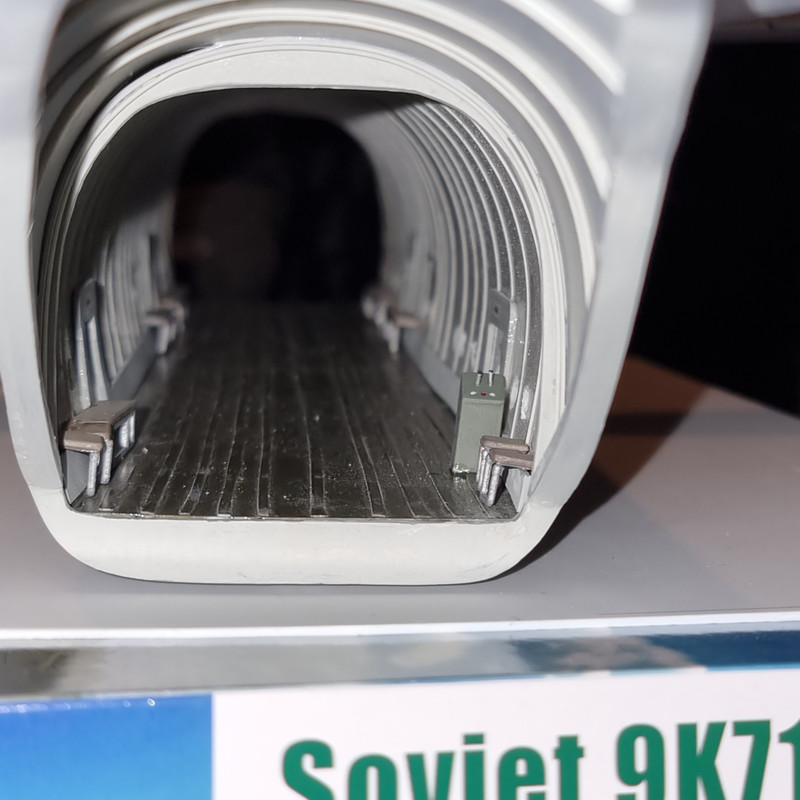
You can see alse see the console for the rear doors is also in place.
Somehow one of the ribs in the centre became ustuck! This required a bit of creative thinking in getting adhesive down to the necessary area.....
Don't laugh - it worked!!

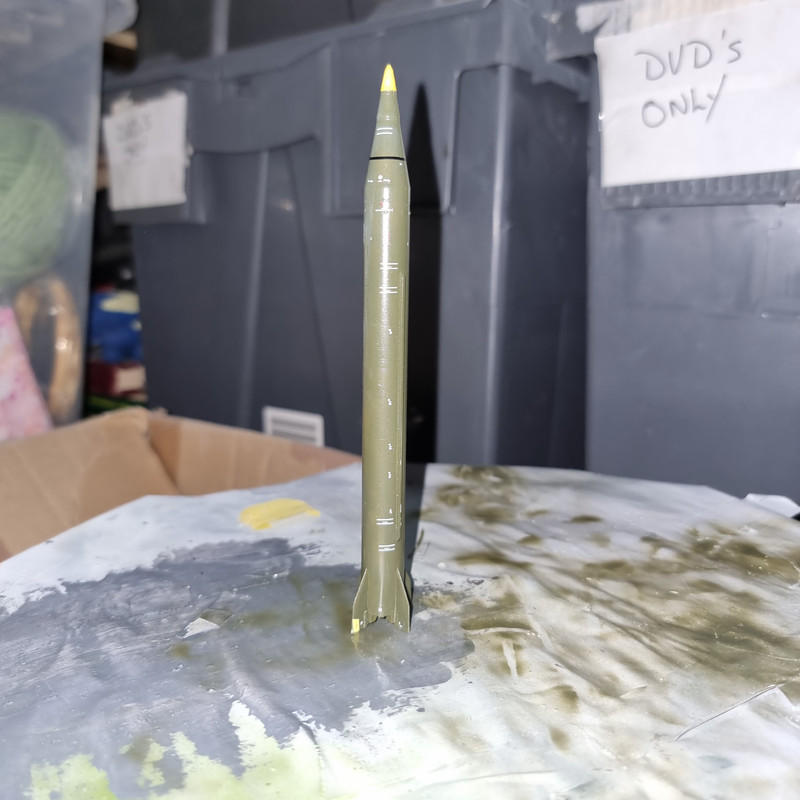
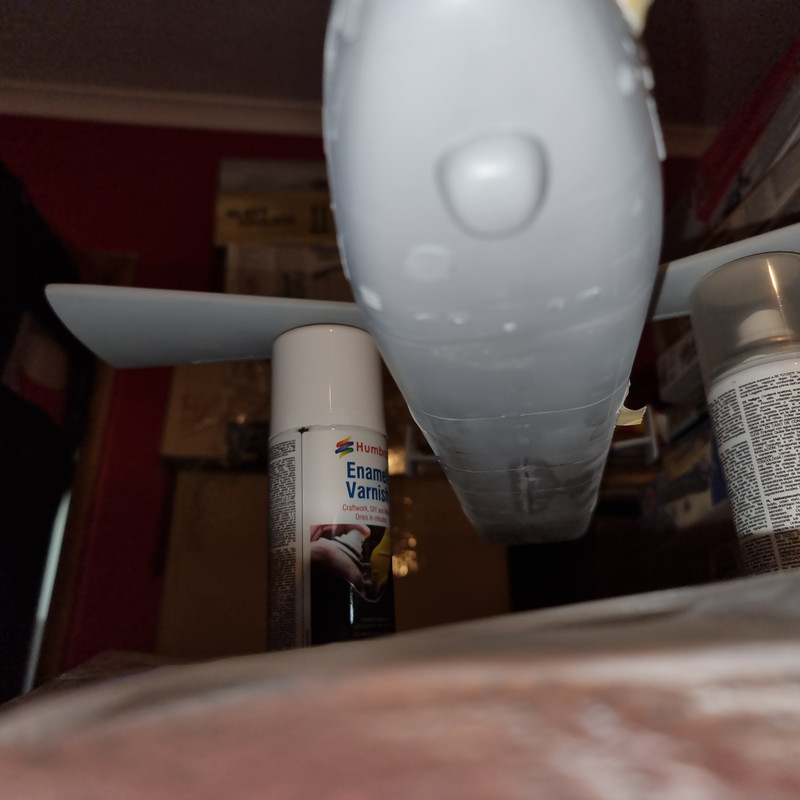
Moving on - the TEL has had a coat of satin varnish which is drying overnight. If I'm happy then the lighting parts can be fitted and the Maskol removed. Mean time a start has been made on the myriad decals on the scud itself.
Re: Mil Mi-V-12 - the BIG one!!
Posted: Tue Oct 24, 2023 6:58 pm
by RangerNeil
Re: Mil Mi-V-12 - the BIG one!!
Posted: Wed Oct 25, 2023 12:01 am
by digger303
Re: Mil Mi-V-12 - the BIG one!!
Posted: Wed Oct 25, 2023 2:11 am
by RangerNeil
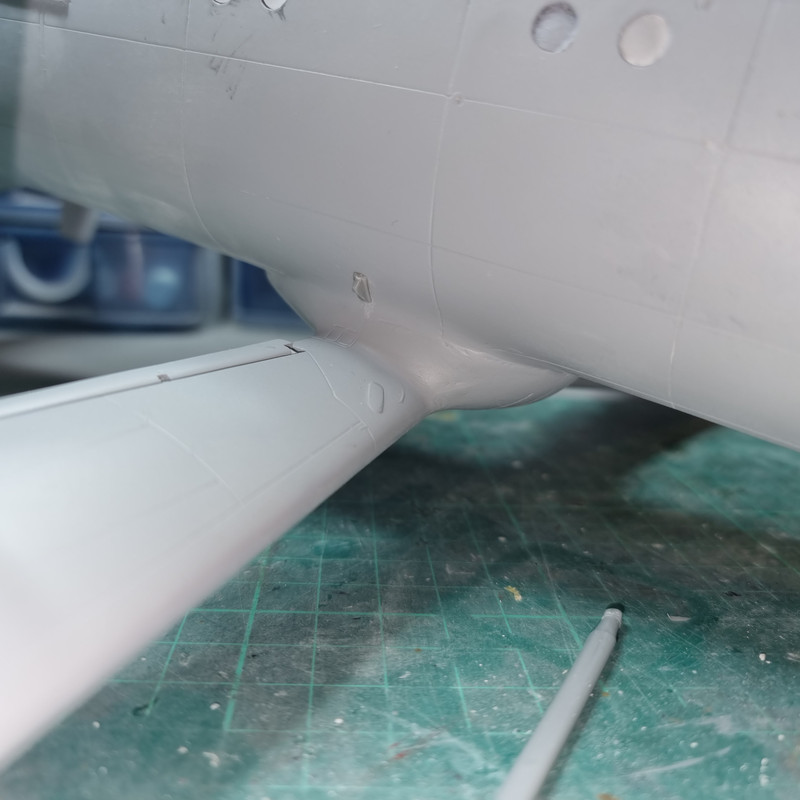
Thats the gap AFTER joining them Digger. And to get that I had to sand the nose of the main fuselage back till the lip was maybe 2mm. Was 5mm.
Whats making it worse is the cockpit section is a completely different profile to the fuselage - most of what appears to be gaps is actually one side or the other standing proud.
Re: Mil Mi-V-12 - the BIG one!!
Posted: Wed Oct 25, 2023 10:26 am
by digger303
RangerNeil wrote: Wed Oct 25, 2023 2:11 am
Thats the gap AFTER joining them Digger. And to get that I had to sand the nose of the main fuselage backill the lip was maybe 2mm. Was 5mm.
Whats making it worse is the cockpit section is a completely different profile to the fuselage - most of what appears to be gaps is actually one side or the other standing proud.

Re: Mil Mi-V-12 - the BIG one!!
Posted: Thu Oct 26, 2023 1:35 am
by DRUMS01
I trust, with the superior modeling skills you've already shown, that you will have that seam under control in no time. OK, it will be some time and a lot of putty, but you got this...
Re: Mil Mi-V-12 - the BIG one!!
Posted: Thu Oct 26, 2023 11:19 am
by RangerNeil
Odd - I thought I'd posted a progress report here yesterday.... Must have done it, hit preview and thought I'd posted it.
Oh well - do it again time.
The voids are now filled and were left to dry overnight. I tried first using scraps of plastic sheet but wasn't happy with the outcome so it was out with the filler. LOTS of filler in truth but I felt more in control of how well the voids were being filled.
Plan is - so far - to get the actual join smoothed all the way around until I am satisfied with the finish then address the two lower corners and blend them in somehow.
On the positive news front - payload #2 is completed.
I'm still hunting figures for the finished scenario, no joy there so far. Was thinking of a Paris airshow setting where the beast was first unveiled to the West so ordinary airline crew figures would do. Only set I found so far was mainly air hostesses but I keep looking.
Re: Mil Mi-V-12 - the BIG one!!
Posted: Thu Oct 26, 2023 11:56 am
by digger303
RangerNeil wrote: Thu Oct 26, 2023 11:19 am
I'm still hunting figures for the finished scenario, no joy there so far. Was thinking of a Paris airshow setting where the beast was first unveiled to the West so ordinary airline crew figures would do. Only set I found so far was mainly air hostesses but I keep looking.
Hmm..... air hostesses huh ....me thinks these late nights are causing the imagination to lead you off the path be strong young Padewan ...
Re: Mil Mi-V-12 - the BIG one!!
Posted: Thu Oct 26, 2023 7:03 pm
by smokeriderdon
Looking great! One thing though. Youre doing this with the SCUD stuff in or being loaded. Wouldnt they have the seats up with a load in? The loadmaster in me shudders at seats being down with cargo on. LOL
Re: Mil Mi-V-12 - the BIG one!!
Posted: Thu Oct 26, 2023 7:54 pm
by BigWall
It's looking great!
I think the rest of the forum members should pitch in and buy you a new release Tamiya kit once you're done with this build. You deserve a break!
Re: Mil Mi-V-12 - the BIG one!!
Posted: Thu Oct 26, 2023 9:47 pm
by RangerNeil
digger303 wrote: Thu Oct 26, 2023 11:56 am
RangerNeil wrote: Thu Oct 26, 2023 11:19 am
I'm still hunting figures for the finished scenario, no joy there so far. Was thinking of a Paris airshow setting where the beast was first unveiled to the West so ordinary airline crew figures would do. Only set I found so far was mainly air hostesses but I keep looking.
Hmm..... air hostesses huh ....me thinks these late nights are causing the imagination to lead you off the path be strong young Padewan ...
I will put it thus and leave it so: ex-British Army of the 1970's......

smokeriderdon wrote: Thu Oct 26, 2023 7:03 pm
Looking great! One thing though. Youre doing this with the SCUD stuff in or being loaded. Wouldnt they have the seats up with a load in? The loadmaster in me shudders at seats being down with cargo on. LOL
The Scud TEL will be half in, half out, front wheels on the loading ramp. Which reminds me - I need to fabricate the loading ramp extensions as well as the pedestrian boarding ladder. There is method in the madness of having the seats down though - it serves to illustrate just how damn BIG this thing is. I remember Andovers, Belfasts and C-130's carrying freight and it was barely possible to shuffle past so when you look in the back of this and see the seats down either side of the TEL and room to walk past it makes the point quite nicely.
BigWall wrote: Thu Oct 26, 2023 7:54 pm
It's looking great!
I think the rest of the forum members should pitch in and buy you a new release Tamiya kit once you're done with this build. You deserve a break!
Thanks for the kind words.
Thats a nice thought - never happen - but nice thought!!
You'd all have had plenty of time to save up though, this beast is no where near finished. No where near......
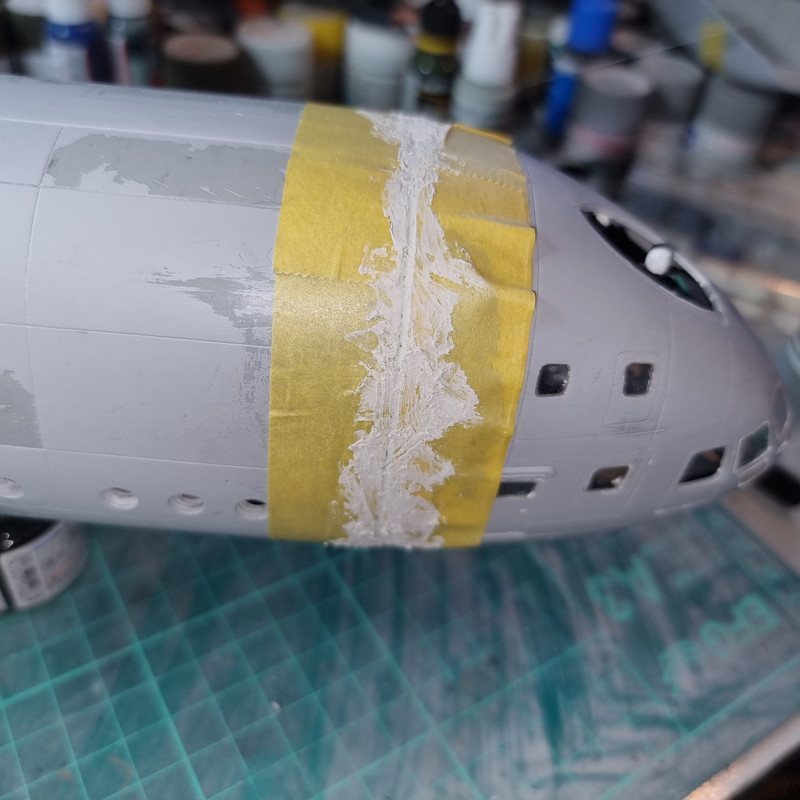
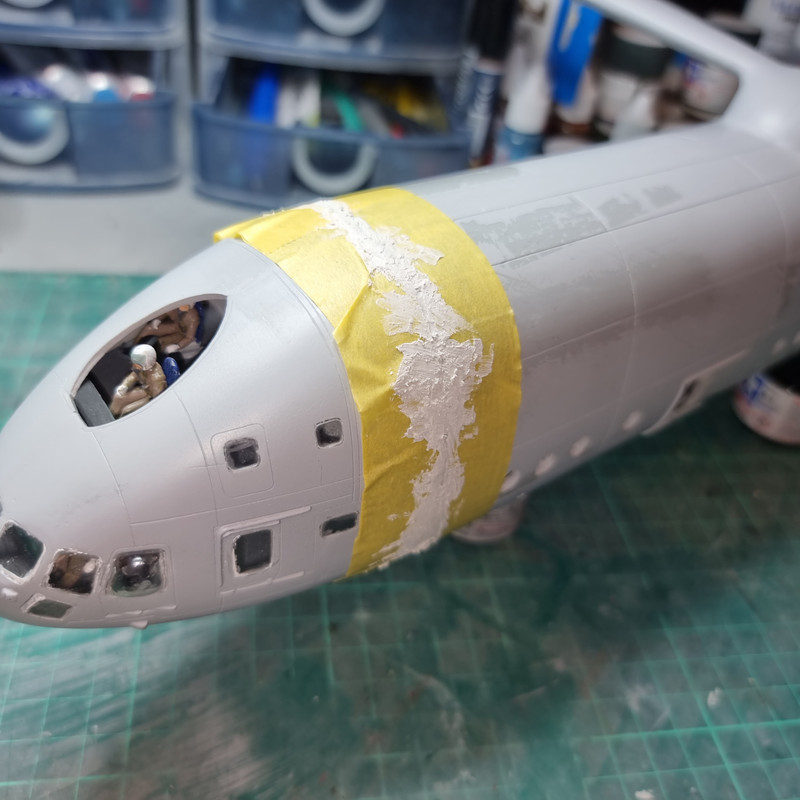
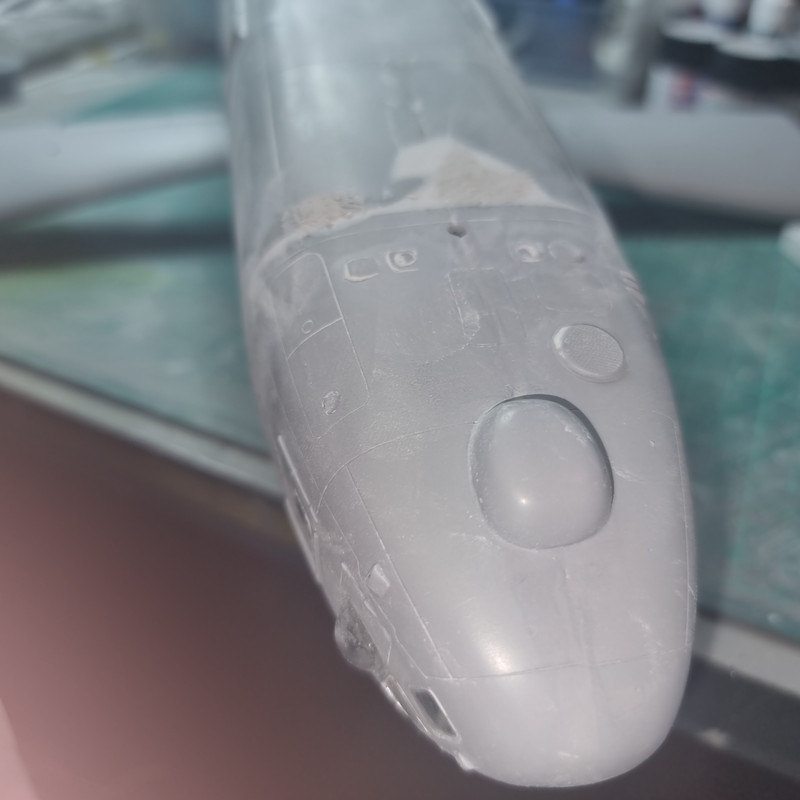
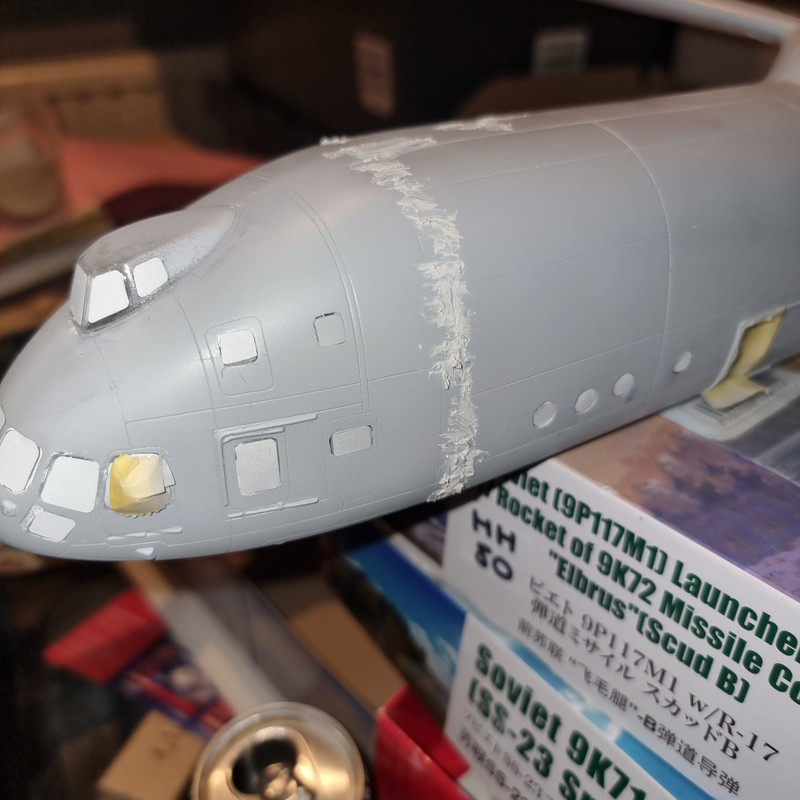
Which brings us nicely to todays progress. After many hours of sanding - and some work with a file - the first stage of sanding the fuselage/cockpit join is done. The sides, although a large gap, have started levelling nicely.

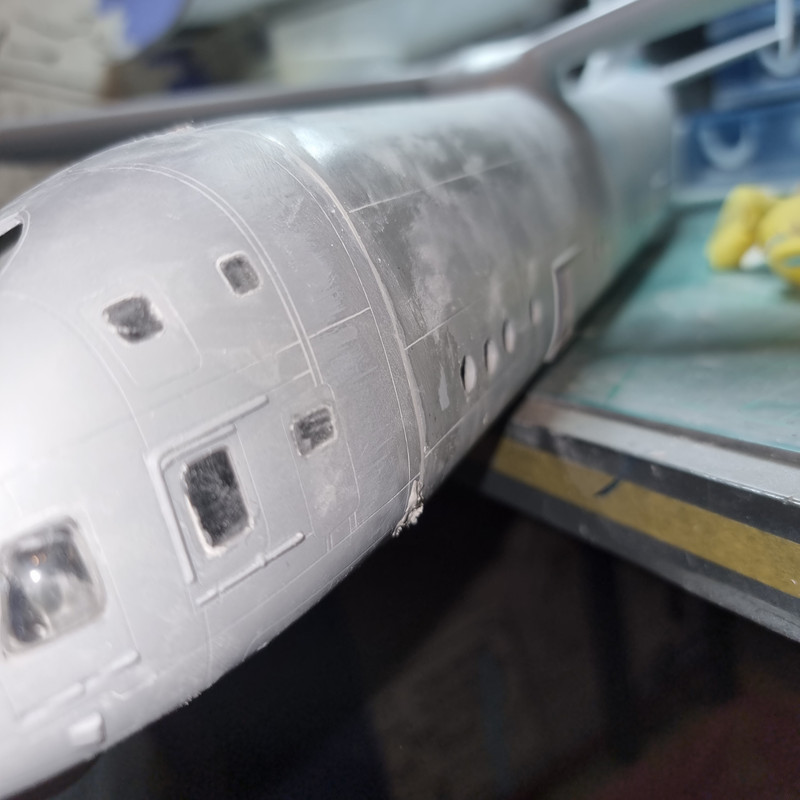
The top and bottom are a different story. The top of the fuselage has a 10mm wide spine that should have matched a "peak" on the cockpit roof. I don't think the designers of either part were talking to one another as the entire cockpit is the height of the spine so its a case of filing & sanding the areas either side of the spine to create the "peak" on the cockpit roof. Getting there slowly - VERY slowly.
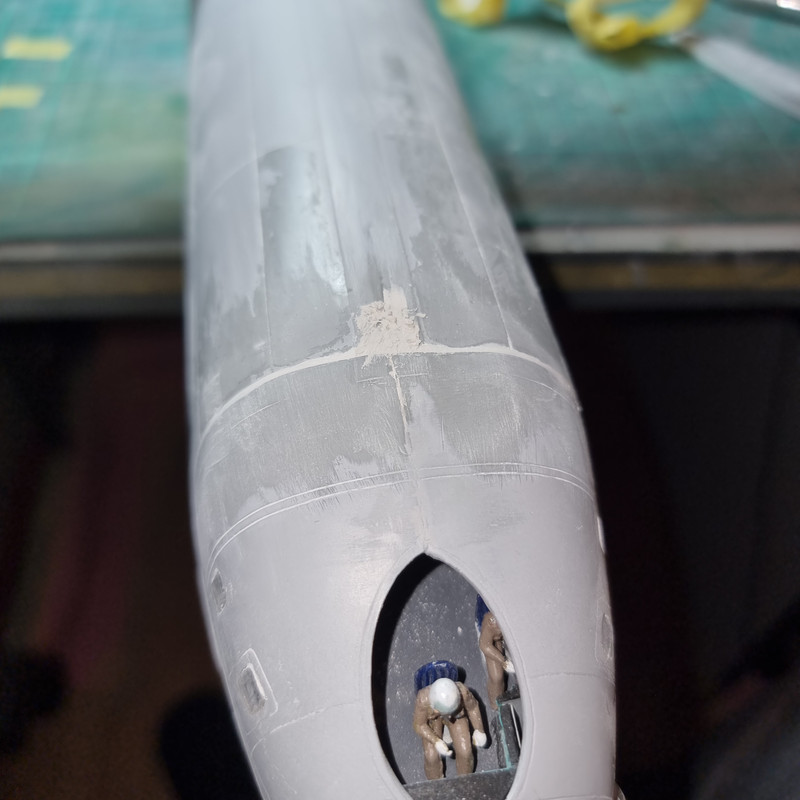
The bottom - man, is it weird!

The corners of the fuselage are a lot squarer than that of the cockpit so I either:
1) Pad the cockpit with filler to blend the corners in. This will lose a lot of panel details that will need to be re-scribed.
2) Sand the fuselage corners down to match the cockpit. A lot more work with the risk of going through the resin/matting at the extremities.
3) A combination of (1) and (2).
The initial plan is to go for number 2 and if the matting becomes exposed adjust to number 3. But to add to the fun the centre of the fuselage has sagged during the moulding process so the corners are higher than the cockpit but the centre is lower.... Figures..... So the centre line has to have a roughly Vee shaped section of filler to bring it up to the level of the cockpit.
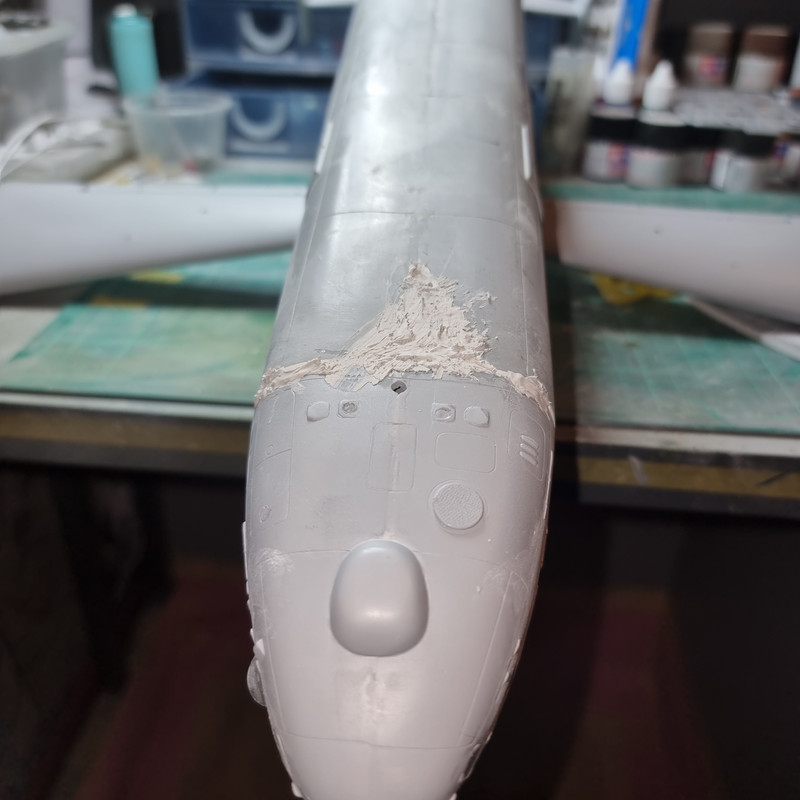
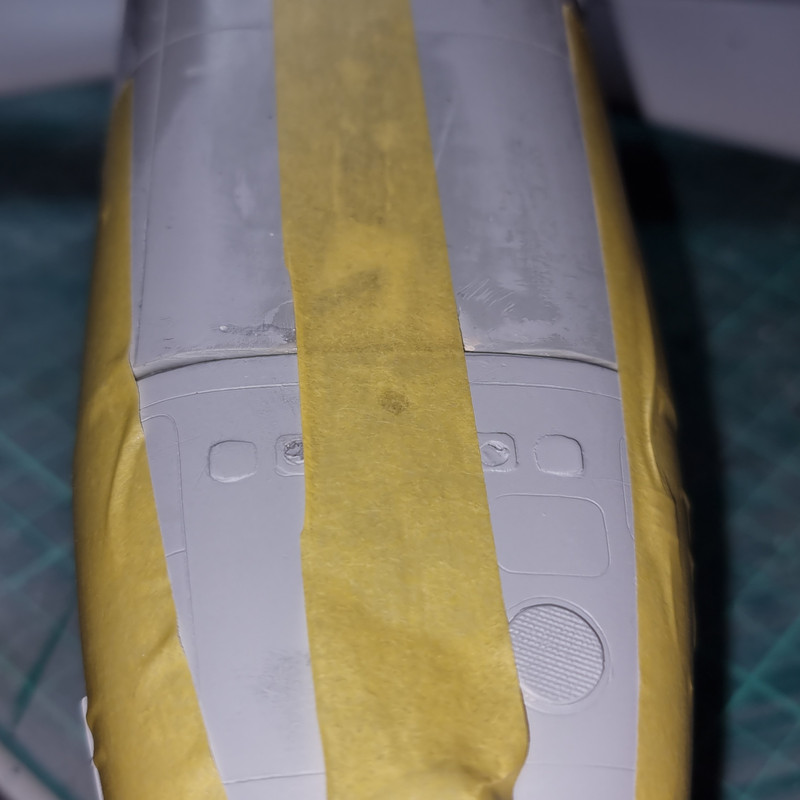
Other thing I've noted - and is bothering me a lot - is the number of patches of primer the masking tape has lifted off the resin fuselage. Its not filling me with confidence for masking up for top coats......
I am thinking once this and the Mi-6 are done and the SM-79 and Swordfish are finishec it will be time to go back to armour - or something so, so simple its not going to give me any headaches
Re: Mil Mi-V-12 - the BIG one!!
Posted: Fri Oct 27, 2023 5:12 am
by digger303
Re: Mil Mi-V-12 - the BIG one!!
Posted: Sat Oct 28, 2023 5:26 pm
by DRUMS01
We can see and watch this kit trying to beat you down, but look at how far you've come already; fuselage halves, engine nacelles, cockpit and nose fitment, fuselage interior, wing and tail joints, etc. I could go on but you know you have not only handles those issues, you've even elevated the build with those modifications. Hopefully you should be seeing the light at the end of the tunnel regarding the pounds of putty/filler used. Keep up the great work and the reward will be worth it.
I was wondering, with the weight of the kit, will the landing gear support the weight, especially with the modifications and putty?
Re: Mil Mi-V-12 - the BIG one!!
Posted: Sat Oct 28, 2023 9:21 pm
by RangerNeil
DRUMS01 wrote: Sat Oct 28, 2023 5:26 pm
We can see and watch this kit trying to beat you down, but look at how far you've come already; fuselage halves, engine nacelles, cockpit and nose fitment, fuselage interior, wing and tail joints, etc. I could go on but you know you have not only handles those issues, you've even elevated the build with those modifications. Hopefully you should be seeing the light at the end of the tunnel regarding the pounds of putty/filler used. Keep up the great work and the reward will be worth it.
I was wondering, with the weight of the kit, will the landing gear support the weight, especially with the modifications and putty?
That question had crossed ny mind! Nose gear is compact, worry is the main gear. We'll find out once its assembled. There are a LOT of struts and braces running fore and aft as well as out along the wing so fingers crossed!
Re: Mil Mi-V-12 - the BIG one!!
Posted: Mon Oct 30, 2023 9:24 pm
by RangerNeil
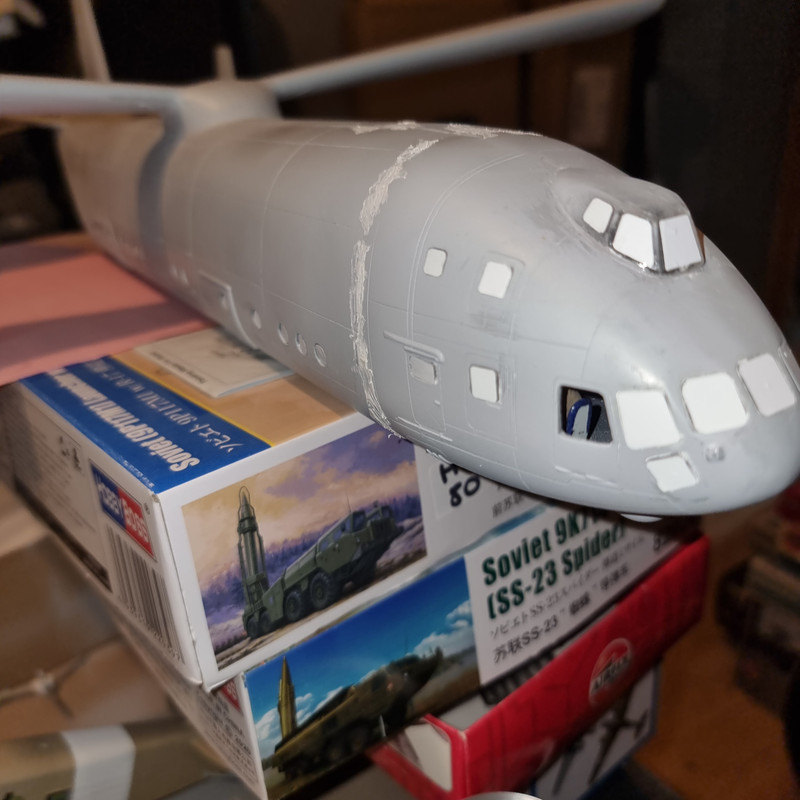
After something like 6 hours of sanding today we have progress - and a set-back!! Come on - who DIDN'T expect that?
However the set-back didn't ocurr where expected. Working on the top of the fuselage a hole appeared in the resin at one side so that had to be filled. Hopefully just an air bubble but time will tell tomorrow.
Other than this works progressing not too badly. Apart from that hole the top and sides are about ready to pass the thumb nail test for edges.
This just leaves the underside. Here again the corners are gradually blending in so maybe tomorrow or the day after they, too, might pass the thumbnail test.
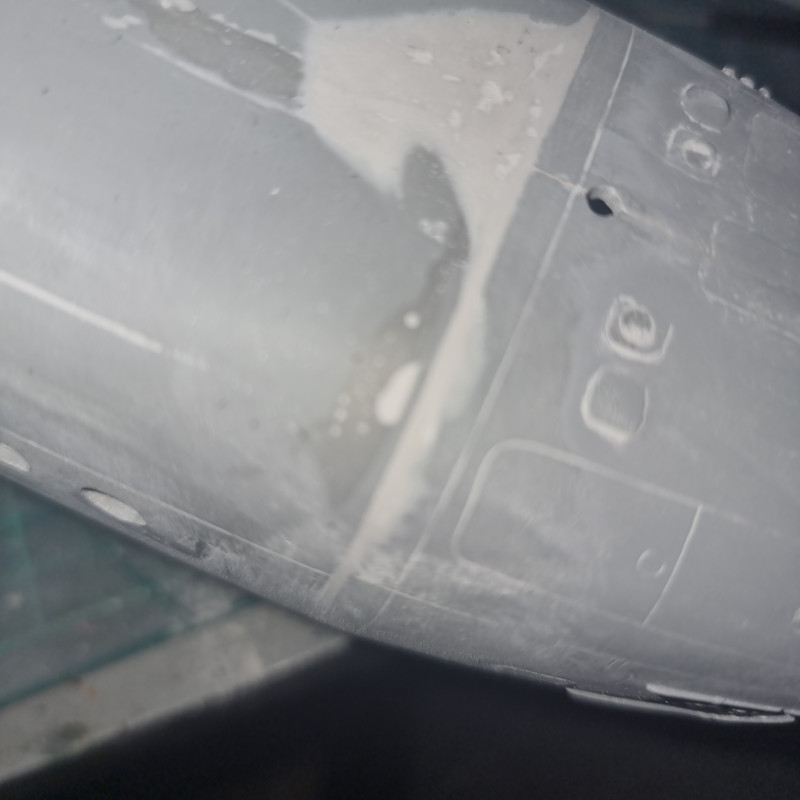
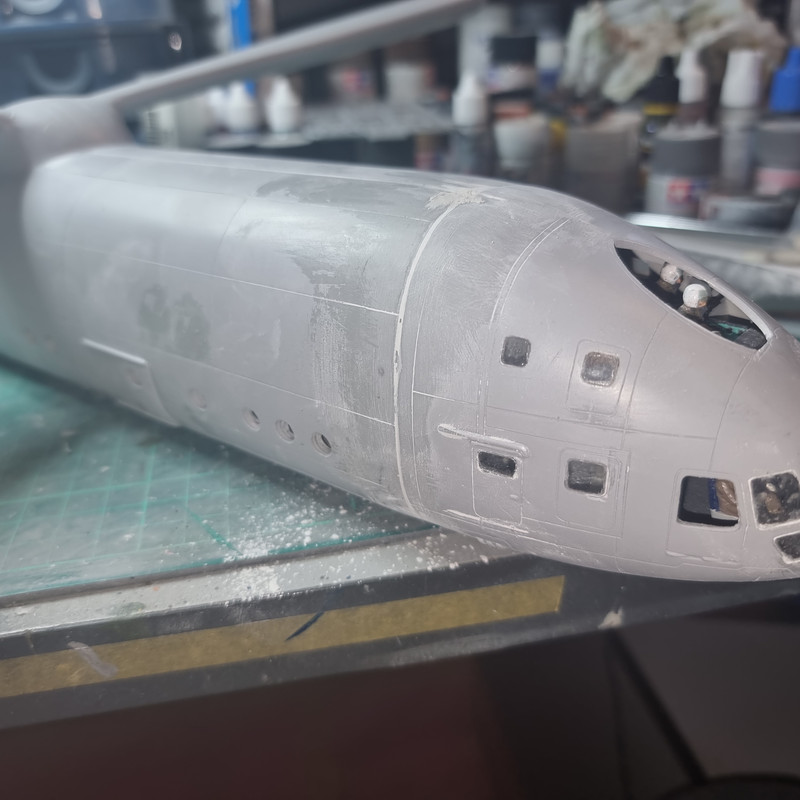
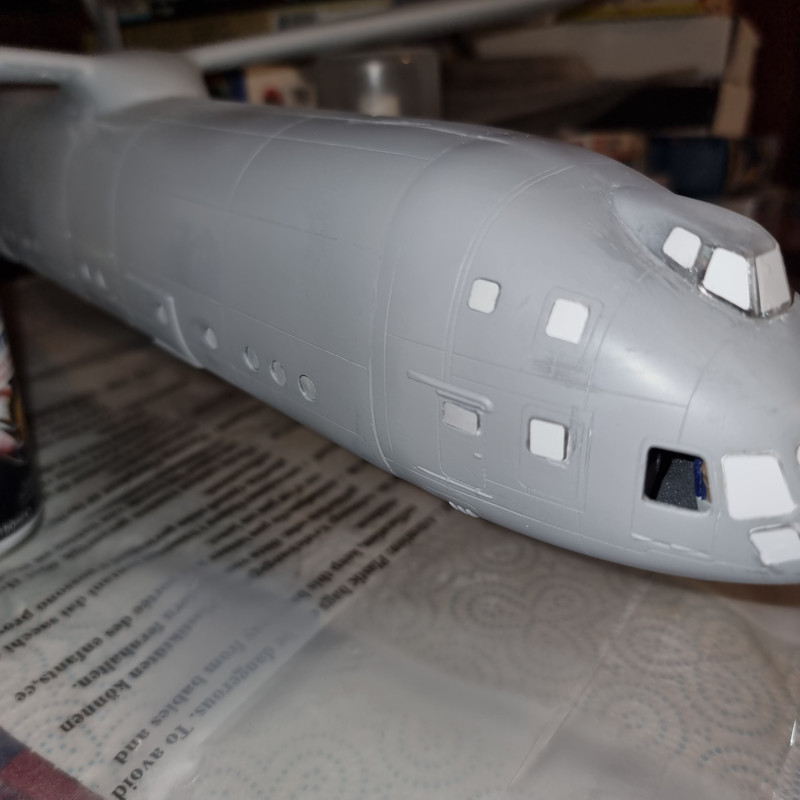
Once its all done and I'm happy with the look and feel the next step is to lay a coat of primer over it to see what that reveals - i.e. how much more work is needed and where. But before that can be done the fuselage windows need to be fitted and then the masking kit applied to them and the cockpit windows.
Re: Mil Mi-V-12 - the BIG one!!
Posted: Mon Oct 30, 2023 11:16 pm
by DRUMS01
Looking good. It appear that you were able to keep most the detail and panel lines even after the layers of putty. Lets hope the primer does not reveal too many variances that need attention. Although I've been following along, I kind of remember but not sure if you mentioned, is this going to be the civilian / prototype colored version or will you make is a "what if" military paint scheme (considering the military payload)?
Re: Mil Mi-V-12 - the BIG one!!
Posted: Mon Oct 30, 2023 11:38 pm
by digger303
Re: Mil Mi-V-12 - the BIG one!!
Posted: Tue Oct 31, 2023 7:56 pm
by RangerNeil
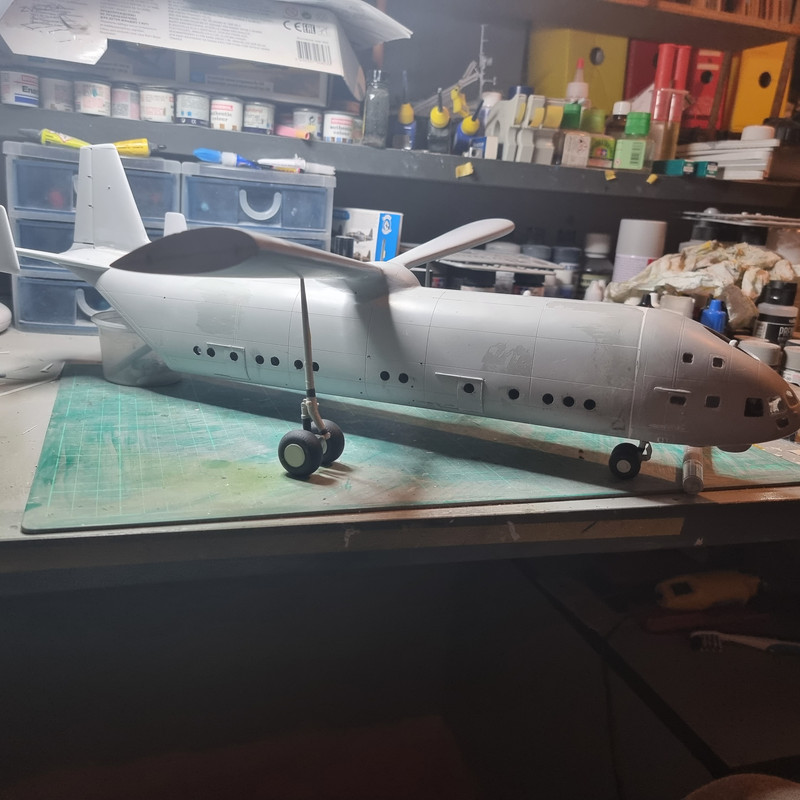
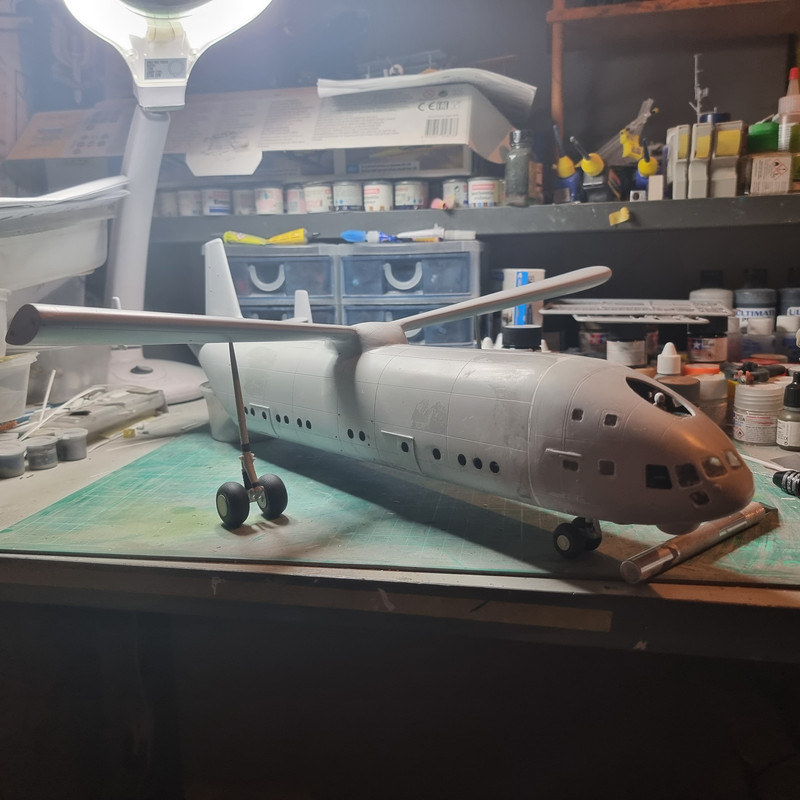
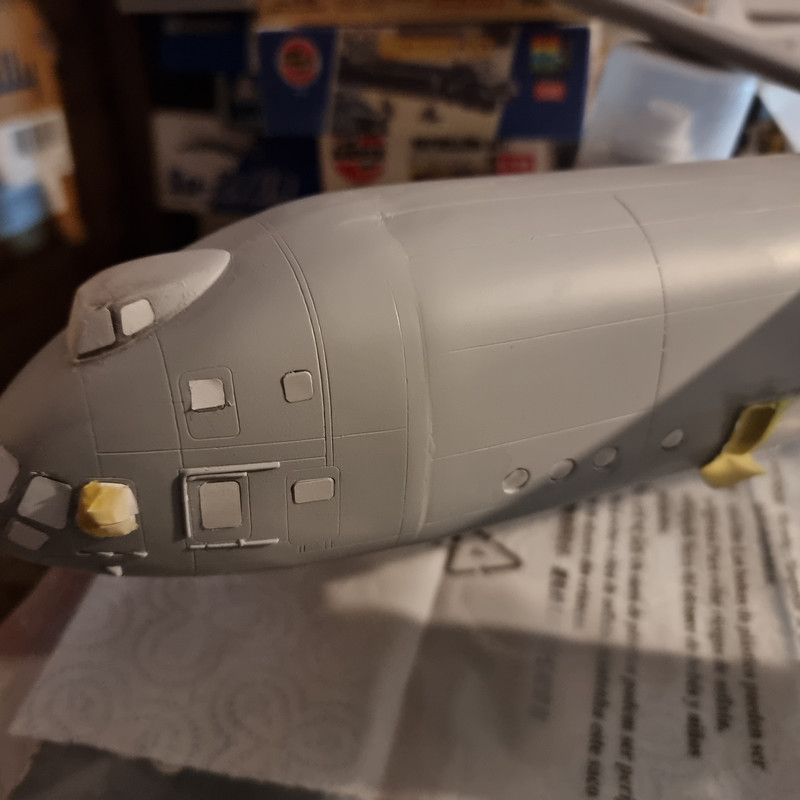
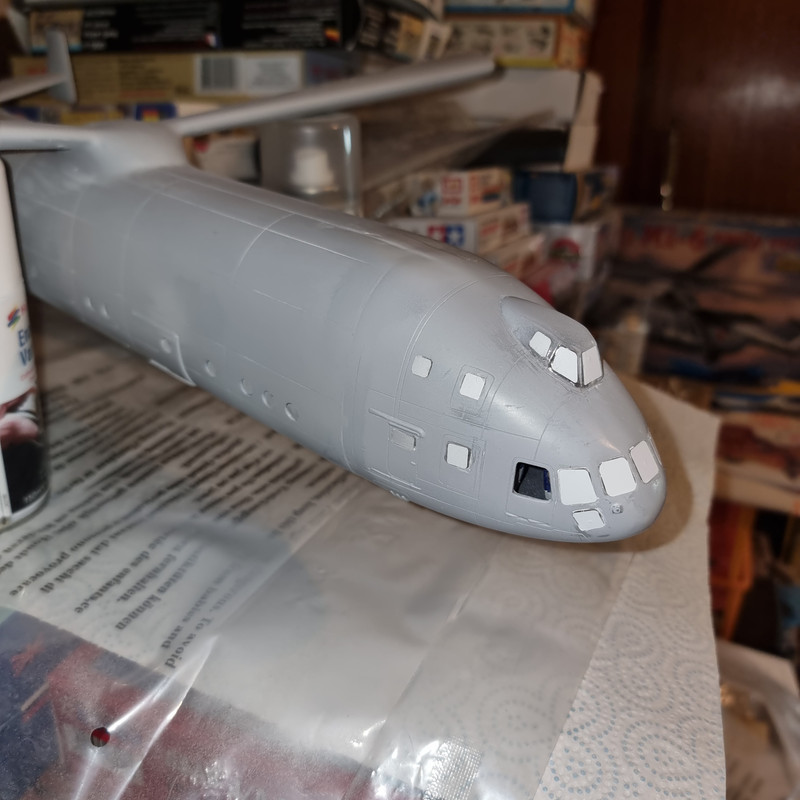
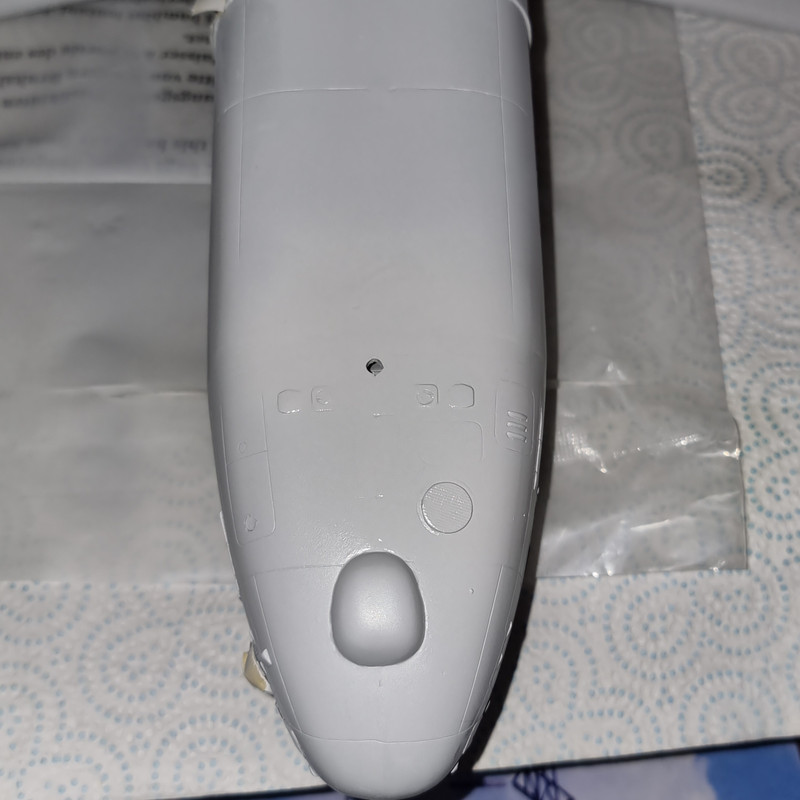
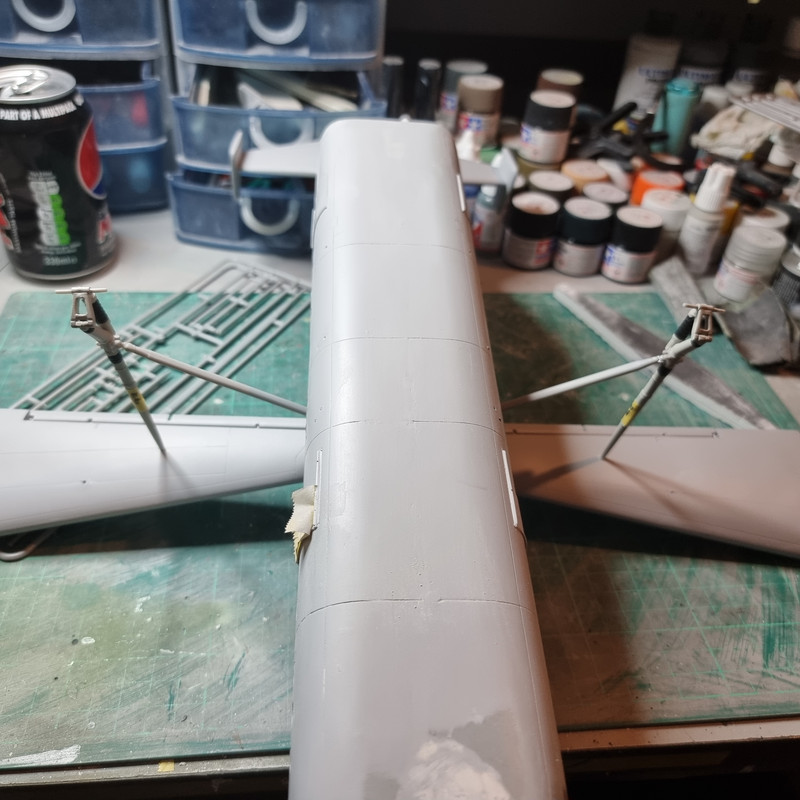
Another few hours sanding and its is virtually there. So close that I decided it was time to paint the recesses for the cabin windows prior to fitting and masking them.
And, just out of curiosity, the question of "will the undercarriage take the weight" is answered. Here it is standing on the as yet unsupported/unbraced main undercarriage and nose gear:
Re: Mil Mi-V-12 - the BIG one!!
Posted: Tue Oct 31, 2023 11:15 pm
by DRUMS01
Now it's starting to look like something, ...something big. Nice work on the fuselage joints.
Re: Mil Mi-V-12 - the BIG one!!
Posted: Wed Nov 01, 2023 12:18 am
by digger303
Re: Mil Mi-V-12 - the BIG one!!
Posted: Wed Nov 01, 2023 12:55 pm
by RangerNeil
DRUMS01 wrote: Tue Oct 31, 2023 11:15 pm
Now it's starting to look like something, ...something big. Nice work on the fuselage joints.
Thanks for the kind words!
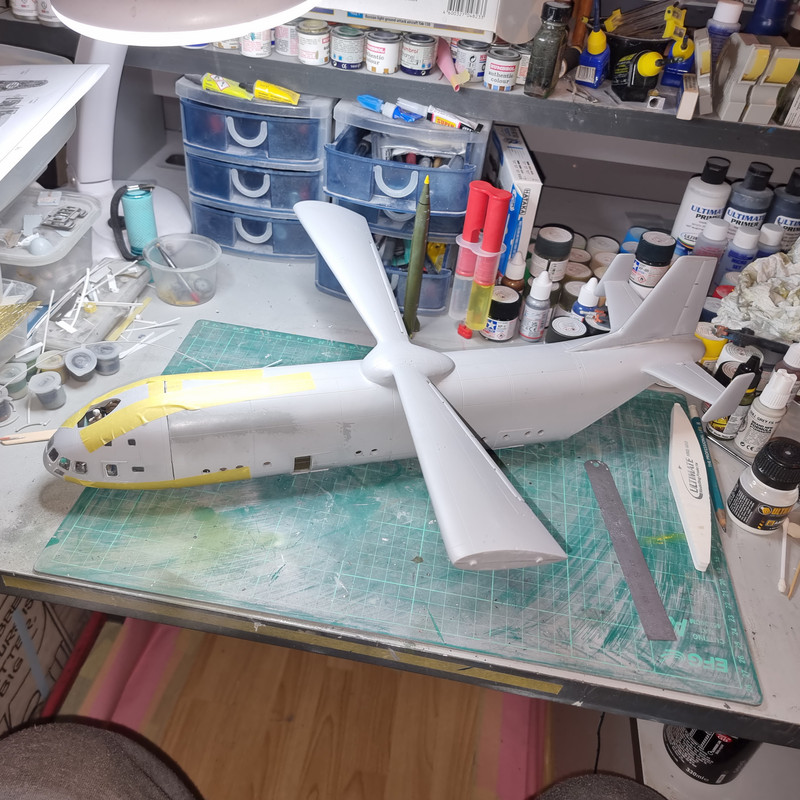
By my estimation once the engine pods and rotors go on the beast will double in width .....

Nose gear is actually much stronger than it looks, mounting point is about 4mm dia and it's compact. It was the main gear that worried me. The long legs taper at the top to about 1.5mm dia where it goes into the wings. The finished kit has a ton of bracing struts for those legs but its reassuring to know they will take the weight unaided.
Surprisingly - for Amodel - the engine pods are a good fit. I think - emphasis on think - there will be no need for filler, maybe just a bead of PVA. Before they go on, though, the instructions require all the bracing for the main undercarriage be fitted. So I will go with this to be safe.
Good point on the paint. The two main colours are White and Aeroflot Blue - both gloss. I have Tamiya sized bottles of both - but the more I look the more I think "not enough" and that maybe a better option would be rattle cans - Tamiya gloss White is easy enough, the Aeroflot Blue may be problematical though - we shall see!
Re: Mil Mi-V-12 - the BIG one!!
Posted: Wed Nov 01, 2023 9:47 pm
by RangerNeil
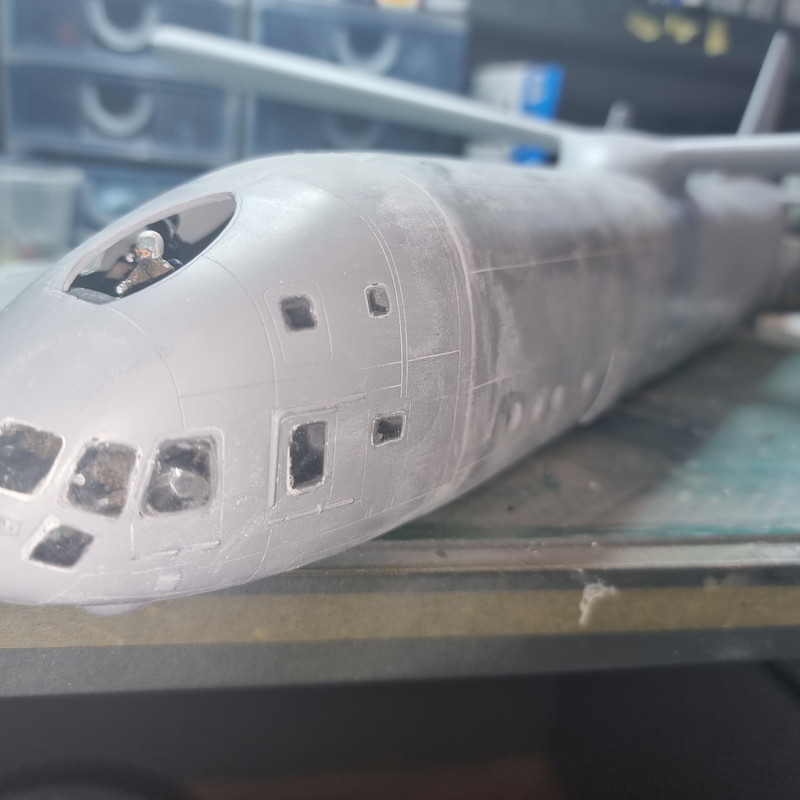
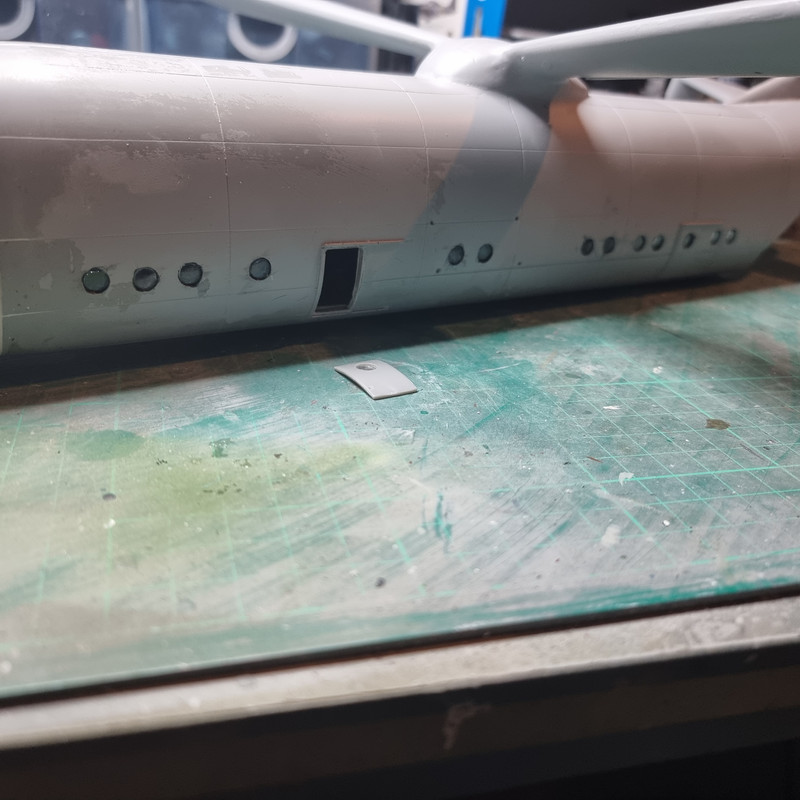
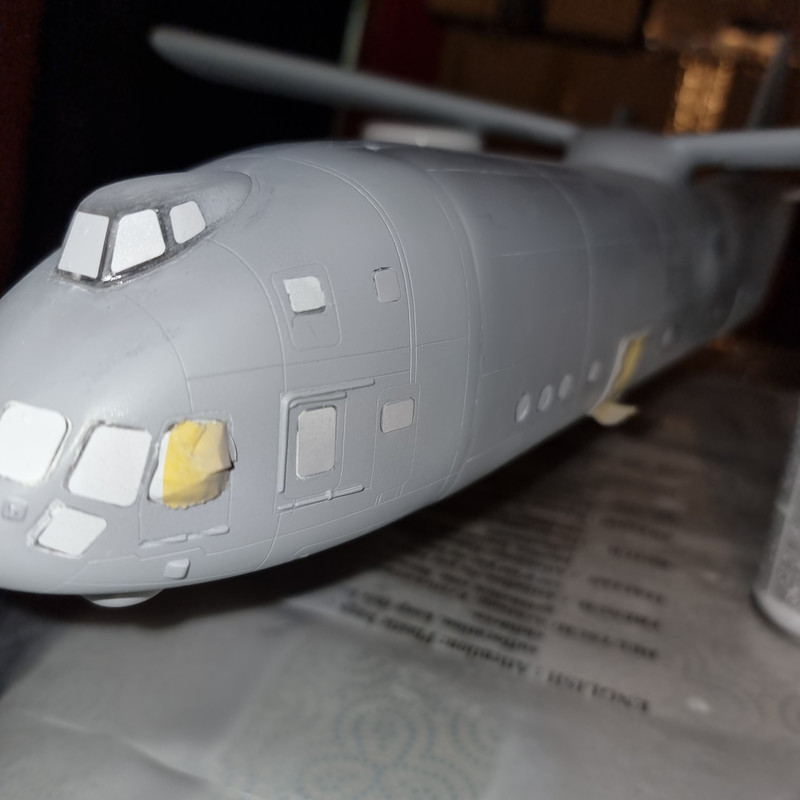
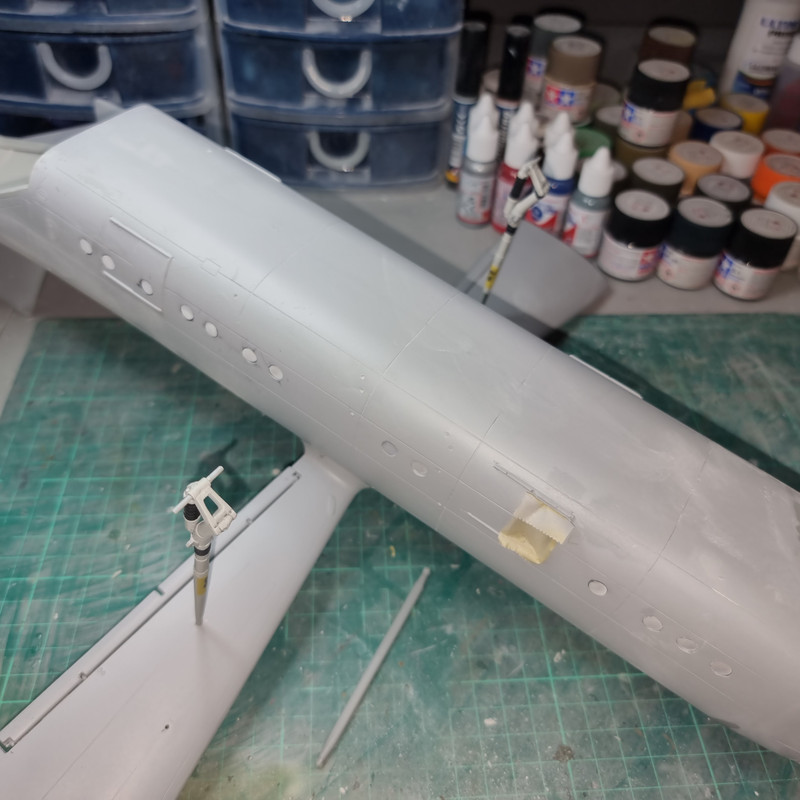
Fuselage windows are now in. I used Ammo's Ultra as the adhesive so they arexbeing left to dry overnight. Tomorrow the plan is to make sure all are clear, give a polish to any that have maybe got the adhesive on the surface and then apply the masks. This is where a small issue arises - the masking kit provides 26 circular masks - and there are 28 windows!!! So I'll have to use Maskol on one each side, probably one of the central ones obscured by the landing gear braces.
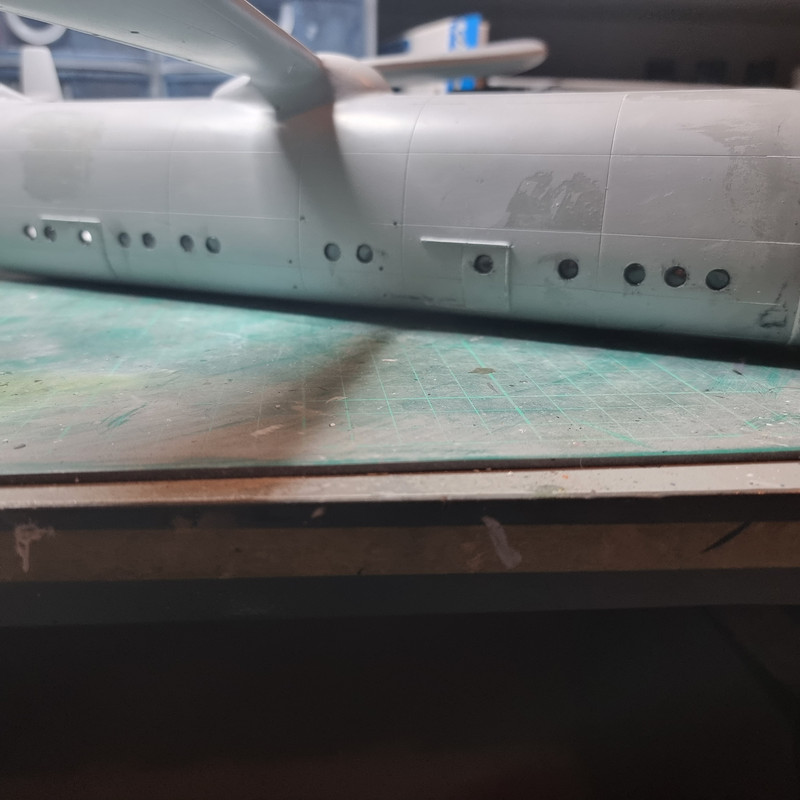
The cockpit windows are all masked ready for primer on the nose to fuselage seam.
Amazingly there are quite a few spares for the fuselage.
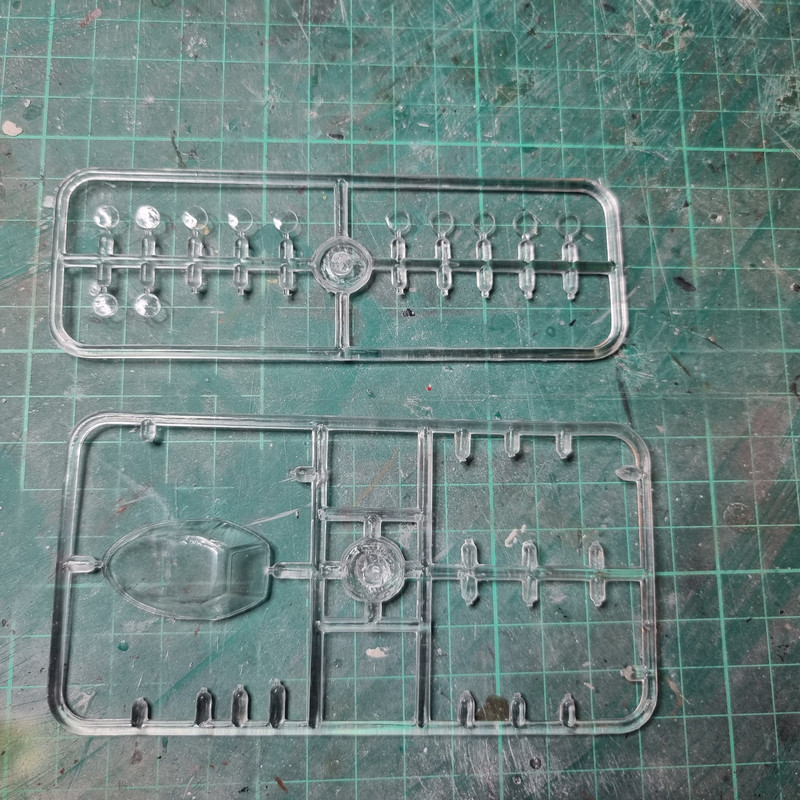
Thats where I stopped for today.
Re: Mil Mi-V-12 - the BIG one!!
Posted: Wed Nov 01, 2023 11:51 pm
by digger303
Since you said earlier about the paint flaking off. I am wondering if you washed the kit at any point. I usually like to do a alcohol wash just before painting to take off finger grease/oil and any residual mold release. Which being one of these old school kits it might have some on it.
Having paint ripped off by masking tape years ago when I built a Trumpeter Stuka instilled in me the need to wash and clean before paint.
I'm loving the build .
Re: Mil Mi-V-12 - the BIG one!!
Posted: Thu Nov 02, 2023 1:49 am
by RangerNeil
digger303 wrote: Wed Nov 01, 2023 11:51 pm
Since you said earlier about the paint flaking off. I am wondering if you washed the kit at any point. I usually like to do a alcohol wash just before painting to take off finger grease/oil and any residual mold release. Which being one of these old school kits it might have some on it.
Having paint ripped off by masking tape years ago when I built a Trumpeter Stuka instilled in me the need to wash and clean before paint.
I'm loving the build .
I washed everything in warm, soapy, water then rised under a running cold tap and dried on a paper towel. Its how I've done every kit to date. However - this is the first glass matting and resin one I've ever done so, yes, maybe alcohol might have been a better option. I guess this is "lessons learnt". The areas that have pulled off have been sanded to loose the edging no though so hopefully the paint will grip in those areas........

Re: Mil Mi-V-12 - the BIG one!!
Posted: Thu Nov 02, 2023 3:56 am
by digger303
RangerNeil wrote: Thu Nov 02, 2023 1:49 am
digger303 wrote: Wed Nov 01, 2023 11:51 pm
Since you said earlier about the paint flaking off. I am wondering if you washed the kit at any point. I usually like to do a alcohol wash just before painting to take off finger grease/oil and any residual mold release. Which being one of these old school kits it might have some on it.
Having paint ripped off by masking tape years ago when I built a Trumpeter Stuka instilled in me the need to wash and clean before paint.
I'm loving the build .
I washed everything in warm, soapy, water then rinsed under a running cold tap and dried on a paper towel. Its how I've done every kit to date. However - this is the first glass matting and resin one I've ever done so, yes, maybe alcohol might have been a better option. I guess this is "lessons learnt". The areas that have pulled off have been sanded to loose the edging no though so hopefully the paint will grip in those areas........
I must have missed it, but I didn't realise this was a glass resin kit looked like Styrene to me.
Re: Mil Mi-V-12 - the BIG one!!
Posted: Thu Nov 02, 2023 10:59 am
by RangerNeil
digger303 wrote: Thu Nov 02, 2023 3:56 am
RangerNeil wrote: Thu Nov 02, 2023 1:49 am
digger303 wrote: Wed Nov 01, 2023 11:51 pm
Since you said earlier about the paint flaking off. I am wondering if you washed the kit at any point. I usually like to do a alcohol wash just before painting to take off finger grease/oil and any residual mold release. Which being one of these old school kits it might have some on it.
Having paint ripped off by masking tape years ago when I built a Trumpeter Stuka instilled in me the need to wash and clean before paint.
I'm loving the build .
I washed everything in warm, soapy, water then rinsed under a running cold tap and dried on a paper towel. Its how I've done every kit to date. However - this is the first glass matting and resin one I've ever done so, yes, maybe alcohol might have been a better option. I guess this is "lessons learnt". The areas that have pulled off have been sanded to loose the edging no though so hopefully the paint will grip in those areas........
I must have missed it, but I didn't realise this was a glass resin kit looked like Styrene to me.
Most of it is.
The major parts - the fuselage and the wing - are resin coated glass fibre. Most unusual.
Re: Mil Mi-V-12 - the BIG one!!
Posted: Thu Nov 02, 2023 10:31 pm
by RangerNeil
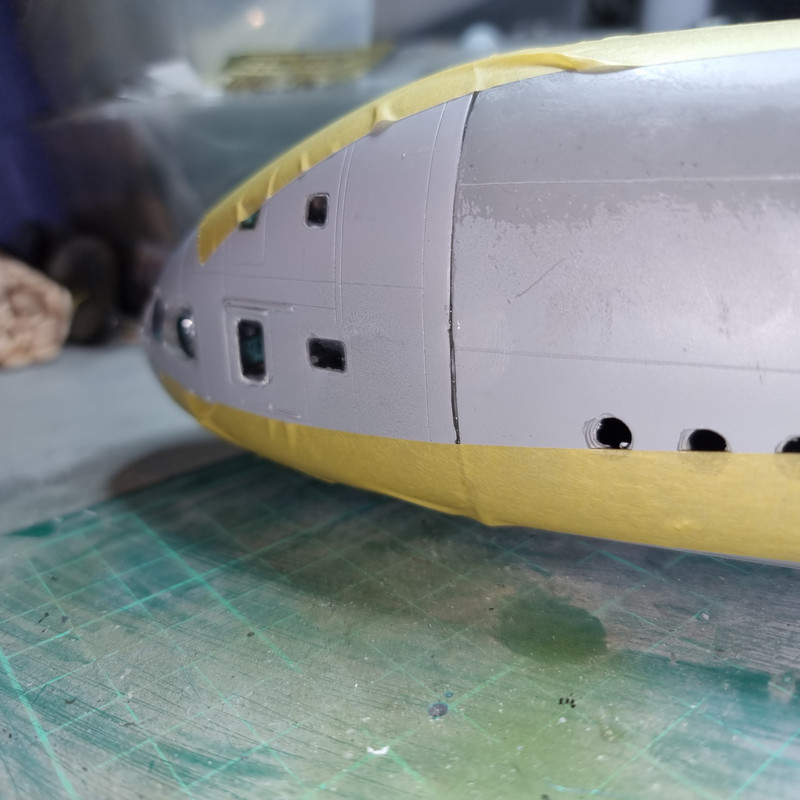
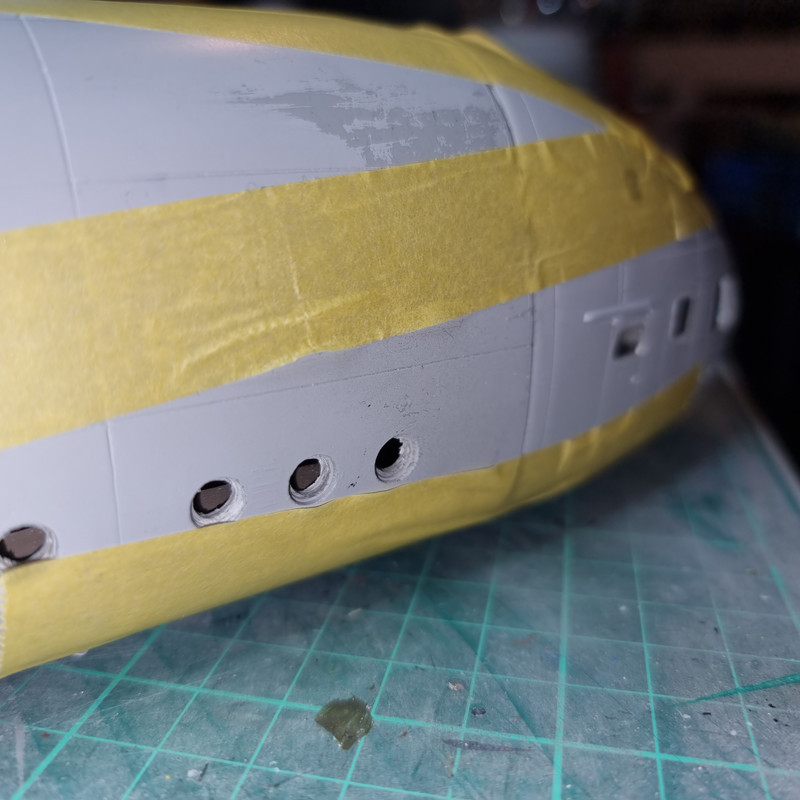
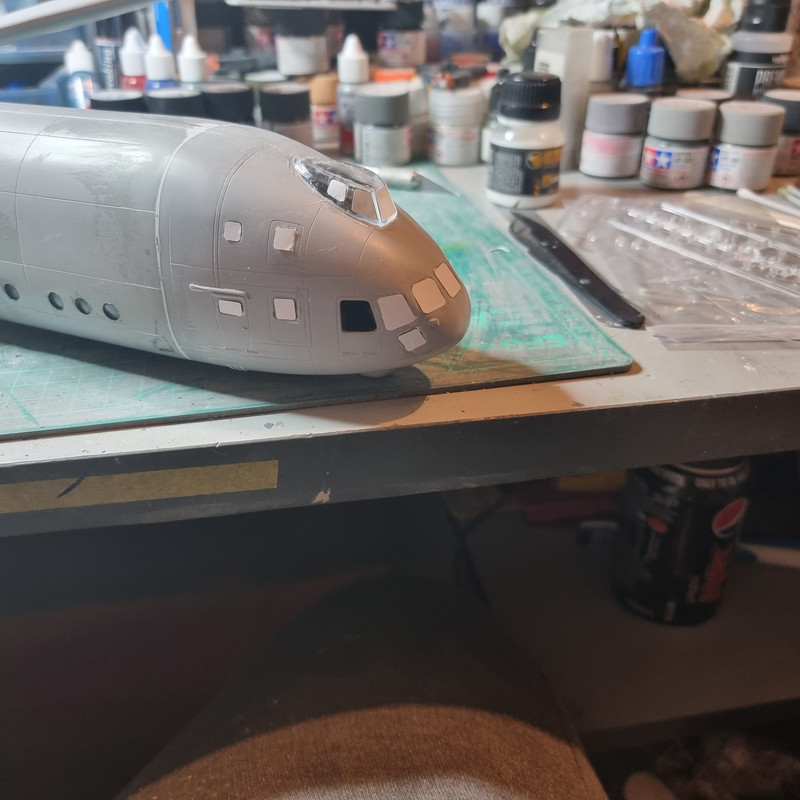
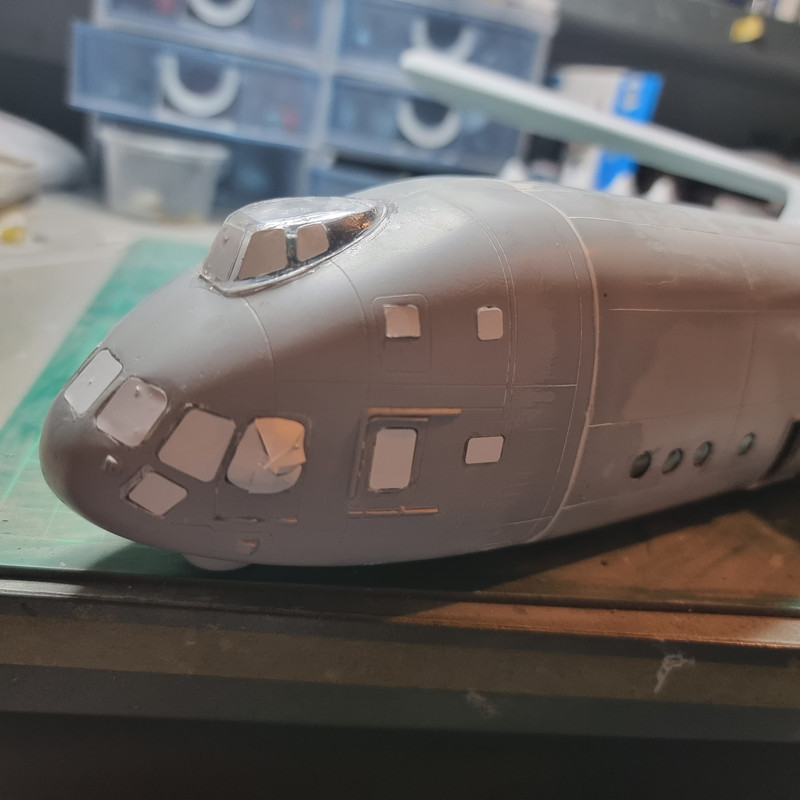
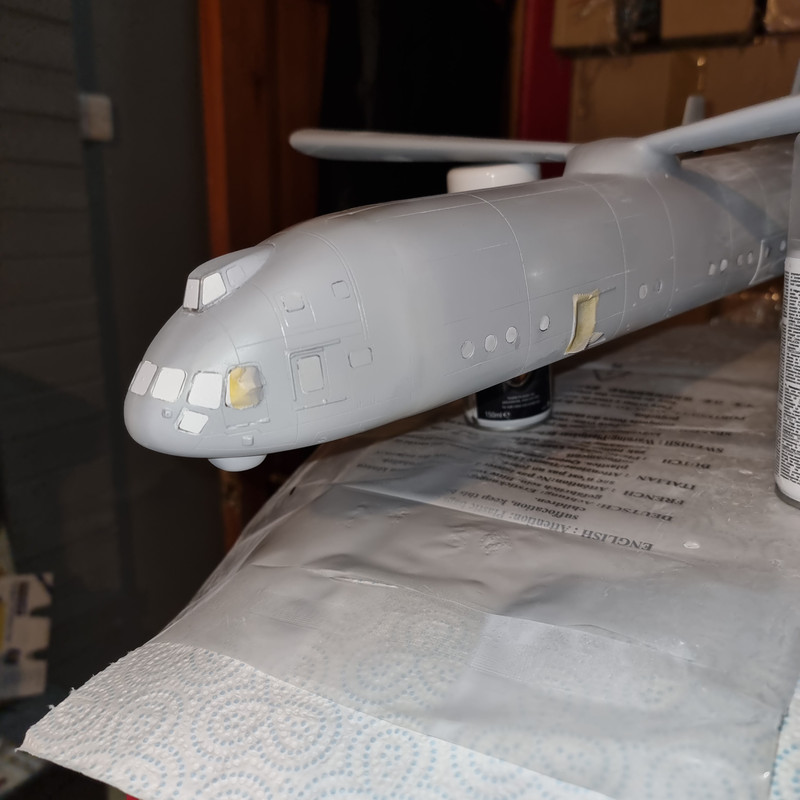
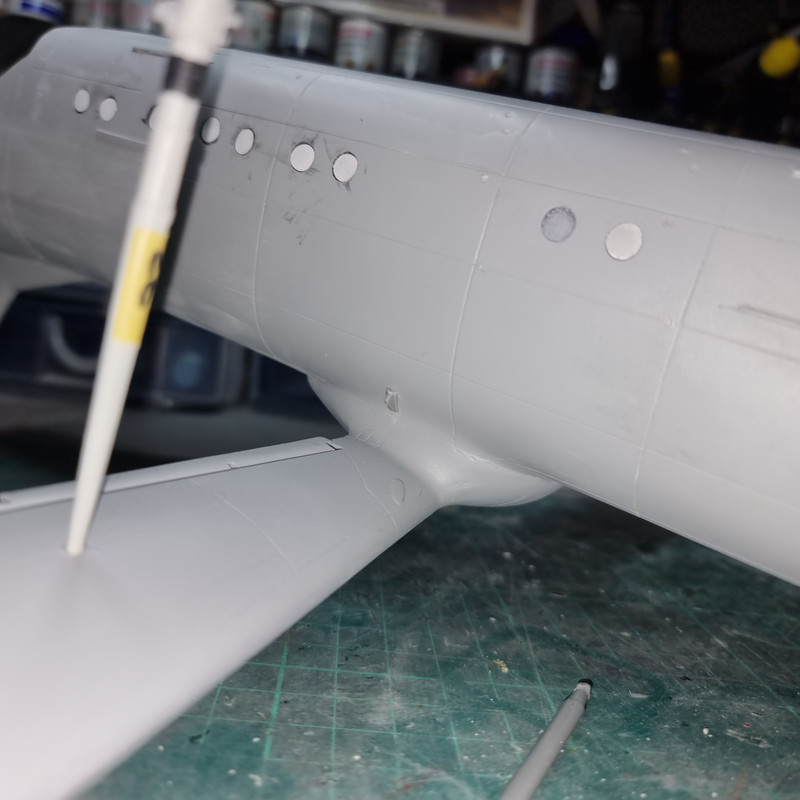
First on the bench today, I masked up 26 of the cabin windows using the masking kit - and two using Maskol. One of the things I noticed in daylight once the masks were on is a few windows have gone in at odd angles. Can't do anything about it though, just got to hope they don't stick out like a sore thumb once the paint goes on!
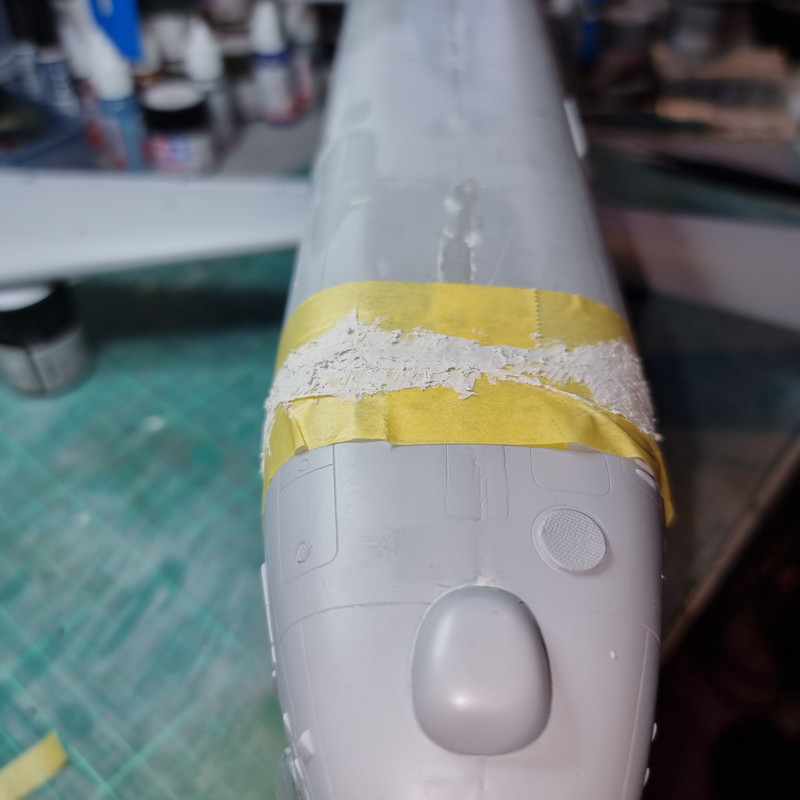
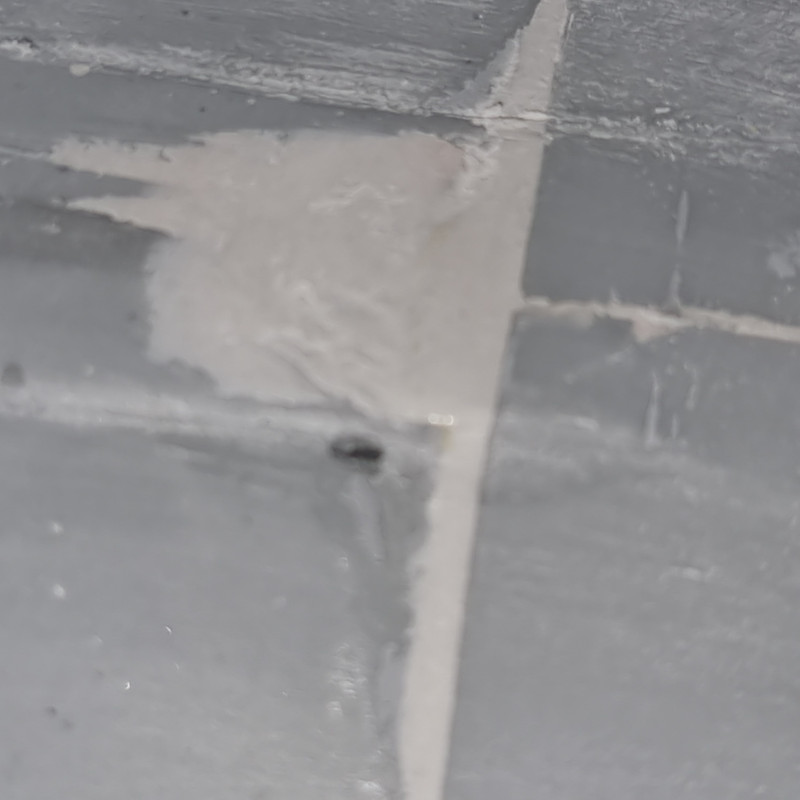
That all went well so I turned my attention to finishing the filler. And just to cure any potential complacency the damn thing bit me. Again. There must have been a void in the resin because this happened....
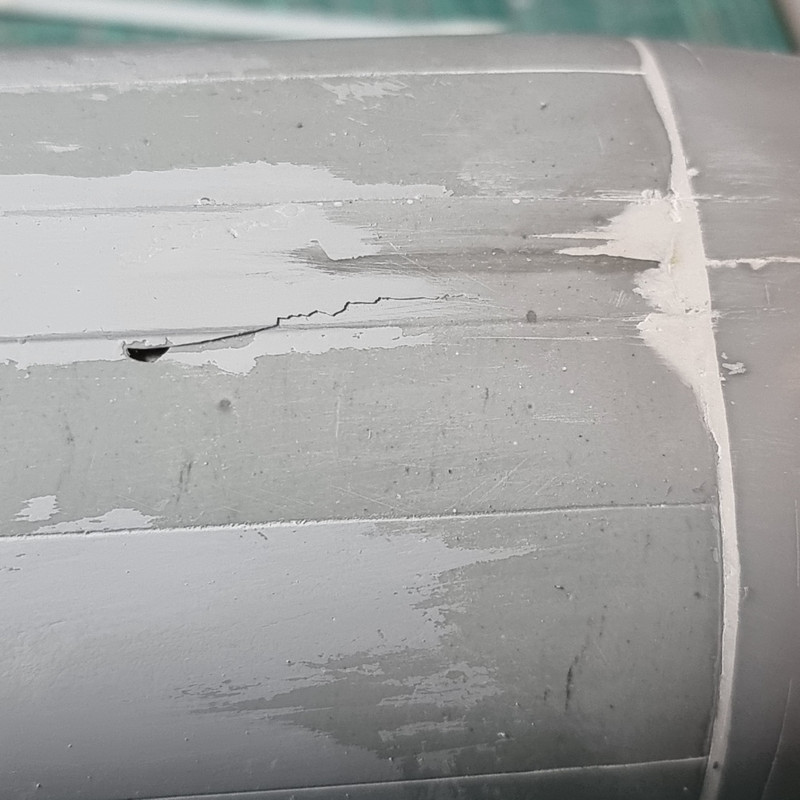
So that had to be treated, the hole was filled and I fed CA into the crack with a toothpick then skimmed that with filler. Whilst that was drying I cracked on with the floor problem on the Mi-6.
Once that batch of filler was dry it was - gently - sanded down and then the primer was applied
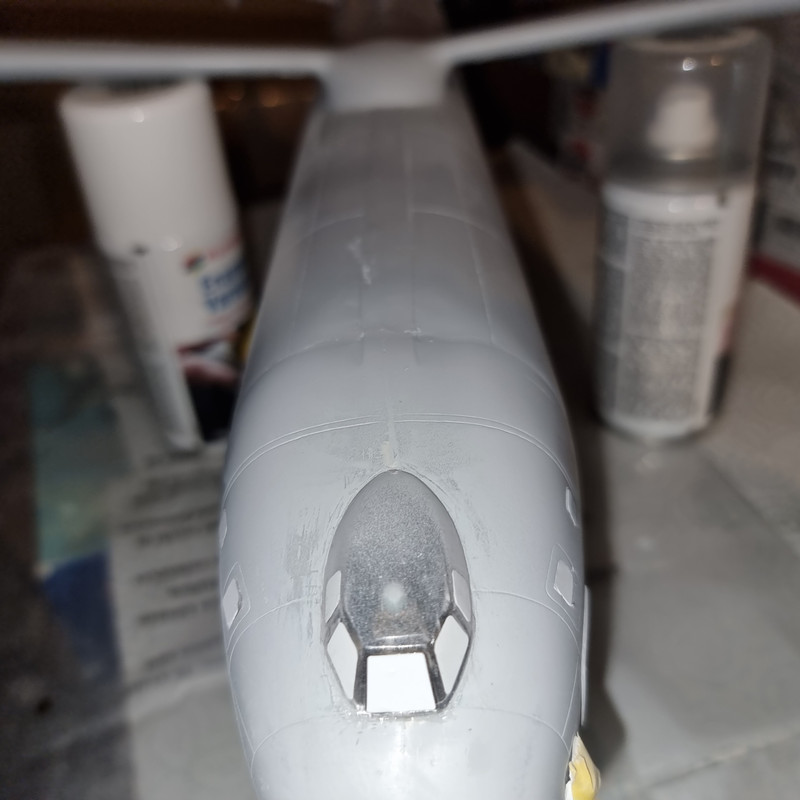
First sight - didn't loook too bad! But I'll wait till daylight tomorrow before passing judgement.
I don't think much will be needed though, looks mainly around the top.
Then comes the maze of bracing struts!!
Re: Mil Mi-V-12 - the BIG one!!
Posted: Fri Nov 03, 2023 10:48 pm
by RangerNeil
After a close look at the seam today in daylight its not as good as I hoped but not as bad as I feared so I'll.call that a win situation.
The filler is being left to dry thoroughly overnight so hopefully tomorrow will see this particular job done and dusted and then I can start tearing my hair out over the undercarriage bracing!!
Re: Mil Mi-V-12 - the BIG one!!
Posted: Sun Nov 05, 2023 1:04 am
by RangerNeil
OK - I am calling this seam done. I honestly don't think I can get it any better and not lose my sanity in the depths of tubes of filler and sanding sticks.
So - just need to rescribe some panel lines and then we move onto the main undercarriage and its myriad bracing struts on both sides.....
Another test of sanity in the making..

Re: Mil Mi-V-12 - the BIG one!!
Posted: Sun Nov 05, 2023 1:41 am
by digger303
Re: Mil Mi-V-12 - the BIG one!!
Posted: Fri Nov 10, 2023 8:48 pm
by RangerNeil
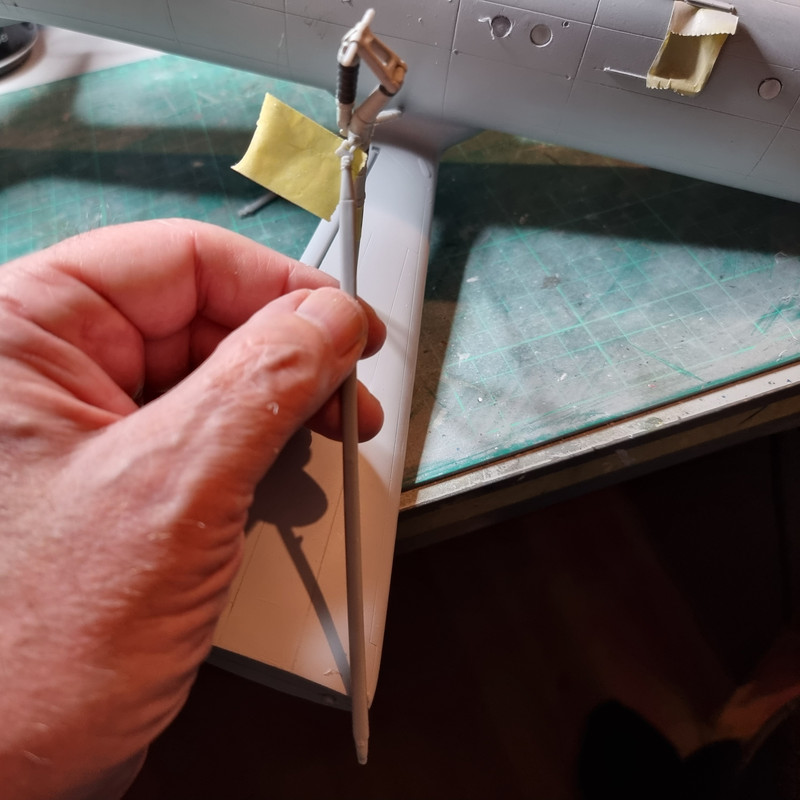
Work resumes at last on the big bird. I took the option , when I bought the CA, of getting the slow setting form and already this has paid off.
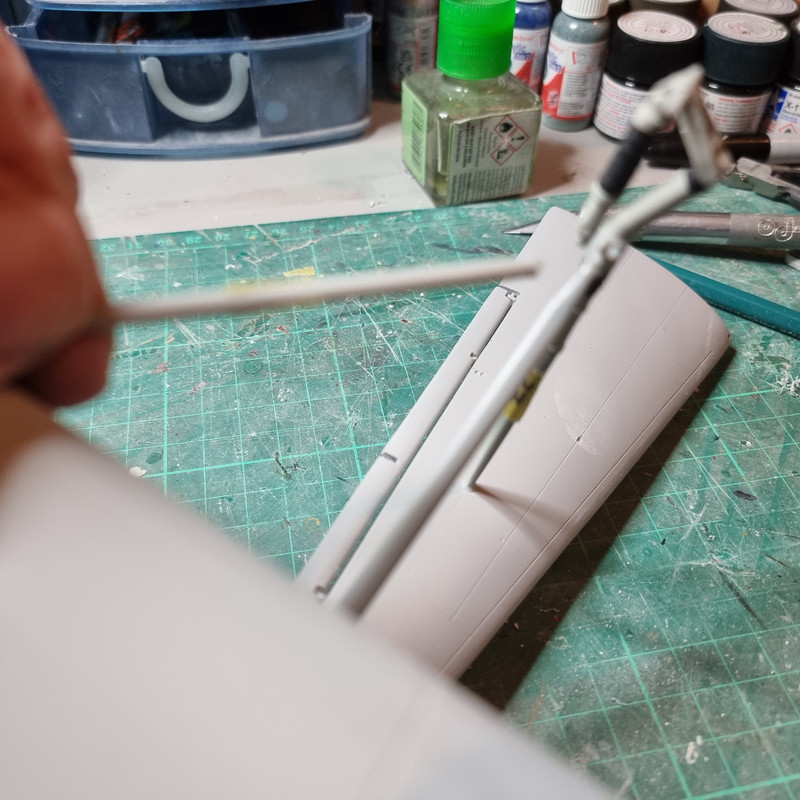
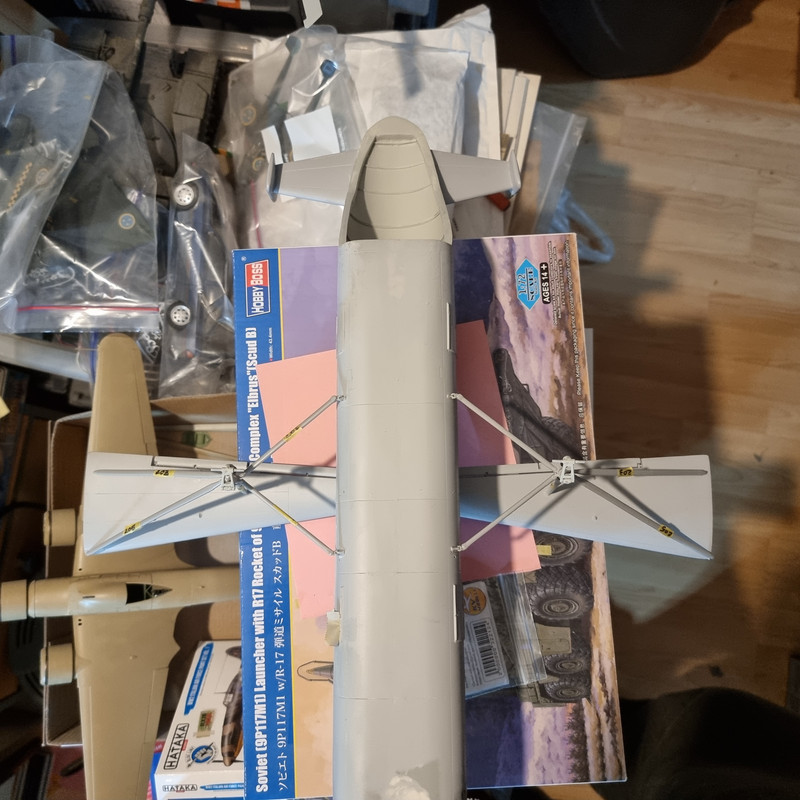
The main undercarriage legs are now in the wings - height to axles checked each side (92mm) and the alignment vertically and across the assembly.
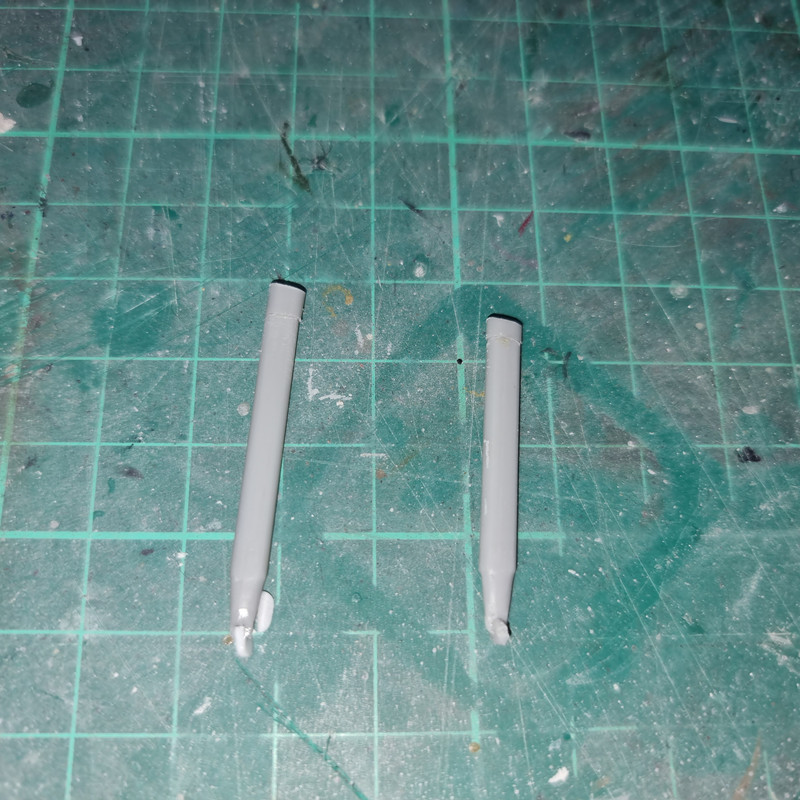
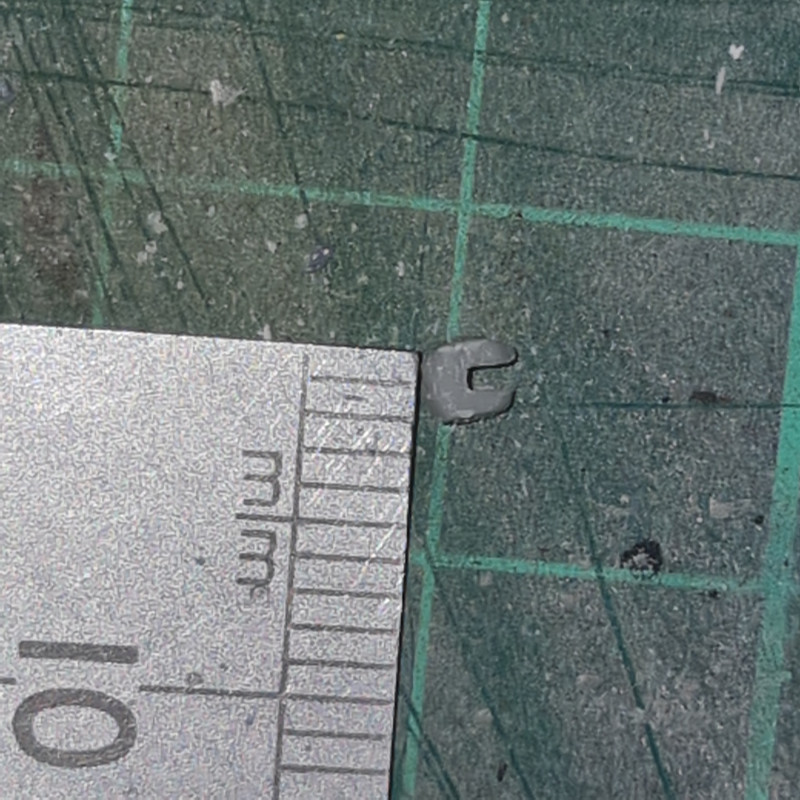
And the first of about 40 teeny weeny mounting brackets is on each side.
In case you can't see it......
Re: Mil Mi-V-12 - the BIG one!!
Posted: Mon Nov 13, 2023 9:34 pm
by RangerNeil
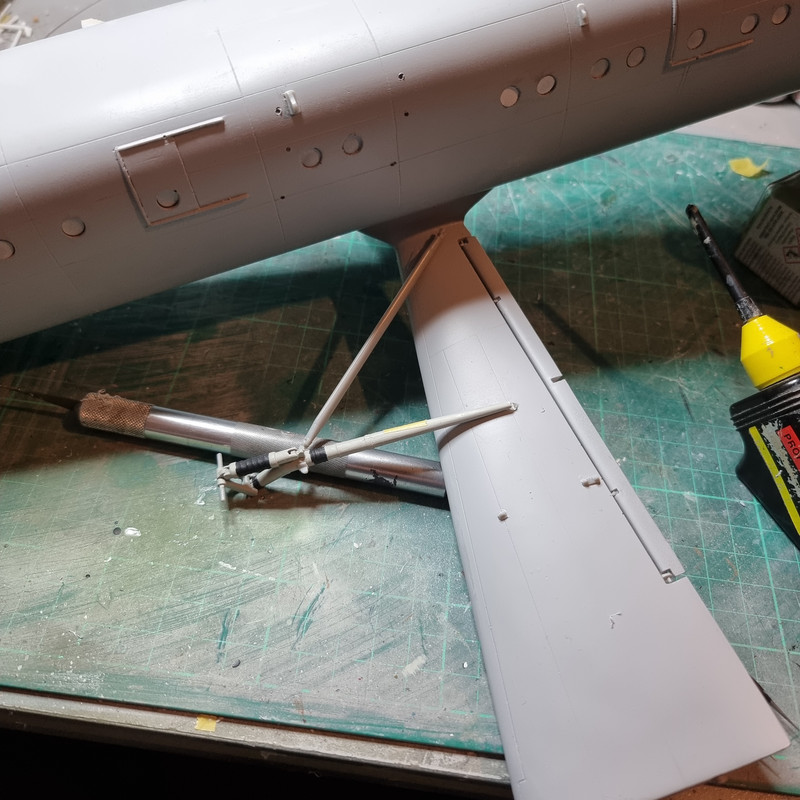
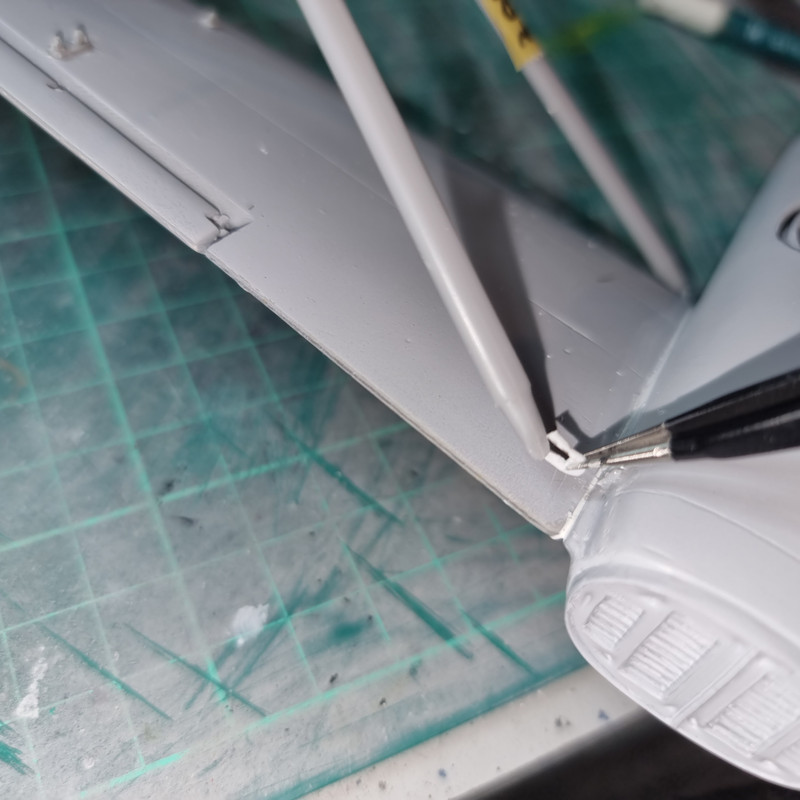
Started back on the bigger Mil tonight. Firstly I found - probably to be expected - that none of the brackets, rod ends and fixing points fitted without a LOT of work in thinning out pads and opening slots. I got the main leg to body braces on and was a bit disturbed to find I had to move the undercarriage legs outward to get that end in. Which then put the axles at odd angles.
I then went to add the Vee shaped lower braces from the fuselage to the undercarriage legs.
Surprise surprise - they are some 10mm short.....

I've checked and rechecked to make sure the correct brace has been used - it is. And also that the upper mount is the right position - it is. So I think I need to break out the CA debonder tomorrow and release the top mounts, reposition them and see if I neeed to take a section out of the brace length.
Meantime the outer brace mount points have been fitted so I can try them first because if I am right - these will look to be too long!!
This kit is seriously doing my head in!!!!

Re: Mil Mi-V-12 - the BIG one!!
Posted: Mon Nov 13, 2023 10:23 pm
by DRUMS01
Why not leave what you have attached. Then just use your side cutters or sprue cutter to remove a small portion out of the center of the brace going from the fuselage to the strut (just enough to bring it back to vertical)? You may find that the 10mm will be brought back close to correct once the struts are back to normal. As for the other braces still to be attached, you will just need to add or remove as needed to keep the main strut parallel with the fuselage. Just a thought....
Are you going to re-scribe the panel lines and perhaps add rivets to the sheet metal? For something that large it would make quite the impact.
Also wondering if you ever found the other figures for the missile crew?
Re: Mil Mi-V-12 - the BIG one!!
Posted: Tue Nov 14, 2023 12:00 am
by digger303
Re: Mil Mi-V-12 - the BIG one!!
Posted: Tue Nov 14, 2023 1:46 pm
by RangerNeil
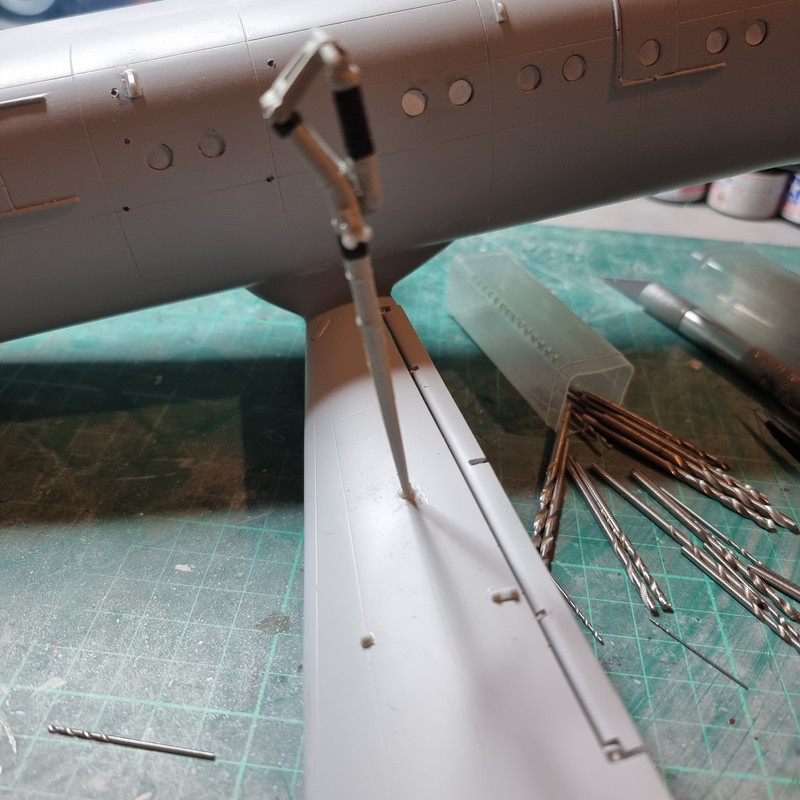
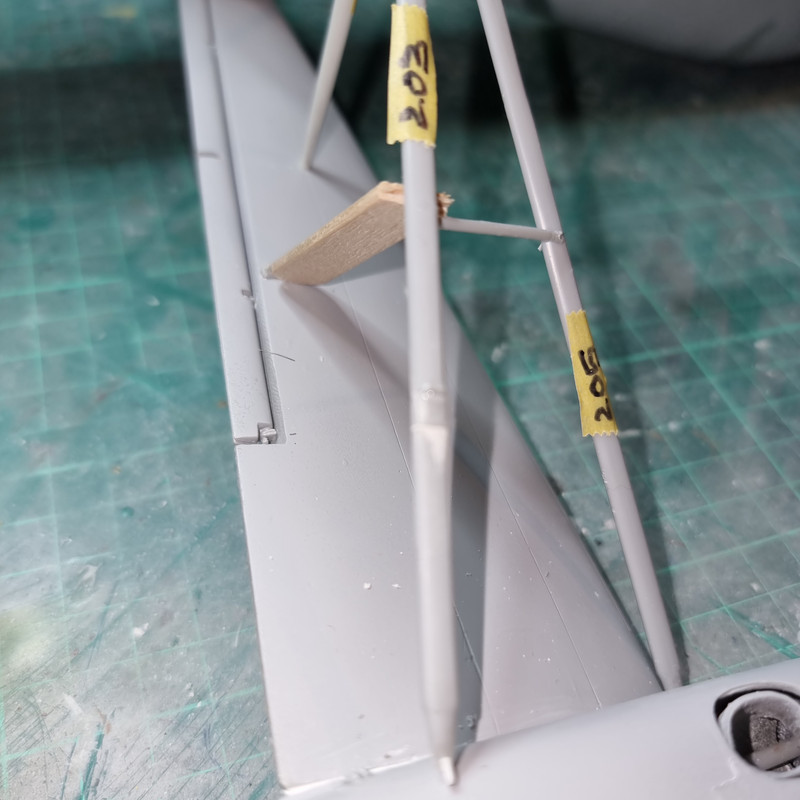
I tried the outboard braces late last night and, as expected, they were too long. So I popped the top mounts off to let the under carriage legs spring back and most every thing else fits - more or less.
I'm leaving those inboard ones loose at the top for now until the others are in place then I can work out how much I need to shorten them.
Typically Amodel - they actually provided location holes for the brace mounts on the resin wings and fuselage - but then half the mounts don't have the corresponding pins on their undersides so positioning them is a case of best guess/trial & error. Getting that slow setting gel CA is really paying off now as I can tweak the positioning to suit.
Re: Mil Mi-V-12 - the BIG one!!
Posted: Tue Nov 14, 2023 9:16 pm
by RangerNeil
DRUMS01 wrote: Mon Nov 13, 2023 10:23 pm
Why not leave what you have attached. Then just use your side cutters or sprue cutter to remove a small portion out of the center of the brace going from the fuselage to the strut (just enough to bring it back to vertical)? You may find that the 10mm will be brought back close to correct once the struts are back to normal. As for the other braces still to be attached, you will just need to add or remove as needed to keep the main strut parallel with the fuselage. Just a thought....
Are you going to re-scribe the panel lines and perhaps add rivets to the sheet metal? For something that large it would make quite the impact.
Also wondering if you ever found the other figures for the missile crew?
Yes, panel lines will rescribed once I get to a point where it won't interfere with other work - or vice versa!! Still looking for a suitable set of figures. Saw a set on eBay - Revell cold war Russians if memory serves - but got out bid - by quite a lot!!!
It turned out to be easier to remove those struts as they kept catching on panel lines and such. I'd have needed a 3rd hand to have left them on.
You can see here how much its pushed the the outer struts out of place:
With the inner struts removed and the legs back into place the outer brace and the lower inners fitted relatively (
this IS Amodel we are talking about!!) well. So I flipped the model around to do the other side, cut the first of the struts off the sprue, reached for the mould line remover - and disaster!! My hand caught the unbraced leg and SNAP!!! What I'd feared since starting this phase happened, the leg snapped off at the wing surface......
After a comprehensive bout of swearing VERY loudly - and barely resisting the urge to open the window and launch the bl@#dy thing I got a grip and looked at the damage. And started swearing again. I was worried a solid leg would be a weak spot - this was hollow!! Inner bore was only 0.5mm but enough to weaken the leg. A quick raid on the wifes dress making supplies yielded a 0.6mm dia pin that was cut to length, pushed into the leg with CA and then into the stub in the wing, again with CA. That got me a leg back in place.
This was then set aside to set hard whilst I had a go at the Mi-6 fuselage, another wonder of Amodel design excellence.....

After an hour or so I checked the hardness and it was OK to continue so the outer and inner lower braces are now on and drying.
The rearmost outers are unsecured at the outer ends as they locate onto brackets that gomonto the engine pods and those don't go on till the end.
Re: Mil Mi-V-12 - the BIG one!!
Posted: Wed Nov 15, 2023 12:07 am
by digger303
Re: Mil Mi-V-12 - the BIG one!!
Posted: Thu Nov 16, 2023 8:15 pm
by RangerNeil
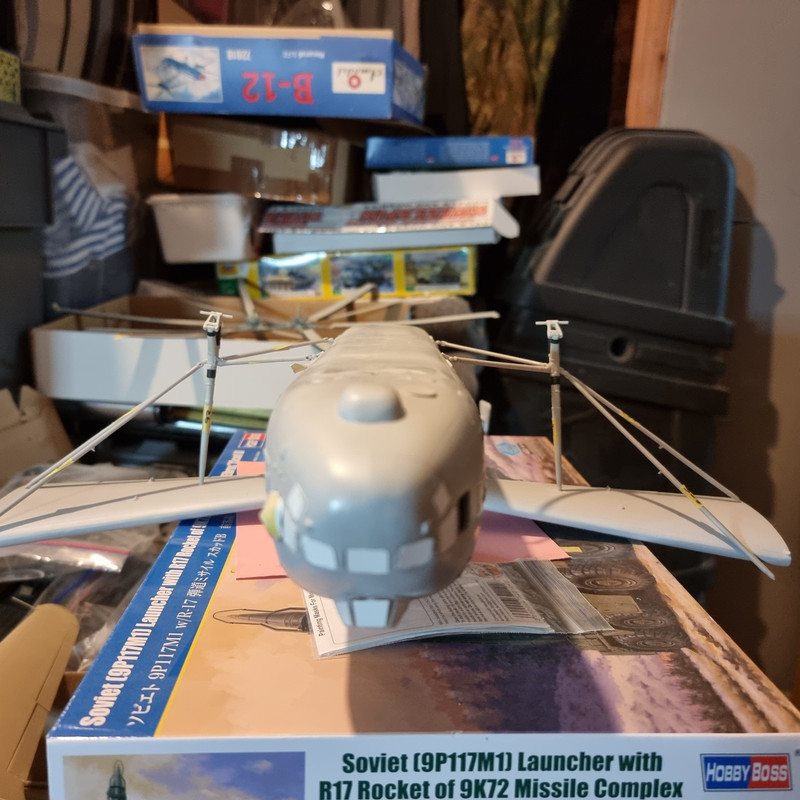
Engine pods went on today, not supposed to go on yet according to the instructions but the rear outer brace goes onto a mount on the side of the pod. I thought they looked a bit short for where they are meant to go and with the pods on it seems I am right
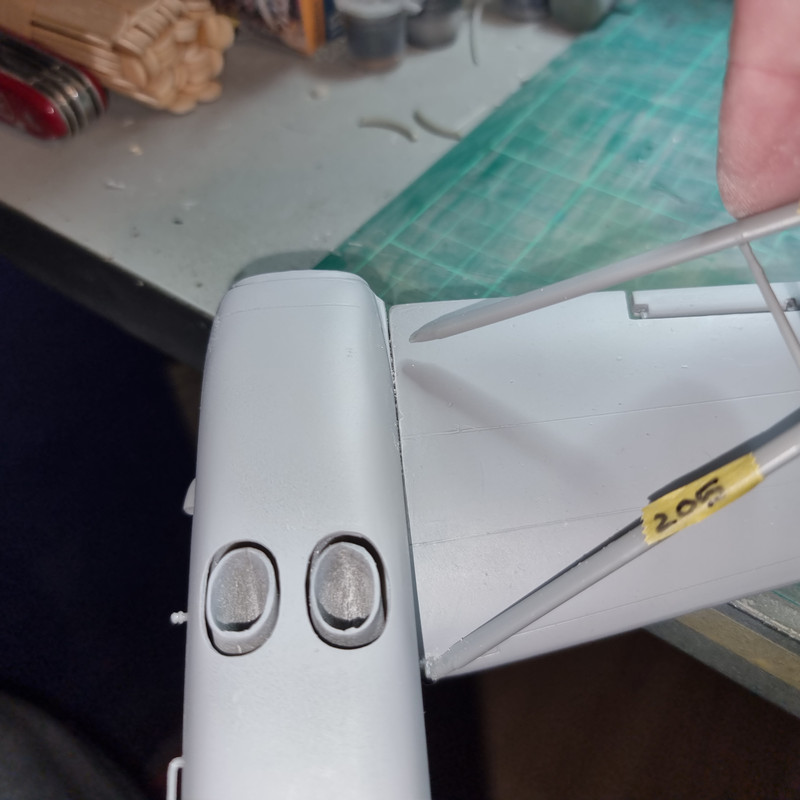

On the positive side the basic bracing is completed. Just got to add the 4 intermediate braces and its completed. Taking the weight of the model nicely too.
I had to cut 12mm out of those vertical inner braces to get them to fit. There was a step at each end so I cut the top end off at the step with a razor saw, cut 5mm out of the strut, measured it up - still too long so cut another 2mm. Still too long so I cut another 2mm and it fitted perfectly.
Re: Mil Mi-V-12 - the BIG one!!
Posted: Thu Nov 16, 2023 9:53 pm
by digger303
Re: Mil Mi-V-12 - the BIG one!!
Posted: Sun Nov 19, 2023 6:27 pm
by RangerNeil
As expected the rear outer struts were too short. But heres the odd thing - not by the same amount! One side was out by about 2.5mm whilst the other side was out was short by about 5mm.
Luckily I kept the sections cut out of the inner vertical struts and they are the same profile. So the struts were cut by saw and then 2 of the cut out sections shaped to fit.
These, again, are being left to set overnight even though CA was used to join them. Tomorrow they get joined to the main body of the strut - and again left for 24 hours to set before filling and sanding.
Annoyingly one of the teeny weeny connectors between the strut and the engine pod pinged off into the jaws of the carpet monster so I had to make another from plastic card.
Re: Mil Mi-V-12 - the BIG one!!
Posted: Sun Nov 19, 2023 11:35 pm
by digger303
Re: Mil Mi-V-12 - the BIG one!!
Posted: Mon Nov 20, 2023 2:49 am
by aur0ra145
Oof carpet monster strikes again!
Re: Mil Mi-V-12 - the BIG one!!
Posted: Tue Nov 21, 2023 4:16 pm
by Tomcat64
It's taken me two days to catch up on this build as I ran out of time yesterday - this is properly insane

The aircraft is insane
The kit is insane
The build is insane
I am seriously blown away by the way you've stuck with this filler queen and not only sorted out the inadequacies that A-Model threw at you but also added the extra details.
The ribbed cargo hold looks superb and it's truly awesome to see all those subassemblies finally coming together.
Sorry if I missed it but did you ever get that missing cockpit window sorted out? And if it's not too late I'd give a vote for the Ultimate Apex as well - I've picked up a couple of them over the years and they're pretty much all I use.
Awesome work mate - absolutely awesome
Re: Mil Mi-V-12 - the BIG one!!
Posted: Tue Nov 21, 2023 6:22 pm
by smokeriderdon
This does not fill me with the urge to do the Amodel C-123 I have. LOL
Re: Mil Mi-V-12 - the BIG one!!
Posted: Tue Nov 21, 2023 6:31 pm
by RangerNeil
Tomcat64 wrote: Tue Nov 21, 2023 4:16 pm
It's taken me two days to catch up on this build as I ran out of time yesterday - this is properly insane
The aircraft is insane
The kit is insane
The build is insane
I am seriously blown away by the way you've stuck with this filler queen and not only sorted out the inadequacies that A-Model threw at you but also added the extra details.
The ribbed cargo hold looks superb and it's truly awesome to see all those subassemblies finally coming together.
Sorry if I missed it but did you ever get that missing cockpit window sorted out? And if it's not too late I'd give a vote for the Ultimate Apex as well - I've picked up a couple of them over the years and they're pretty much all I use.
Awesome work mate - absolutely awesome
Thank you for the kind words - they've given the sagging mojo a much needed boost!! I'm spending hours these day with little, if anything to show for it - more on that in a moment.
No joy on the missing window yet. First email got a request for a shipping address - since then silence!! I'll drop them another email later this week to see if they respond. But the agent is in Poland and the company is Ukrainian - under the circumstances ailence is not surprising really.
Thanks for the vote on the Apex - pulled a crafty one at the weekend, daughter Mk1 askedwjat I wanted for Xmas - so I gave her the link to the Ultimate page for the Apex... We'll see what happens come Xmas!
Back to the beast now. After a few hours today one strut is lengthened - but had sagged despite being clamped so its had another dose of CA and is propped letting gravity remove the sag.
The other side is glued and clamped and setting overnight. Hopefully this one won't sag so tomorrow the gaps can be filled and sanded. But I'm not holding my breath........