The paintjob on that interior really blew me away. Great job.
I do wonder how one should display full interior kits though. I've got two Rye Field full interior Tiger 1s and I'm not quite sure if I should put them on dioramas and just leave all the hatches open or if I should make a display that shows off the interior.
Attila's 1:35 Tiger I from Academy
Moderator: T3hGuppy
-
TheNordus
- Master Sergeant

- Posts: 453
- Joined: Wed Jul 02, 2014 10:03 pm
- Location: Finland

Re: Attila's 1:35 Tiger I from Academy
-Tommi
There's always armour on my work bench.
There's always armour on my work bench.
-
papatika

- Master Sergeant
- Posts: 382
- Joined: Thu Jun 05, 2014 11:12 am
- Location: Budapest, Hungary

Re: Attila's 1:35 Tiger I from Academy
Kevthemodeller wrote: ↑Tue Oct 24, 2017 8:18 am Some excellent work going on here mate. top stuff
I'm going to watch this build with great interest.
Thank you, Gentlemen!
Thanks m8! I think you have basically 3 options:TheNordus wrote: ↑Tue Oct 24, 2017 9:19 pm The paintjob on that interior really blew me away. Great job.
I do wonder how one should display full interior kits though. I've got two Rye Field full interior Tiger 1s and I'm not quite sure if I should put them on dioramas and just leave all the hatches open or if I should make a display that shows off the interior.
- make a diorama/vignette, and you can show the interior by decoupling it by hand. I think this is the most impressive, but less suitable for competitions and a lot of stress for the paint job, or
- display it decoupled by placing the parts next to each other, or on some clear rods. This way you can show everything without touching it, but the power of surprise will be lost, and in vignette / dio it would look strange. Or
- make a cutaway so that you don't have to touch the finished model and still let the viewers to see the fine details inside. This way you can have a vignette or diorama, but some of the details will be hidden, the interior won't be visible from a distance because of lack of light inside the vehicle. (Interesting would be to add LED lights)
Personally I will go for the first option, and will decouple it by hand.


-
TheNordus
- Master Sergeant
- Posts: 453
- Joined: Wed Jul 02, 2014 10:03 pm
- Location: Finland
Re: Attila's 1:35 Tiger I from Academy
Yeah, I do think that's the best option. I wouldn't trust myself to make a cutaway.papatika wrote: ↑Tue Oct 24, 2017 10:41 pm
Thanks m8! I think you have basically 3 options:
- make a diorama/vignette, and you can show the interior by decoupling it by hand. I think this is the most impressive, but less suitable for competitions and a lot of stress for the paint job, or
- display it decoupled by placing the parts next to each other, or on some clear rods. This way you can show everything without touching it, but the power of surprise will be lost, and in vignette / dio it would look strange. Or
- make a cutaway so that you don't have to touch the finished model and still let the viewers to see the fine details inside. This way you can have a vignette or diorama, but some of the details will be hidden, the interior won't be visible from a distance because of lack of light inside the vehicle. (Interesting would be to add LED lights)
Personally I will go for the first option, and will decouple it by hand.
-Tommi
There's always armour on my work bench.
There's always armour on my work bench.
-
Stokesy44

- Major General

- Posts: 8674
- Joined: Thu Jun 18, 2015 10:13 am
- Location: The Midlands, UK

Re: Attila's 1:35 Tiger I from Academy
Really nice work on the turret interior. Love the panzer glass for the vision slits - very cool
Its been tried and tested, it works! So don't blame the system if you're no good. 
-
Tomcat64

- Brigadier General

- Posts: 7150
- Joined: Thu Sep 22, 2016 3:24 pm
- Location: Swindon, UK

Re: Attila's 1:35 Tiger I from Academy
Fabulous work inside the turret again mate - I really hope you find a way to show it off.
Cheers, Neil
On the Bench:
Revell 1/72 Millennium Falcon - stalled due to stupidity
Tamiya 1/35 Stegosaurus Stenops
Tamiya 1/35 Sherman Firefly VC
On the Bench:
Revell 1/72 Millennium Falcon - stalled due to stupidity
Tamiya 1/35 Stegosaurus Stenops
Tamiya 1/35 Sherman Firefly VC

-
papatika
- Master Sergeant
- Posts: 382
- Joined: Thu Jun 05, 2014 11:12 am
- Location: Budapest, Hungary
Re: Attila's 1:35 Tiger I from Academy
Thank you guys!
Fasten your seat belts, Sergio, we are closing in!SergioSolo wrote: ↑Wed Sep 20, 2017 6:23 pm Looks great! I've been curious about those Zimmerit PE. Can't wait for more updates!
Yesterday evening I opened the second PE set, the zimmerit. It looks nice, but maybe a bit too shallow. Maybe not. I've checked several references and I have the feeling that the depth / height of the ripples was not constant. I cut out and glued on the front plate.

Now, the front plate can be removed to reveal the transmission. I'd like to keep this option, but the whole horizontal plate shall be covered by the zimmerit, without interruption if possible. Currently the front edges of the hull (and a bit of the side ones too) are visible from above.

This means that the horizontal plate is smaller then the PE.

If I would like to keep it openable, I have to do some modifications. Hmm... maybe I start another project, with no PE, state_of_the_art molding, which just falls together...
-
papatika
- Master Sergeant
- Posts: 382
- Joined: Thu Jun 05, 2014 11:12 am
- Location: Budapest, Hungary
Re: Attila's 1:35 Tiger I from Academy
Hi all!
Zimmerit coating is ready! The preparation took a lot of time, but applying the PE went almost smooth.
We left over where I had problems with the PE, which wouldn't allow to open the nose of the hull. I had to reshape these joints first.
In the first step I extended the horizontal plate to the size of the PE using styrene, and let the glue dry 24 hrs.

While the glue was drying I filed down the sidewalls' edges to have a 45°(or more) angle instead of the 90.

The next day I sanded the extended plate to have a 45°or less.

It was hard to see the progress, so from time to time I stopped and painted the surface (especially the edges) with a permanent marker.

Test fitting, marking, sanding, test, mark, sand... on both parts. It was loooong and tedious (took 2 days ), but it's ok now.


I had one minor issue with the PE. When I was working on the inside of the turret I glued the escape hatch into it's position. And glued the hinge on, because why not? It is part of the turret. Well, turned out that the PE does not have a cutout there, only a small hole for the locator pin of the hinge. It seems that the guys at Eduard thought that it is absolutely fine that the zimmerit coat goes underneath a welded-on part.

I just cut is out at the end. Another small modification on the zimmerit: it was a little bit longer than needed (about 1mm). The escape hatch's area was perfect to cut the PE into 2, and shorten one of them.

I was thinking a lot about how to glue the PE to the hull. Usually I use CA glue. But these are pretty big parts and I can glue them only in smaller sections before the glue drys. And if I'm not fast enough, the glue will harden and create all sort of bumps. To remove the bumps the PE shall be removed, and it will badly bend for sure... If I use thin CA, it might bleed out at the edge, and run into the zimmerit texture... Because large, flat surfaces meet, and one of them is plastic, I gave a try to Tamiya Extra Thin. It melts the plastic, and the melted plastic can adhere to the metal. I also sanded the back part of the PE to have a better grip on it. And if I screwed up, no bumps were created, and I could remelt the plastic to remove the PE with ease. When the glue ran into the zimmerit texture, it evaporated without any residue. Now I leave the glue to dry for at least 2 days, and we'll see. Until now it looks fine.
Here is a 360 for you, guys:


Nose (one of the PE seams to be a bit too short)

Butt

As always thank you everybody for reading my status report, asking questions, leaving comments, or just dropping in and stopping by for a few moments!
Cheers,
Attila
Zimmerit coating is ready! The preparation took a lot of time, but applying the PE went almost smooth.
We left over where I had problems with the PE, which wouldn't allow to open the nose of the hull. I had to reshape these joints first.
In the first step I extended the horizontal plate to the size of the PE using styrene, and let the glue dry 24 hrs.
While the glue was drying I filed down the sidewalls' edges to have a 45°(or more) angle instead of the 90.
The next day I sanded the extended plate to have a 45°or less.
It was hard to see the progress, so from time to time I stopped and painted the surface (especially the edges) with a permanent marker.
Test fitting, marking, sanding, test, mark, sand... on both parts. It was loooong and tedious (took 2 days
I had one minor issue with the PE. When I was working on the inside of the turret I glued the escape hatch into it's position. And glued the hinge on, because why not? It is part of the turret. Well, turned out that the PE does not have a cutout there, only a small hole for the locator pin of the hinge. It seems that the guys at Eduard thought that it is absolutely fine that the zimmerit coat goes underneath a welded-on part.
I just cut is out at the end. Another small modification on the zimmerit: it was a little bit longer than needed (about 1mm). The escape hatch's area was perfect to cut the PE into 2, and shorten one of them.
I was thinking a lot about how to glue the PE to the hull. Usually I use CA glue. But these are pretty big parts and I can glue them only in smaller sections before the glue drys. And if I'm not fast enough, the glue will harden and create all sort of bumps. To remove the bumps the PE shall be removed, and it will badly bend for sure... If I use thin CA, it might bleed out at the edge, and run into the zimmerit texture... Because large, flat surfaces meet, and one of them is plastic, I gave a try to Tamiya Extra Thin. It melts the plastic, and the melted plastic can adhere to the metal. I also sanded the back part of the PE to have a better grip on it. And if I screwed up, no bumps were created, and I could remelt the plastic to remove the PE with ease. When the glue ran into the zimmerit texture, it evaporated without any residue. Now I leave the glue to dry for at least 2 days, and we'll see. Until now it looks fine.
Here is a 360 for you, guys:
Nose (one of the PE seams to be a bit too short)
Butt
As always thank you everybody for reading my status report, asking questions, leaving comments, or just dropping in and stopping by for a few moments!
Cheers,
Attila
Last edited by papatika on Sun Oct 29, 2017 12:20 pm, edited 1 time in total.
-
Stokesy44
- Major General
- Posts: 8674
- Joined: Thu Jun 18, 2015 10:13 am
- Location: The Midlands, UK
Re: Attila's 1:35 Tiger I from Academy
Great work on applying that Zim. Special mention too for the work on the amended from plate 
Its been tried and tested, it works! So don't blame the system if you're no good.
-
Tomcat64
- Brigadier General
- Posts: 7150
- Joined: Thu Sep 22, 2016 3:24 pm
- Location: Swindon, UK
Re: Attila's 1:35 Tiger I from Academy
This is just fantastic work mate - you're raising the bar with every post 
Cheers, Neil
On the Bench:
Revell 1/72 Millennium Falcon - stalled due to stupidity
Tamiya 1/35 Stegosaurus Stenops
Tamiya 1/35 Sherman Firefly VC
On the Bench:
Revell 1/72 Millennium Falcon - stalled due to stupidity
Tamiya 1/35 Stegosaurus Stenops
Tamiya 1/35 Sherman Firefly VC
-
papatika
- Master Sergeant
- Posts: 382
- Joined: Thu Jun 05, 2014 11:12 am
- Location: Budapest, Hungary
Re: Attila's 1:35 Tiger I from Academy
Thank you guys!
-
pourquoi61

- Sergeant Major of the Army

- Posts: 1289
- Joined: Tue Feb 16, 2016 12:57 pm
- Location: Ilkeston, Derbyshire
Re: Attila's 1:35 Tiger I from Academy
The amount of work that you have put in is just mind blowing.
Fantastic.
Fantastic.

-
demarcation
- Command Sergeant Major

- Posts: 960
- Joined: Wed May 13, 2015 11:34 pm
- Location: Denmark

Re: Attila's 1:35 Tiger I from Academy
Wow!! This is a real jaw dropper!!  Brilliant work mate!!
//Anders
-
papatika
- Master Sergeant
- Posts: 382
- Joined: Thu Jun 05, 2014 11:12 am
- Location: Budapest, Hungary
Re: Attila's 1:35 Tiger I from Academy
pourquoi61 wrote: ↑Wed Nov 08, 2017 8:26 pm The amount of work that you have put in is just mind blowing.
Fantastic.
Thank you guys, I really appreciate it!demarcation wrote: ↑Sun Nov 19, 2017 11:42 am Wow!! This is a real jaw dropper!!
Lately private and office life prevented me from investing considerable time and effort into this project, but the build phase is basically completed now.
Where have I left off? I glued the PE zimmerit using plastic melted by Tamiya extra thin as an experience. Everything happens for reasons, and life proved it. I had no time to work on the tiger for 2 weeks or so - fortunately. For several days I numerously picked up the Tiger, turned around, checked, and put back where it was previously, because of lack of time. And one day, I saw this:

and this:

After 2 weeks the PE started to peel off. There was no sign of this disaster until this point. Conclusion: Tamiya Extra Thin and melted plastic is not enough to glue PE...
I glued everything back with CA this time. Checked each panel whether it wants to fall of or not. Interestingly not all panels had to be glued on again.
After fixing the zimmerit coating it was time to pimp up the exterior. The third Eduard PE set gave me a lot of work. Grills, clamps, straps all over.
First I started to play with the tools on the hull's roof.

Added some battle-damage on the storage bin for the eyes to look at...

... and some PE ofcourse

Added mud guards to the end (buildt using 8 parts each) ...

... and a smokedischarger. But after checking several photos I haven't find any mid Tiger equipped with this, so I snapped it off at the end.

Front mudguards are not so complex, on 6 pieces were needed

Next is to add some extra protection to the lower hull. The kit includes dozens of individual track links, but they do not have ice cleats on their surface, which was typical for the early variants. But since the running surface of the links won't be visible here, they were perfect for the job. I actually sanded them even more to be thinner, and applied more pressure to their lower end, so they need less room, still it is not visible from the top view.
This type of extra armor have been applied on the field. I could distinguish 2 basic types: a steel stripe welded between the drive gears, or a rod inserted through the holes made for the towing eyelets. I went for the first one.
During the dryfit I realized that there isn't too much material to glue it on.

So I built a thicker end. The outline of it is intentional. If I would get the task to weld a steel stripe on the Tiger's chase, which has to hold at least 10 track links (30 kg each), I would "laminate" steel stripes. Fast, easy, strong.

Glued on ...

... and in action:

The hatches had pretty big sinkmarks on them, I filled them with Tamiya putty.

Finally I added the tow cables, side skirts and the exhaust covers, and applied some "drama" on them...


So, this is how it looks like now. I think I have everything to accomplish the next step: painting the exterior.
As always thank you everybody for reading my status report, asking questions, leaving comments, or just dropping in and stopping by for a few moments!
Cheers,
Attila
-
TheNordus
- Master Sergeant
- Posts: 453
- Joined: Wed Jul 02, 2014 10:03 pm
- Location: Finland
Re: Attila's 1:35 Tiger I from Academy
(It's a bit late to remark on this now when the build is almost complete, but I didn't even know Academy made a mid-production version with an interior, I'd only heard of the early variant.)
It's looking lovely, mate. Shame about the zimmerit coming off, maybe you would do fine to apply some CA to the edges of the other sheets so they don't peel off? I like the battle damage you did on the stowage bin, except for the big crack. Just my opinion though.
You did really great on those PE clamps, I don't think I could do the same. I tried a few on my Jagdpanther and it wasn't very fun at all. I'll probably try doing it on my Tiger 2 and see how that goes. That extra smoke discharger is also interesting, I've never seen anything like that. Possibly the worst part about working with PE for me is when they ask you to roll something into a tube like that, it never works out for me.
Ever since I started painting my tools and towcables off the tank and only gluing them on after painting I haven't been able to go back, it's just so easy when you don't have to watch spilling tool colours on the camouflage.
-Tommi
There's always armour on my work bench.
There's always armour on my work bench.
-
papatika
- Master Sergeant
- Posts: 382
- Joined: Thu Jun 05, 2014 11:12 am
- Location: Budapest, Hungary
Re: Attila's 1:35 Tiger I from Academy
Thank you!TheNordus wrote: ↑Tue Nov 21, 2017 10:58 pm (It's a bit late to remark on this now when the build is almost complete, but I didn't even know Academy made a mid-production version with an interior, I'd only heard of the early variant.)
It's looking lovely, mate. Shame about the zimmerit coming off, maybe you would do fine to apply some CA to the edges of the other sheets so they don't peel off? I like the battle damage you did on the stowage bin, except for the big crack. Just my opinion though.
You did really great on those PE clamps, I don't think I could do the same. I tried a few on my Jagdpanther and it wasn't very fun at all. I'll probably try doing it on my Tiger 2 and see how that goes. That extra smoke discharger is also interesting, I've never seen anything like that. Possibly the worst part about working with PE for me is when they ask you to roll something into a tube like that, it never works out for me.
Ever since I started painting my tools and towcables off the tank and only gluing them on after painting I haven't been able to go back, it's just so easy when you don't have to watch spilling tool colours on the camouflage.
It is actually based on the molds of the early version. You still can find the early type drive wheel, cupola, track links. Even the instruction contains parts for early type, for example the Feifel filters. The simplified ones, which have been introduced in March 1943, and discontinued in October, thus some of the mid era Tigers (July 1943 - February 1944) were equipped with them.
When I decided to try Extra Thin I had a pretty bad CA. It was not thin enough to flow in without leaving a nice mark on the edge. But it sounds to be a good idea to mix Extra Thin with CA. ET allows you to put it into position and holds firmly when dried. Then coming back with a really thin CA would bind things together hard.
Yes, the crack seems really bad on the photos. My original intention wasn't a crack, but a deep dent, which can be caused by a large branch. You were right, I didn't like it either, so I improved it using some jewelers' files, it looks better now. Thanks for pointing that out!
I also like to paint tools separately, but with the clamps... ummm... nope...
-
ElCapitan

- Chief Warrant Officer 2

- Posts: 1725
- Joined: Sun Aug 14, 2016 10:59 pm
- Location: Glasgow

Re: Attila's 1:35 Tiger I from Academy
Amazing amount of details, I can't wait to see it with paint on!! You've done such a good job with all the PE
Rob
ElCapitan
ElCapitan
-
papatika
- Master Sergeant
- Posts: 382
- Joined: Thu Jun 05, 2014 11:12 am
- Location: Budapest, Hungary
Re: Attila's 1:35 Tiger I from Academy
Thanx Rob! I also can't wait to see it with paint on. The problem is that it won't go on by itself...
-
Stokesy44
- Major General
- Posts: 8674
- Joined: Thu Jun 18, 2015 10:13 am
- Location: The Midlands, UK
Re: Attila's 1:35 Tiger I from Academy
Looking really good mate. The metal skirts and shrouds look the business. Looking forward to seeing the painting started.
Its been tried and tested, it works! So don't blame the system if you're no good.
-
TommyKillander

- Chief Warrant Officer 5

- Posts: 2776
- Joined: Sat Dec 27, 2014 1:59 pm
- Location: Gothenburg, Sweden

Re: Attila's 1:35 Tiger I from Academy
The Tiger looks fantastic!
Good luck with the painting
Tommy
Good luck with the painting
Tommy
-
papatika
- Master Sergeant
- Posts: 382
- Joined: Thu Jun 05, 2014 11:12 am
- Location: Budapest, Hungary
Re: Attila's 1:35 Tiger I from Academy
Thank you guys!TommyKillander wrote: ↑Fri Nov 24, 2017 7:42 pm The Tiger looks fantastic!
Good luck with the painting
Tommy
I'm not a big fan of "rivet counting". For me the visuals, the story behind is more important, then the accuracy. Still I like to do researches and be historically accurate. So before painting I spent a lot of time to find accurate camo descriptions about the vehicles of 101st battalion in France, 1944.
This one for is a 3 color pattern made of thin lines:
(http://www.alanhamby.com/paints.shtml)
Some more 3 tone patterns with thick lines:
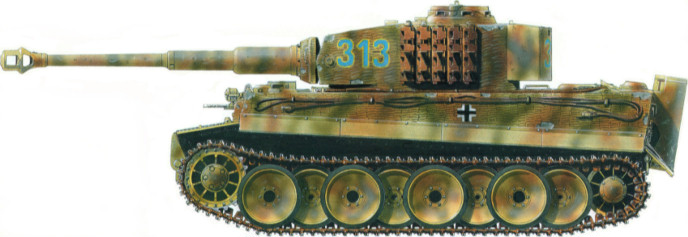
But somehow I like the one I mentioned at the beginning of this thread: Tiger 131 from 101st

Other vehicle from the same time period and company:

For me this looks like a 2 tone pattern: dark green over dunkelgelb base. And it looks like a hand painted, soft edge, random paint.
Also the manually colored photo shows 2 colors.

This one shows something similar:

(On this Printerest page your can find a great collection of camos)
Interesting, that the picture of 131 shows no camo on the sideskirts and the mud guard on the back. Or is this just the fading effect of the shiny surface? What do you think? I would assume that the camo was applied during transportation, or short before or after that. During transportation the sideskirts were usually removed. If this would be true, the question is why are the wheels painted? They were removed, too... Dunno... To paint, or not to paint, that is the Question...
Additionally this type of camo leaves more of the modulation visible.
Ok, after all this contemplation let's make some progress!
First: Large metal surfaces were covered with Mr.Metal Primer, then everything with Ultimate Black primer

Second: I forgot to glue the spare tracks on...
The instruction calls for 4 on the left side, and 3 on the right. Actually they never had 4 of left...
According to Tiger1.info this was the most commonly used layout for mid and late tigers:

Luckily both solutions deal with 7 track links.
I glued the upper clips on first. Then glued the bottom parts to the individual track links with regular paper glue. This way I could put the lower holders with CA to their exact place, and easily remove the tracks one CA dried.

I painted the gun barrel to german gray (XF-63) to have some more colors on the tank. As far I know gun barrels were primed with a dark gray primer, which was more resistant to heat and expansion. In my story the Tiger's gun barrel has been damaged, had to be replaced, and the new barrel wasn't painted yet. Historically accurate tank? No. Based on facts? Yes. Not counting rivets, but based on real facts, and has it's own story...
I covered it with masking tape, and shoot the rest with dark yellow (XF-60).

Painted some highlights and modulation with 50-50 of XF-60 dark yellow and XF-55 deck tan.
Also the tools and accessories were painted.
Am I going to cover the tools with the camo? Numerous times the tools and even the spare tracks were not removed while the crew applied the camo on field. On the picture the tow cable was definitely not painted, so I assume the tools are intact, too.

Before the exhaust covers are glued to their place I created a rusty look. Here it is step by step.
First the exhausts were painted using AMMO's Chipping color (044)

In the next step I applied oils from Abtailung 501. I went from darker to brighter colors, applying with stippling motions.
First was Dark Rust, second was Light Rust, and Red Primer was the last one.

While the paint was still wet I added Rust and Sand pigments made by Humbrol.

As last step I chipped the upper plate of the exhausts with AMMO's Chipping color (044), and imitated the smoke by applying black pigments.

Here they are without the protecting masks:

Sadly it is not too visible after gluing the shields on.

I think I'm ready now to apply hairspray and dark green (XF-61).
As always thank you everybody for reading my status report, asking questions, leaving comments, or just dropping in and stopping by for a few moments!
Cheers,
Attila
Last edited by papatika on Sat Dec 02, 2017 8:30 am, edited 1 time in total.
-
SprueSurgeon
- Sergeant

- Posts: 142
- Joined: Thu Sep 15, 2016 12:15 pm
Re: Attila's 1:35 Tiger I from Academy
Last edited by SprueSurgeon on Mon Jan 29, 2018 6:49 am, edited 1 time in total.
Deuteronomy 32:35
-
papatika
- Master Sergeant
- Posts: 382
- Joined: Thu Jun 05, 2014 11:12 am
- Location: Budapest, Hungary
Re: Attila's 1:35 Tiger I from Academy
Thank you, that's very kind of you!SprueSurgeon wrote: ↑Sat Dec 02, 2017 2:15 am
Man what a build diary.. what a build! Kudos to you, so very impressed much better than anything I've ever done. Great work.
Meanwhile I found an other picture. Same time period, same battalion, other company.

I think they have the same 2 tone camo. But from this angle it is clearly visible, that the sideskirts were decorated, too.
Question: how to glue the rubber tracks made of ungluable rubber?
I tried 5 different types until now. The last (and the best) one was double sided tape...
Maybe some kind of epoxy...
-
papatika
- Master Sergeant
- Posts: 382
- Joined: Thu Jun 05, 2014 11:12 am
- Location: Budapest, Hungary
Re: Attila's 1:35 Tiger I from Academy
Hi all!
2 weeks left, and still a lot to do.
After painting the whole thing with dark yellow (XF-60) I applied 2 coats of hair spray to chip the camo, or fix unwanted oversprays.

Then I spent about 3 hours to add a bunch of dark green (XF-61) lines. Not my best paintsjob, but nothing to complain about.

But the chipping was not what I was expecting. I suppose it is because only thin lines have been applied, and moisture could penetrate the HS layer from the sides with ease, and paint came mostly off in large patches. Next time for such camo I'll apply only one, really thin layer of HS.
I managed to glue the tracks using two part epoxy. Since it is a rubber band track, it has to be put on at once. In case of the Tiger and it's 4 row wheels (actually 6, but the 2 inner one are in pairs) the best is to do it layer by layer. So first I attached the innermost wheels. Then the drive sprocket (only half way, one of the road wheels will be in between the two cogs) and the track, followed by the idler wheels. Then the second layer of road wheels (and now the drive sprocket can be pushed into its final position). At this point the track can be glued to the wheels to imitate the natural sag. The ugly glue marks won't be visible, the remaining wheels will hide them.

While the glue was drying I was working on the paint chipping. I used two tone chipping. The lighter color is XF-55 Deck Tan, the darker one is AMMO's 045 Chipping.


The drive sprocket and its base was attached only now. The base has a locator pin on the inside which helps you to align the transmission correctly. When I was working on the front cover, the transmission was slightly off. It had to be pulled back to the front a little bit, this resulted a nice gap on the front panel. To locate the high points, I used Microscale Industries' Micro Mask, which is water soluble, and has a nice blue color. I applied it on the transmission's housing, and put the front panel back. Where they met, the mask painted the inner side of the front plate. Then I took a rotary tool, and carved out a bit of plastic. Placed back, checked, carved, placed back...


The gap is now acceptable (from the front and also from the side views), maybe I'll do some more fine tuning later on. The masking liquid could be removed with tap water and cotton buds. (Oh, and the 3rd layer of the road wheels has been added)


Next was to paint the markings using the stencils provided by the Eduard kit. The easiest: the Balkenkreuz on the right side.
1st step: the outher outlines

2nd: paint it white (XF-2)

3rd: place the extensions which will cover the white areas

4th: paint the rest black (XF-1)

5th: enjoy!

The other side was a bit trickier (TODO FIXME: the glue released the tracks... )

The markings on the turret were a a bit fiddly. It was hard to find the correct location of the second mask (mask for the red). Would be good the have the two masks with the same frame size, so I could mark the outer edge of the first stencil with masking tapes and align the second one to these tapes, but the second one is smaller. Could, would, should...

Meanwhile I just discovered, that I lost a small PE part form the front right mud guards. I have no idea where that happened. On the photos it is still there where I was talking about painting the green lines, and it is already missing and bare metal is visible on the next picture about securing track while glue drys. (TODO FIXME: find a solution to cover this area). It is also visible on this picture which was taken after adding the two interior MG

And talking about glue: it seams that I haven't applied glue everywhere to the joints, and the two pieces separated. (TODO FIXME)

I still have the spare tracks and some smaller details to get painted, and my other project while the glue dries. Then some weathering, and tank is basically completed.
I don't know yet whether I add a crew or not. I like to have small vignettes at least, it helps to understand the sizes.
As always thank you everybody for reading my status report, asking questions, leaving comments, or just dropping in and stopping by for a few moments!
Cheers,
Attila
2 weeks left, and still a lot to do.
After painting the whole thing with dark yellow (XF-60) I applied 2 coats of hair spray to chip the camo, or fix unwanted oversprays.
Then I spent about 3 hours to add a bunch of dark green (XF-61) lines. Not my best paintsjob, but nothing to complain about.
But the chipping was not what I was expecting. I suppose it is because only thin lines have been applied, and moisture could penetrate the HS layer from the sides with ease, and paint came mostly off in large patches.
I managed to glue the tracks using two part epoxy. Since it is a rubber band track, it has to be put on at once. In case of the Tiger and it's 4 row wheels (actually 6, but the 2 inner one are in pairs) the best is to do it layer by layer. So first I attached the innermost wheels. Then the drive sprocket (only half way, one of the road wheels will be in between the two cogs) and the track, followed by the idler wheels. Then the second layer of road wheels (and now the drive sprocket can be pushed into its final position). At this point the track can be glued to the wheels to imitate the natural sag. The ugly glue marks won't be visible, the remaining wheels will hide them.
While the glue was drying I was working on the paint chipping. I used two tone chipping. The lighter color is XF-55 Deck Tan, the darker one is AMMO's 045 Chipping.
The drive sprocket and its base was attached only now. The base has a locator pin on the inside which helps you to align the transmission correctly. When I was working on the front cover, the transmission was slightly off. It had to be pulled back to the front a little bit, this resulted a nice gap on the front panel. To locate the high points, I used Microscale Industries' Micro Mask, which is water soluble, and has a nice blue color. I applied it on the transmission's housing, and put the front panel back. Where they met, the mask painted the inner side of the front plate. Then I took a rotary tool, and carved out a bit of plastic. Placed back, checked, carved, placed back...
The gap is now acceptable (from the front and also from the side views), maybe I'll do some more fine tuning later on. The masking liquid could be removed with tap water and cotton buds. (Oh, and the 3rd layer of the road wheels has been added)
Next was to paint the markings using the stencils provided by the Eduard kit. The easiest: the Balkenkreuz on the right side.
1st step: the outher outlines
2nd: paint it white (XF-2)
3rd: place the extensions which will cover the white areas
4th: paint the rest black (XF-1)
5th: enjoy!
The other side was a bit trickier (TODO FIXME: the glue released the tracks...
The markings on the turret were a a bit fiddly. It was hard to find the correct location of the second mask (mask for the red). Would be good the have the two masks with the same frame size, so I could mark the outer edge of the first stencil with masking tapes and align the second one to these tapes, but the second one is smaller. Could, would, should...
Meanwhile I just discovered, that I lost a small PE part form the front right mud guards. I have no idea where that happened. On the photos it is still there where I was talking about painting the green lines, and it is already missing and bare metal is visible on the next picture about securing track while glue drys. (TODO FIXME: find a solution to cover this area). It is also visible on this picture which was taken after adding the two interior MG
And talking about glue: it seams that I haven't applied glue everywhere to the joints, and the two pieces separated. (TODO FIXME)
I still have the spare tracks and some smaller details to get painted, and my other project while the glue dries. Then some weathering, and tank is basically completed.
I don't know yet whether I add a crew or not. I like to have small vignettes at least, it helps to understand the sizes.
As always thank you everybody for reading my status report, asking questions, leaving comments, or just dropping in and stopping by for a few moments!
Cheers,
Attila
Last edited by papatika on Wed Dec 13, 2017 11:11 am, edited 1 time in total.
-
Stokesy44
- Major General
- Posts: 8674
- Joined: Thu Jun 18, 2015 10:13 am
- Location: The Midlands, UK
Re: Attila's 1:35 Tiger I from Academy
Superb work. I really like the mangling of the side fenders.
Looks great all round
Looks great all round
Its been tried and tested, it works! So don't blame the system if you're no good.
-
ElCapitan
- Chief Warrant Officer 2
- Posts: 1725
- Joined: Sun Aug 14, 2016 10:59 pm
- Location: Glasgow
Re: Attila's 1:35 Tiger I from Academy
Great work on the paint job! Hope you're able to sort out the missing piece of PE, I wouldn't have noticed!
Rob
ElCapitan
ElCapitan
-
Quax
- Warrant Officer

- Posts: 1330
- Joined: Thu Feb 26, 2015 9:52 am
- Location: Andover, Hampshire

Re: Attila's 1:35 Tiger I from Academy
Just keeps on getting better and better Attila!
Paul
Paul
Paul  (not THE Paul a more inconsequential Paul)
On the bench:
A mess as usual...
now residing in the Peoples Democratic Republic of Penguinland - long live the Emperor!
On the bench:
A mess as usual...
now residing in the Peoples Democratic Republic of Penguinland - long live the Emperor!
-
TheNordus
- Master Sergeant
- Posts: 453
- Joined: Wed Jul 02, 2014 10:03 pm
- Location: Finland
Re: Attila's 1:35 Tiger I from Academy
That camouflage is super neat and clean! I always get tons of overspray when I try that.
-Tommi
There's always armour on my work bench.
There's always armour on my work bench.
-
TommyKillander
- Chief Warrant Officer 5
- Posts: 2776
- Joined: Sat Dec 27, 2014 1:59 pm
- Location: Gothenburg, Sweden
Re: Attila's 1:35 Tiger I from Academy
Outstanding work!
I really like how you have solved the problems along the way and the end result is stunning
Tommy
I really like how you have solved the problems along the way and the end result is stunning
Tommy
-
papatika
- Master Sergeant
- Posts: 382
- Joined: Thu Jun 05, 2014 11:12 am
- Location: Budapest, Hungary
Re: Attila's 1:35 Tiger I from Academy
Tank you, Stokesy!
Thank you Rob!
I ran through a lot of options, like placing a sitting / climbing figure there, but it didn't sound realistic. Or putting a cloth / bag / flag there, but I have no clue what and how. Or gently cut and bend the fender, and paint it rusty as if it was broken. Any idea is highly welcomed!
Thanx Paul, highly appreciated!
Thank you, Nordus!
Well thinned paint and low pressure is what I used. And time... a lot...
Thank you, Tommy!TommyKillander wrote: ↑Wed Dec 13, 2017 7:23 pm Outstanding work!
I really like how you have solved the problems along the way and the end result is stunning
Tommy
Yep, I met a few problem, and I have to say, I liked them!
-
Tomcat64
- Brigadier General
- Posts: 7150
- Joined: Thu Sep 22, 2016 3:24 pm
- Location: Swindon, UK
Re: Attila's 1:35 Tiger I from Academy
Absolutely stunning work mate - this looks fabulous!
Cheers, Neil
On the Bench:
Revell 1/72 Millennium Falcon - stalled due to stupidity
Tamiya 1/35 Stegosaurus Stenops
Tamiya 1/35 Sherman Firefly VC
On the Bench:
Revell 1/72 Millennium Falcon - stalled due to stupidity
Tamiya 1/35 Stegosaurus Stenops
Tamiya 1/35 Sherman Firefly VC
-
NorthernModeller

- Command Sergeant Major
- Posts: 927
- Joined: Sat Jan 09, 2016 8:39 pm
- Location: Preston, Lancashire, England
- Contact:
Re: Attila's 1:35 Tiger I from Academy
Brilliant work mate looks amazing
SAMI Magazine, Model aircraft and Tamiya Model Magazine contributor
-
papatika
- Master Sergeant
- Posts: 382
- Joined: Thu Jun 05, 2014 11:12 am
- Location: Budapest, Hungary
Re: Attila's 1:35 Tiger I from Academy
Thank you very much, Gentlemen!
-
papatika
- Master Sergeant
- Posts: 382
- Joined: Thu Jun 05, 2014 11:12 am
- Location: Budapest, Hungary
Re: Attila's 1:35 Tiger I from Academy
Hello fellow modellers! (© Plasmo )
It seems I'll be able to finish this build in time!
Today and tomorrow we are visiting relatives with the family, so basically 3 days left. But I'm on 99% with the tank , although 0% on the vignette  .
.
So, let's see what happened in the last few days on my desk!
There fore a few smaller part left, and the weathering.
First I painted the ammunition. Satin black for the warhead, brass for the cartridge case. I used AMMO's brass from their acrylic paint range sprayed over glossy black primer. I was pretty disappointed. I expected to have a much smoother result. It seems like having too large pigments.

But this is the paint what I have, so I used it, and put the painted shells into their storage racks.

As next step I applied oils. I took several pictures. There are several befores and afters, some step-by-steps, but I'm not satisfied with their quality.
This was the right side before...

... and after paintjob done.

Left side:

Upper plate:

And overall:

Umm... they do not reflect the reality very well... There are some more in the flickr album, feel free to check them.
But cheer up, there are 3 more days, to find a matching figure, build a vignette, a take great photos! Piece of cake! 
Thank you everybody for reading my status report, asking questions, leaving comments, or just dropping in and stopping by for a few moments!
Cheers,
Attila
It seems I'll be able to finish this build in time!
Today and tomorrow we are visiting relatives with the family, so basically 3 days left. But I'm on 99% with the tank
So, let's see what happened in the last few days on my desk!
There fore a few smaller part left, and the weathering.
First I painted the ammunition. Satin black for the warhead, brass for the cartridge case. I used AMMO's brass from their acrylic paint range sprayed over glossy black primer. I was pretty disappointed. I expected to have a much smoother result. It seems like having too large pigments.
But this is the paint what I have, so I used it, and put the painted shells into their storage racks.
As next step I applied oils. I took several pictures. There are several befores and afters, some step-by-steps, but I'm not satisfied with their quality.
This was the right side before...
... and after paintjob done.
Left side:
Upper plate:
And overall:
Umm... they do not reflect the reality very well...
But cheer up, there are 3 more days, to find a matching figure, build a vignette, a take great photos!
Thank you everybody for reading my status report, asking questions, leaving comments, or just dropping in and stopping by for a few moments!
Cheers,
Attila
-
DrSprue
- Warrant Officer
- Posts: 1497
- Joined: Wed Apr 26, 2017 3:24 am

-
Tomcat64
- Brigadier General
- Posts: 7150
- Joined: Thu Sep 22, 2016 3:24 pm
- Location: Swindon, UK
Re: Attila's 1:35 Tiger I from Academy
So glad that you're going to get this done on time mate - this is a real work of art
Cheers, Neil
On the Bench:
Revell 1/72 Millennium Falcon - stalled due to stupidity
Tamiya 1/35 Stegosaurus Stenops
Tamiya 1/35 Sherman Firefly VC
On the Bench:
Revell 1/72 Millennium Falcon - stalled due to stupidity
Tamiya 1/35 Stegosaurus Stenops
Tamiya 1/35 Sherman Firefly VC
-
papatika
- Master Sergeant
- Posts: 382
- Joined: Thu Jun 05, 2014 11:12 am
- Location: Budapest, Hungary
Re: Attila's 1:35 Tiger I from Academy
Thank you, guys!
After 4 month relationship I thought I have to make a base for her. The original idea was to show her in action, with all the crew members.
I decided to change this vision a bit. I have some really old figures (20yrs old or so) with red skins.

As base I chose an IKEA picture frame with thick sides.

For ground I took a piece of pink insulation foam, and formed it with some fire.

Painted it with some cheap acrylic paint.

Sprinkled on some dirt from the garden, then covered the whole thing with thinned PVA and static grass. I had only 6 mm length grass, but in 2 colors.
While the glue dried I assembled and painted the figure.

Primed with dark gray (XF1 black + XF2 white in undefined ratio), added shadows with XF1 black and highlights with lighter gray mixture.
Also painted the face with AMMO's Oilbrusher (Flesh tone set).

This paint set is for highlights I think. My soldier looked like a living dead...

I added some life with some brown. Still not the best, but acceptable. For now...

So, that's all, Folks!
A 4 month journey ends here. Final reveal photos will come soon.
All pictures taken can be found in the Flickr album
A big "THANK YOU" to all of you who joined me on this looooong trip by visiting this topic.
As always thank you everybody for reading my status report, asking questions, leaving comments, or just dropping in and stopping by for a few moments!
Cheers,
Attila
PS.:
Here is a teaser, just for YOU:

-
papatika
- Master Sergeant
- Posts: 382
- Joined: Thu Jun 05, 2014 11:12 am
- Location: Budapest, Hungary
Re: Attila's 1:35 Tiger I from Academy
Update: final reveal is here! 
