Page 2 of 2
Re: Tamiya F-14A Tomcat
Posted: Thu Oct 19, 2017 2:06 pm
by Quax
Oh no Matthew I feel your pain!

However adversity is the the mother of invention and I'm sure you find a way to solve it (you've already solvented it....

), you've got the skills!!

cheers
Paul
Re: Tamiya F-14A Tomcat
Posted: Thu Oct 19, 2017 3:32 pm
by Tomcat64
Ouch!
Has it just affected the paint or disrupted the plastic underneath as well?
Hope you get it straightened out, and let us know how you approach it too - we learn as much from people sorting out this sort of thing as we do from new techniques.
Otherwise that finish looks superb

Re: Tamiya F-14A Tomcat
Posted: Thu Oct 19, 2017 9:29 pm
by bfrd
Here are a couple of pictures of the damaged wing.


I soaked the part in a 50:50 solution of warm water and IPA. After a couple of minutes I used a old toothbrush to get the paint off. This was quite easy.

You can see there is some depth to damage. I used some tape to cover up some of the rivet detail I didn't want to destroy. Then I used a semi-round file to clean up the edges.

I allowed the part to dry and applied Squadron White Putty with an applicator knife. I put it on generously, but too thick.

After the putty was given about an hour and a half to dry I sanded down with a sanding stick from Ultimate.

Next I just have to prime, paint, and detail. Hopefully I have learned my lesson and will keep my solvents away from finished parts.
Re: Tamiya F-14A Tomcat
Posted: Thu Oct 19, 2017 9:48 pm
by ElCapitan
Well done, should look fine once it's got paint on it. Is it smooth?
Re: Tamiya F-14A Tomcat
Posted: Thu Oct 19, 2017 11:29 pm
by bfrd
ElCapitan wrote: Thu Oct 19, 2017 9:48 pm
Well done, should look fine once it's got paint on it. Is it smooth?
It is fairly smooth, but could be better. I will probably put another coat of putty and re-sand before priming.
I also worked up some heat staining on the exhaust.
This was the first time I have tried this and I think it turned out well. Here is what I did. I used clear colors from Tamiya; Orange, Red, and Blue. I used a small syringe to pick up a small amount of paint (> ml) and mix it 50:50 with IPA. I wanted a thin mix. I first used the orange mix and sprayed a band around where I wanted the heat staining to start. Then I followed up with a red band. Finally a blue band at the end. Each band overlaps a little to blend the colors. I could have started with a yellow band, but I decided to just use 3 colors.

Re: Tamiya F-14A Tomcat
Posted: Thu Oct 19, 2017 11:31 pm
by Twokidsnosleep
Good Save!!!
Re: Tamiya F-14A Tomcat
Posted: Fri Oct 20, 2017 11:14 am
by gaz45
Well recovered mate those exhausts will look great
Re: Tamiya F-14A Tomcat
Posted: Fri Oct 20, 2017 12:34 pm
by bfrd
Thanks, though I would have rather not have had to save.
gaz45 wrote: Fri Oct 20, 2017 11:14 am
Well recovered mate those exhausts will look great
Thanks, this is my first attempt at heat stains, so any feedback is appreciated.
Re: Tamiya F-14A Tomcat
Posted: Fri Oct 20, 2017 8:15 pm
by gaz45
Looks great mate i wouldn't know where to start with that
Re: Tamiya F-14A Tomcat
Posted: Sat Oct 21, 2017 6:42 pm
by bfrd
I finished up the repair. I could have done a little better job, but I am ok with the results.

The instruction at this point have become an issue. I haven't been following their order and have just been jumping around to make the painting easier. Next up for me was to attach the landing gear covers. I also added some panel line color to give a dirty appearance to the gear.


I glued up and painted the pylons for the drop tanks and missles.

I painted them in the accent color for some variation.

I painted the tail hook in Nato Black and masked up for the striping. I used Tamiya thin tape for curves as it gave the right width.

I finished up the details on the weapons and tanks. Then I glued them on.

I painted the tip of the tank to match the plane.

I am just about finished. I have decided to keep the plane pretty clean. So all I have left is a few small bits and bobs and then a matte coat. I may do a little something for display, but have not yet decided.
Thanks for looking. Please make comments (or memes), they really help.
Re: Tamiya F-14A Tomcat
Posted: Sun Oct 22, 2017 11:50 pm
by bfrd
Re: Tamiya F-14A Tomcat
Posted: Mon Oct 23, 2017 12:11 am
by Fridgy
She looks awesome all in black
Well done
Re: Tamiya F-14A Tomcat
Posted: Mon Oct 23, 2017 1:55 am
by xSCAR45
Nice result!
Somehow I was thinking an all black Tomcat would look better. Not saying you did a bad job or anything. Just my opinion.
The black really makes your cockpit standout. I'd say the cockpit steals the show for sure.
Re: Tamiya F-14A Tomcat
Posted: Mon Oct 23, 2017 7:14 am
by sheppsea
Great job
Re: Tamiya F-14A Tomcat
Posted: Mon Oct 23, 2017 8:57 am
by Tomcat64
Great job! Well done Bob!
Re: Tamiya F-14A Tomcat
Posted: Mon Oct 23, 2017 12:50 pm
by papatika
A really impressive, unusual kitten you have there! Well done!
Re: Tamiya F-14A Tomcat
Posted: Mon Oct 23, 2017 1:08 pm
by Quax
well done Matthew you've done a superb job there!
is Bob hireable for other modelers to use?

Paul
Re: Tamiya F-14A Tomcat
Posted: Tue Oct 24, 2017 3:12 am
by bfrd
Thanks for the comments. It was a fun build and I think I learned some things.
Unfortunately, Bob is not available. He didn't have a lawyer check out his contract. I literally own him.
Re: Tamiya F-14A Tomcat
Posted: Tue Oct 24, 2017 7:37 am
by Twokidsnosleep
She finished off really nice and clean

Re: Tamiya F-14A Tomcat
Posted: Tue Oct 24, 2017 10:40 am
by TommyKillander
Awesome paintscheme!

Great job, buddy!

Tommy
Re: Tamiya F-14A Tomcat
Posted: Wed Oct 25, 2017 8:44 am
by gaz45
Awesome job there mate with mine there are no decals for the weapons
Re: Tamiya F-14A Tomcat
Posted: Wed Oct 25, 2017 11:21 am
by bfrd
I really (really) appreciate the kind words. Makes me want to keep building.
gaz45 wrote: Wed Oct 25, 2017 8:44 am
Awesome job there mate with mine there are no decals for the weapons
I bought the resin weapon kit and didn't use it. I broke off a couple of the fins trying to saw the missles off of the blocks and gave up. Regardless, I have the decal sheets left over if you want I can mail them to you. I couldn't guarantee they would fit, but I am almost positive I kept everything.
Re: Tamiya F-14A Tomcat
Posted: Wed Oct 25, 2017 3:15 pm
by gaz45
bfrd wrote: Wed Oct 25, 2017 11:21 am
I really (really) appreciate the kind words. Makes me want to keep building.
gaz45 wrote: Wed Oct 25, 2017 8:44 am
Awesome job there mate with mine there are no decals for the weapons
I bought the resin weapon kit and didn't use it. I broke off a couple of the fins trying to saw the missles off of the blocks and gave up. Regardless, I have the decal sheets left over if you want I can mail them to you. I couldn't guarantee they would fit, but I am almost positive I kept everything.
That would be awesome mate thank you very much.
It is all the comments that keep me going aswell
Re: Tamiya F-14A Tomcat
Posted: Sat Nov 04, 2017 1:04 pm
by bfrd
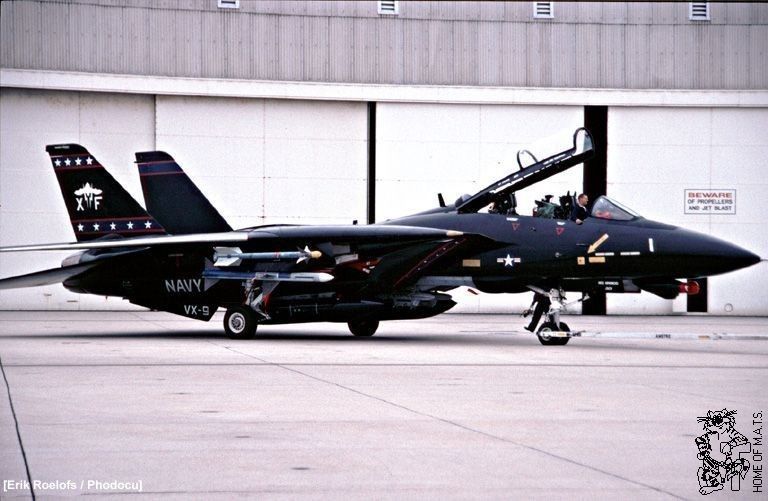
After a bit of a break I am starting work on the display portion of my build. I am using the photo below as reference.
I am working on the concrete portion first. I am using a simple piece of 1/4 plywood. The first thing I did was to guess the size of the concrete squares. The Sidewinder missle is around 10 feet long so I am making the concrete squares 12 feet. Complete guess. At 1:48 scale that makes each square 3 inches.

I drew out a grid pattern and scored the lines with a sharp hobby knife. I deepened the cuts with an
Xacto razor saw. The long blade made it easier for me to keep the cuts straight. I did have a problem with some of the wood chipping out, but overall I am pleased.
I decided to use Vallejo primer because I have a couple of bottles and won't use it on models since I have discovered Badger. I figure this is a perfect opportunity to use it up! I darkened the gray with a bit of black to get a darker base. I switched out my needle and nozzle for a larger one. Paasche uses numbers so the #3 I used is a .66. I also used their fan pattern air cap. It makes about a 3 inch flat pattern which is ideal for painting large surfaces.

After I got the base color down, I switched out the dark gray for straight black and hit the lines heavily.

Next I will use a lighter gray color and start filling in with small random patterns to create a mottled look. At least that is my plan. This is yet another area I have never tried to do before, so I am relying on Bob's wisdom. Bob is pretty stupid, so who knows how this will turn out.
Re: Tamiya F-14A Tomcat
Posted: Mon Nov 06, 2017 2:25 pm
by bfrd
Filled in with the lighter gray color. Not sure how much more I am going to do with the concrete. Possibly paint a few lines.

Re: Tamiya F-14A Tomcat
Posted: Mon Nov 06, 2017 4:01 pm
by ElCapitan
Excellent work, it looks like...concrete!
Re: Tamiya F-14A Tomcat
Posted: Mon Nov 06, 2017 7:03 pm
by Twokidsnosleep
Ya, I love the base, taking some notes for later
The chipping of the wood can look like old chipped concrete joints and add to the realism
Re: Tamiya F-14A Tomcat
Posted: Tue Nov 07, 2017 11:13 am
by Tomcat64
yeah - that's fantastic work, like Scott said I've been making notes for future reference!
Re: Tamiya F-14A Tomcat
Posted: Wed Nov 08, 2017 12:29 pm
by bfrd
Started work on the wall portion.
First here is the basic layout. I used a piece of foam board that came in the Moai printer box as packaging material as the base. Let's hear it for recycling!

Now a little bit of a closer look at the detail part. I used
Plastruct corrugated siding for the top detail. I had some
evergreen "C" channel, which I cut to a "L" shape to lay over the exposed edge. Please note that I don't recall the exact size of the "C" channel, so the link I used was just a guess. After the "L" piece was glued in place I used some craft wooden square dowels to create a larger edge. I picked these up at Wally-World on a whim and found a use for them! Finally, I used some balsa wood strips to create the hangar doors.

I used the same darkened gray Crapejo primer for all. Here it is after the first coat and first sanding. As I feared the balsa wood soaked up the primer like a sponge. I may put a pledge floor care coat on next to try and seal it some more. I also don't care for the edges of the corrugated siding showing up so prominently. I may just come back with some strip styrene and cap the joints. It will be even more prominent, but at least look like it was supposed to be there.

Thanks for looking and commenting. I am a little shocked that you guys are taking notes of what I am doing. I have no idea what I am doing. I am taking my cues from a 1" tall plastic man.
**Bob is currently visiting Archibald on Tatooine and was unavailable for the photos.
Re: Tamiya F-14A Tomcat
Posted: Wed Nov 08, 2017 4:15 pm
by Twokidsnosleep
It is going to look great!!! I like that slightly battered look to the hanger doors
Future would work, though might take a few coats and some sanding as the grain gets raised by moisture...just like woodworking

For a super cheap balsa sealer, you could thin down some latex house paint and use that..not sure I would airbrush spray it unless you got a big needle
Then your subsequent model paint layers would stick to it
Re: Tamiya F-14A Tomcat
Posted: Wed Nov 08, 2017 7:03 pm
by pourquoi61
Re: Tamiya F-14A Tomcat
Posted: Thu Nov 09, 2017 11:30 am
by bfrd
Thanks!
Ok, I got some good advice on sanding sealers that I will try out next time I work with balsa. This time since I already had some primer laid down I thought I would experiment with
Pledge Floor Care.
For anyone that doesn't know PFC is an acrylic floor polish that doubles as a cheap gloss coat for modelling. There are TONS of videos about its uses so I won't go into them here, but it is a good product that I use frequently. It can be sprayed neat, but in this case I went for a more direct approach. I laid my wall down and just squirted a liberal amount directly onto the doors. I then used a brush to spread it out and make sure it covered evenly. This stuff does self-level pretty well, but I wanted to help it out. I let it dry for a couple of hours and repeated. I did the second coat exactly the same as the first. I let dry for a couple of hours and repeated. This time after I spread the PFC out I picked up the wall into its natural upright position and did a final smoothing. A decent amount ran off the bottom. I let dry for a couple of hours and sanded down with 400 grit sandpaper. Wiped off any dust and re-sprayed the primer.

It may not be as smooth as styrene, but it will do for Bob and I. One other thing that I should mention. I haven't trimmed the bottom of the hangar doors yet. I will do that next.
**Bob wanted the record corrected... He is not 1" tall; he is 1.4" tall. I suppose 4 tenths of an inch matters. All tenths matter!
Re: Tamiya F-14A Tomcat
Posted: Thu Nov 09, 2017 3:51 pm
by Twokidsnosleep
From here the texture look perfect
Well done, used what you had and made it work
I am a Future guy as well, though it lets me down on auto bodies as no where near the shine those guys get with 2 part acrylics
Re: Tamiya F-14A Tomcat
Posted: Sun Nov 12, 2017 12:53 am
by bfrd
I painted the corrugated section with a steel color. I left some variation in the finish to give it a worn look. I used white badger primer for the main wall.
I decided to add something extra to the wall portion of the diorama. Since I wasn't going to have functioning doors I felt it needed more. I used a vinyl cutter to make a few stencils to paint on the Vampire logo and squadron number. I used a low-tack vinyl to reduce the chance of pulling up the paint.

The logo has three colors so I needed to split up the stencils in two sections. I used a dark gray for the letters, and yellow for the lightning bolts. The bat was painted after the lower portions were dried in nato black. The squadron number was painted in dark gray.

I added a little fading on the new paint by dry-brushing more white primer.

I guess that just about wraps it up. All I have left is to attach the wall somehow and shoot the reveal pictures.
Bob and I appreciate your support through the build process.
Re: Tamiya F-14A Tomcat
Posted: Sun Nov 12, 2017 1:07 am
by Twokidsnosleep
Super cool
Well done
Re: Tamiya F-14A Tomcat
Posted: Mon Nov 13, 2017 8:59 am
by Tomcat64
Great work - very well done!
Looking forward to seeing Bob in the final reveals if he's back from his travels now.
Re: Tamiya F-14A Tomcat
Posted: Tue Nov 21, 2017 9:19 pm
by papatika
The wood figures look a bit strange for me, but all together an absolutely superb build is going on here!
Keep up the good work!
Re: Tamiya F-14A Tomcat
Posted: Wed Nov 22, 2017 12:45 pm
by bfrd
papatika wrote: Tue Nov 21, 2017 9:19 pm
The wood figures look a bit strange for me, but all together an absolutely superb build is going on here!
Keep up the good work!
Most of what I do is strange!
I should have posted a link to the reveal thread earlier. I forgot. I blame Bob.
Final Reveal


