Mil Mi-V-12 - the BIG one!!
-
BigWall
- Chief Warrant Officer 5

- Posts: 2961
- Joined: Sun Mar 15, 2020 11:44 pm
- Location: Denver, Colorado

Re: Mil Mi-V-12 - the BIG one!!
You may also be able to find some clear plastic packaging with a curve/bubble that is close and carefully heat it, bending it into the shape you want.
Joe

-
RangerNeil
- Captain

- Posts: 4584
- Joined: Fri Jul 12, 2019 9:42 pm
- Location: Dagenham
- Contact:

Re: Mil Mi-V-12 - the BIG one!!
Cheers folks - some good ideas there. I did some digging and it seems Amodel is a Ukrainian company! So, being on the - "right" ? - side of the problem getting a spare if one exists is less of a problem. I fired off a couple of e-mails today so I'll see what come back from that. If it fails I have some clear sheet here, just a case of finding a way of fabricating something. Never tried vac-forming before - what do you need to do it?
Another thought that occurs is going through the stash to see if any kit either has an optional part or both has a similar part AND is new enough that the manufacturer still has spares. The Soviets were great fans of standardisation on such things......
Moving on though I was looking at the rear cargo doors and wondering how the hell the doors would close the way things were assembled. Basically the answer was they won't!!
So I back-pedalled through the instructions - which are suitably vague - and had a hard think over a coffee. Slowly coming to realise that where the instructions appear to show these parts going is not where they actually go. The braces for the tail gate opening actually butt against the wall of the fuselage, they do not sit on it and the reinforcers on the tail gate doors also butt againstthe insides of the doors, they do not sit on top. So an hour or so was spent removing these parts, cleaning them up and refitting where I think they should go.
For the record - CA debonder also works on TET and Contacta.
Going back over the instructions I am even more convinced that this kit was meant to have an interior to the fuselage as they give the option to cut the passenger doors out in the fuselage and have them opened. And doors are included in the kit as well as interior seating.
*** UPDATE ***
Just had an email.back from the main agents for Amodel in Poland (talk about international!!) asking for my postal address! This looks promising....
On the board now:
Airfix 1/35 Alvis Stalwart Mk2 FV622
Hobby Boss 1/350 Surcouf
Hobby Boss 1/350 Soviet Alfa class
Hobby Boss 1/350 USN Los Angeles
Mikro Mir 1/350 HMS M1
Scalemates stash info
=58417&fkSTASHSTATUS[]=58417-Stash&page=stash]Scalemates Stash manager
-
digger303

- General

- Posts: 16305
- Joined: Mon Mar 16, 2015 10:01 am
- Location: Western Australia

Re: Mil Mi-V-12 - the BIG one!!
A few more curve balls for the course.


-
RangerNeil
- Captain
- Posts: 4584
- Joined: Fri Jul 12, 2019 9:42 pm
- Location: Dagenham
- Contact:
Re: Mil Mi-V-12 - the BIG one!!
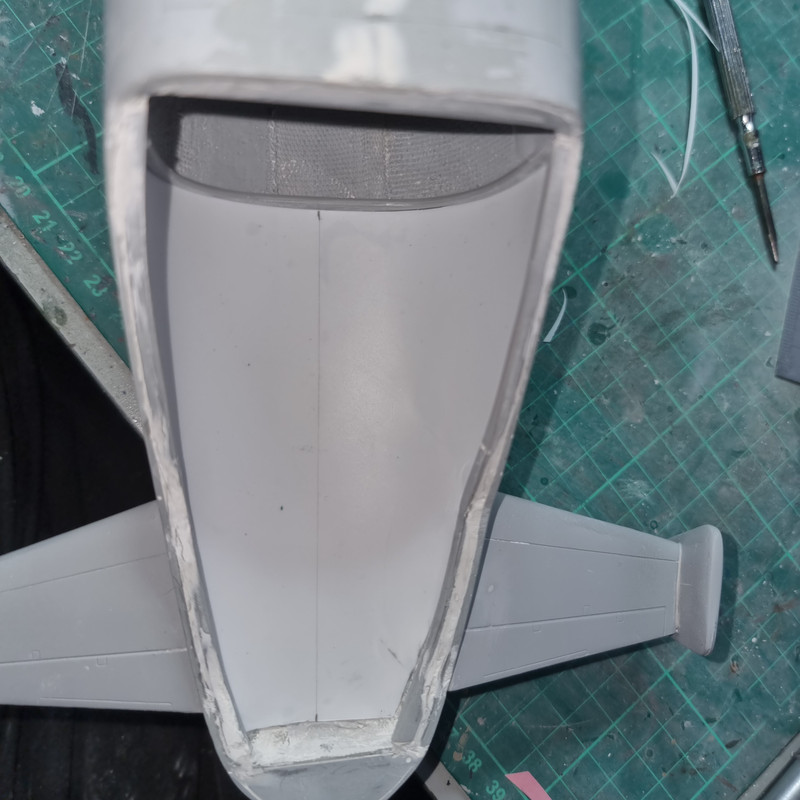
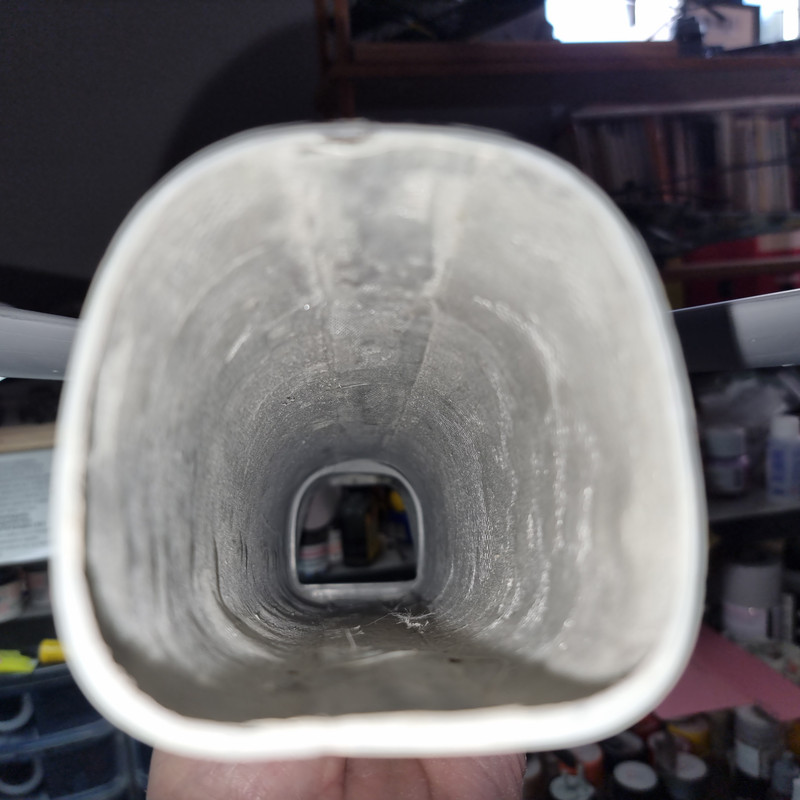
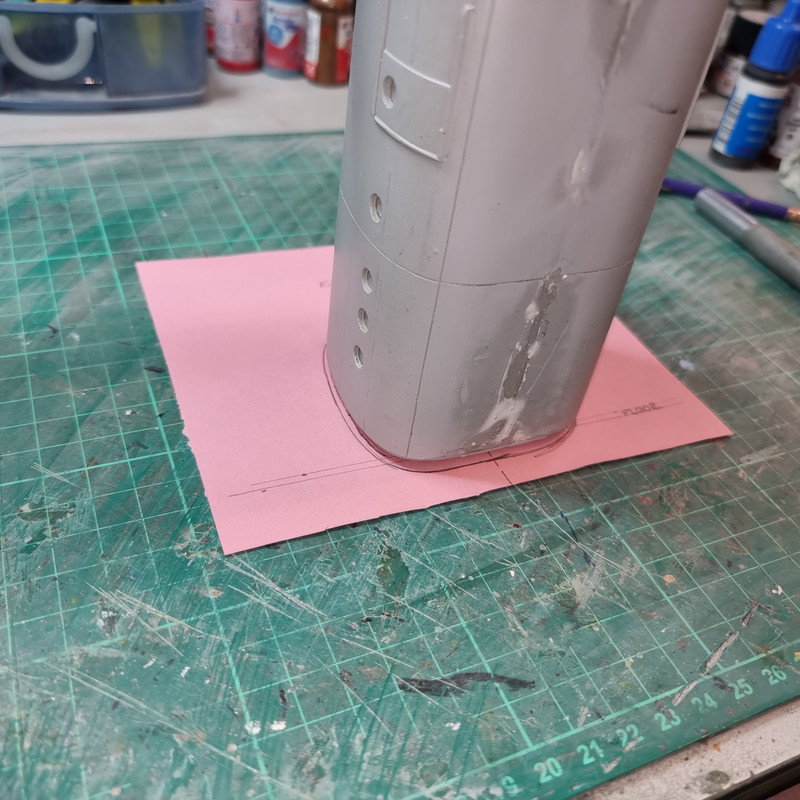
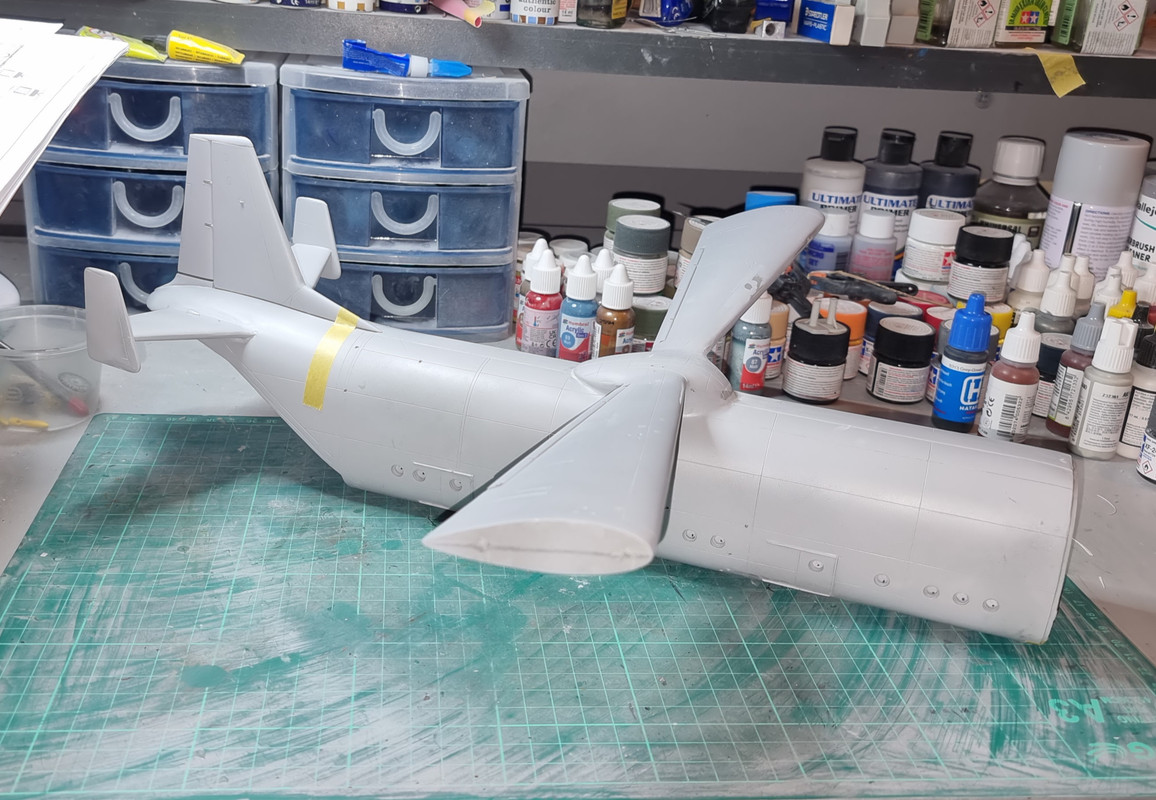
Having put the cockpit section to one side whilst I wait and see what happens about the missing window I apent a "happy" couple of hours rubbing filler down on the tail planes and where the wing mounts to the fuselage.. Had to patch a few places, wait for it to dry and rub down again. Its now had a coat of primer filler and when its fully dry I'll see if anymore patching is required. Good news is the ramp and doors now fit properly.

Then, sitting looking at the fuselage, I was overcome by an attack of Masochism! I decided to add the fuselage floor.... Which, oddly, was a lot easier than it seemed. A simple sheet of 1.5mm plastic card cut the length of the sheet at 57mm wide dropped nicely onto the ledge on the inside of the aft bulkhead with an appropriate height support up the front. I - could - line the the interior with O.25mm sheet as well - but then I'd have to open the cabin windows so...... I am looking at covering the open area for the cargondoors though as I'm thinking of having the cargo doors and ramp open.
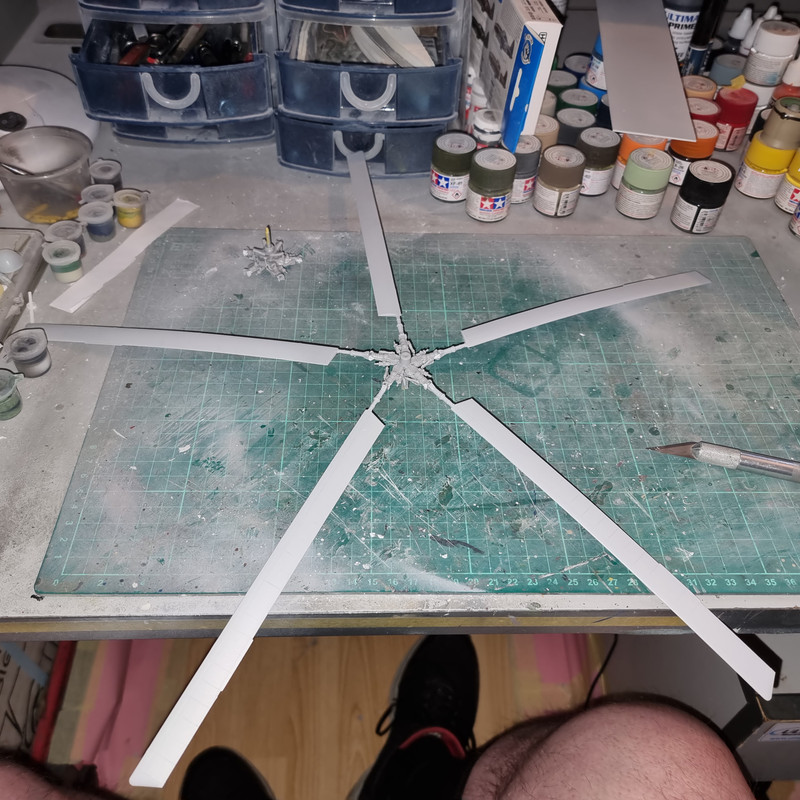
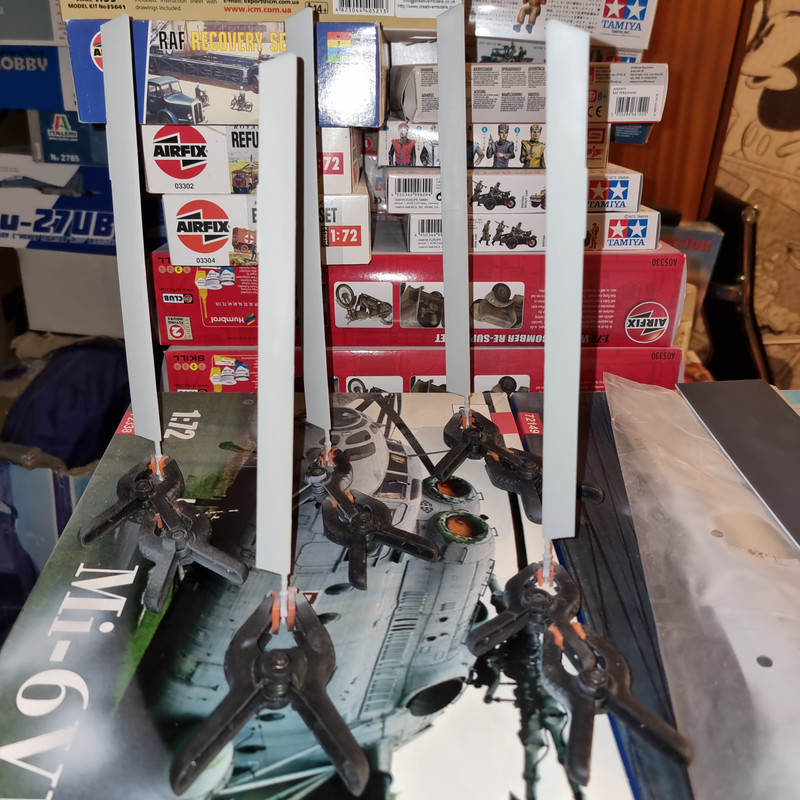
Also made a start on the rotor heads - the right side first. Par for the course - the holes on the carrier and spacer were badly undersize and required a 3mm drill to open out so the shaft would fit.
Rotor blades have a nice feature - the blade droop is moulded in. That came as a very pleasnt surprise.
So - state of play so far is thus with regards to sub-assemblies:
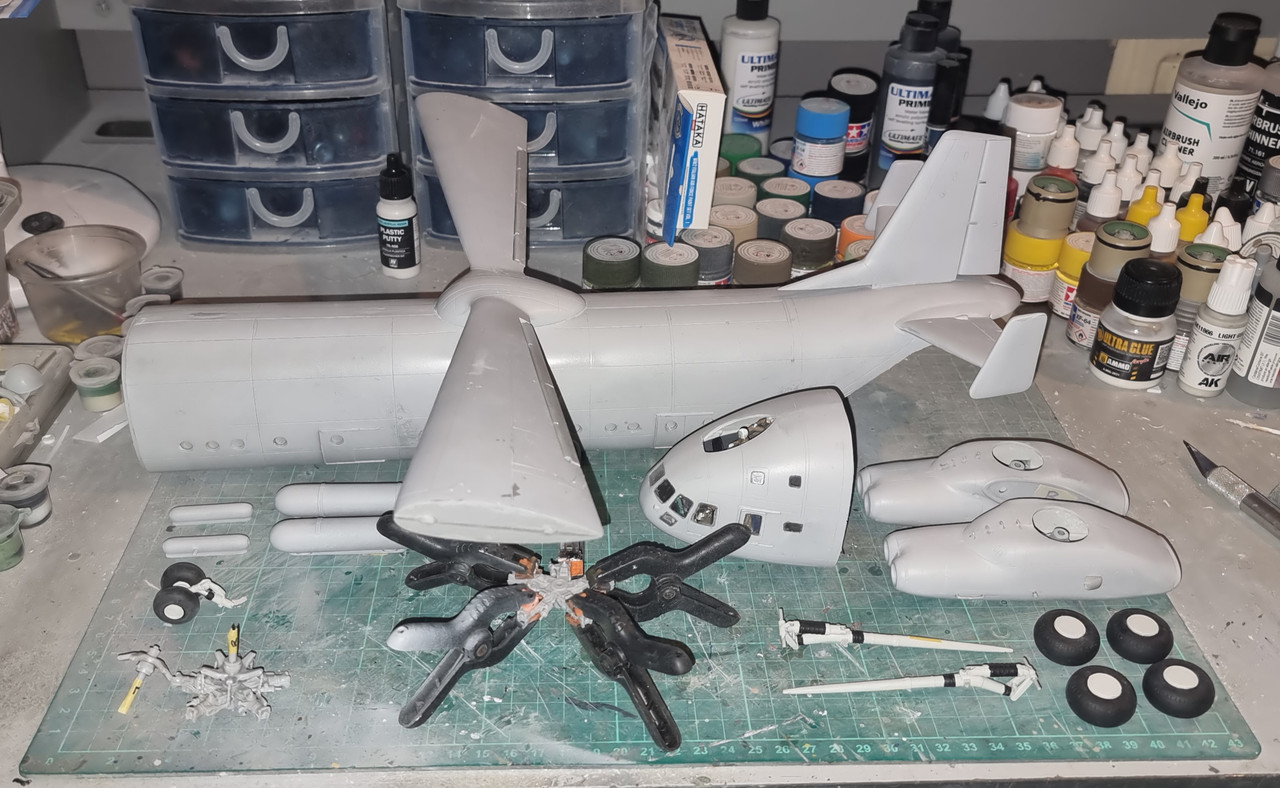
Next step is to finish the lefthand head - currently being held by clamps - then both can be painted. The righthand blades are now in primer to be masked for painting. I'll get these done and fitted to the head before making a start on the lefthand blades.
Then I am back to waiting for a window...........
Then, sitting looking at the fuselage, I was overcome by an attack of Masochism! I decided to add the fuselage floor.... Which, oddly, was a lot easier than it seemed. A simple sheet of 1.5mm plastic card cut the length of the sheet at 57mm wide dropped nicely onto the ledge on the inside of the aft bulkhead with an appropriate height support up the front. I - could - line the the interior with O.25mm sheet as well - but then I'd have to open the cabin windows so...... I am looking at covering the open area for the cargondoors though as I'm thinking of having the cargo doors and ramp open.
Also made a start on the rotor heads - the right side first. Par for the course - the holes on the carrier and spacer were badly undersize and required a 3mm drill to open out so the shaft would fit.
Rotor blades have a nice feature - the blade droop is moulded in. That came as a very pleasnt surprise.
So - state of play so far is thus with regards to sub-assemblies:
Next step is to finish the lefthand head - currently being held by clamps - then both can be painted. The righthand blades are now in primer to be masked for painting. I'll get these done and fitted to the head before making a start on the lefthand blades.
Then I am back to waiting for a window...........
On the board now:
Airfix 1/35 Alvis Stalwart Mk2 FV622
Hobby Boss 1/350 Surcouf
Hobby Boss 1/350 Soviet Alfa class
Hobby Boss 1/350 USN Los Angeles
Mikro Mir 1/350 HMS M1
Scalemates stash info
=58417&fkSTASHSTATUS[]=58417-Stash&page=stash]Scalemates Stash manager
-
digger303
- General
- Posts: 16305
- Joined: Mon Mar 16, 2015 10:01 am
- Location: Western Australia
Re: Mil Mi-V-12 - the BIG one!!
Nice a couple of wins there. The rotor could have been a sloppy fit which is worse than having to drill and the cargo doors fit now.

-
aur0ra145

- Second Lieutenant

- Posts: 3155
- Joined: Thu Jan 14, 2016 9:44 am
- Location: TX
- Contact:
Re: Mil Mi-V-12 - the BIG one!!
Very cool on the rotor blades. Looking at the assembly process, I never realized this had such a pronounced rudder.
-
BigWall
- Chief Warrant Officer 5
- Posts: 2961
- Joined: Sun Mar 15, 2020 11:44 pm
- Location: Denver, Colorado
-
Parker
- First Sergeant

- Posts: 545
- Joined: Tue May 19, 2020 6:49 am
- Location: Melbourne
Re: Mil Mi-V-12 - the BIG one!!
brilliant work, Neil.
Its stupidly big.
Its stupidly big.
On The Bench (Dining Table) - CF-104 Starfighter

-
RangerNeil
- Captain
- Posts: 4584
- Joined: Fri Jul 12, 2019 9:42 pm
- Location: Dagenham
- Contact:
Re: Mil Mi-V-12 - the BIG one!!
Thanks for the kind words folks!!
Had a vets appointment to get Maggies claws clipped today so not a lot done model-wise.
Got the lefthand head fully assembled less blades so now both are complete and just need "refining" (fancy word for filling/sanding. Tried test fitting the righthand blades - aaaand - the holes are too small. So out with the calipers, measure the prong on the blades - 1.8mm dia - find the nearest drill below that - 1.75mm dia - and use a pin vice to open out the holes in the heads and retry. Now the blades a perfect fit.
Did I mention this thing is BIG? This is one that sits at the ends of the wing - an identical one sits at the other end of the wing.......
Other than this - the right hand blades were given a coat of Tamiya XF80 Light Grey both sides. (Lefthand ones are still on the sprue to avoid mixing them up).
The cargo bed floor was scribed with panel lines that look as close as I can get to whats in the few photos of the beast then given a coat of XF24 Dark Grey - I just barely had enough to coat it, its going to need doing again when I get another bottle!
And the acreage of filler on the tail planes, rear access and wing mount was rubbed down with the inevitable low spots topped and left to dry over.
Other than this - insanity is rearing its ugly head again.... I was thinking about lining the open roof area for the load bed with 0.25mm plastic sheet when the mind spurred off on a tangent and started wondering how hard it would be to line the fuselage as well..... And then opening one of the fuselage personnel doors. Oh dear.....
On the board now:
Airfix 1/35 Alvis Stalwart Mk2 FV622
Hobby Boss 1/350 Surcouf
Hobby Boss 1/350 Soviet Alfa class
Hobby Boss 1/350 USN Los Angeles
Mikro Mir 1/350 HMS M1
Scalemates stash info
=58417&fkSTASHSTATUS[]=58417-Stash&page=stash]Scalemates Stash manager
-
DRUMS01

- Chief Warrant Officer 3

- Posts: 2251
- Joined: Wed Jun 08, 2016 1:48 am
- Location: Ohio, USA
Re: Mil Mi-V-12 - the BIG one!!
Strange enough, it appears that most of the active modelers on our forum are talking about, "the big one". I guess even in modeling, it is always a size issue and evidently bigger may be better (the verdict is still out) but bigger is definitely more work, just ask Neal.
Good on ya for deciding to add a floor and open her up, but now you-ll need the rest of the flight crew and something to fill the cargo hold, any thoughts on that yet? You modeling daredevil you....
Good on ya for deciding to add a floor and open her up, but now you-ll need the rest of the flight crew and something to fill the cargo hold, any thoughts on that yet? You modeling daredevil you....
On the table or recently completed:
1/18 AV8-B Harrier - WIP
1/35 Churchill AVRE with SBG Bridge Diorama - DONE
75mm BMW R75 WW2 motorcycle with rider - DONE
1/18 AV8-B Harrier - WIP
1/35 Churchill AVRE with SBG Bridge Diorama - DONE
75mm BMW R75 WW2 motorcycle with rider - DONE
-
RangerNeil
- Captain
- Posts: 4584
- Joined: Fri Jul 12, 2019 9:42 pm
- Location: Dagenham
- Contact:
Re: Mil Mi-V-12 - the BIG one!!
Oddly for the Soviets the loadmaster was part of the flight crew so he's accounted for in the seated figures. I cleaned up and primed one of the sprues containing seating for the cargo hold - just got to work out how they go together as this is not included in the instructions.DRUMS01 wrote: Fri Sep 22, 2023 12:43 am Strange enough, it appears that most of the active modelers on our forum are talking about, "the big one". I guess even in modeling, it is always a size issue and evidently bigger may be better (the verdict is still out) but bigger is definitely more work, just ask Neal.
Good on ya for deciding to add a floor and open her up, but now you-ll need the rest of the flight crew and something to fill the cargo hold, any thoughts on that yet? You modeling daredevil you....
As for a payload - seen a couple of nice 1/72 MAZ units - one is a tractor-trailer unit and the other a Scud TEL.
On the board now:
Airfix 1/35 Alvis Stalwart Mk2 FV622
Hobby Boss 1/350 Surcouf
Hobby Boss 1/350 Soviet Alfa class
Hobby Boss 1/350 USN Los Angeles
Mikro Mir 1/350 HMS M1
Scalemates stash info
=58417&fkSTASHSTATUS[]=58417-Stash&page=stash]Scalemates Stash manager
-
digger303
- General
- Posts: 16305
- Joined: Mon Mar 16, 2015 10:01 am
- Location: Western Australia
Re: Mil Mi-V-12 - the BIG one!!
Having a scud being loaded or unloaded would make for a nice dio, but the size of it. You would have to invert it and stick it to the ceiling above the bedRangerNeil wrote: Fri Sep 22, 2023 1:10 amOddly for the Soviets the loadmaster was part of the flight crew so he's accounted for in the seated figures. I cleaned up and primed one of the sprues containing seating for the cargo hold - just got to work out how they go together as this is not included in the instructions.DRUMS01 wrote: Fri Sep 22, 2023 12:43 am Strange enough, it appears that most of the active modelers on our forum are talking about, "the big one". I guess even in modeling, it is always a size issue and evidently bigger may be better (the verdict is still out) but bigger is definitely more work, just ask Neal.
Good on ya for deciding to add a floor and open her up, but now you-ll need the rest of the flight crew and something to fill the cargo hold, any thoughts on that yet? You modeling daredevil you....
As for a payload - seen a couple of nice 1/72 MAZ units - one is a tractor-trailer unit and the other a Scud TEL.
Keep at it
-
RangerNeil
- Captain
- Posts: 4584
- Joined: Fri Jul 12, 2019 9:42 pm
- Location: Dagenham
- Contact:
Re: Mil Mi-V-12 - the BIG one!!
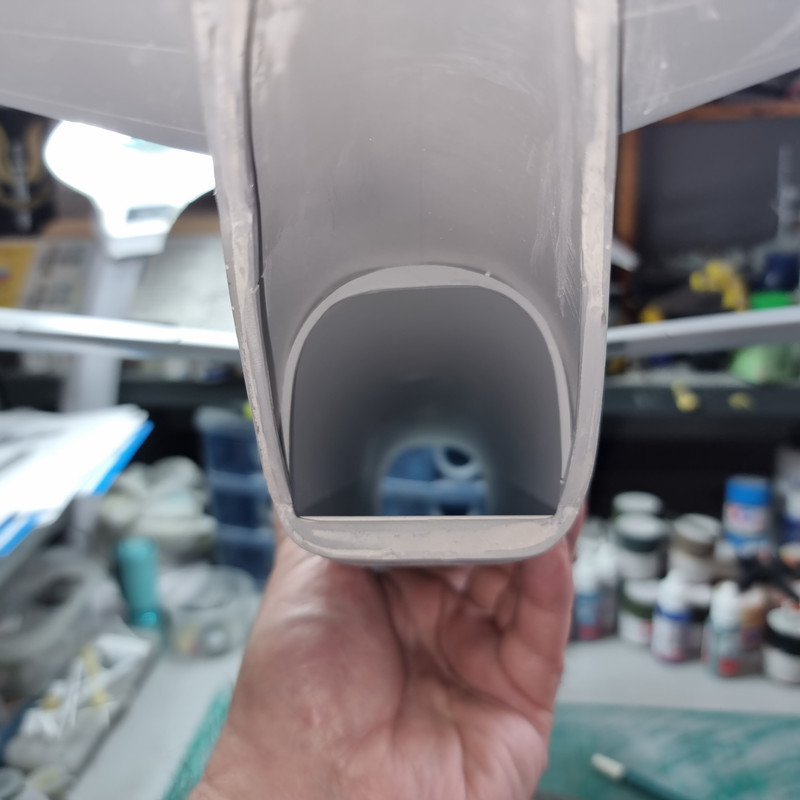
Work is bogging down now due to that missing window. I need to fit that to the cockpit section before I can fit the flight decks. I need to fit them before the rear bulkhead goes in and that needs to go in before I can join the cockpit section to the main body. Which in turn leads to a whole new round of filling and sanding.......
However.... Today was the start of insanity phase 1.
First a piece of paper was cut roughly to shape, pressed into the area of fuselage behind the aft bulkhead and gradually trimmed to shape.
The final shape paper was then taped to a piece of 0.25mm plastic sheet.
This was cut out - thankfully using scissors - and pressed i to the fuselage. A bit of fettling was needed as the plastic was thicker than the paper but it finally went in OK. It actually clips in behind the frame on the loading doors but was also secured with CA.
So thats another job ticked off. Yet more filling and sanding, though, to merge the edge of the plastic sheet with the rear edge of the fuselage roof.
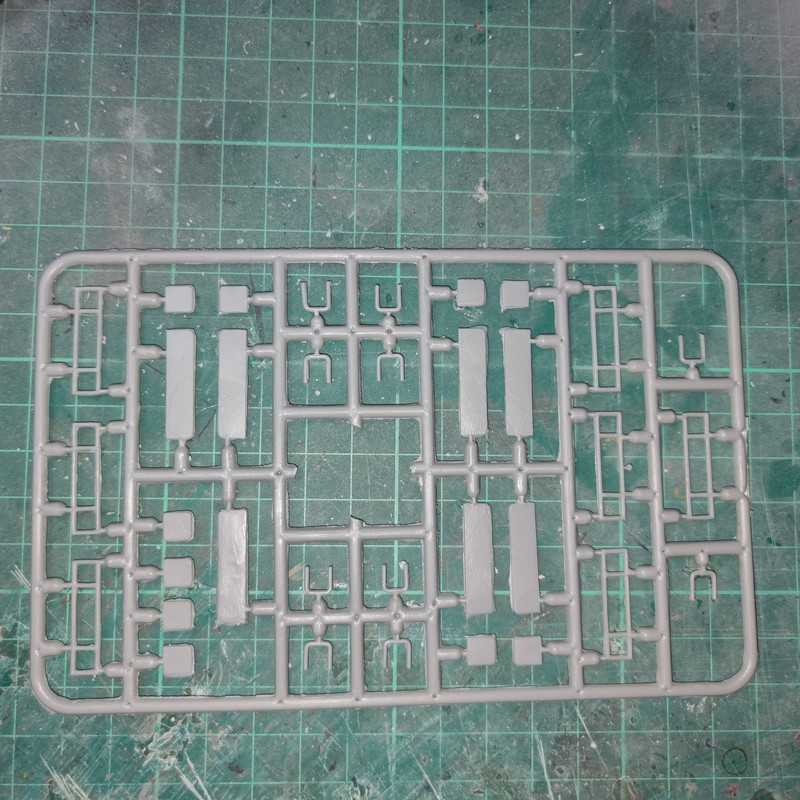
Had a look at the two sprues of load bay seating - the flash on these is chronic:
I've cleaned one up and started painting the parts, also tried assembling one of them:
The theory - currently - is to place one in position and mark the position on the floor, lay a strip of masking tape along that line then stick the seats to the floor before fitting the floor making sure they don't overlap the access doors!
Before I do that though I need to decide if I am going to line the fuselage interior with all that that entails......
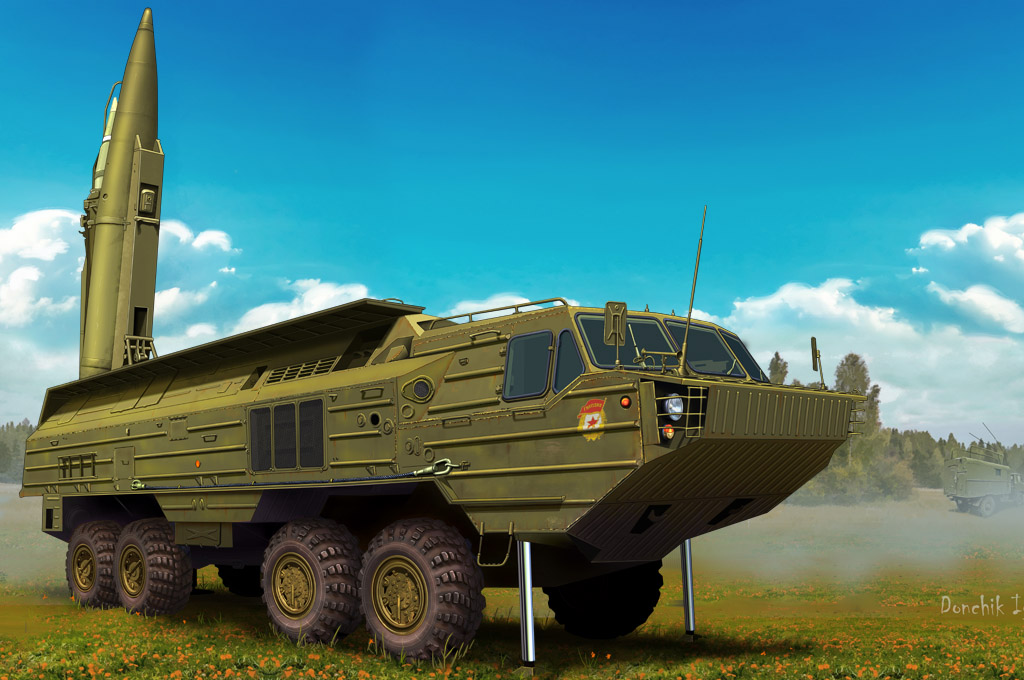
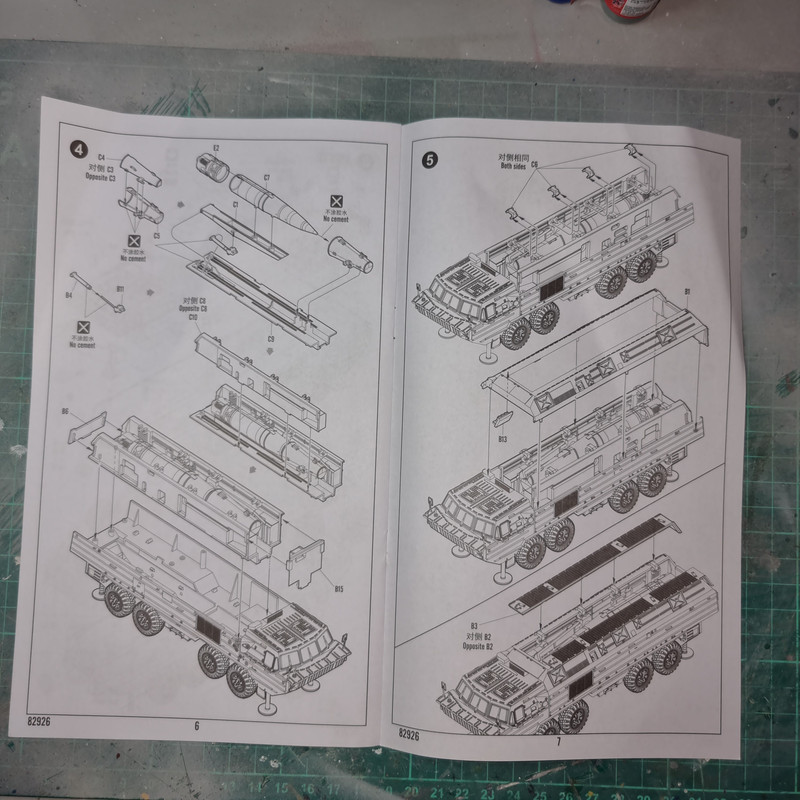
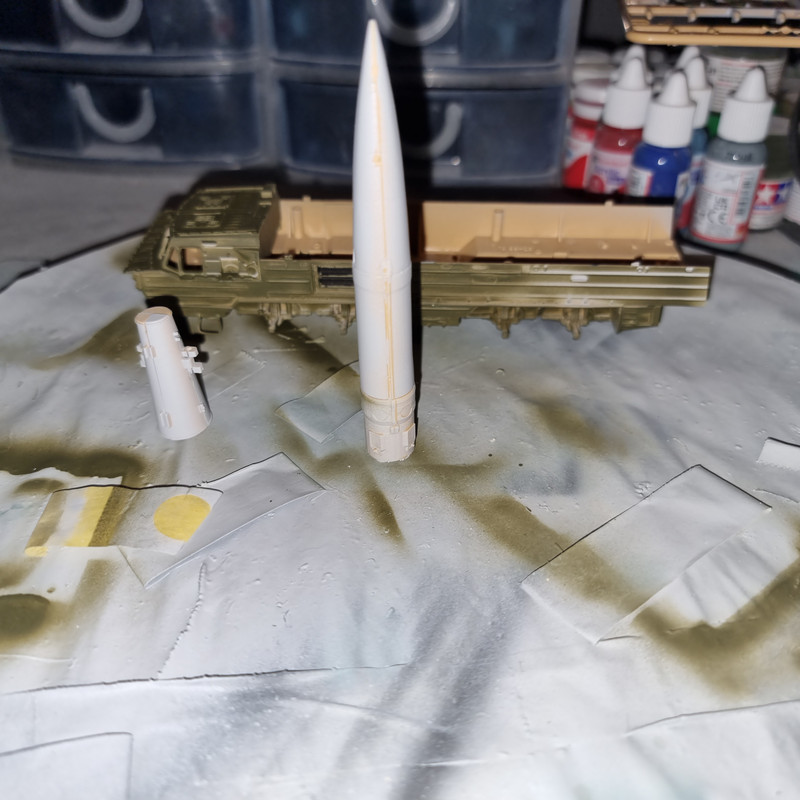
Oh yeah - almost forgot - ordered one of these from Hannants today - a Soviet 9K714 TEL to act as pay load.
However.... Today was the start of insanity phase 1.
First a piece of paper was cut roughly to shape, pressed into the area of fuselage behind the aft bulkhead and gradually trimmed to shape.
The final shape paper was then taped to a piece of 0.25mm plastic sheet.
This was cut out - thankfully using scissors - and pressed i to the fuselage. A bit of fettling was needed as the plastic was thicker than the paper but it finally went in OK. It actually clips in behind the frame on the loading doors but was also secured with CA.
So thats another job ticked off. Yet more filling and sanding, though, to merge the edge of the plastic sheet with the rear edge of the fuselage roof.
Had a look at the two sprues of load bay seating - the flash on these is chronic:
I've cleaned one up and started painting the parts, also tried assembling one of them:
The theory - currently - is to place one in position and mark the position on the floor, lay a strip of masking tape along that line then stick the seats to the floor before fitting the floor making sure they don't overlap the access doors!
Before I do that though I need to decide if I am going to line the fuselage interior with all that that entails......
Oh yeah - almost forgot - ordered one of these from Hannants today - a Soviet 9K714 TEL to act as pay load.
On the board now:
Airfix 1/35 Alvis Stalwart Mk2 FV622
Hobby Boss 1/350 Surcouf
Hobby Boss 1/350 Soviet Alfa class
Hobby Boss 1/350 USN Los Angeles
Mikro Mir 1/350 HMS M1
Scalemates stash info
=58417&fkSTASHSTATUS[]=58417-Stash&page=stash]Scalemates Stash manager
-
digger303
- General
- Posts: 16305
- Joined: Mon Mar 16, 2015 10:01 am
- Location: Western Australia
Re: Mil Mi-V-12 - the BIG one!!
Going for broke  I'm crossing my fingers that it will fit.
Will there be any need to put the seating in if you fill the interior with this payload ?
Will there be any need to put the seating in if you fill the interior with this payload ?
-
RangerNeil
- Captain
- Posts: 4584
- Joined: Fri Jul 12, 2019 9:42 pm
- Location: Dagenham
- Contact:
Re: Mil Mi-V-12 - the BIG one!!
I'm thinking (dangerous I know before anyone else says it) - that the 9K714 will be positioned on the loading ramp so the folded down seats can go up the front. And I might even open one of the passenger doors up front as the kit makes provision for this....digger303 wrote: Sat Sep 23, 2023 1:33 am Going for broke
Will there be any need to put the seating in if you fill the interior with this payload ?
On the board now:
Airfix 1/35 Alvis Stalwart Mk2 FV622
Hobby Boss 1/350 Surcouf
Hobby Boss 1/350 Soviet Alfa class
Hobby Boss 1/350 USN Los Angeles
Mikro Mir 1/350 HMS M1
Scalemates stash info
=58417&fkSTASHSTATUS[]=58417-Stash&page=stash]Scalemates Stash manager
-
RangerNeil
- Captain
- Posts: 4584
- Joined: Fri Jul 12, 2019 9:42 pm
- Location: Dagenham
- Contact:
Re: Mil Mi-V-12 - the BIG one!!
Work is about to stall on this one. I finished one set of rotor blades today:
Just going to start on the other set - then its brick wall time waiting for deliveries...
Currently waiting on:
* The replacement window (fingers still crossed)
* The exterior paint colours.
* The payload
* An A3 sheet of 0.25mm plastic sheet
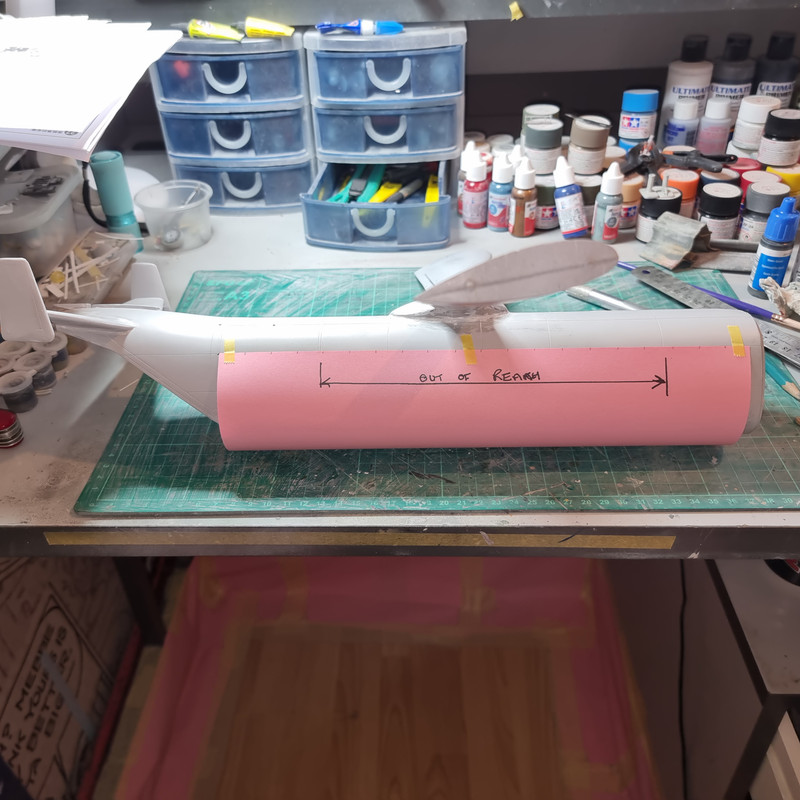
Measured up the interior and I need a piece 152.5mm wide x 308mm long to line the interior of the fuselage. Hence the A3 sheet. Everything now hinges on getting the nose section on to the front of the fuselage as that is guaranteed to be another mammoth fill and sand jobbie......
Just going to start on the other set - then its brick wall time waiting for deliveries...
Currently waiting on:
* The replacement window (fingers still crossed)
* The exterior paint colours.
* The payload
* An A3 sheet of 0.25mm plastic sheet
Measured up the interior and I need a piece 152.5mm wide x 308mm long to line the interior of the fuselage. Hence the A3 sheet. Everything now hinges on getting the nose section on to the front of the fuselage as that is guaranteed to be another mammoth fill and sand jobbie......
On the board now:
Airfix 1/35 Alvis Stalwart Mk2 FV622
Hobby Boss 1/350 Surcouf
Hobby Boss 1/350 Soviet Alfa class
Hobby Boss 1/350 USN Los Angeles
Mikro Mir 1/350 HMS M1
Scalemates stash info
=58417&fkSTASHSTATUS[]=58417-Stash&page=stash]Scalemates Stash manager
-
digger303
- General
- Posts: 16305
- Joined: Mon Mar 16, 2015 10:01 am
- Location: Western Australia
Re: Mil Mi-V-12 - the BIG one!!
I knew how big this was before you started, yet I'm still amazed by it's size and this is in only 1/72.
-
RangerNeil
- Captain
- Posts: 4584
- Joined: Fri Jul 12, 2019 9:42 pm
- Location: Dagenham
- Contact:
Re: Mil Mi-V-12 - the BIG one!!
Same here Digger - just wait till all the various modules start going together!!digger303 wrote: Sun Sep 24, 2023 12:42 am I knew how big this was before you started, yet I'm still amazed by it's size and this is in only 1/72.
On the board now:
Airfix 1/35 Alvis Stalwart Mk2 FV622
Hobby Boss 1/350 Surcouf
Hobby Boss 1/350 Soviet Alfa class
Hobby Boss 1/350 USN Los Angeles
Mikro Mir 1/350 HMS M1
Scalemates stash info
=58417&fkSTASHSTATUS[]=58417-Stash&page=stash]Scalemates Stash manager
-
DRUMS01
- Chief Warrant Officer 3
- Posts: 2251
- Joined: Wed Jun 08, 2016 1:48 am
- Location: Ohio, USA
Re: Mil Mi-V-12 - the BIG one!!
With the ramp being posed open and the Soviet 9K714 TEL being in the rear, you might want to add the firing crew up in or near the seating? Remember that the more you open, then more you will need to detail the cargo area (bracing, spares, fuselage reinforcements, hydraulic and electrical lines, etc.). The good thing with that is there most likely isn't too many detailed photos of the innards, so you can use your creative judgement I would think.
Regardless of all that, good work so far, keep it up.....
Ben
Regardless of all that, good work so far, keep it up.....
Ben
On the table or recently completed:
1/18 AV8-B Harrier - WIP
1/35 Churchill AVRE with SBG Bridge Diorama - DONE
75mm BMW R75 WW2 motorcycle with rider - DONE
1/18 AV8-B Harrier - WIP
1/35 Churchill AVRE with SBG Bridge Diorama - DONE
75mm BMW R75 WW2 motorcycle with rider - DONE
-
RangerNeil
- Captain
- Posts: 4584
- Joined: Fri Jul 12, 2019 9:42 pm
- Location: Dagenham
- Contact:
Re: Mil Mi-V-12 - the BIG one!!
There is method in the madness of choosing the 9K714 - it virtually fills the opening into the fuselage. If I'm lucky all I will need is a pair of folded sets just inside the rear bulkhead.DRUMS01 wrote: Sun Sep 24, 2023 8:39 pm With the ramp being posed open and the Soviet 9K714 TEL being in the rear, you might want to add the firing crew up in or near the seating? Remember that the more you open, then more you will need to detail the cargo area (bracing, spares, fuselage reinforcements, hydraulic and electrical lines, etc.). The good thing with that is there most likely isn't too many detailed photos of the innards, so you can use your creative judgement I would think.
Regardless of all that, good work so far, keep it up.....
Ben
This is the interior as it is now - in a museum - with most of the ancilluaries like seating stripped out:
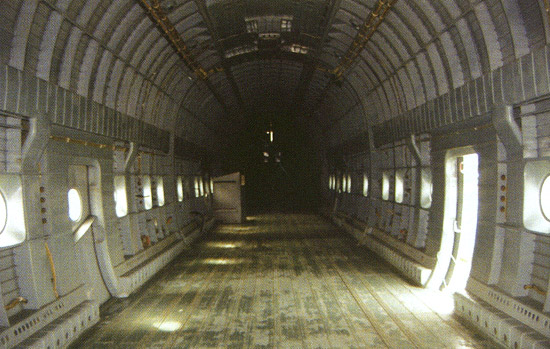
(Image copyright Aviastar.com)
Adding the fine ribbing will be virtually impossible aas the lining gets inserted as a rolled up piece of 0.25mm plastic sheet which is then unrolled inside and worked into place, retained along the edges by the floor at around the ends by CA. Adding even 0.25 rod as ribs will, I think make it impossible to roll it enough to get past the restriction on the front of the fuselage (stepped to allow the cockpit section to fit on).
But - I will try it on a section of scrap!!
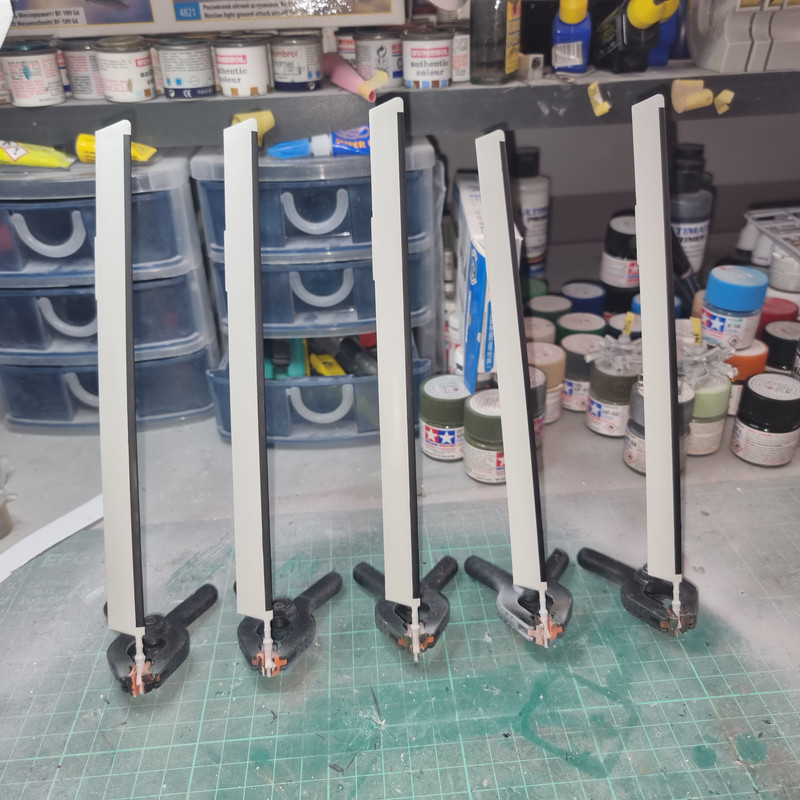
Moving on - is it possible to find a pair of tweezers that won't ping parts off into the ether??? I started on the very final sub assemblies today - the two rear jack that support the fuselage when loading/unloading. One of the first steps was joining two minute pieces - maybe 3mm long max - got them joined just right, went to put them on a piece of paper and suddenly PING!!! Gone forever!! Checked the floor, checked the work top - nothing. Luckily there are two of them so I can copy the other pieces to make replacements but this pinging business is getting on my nerves..... Especially as there are a load of little brackets to go on the fuselage that won't be copiable.......
Other than this the other 5 rotor blades have had their coat of grey which is drying overnight. Tomorrow they get their black leading edges and then its wait for the grey for the rotor arms and head to arrive. Then they can be assembled and painted. Then satin coated and they will be complete.
On the board now:
Airfix 1/35 Alvis Stalwart Mk2 FV622
Hobby Boss 1/350 Surcouf
Hobby Boss 1/350 Soviet Alfa class
Hobby Boss 1/350 USN Los Angeles
Mikro Mir 1/350 HMS M1
Scalemates stash info
=58417&fkSTASHSTATUS[]=58417-Stash&page=stash]Scalemates Stash manager
-
digger303
- General
- Posts: 16305
- Joined: Mon Mar 16, 2015 10:01 am
- Location: Western Australia
Re: Mil Mi-V-12 - the BIG one!!
It is possible to buy tweezers with a curved end. I 've always been meaning to buy a pair, but have never gotten round to it.
https://www.digikey.com.au/en/products/ ... 1263&gad=1
https://jetsinc.com/tweezers/stainless- ... -tweezers/
https://perrinwatchparts.com/collection ... rgeon_4852
https://www.gemcuts.com.au/copper-tongs-fishtail
There is another type too that has a fish tail on one side and a single prong on the other so you have a piece griped at 3 points.
-
digger303
- General
- Posts: 16305
- Joined: Mon Mar 16, 2015 10:01 am
- Location: Western Australia
Re: Mil Mi-V-12 - the BIG one!!
You've got all those box sections that create recesses all up the sides...RangerNeil wrote: Mon Sep 25, 2023 12:39 amThere is method in the madness of choosing the 9K714 - it virtually fills the opening into the fuselage. If I'm lucky all I will need is a pair of folded sets just inside the rear bulkhead.DRUMS01 wrote: Sun Sep 24, 2023 8:39 pm With the ramp being posed open and the Soviet 9K714 TEL being in the rear, you might want to add the firing crew up in or near the seating? Remember that the more you open, then more you will need to detail the cargo area (bracing, spares, fuselage reinforcements, hydraulic and electrical lines, etc.). The good thing with that is there most likely isn't too many detailed photos of the innards, so you can use your creative judgement I would think.
Regardless of all that, good work so far, keep it up.....
Ben
This is the interior as it is now - in a museum - with most of the ancilluaries like seating stripped out:
(Image copyright Aviastar.com)
Adding the fine ribbing will be virtually impossible aas the lining gets inserted as a rolled up piece of 0.25mm plastic sheet which is then unrolled inside and worked into place, retained along the edges by the floor at around the ends by CA. Adding even 0.25 rod as ribs will, I think make it impossible to roll it enough to get past the restriction on the front of the fuselage (stepped to allow the cockpit section to fit on).
But - I will try it on a section of scrap!!
Moving on - is it possible to find a pair of tweezers that won't ping parts off into the ether??? I started on the very final sub assemblies today - the two rear jack that support the fuselage when loading/unloading. One of the first steps was joining two minute pieces - maybe 3mm long max - got them joined just right, went to put them on a piece of paper and suddenly PING!!! Gone forever!! Checked the floor, checked the work top - nothing. Luckily there are two of them so I can copy the other pieces to make replacements but this pinging business is getting on my nerves..... Especially as there are a load of little brackets to go on the fuselage that won't be copiable.......
Other than this the other 5 rotor blades have had their coat of grey which is drying overnight. Tomorrow they get their black leading edges and then its wait for the grey for the rotor arms and head to arrive. Then they can be assembled and painted. Then satin coated and they will be complete.
-
RangerNeil
- Captain
- Posts: 4584
- Joined: Fri Jul 12, 2019 9:42 pm
- Location: Dagenham
- Contact:
Re: Mil Mi-V-12 - the BIG one!!
Thanks for the tweezer info Digger - I will investigate these further!!!
I am thinking the trunking sections can be formed from strips of 2 mm sheet and painted exterally then placed in after the walls and floor are in situ. Fingers crossed it works! That just leaves the issue of the ribbing.......
Finished most of the rear jacks tonight. Firstly this is the mate of the piece that decided - with the aid of a pair of <censored> tweezers - to escape into another dimension:
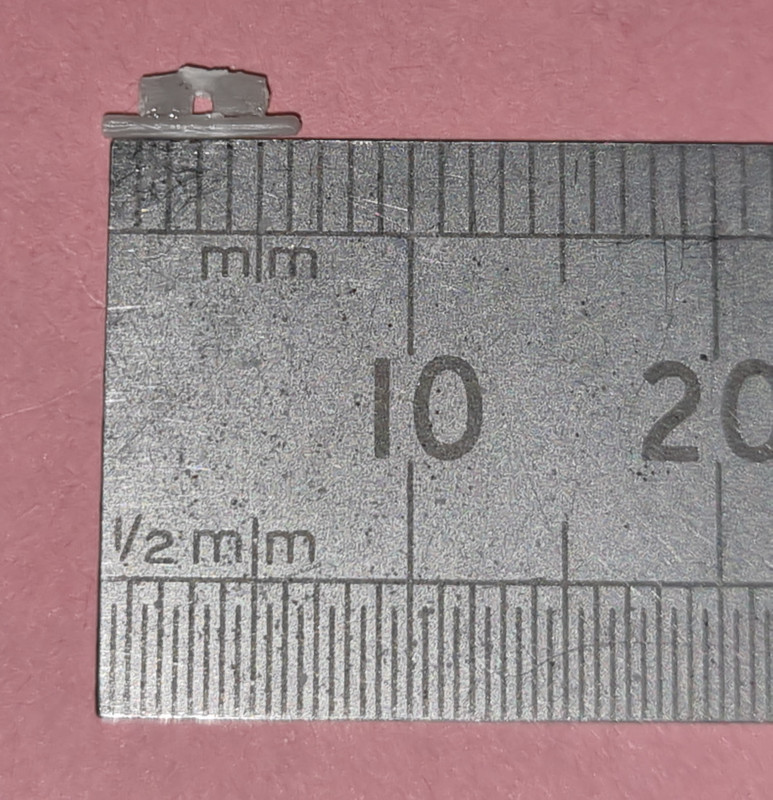
Using the vernier callipers the thickness of the original part was 0.64mm. The materials available were 0.5mm and 0.75mm so I used 0.5mm. Just needed drilling to finish it.:
So the final parts look like this:
As usual the holes in the legs were too small and, when drilled out, started to split so had to be re-stuck..... Going to leave them overnight this time then - carefully - re-drill them. Then its a case of fleaning the assemblies up and giving them a coat of primer. After that everything goes on hold until I can get the cockpit section attached and blended in
I am thinking the trunking sections can be formed from strips of 2 mm sheet and painted exterally then placed in after the walls and floor are in situ. Fingers crossed it works!
Finished most of the rear jacks tonight. Firstly this is the mate of the piece that decided - with the aid of a pair of <censored> tweezers - to escape into another dimension:
Using the vernier callipers the thickness of the original part was 0.64mm. The materials available were 0.5mm and 0.75mm so I used 0.5mm. Just needed drilling to finish it.:
So the final parts look like this:
As usual the holes in the legs were too small and, when drilled out, started to split so had to be re-stuck..... Going to leave them overnight this time then - carefully - re-drill them. Then its a case of fleaning the assemblies up and giving them a coat of primer. After that everything goes on hold until I can get the cockpit section attached and blended in
On the board now:
Airfix 1/35 Alvis Stalwart Mk2 FV622
Hobby Boss 1/350 Surcouf
Hobby Boss 1/350 Soviet Alfa class
Hobby Boss 1/350 USN Los Angeles
Mikro Mir 1/350 HMS M1
Scalemates stash info
=58417&fkSTASHSTATUS[]=58417-Stash&page=stash]Scalemates Stash manager
-
digger303
- General
- Posts: 16305
- Joined: Mon Mar 16, 2015 10:01 am
- Location: Western Australia
Re: Mil Mi-V-12 - the BIG one!!
That is a annoying thing with the drill bits I use. The spiral cutting edge is so steep that once it starts to bite in a hole that just needs widening. Grips aggressively and pulls itself right in. It actually threads a pathway and pulls through until it reaches the end of the bit or if the side walls are a little close splits the plastic....damn annoying.RangerNeil wrote: Mon Sep 25, 2023 8:17 pm Thanks for the tweezer info Digger - I will investigate these further!!!
I am thinking the trunking sections can be formed from strips of 2 mm sheet and painted exterally then placed in after the walls and floor are in situ. Fingers crossed it works!
Finished most of the rear jacks tonight. Firstly this is the mate of the piece that decided - with the aid of a pair of <censored> tweezers - to escape into another dimension:
Using the vernier callipers the thickness of the original part was 0.64mm. The materials available were 0.5mm and 0.75mm so I used 0.5mm. Just needed drilling to finish it.:
So the final parts look like this:
As usual the holes in the legs were too small and, when drilled out, started to split so had to be re-stuck..... Going to leave them overnight this time then - carefully - re-drill them. Then its a case of fleaning the assemblies up and giving them a coat of primer. After that everything goes on hold until I can get the cockpit section attached and blended in
-
RangerNeil
- Captain
- Posts: 4584
- Joined: Fri Jul 12, 2019 9:42 pm
- Location: Dagenham
- Contact:
Re: Mil Mi-V-12 - the BIG one!!
Pretty much reached an impasse on the Mil at the moment. All the sub-assemblies are done, the last 5 rotor blades got the black edge today:
The rotor heads are now primed as are the rear jacks so tomorrow its give the rotor heads and the arms of the rotors a coat of the darker grey, then assemble the rotors to the heads and, when set, give them a coat of satin varnish. And then the Mil grinds to a halt until such time as I feel its give to give up on the replacement window....
Meantime - this is the amount of empty sprues so far:
Theres about a third as much again still in the box.......
Anyways - to keep busy (and keep Digger happy!!) I started on the payload this evening.
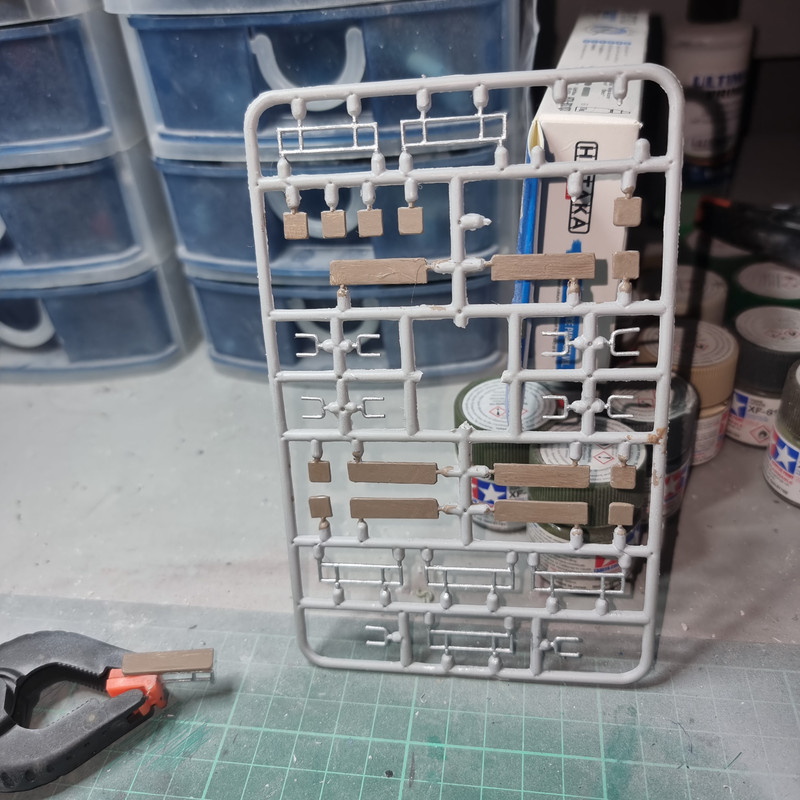
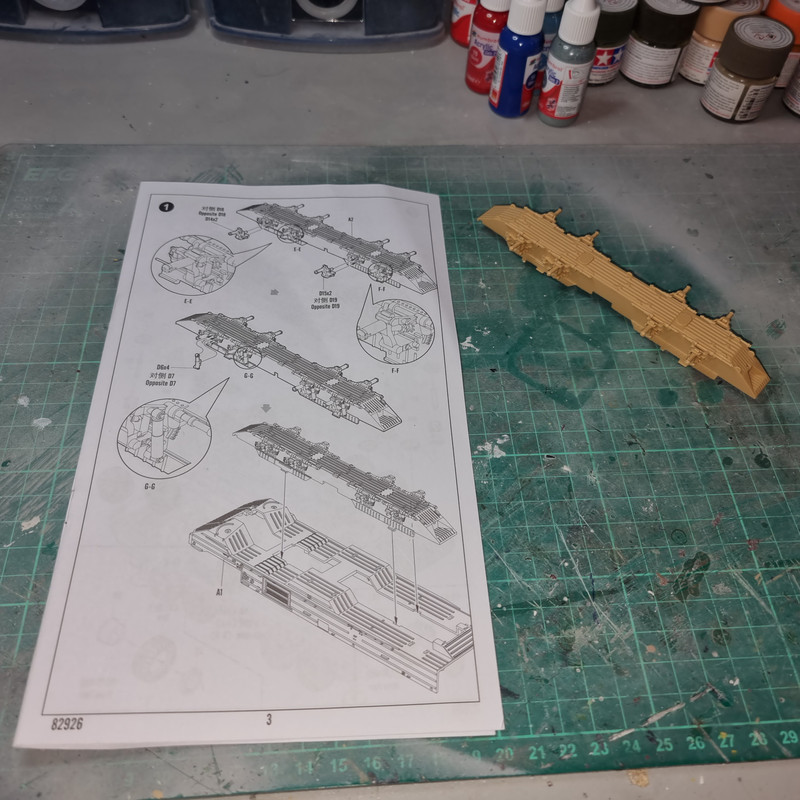
These are the sprues for the 9K714:
The PE and decals:
The instructions:
Painting guide:

First assembly phase:
After weeks of nothing but butt joints (and the accompanying panic) it was a relief and a joy to have something that actually had physical locations. The 8 wheel stations actually CLIP into the body of the vehicle!! Took a little working out but ended up clipping the lower end in first then pushed the upper end down an in before "persuading" the drive shaft to locate into its hole! Once all were in a dab of TET top.and bottom serves to lock them in place.
This part promises to be a very enjoyable build......
The rotor heads are now primed as are the rear jacks so tomorrow its give the rotor heads and the arms of the rotors a coat of the darker grey, then assemble the rotors to the heads and, when set, give them a coat of satin varnish. And then the Mil grinds to a halt until such time as I feel its give to give up on the replacement window....
Meantime - this is the amount of empty sprues so far:
Theres about a third as much again still in the box.......
Anyways - to keep busy (and keep Digger happy!!) I started on the payload this evening.
These are the sprues for the 9K714:
The PE and decals:
The instructions:
Painting guide:
First assembly phase:
After weeks of nothing but butt joints (and the accompanying panic) it was a relief and a joy to have something that actually had physical locations. The 8 wheel stations actually CLIP into the body of the vehicle!! Took a little working out but ended up clipping the lower end in first then pushed the upper end down an in before "persuading" the drive shaft to locate into its hole! Once all were in a dab of TET top.and bottom serves to lock them in place.
This part promises to be a very enjoyable build......
On the board now:
Airfix 1/35 Alvis Stalwart Mk2 FV622
Hobby Boss 1/350 Surcouf
Hobby Boss 1/350 Soviet Alfa class
Hobby Boss 1/350 USN Los Angeles
Mikro Mir 1/350 HMS M1
Scalemates stash info
=58417&fkSTASHSTATUS[]=58417-Stash&page=stash]Scalemates Stash manager
-
digger303
- General
- Posts: 16305
- Joined: Mon Mar 16, 2015 10:01 am
- Location: Western Australia
Re: Mil Mi-V-12 - the BIG one!!
Nice to have a win sometimes.
-
RangerNeil
- Captain
- Posts: 4584
- Joined: Fri Jul 12, 2019 9:42 pm
- Location: Dagenham
- Contact:
Re: Mil Mi-V-12 - the BIG one!!
It surely is!!
On topic though - both of the rotors are complete bar satin top coat - will be doing that tomorrow. I don't recall any decals on the blades but will double check first.
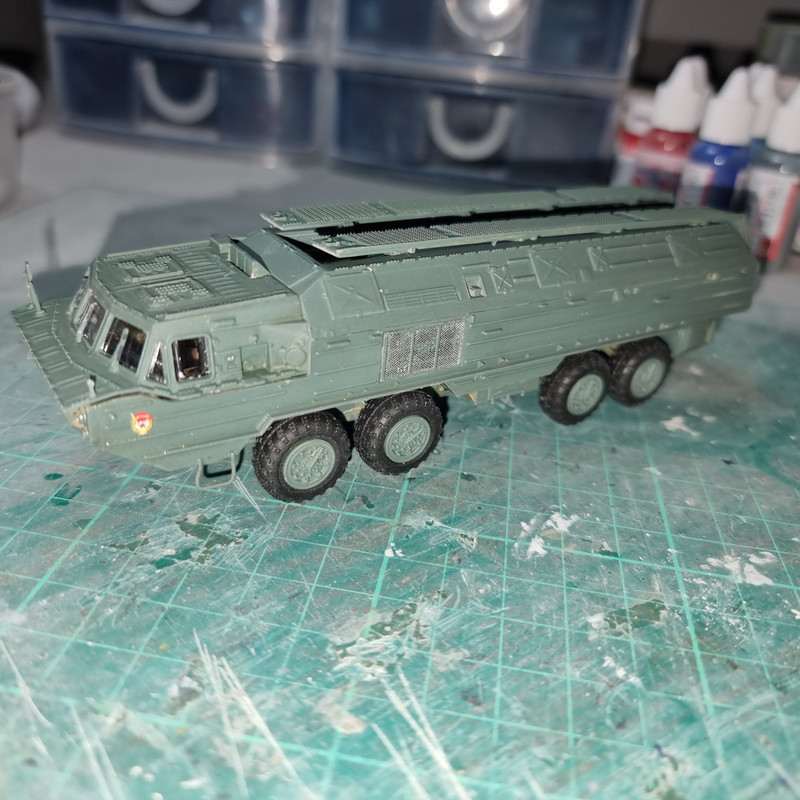
And the lower hull of the 9K714 is completed and in primer as is the rest of the kit now ready for the topcoat of 4BO green before detailing etc.

This part is progressing much faster than anticipated.....
On the board now:
Airfix 1/35 Alvis Stalwart Mk2 FV622
Hobby Boss 1/350 Surcouf
Hobby Boss 1/350 Soviet Alfa class
Hobby Boss 1/350 USN Los Angeles
Mikro Mir 1/350 HMS M1
Scalemates stash info
=58417&fkSTASHSTATUS[]=58417-Stash&page=stash]Scalemates Stash manager
-
aur0ra145
- Second Lieutenant
- Posts: 3155
- Joined: Thu Jan 14, 2016 9:44 am
- Location: TX
- Contact:
Re: Mil Mi-V-12 - the BIG one!!
SS-23 looks like it's coming along nicely!
-
RangerNeil
- Captain
- Posts: 4584
- Joined: Fri Jul 12, 2019 9:42 pm
- Location: Dagenham
- Contact:
Re: Mil Mi-V-12 - the BIG one!!
It is indeed - restoring some much needed mojo in the process!!
I had some Vallejo Model Air Russian green so I gave the lower half of the body and the cab a coat with the airbrush tonight. Not too happy as its dried a semi-gloss right now. I have some Mig 4BO so tomorrow I might give it a dust over with that.
And - in the way of all things Russian/Soviet - even the payload has a payload!!
Apparently the little cover on the left is what stops the warhead accidentally going BOOM whilst in transit!!!
On the board now:
Airfix 1/35 Alvis Stalwart Mk2 FV622
Hobby Boss 1/350 Surcouf
Hobby Boss 1/350 Soviet Alfa class
Hobby Boss 1/350 USN Los Angeles
Mikro Mir 1/350 HMS M1
Scalemates stash info
=58417&fkSTASHSTATUS[]=58417-Stash&page=stash]Scalemates Stash manager
-
digger303
- General
- Posts: 16305
- Joined: Mon Mar 16, 2015 10:01 am
- Location: Western Australia
-
RangerNeil
- Captain
- Posts: 4584
- Joined: Fri Jul 12, 2019 9:42 pm
- Location: Dagenham
- Contact:
Re: Mil Mi-V-12 - the BIG one!!
Progressed the 9K714 today. I'm thinking I will finish this before returning to the Mill.
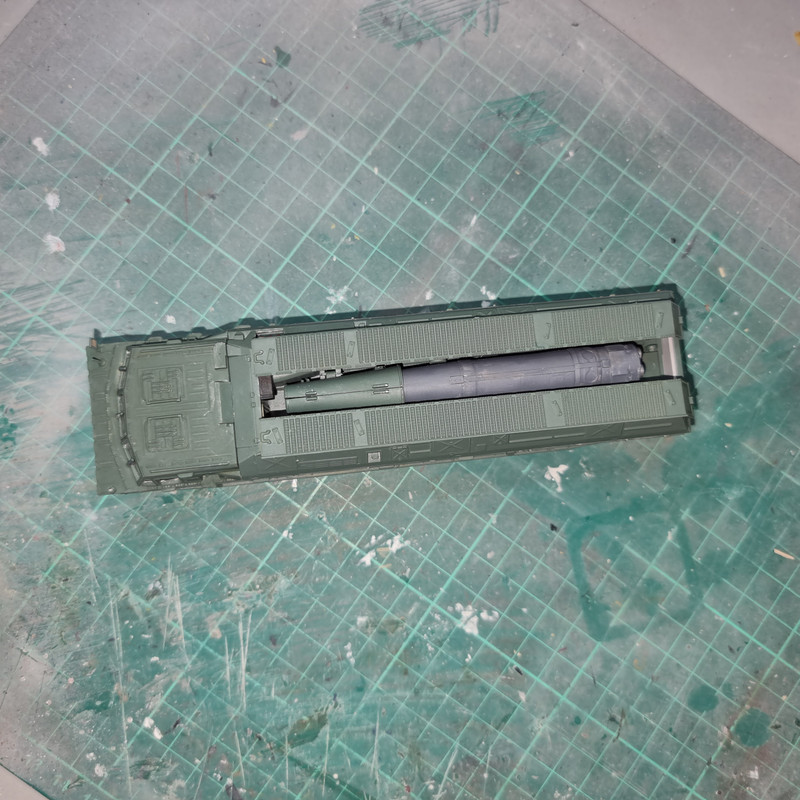
First thing was digging out a set of Ammo Mig Russian Green paints. The correct one for the era of this vehicle is decidely a more blue-green than the 4BO green one of WW2/1950's. So all the exterior and the missile bay was repainted and allowed to dry then assembly started on the missile bay. This is where the - so far - first and only issue cropped up. The base of the ram for the erector is supposed to snap in between two brackets inside the channel - and its a PITA to get it in. I ended up pushing the brackets apart by opening a set of needle nose pliars in them. But I don't think the ram is in correctly as it looks canted to one side. Something to address tomorrow. Other than this its a case of fitting the sides and ends to the missile bay, fitting that to the lower hull.and then fitting the upper hull and bay cover doors.
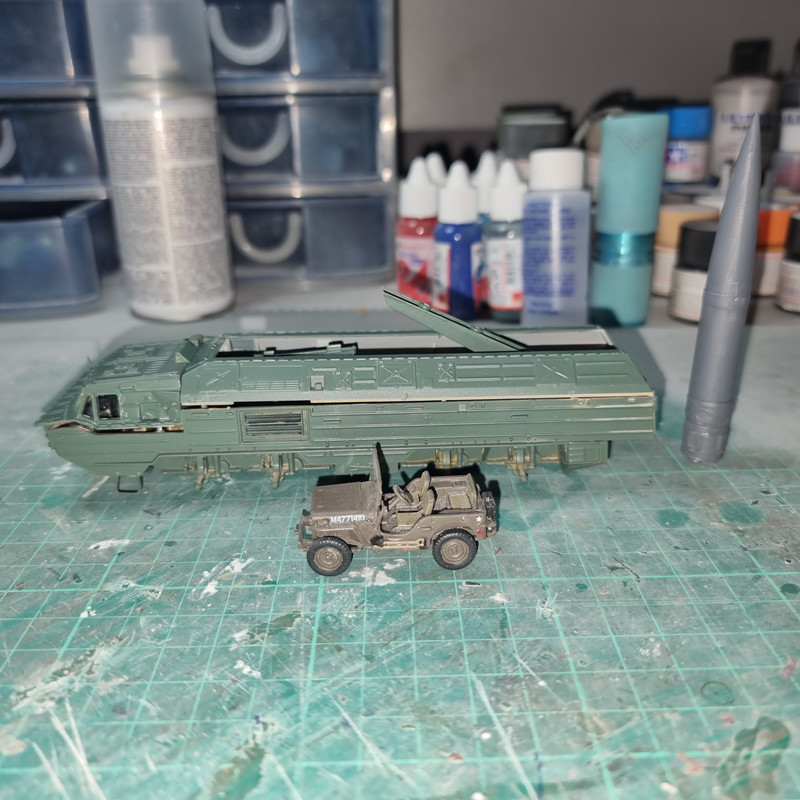
Jeep is the to give an indication of the size of this thing!!
Oh - and the A3 sheet of 0.25mm plastic card arrived today to line the interior of the Mils fuselage.....
First thing was digging out a set of Ammo Mig Russian Green paints. The correct one for the era of this vehicle is decidely a more blue-green than the 4BO green one of WW2/1950's. So all the exterior and the missile bay was repainted and allowed to dry then assembly started on the missile bay. This is where the - so far - first and only issue cropped up. The base of the ram for the erector is supposed to snap in between two brackets inside the channel - and its a PITA to get it in. I ended up pushing the brackets apart by opening a set of needle nose pliars in them. But I don't think the ram is in correctly as it looks canted to one side. Something to address tomorrow. Other than this its a case of fitting the sides and ends to the missile bay, fitting that to the lower hull.and then fitting the upper hull and bay cover doors.
Jeep is the to give an indication of the size of this thing!!
Oh - and the A3 sheet of 0.25mm plastic card arrived today to line the interior of the Mils fuselage.....
On the board now:
Airfix 1/35 Alvis Stalwart Mk2 FV622
Hobby Boss 1/350 Surcouf
Hobby Boss 1/350 Soviet Alfa class
Hobby Boss 1/350 USN Los Angeles
Mikro Mir 1/350 HMS M1
Scalemates stash info
=58417&fkSTASHSTATUS[]=58417-Stash&page=stash]Scalemates Stash manager
-
RangerNeil
- Captain
- Posts: 4584
- Joined: Fri Jul 12, 2019 9:42 pm
- Location: Dagenham
- Contact:
Re: Mil Mi-V-12 - the BIG one!!
Completed the payload with a payload today! 
The 9K714 was a pleasure to build - only two issues in the entire kit:
* The fitting of the base of the ram for the erector.
* The doors on top of the missile bay don't close properly.
* The ram I have an idea for if I do it again - although if I do I won't bother with a moving missile crade, it will be fixed in one position.
* The doors were fitted as per instructions - but - thinking about it later on I suspect the part numbers are swapped on the instructions! They are clip-on hinges so easy enough to pop-off and swap over. I'll give that a try tomorrow before starting on lining the main fuselage.

And the usual jeep comparison:

The 9K714 was a pleasure to build - only two issues in the entire kit:
* The fitting of the base of the ram for the erector.
* The doors on top of the missile bay don't close properly.
* The ram I have an idea for if I do it again - although if I do I won't bother with a moving missile crade, it will be fixed in one position.
* The doors were fitted as per instructions - but - thinking about it later on I suspect the part numbers are swapped on the instructions! They are clip-on hinges so easy enough to pop-off and swap over. I'll give that a try tomorrow before starting on lining the main fuselage.
And the usual jeep comparison:
On the board now:
Airfix 1/35 Alvis Stalwart Mk2 FV622
Hobby Boss 1/350 Surcouf
Hobby Boss 1/350 Soviet Alfa class
Hobby Boss 1/350 USN Los Angeles
Mikro Mir 1/350 HMS M1
Scalemates stash info
=58417&fkSTASHSTATUS[]=58417-Stash&page=stash]Scalemates Stash manager
-
digger303
- General
- Posts: 16305
- Joined: Mon Mar 16, 2015 10:01 am
- Location: Western Australia
Re: Mil Mi-V-12 - the BIG one!!
That didn't take too long at all.
-
RangerNeil
- Captain
- Posts: 4584
- Joined: Fri Jul 12, 2019 9:42 pm
- Location: Dagenham
- Contact:
Re: Mil Mi-V-12 - the BIG one!!
It quite literally clipped together mate. As said there were only two issues in the entire build - I spent almost as much time waiting for paint to dry as I did assembling it.
On the board now:
Airfix 1/35 Alvis Stalwart Mk2 FV622
Hobby Boss 1/350 Surcouf
Hobby Boss 1/350 Soviet Alfa class
Hobby Boss 1/350 USN Los Angeles
Mikro Mir 1/350 HMS M1
Scalemates stash info
=58417&fkSTASHSTATUS[]=58417-Stash&page=stash]Scalemates Stash manager
-
RangerNeil
- Captain
- Posts: 4584
- Joined: Fri Jul 12, 2019 9:42 pm
- Location: Dagenham
- Contact:
Re: Mil Mi-V-12 - the BIG one!!
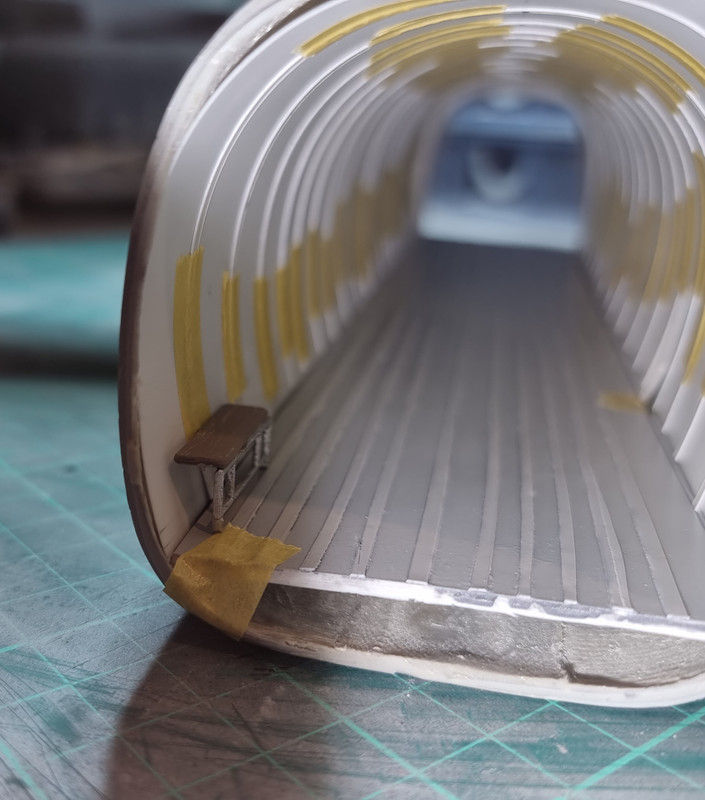
Fuselage liner is cut, shaped and ready to go in.
Before
After
Question now is what to stick it in with? I am not sure if Ammo Ultra will hold it onto resin matting so I'm wondering if a very slow setting CA adhesive would be best? Or perhaps even a UV setting one?
All thoughts/input are welcome please.....
Still got to sort out the ribbing too.......
On the board now:
Airfix 1/35 Alvis Stalwart Mk2 FV622
Hobby Boss 1/350 Surcouf
Hobby Boss 1/350 Soviet Alfa class
Hobby Boss 1/350 USN Los Angeles
Mikro Mir 1/350 HMS M1
Scalemates stash info
=58417&fkSTASHSTATUS[]=58417-Stash&page=stash]Scalemates Stash manager
-
digger303
- General
- Posts: 16305
- Joined: Mon Mar 16, 2015 10:01 am
- Location: Western Australia
Re: Mil Mi-V-12 - the BIG one!!
Could you just run thin Ca into it ?
Stand it on end and just flood it down the inside edge from the ramp towards the cockpit.
Stand it on end and just flood it down the inside edge from the ramp towards the cockpit.
-
RangerNeil
- Captain
- Posts: 4584
- Joined: Fri Jul 12, 2019 9:42 pm
- Location: Dagenham
- Contact:
Re: Mil Mi-V-12 - the BIG one!!
Thats a possibility- thanks Digger.digger303 wrote: Sun Oct 01, 2023 2:14 am Could you just run thin Ca into it ?
Stand it on end and just flood it down the inside edge from the ramp towards the cockpit.
On the board now:
Airfix 1/35 Alvis Stalwart Mk2 FV622
Hobby Boss 1/350 Surcouf
Hobby Boss 1/350 Soviet Alfa class
Hobby Boss 1/350 USN Los Angeles
Mikro Mir 1/350 HMS M1
Scalemates stash info
=58417&fkSTASHSTATUS[]=58417-Stash&page=stash]Scalemates Stash manager
-
digger303
- General
- Posts: 16305
- Joined: Mon Mar 16, 2015 10:01 am
- Location: Western Australia
Re: Mil Mi-V-12 - the BIG one!!
I'm unsure where you want to apply it. Is it the walls to the deck or all round the inside wall lining.RangerNeil wrote: Sun Oct 01, 2023 11:05 amThats a possibility- thanks Digger.digger303 wrote: Sun Oct 01, 2023 2:14 am Could you just run thin Ca into it ?
Stand it on end and just flood it down the inside edge from the ramp towards the cockpit.
If you need to fill large gaps, maybe even a bit of silicone. It is sticky enough to hold anything in place.
-
RangerNeil
- Captain
- Posts: 4584
- Joined: Fri Jul 12, 2019 9:42 pm
- Location: Dagenham
- Contact:
Re: Mil Mi-V-12 - the BIG one!!
Need to apply it inside the main fuselage to hold a sheet 305mm x 160mm in place and conforming to the curves. Solidly enough so that when I start drilling holes it doesn't come apart!!digger303 wrote: Sun Oct 01, 2023 3:31 pmI'm unsure where you want to apply it. Is it the walls to the deck or all round the inside wall lining.RangerNeil wrote: Sun Oct 01, 2023 11:05 amThats a possibility- thanks Digger.digger303 wrote: Sun Oct 01, 2023 2:14 am Could you just run thin Ca into it ?
Stand it on end and just flood it down the inside edge from the ramp towards the cockpit.
If you need to fill large gaps, maybe even a bit of silicone. It is sticky enough to hold anything in place.
On the board now:
Airfix 1/35 Alvis Stalwart Mk2 FV622
Hobby Boss 1/350 Surcouf
Hobby Boss 1/350 Soviet Alfa class
Hobby Boss 1/350 USN Los Angeles
Mikro Mir 1/350 HMS M1
Scalemates stash info
=58417&fkSTASHSTATUS[]=58417-Stash&page=stash]Scalemates Stash manager
-
RangerNeil
- Captain
- Posts: 4584
- Joined: Fri Jul 12, 2019 9:42 pm
- Location: Dagenham
- Contact:
Re: Mil Mi-V-12 - the BIG one!!
Back to the Mil today - I had a brain wave regarding the inner ribs!!.
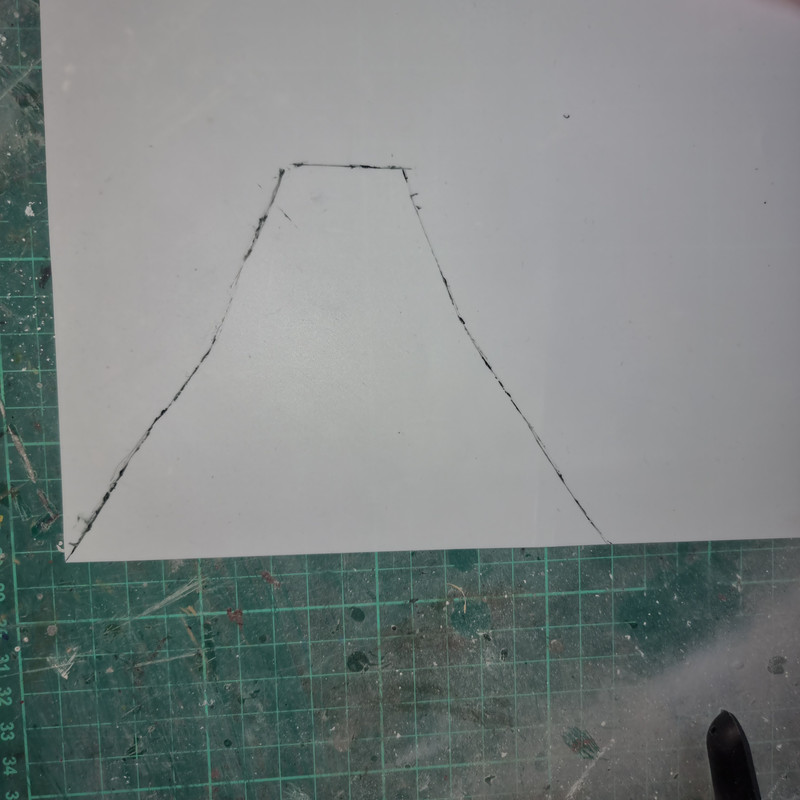
First stand the nose on a piece of paper and trace around it:
This gives the external outline. Next step grab a ruler and work out how much to take off for the wall thickness. In this case 1.5mm
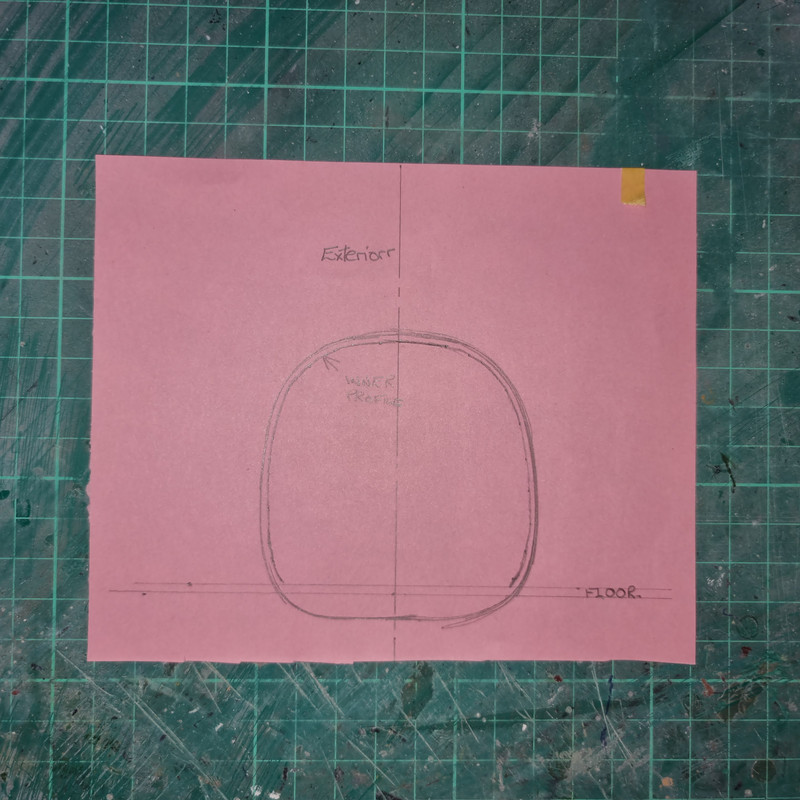
Cut the external shape out and try for size:
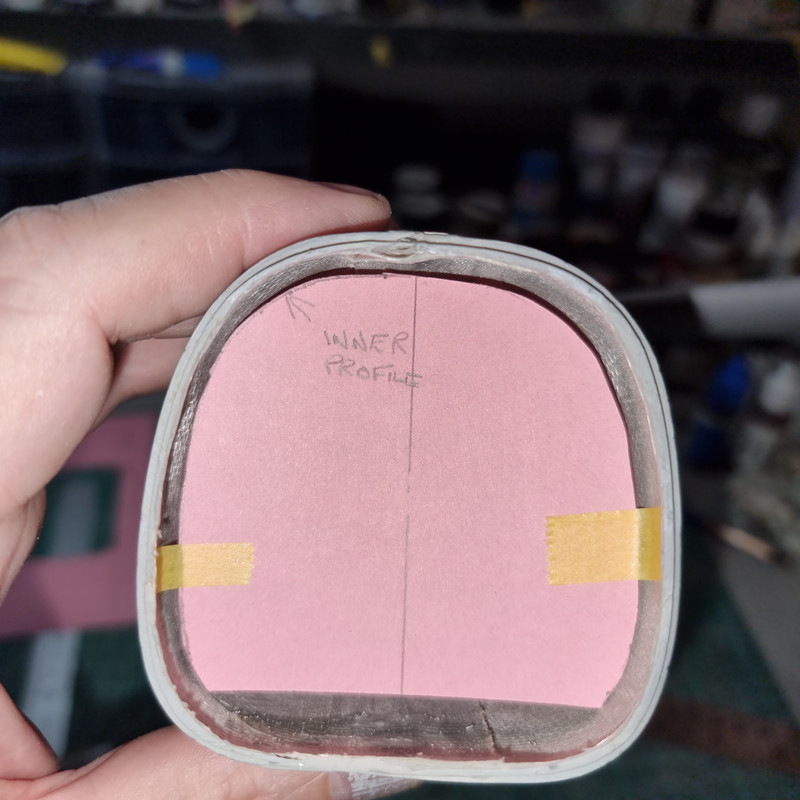
Looks pretty close as a first attempt - so estimate the thickness of the ribs from a photo of the interior - I reckoned 2mm would be close enough, mark out the interior profile and cut out the shape of the rib. Paper is useless for this kind of fitting test so transfer the profile to a peice of card, cut that out and try it:

It seems to work!!! But - and with this Mil there is always a but - it raises another issue!!
I estimated the number of ribs from the interior at 20 which gives roughly a 15mm spacing, the photo below indicates the nature of the problem raised by the "but":
At least half the interior is out of reach from either end!
So - next plan to try is make up a short section of liner, fit it inside loose, fit the floor temporarily and then fit a couple of ribs cut from 0.25mm sheet. Remove the floor and then see if the section with the ribs now attached can be removed. If it can then the plan is to assemble the ribs to the liner and then fit it. The crunch will be whether or not the lower edges can be squeezed in by about 3mm to 5mm a side to get through the "necking" where the cockpit section attaches.
If it won't - then its a much bigger problem.....
First stand the nose on a piece of paper and trace around it:
This gives the external outline. Next step grab a ruler and work out how much to take off for the wall thickness. In this case 1.5mm
Cut the external shape out and try for size:
Looks pretty close as a first attempt - so estimate the thickness of the ribs from a photo of the interior - I reckoned 2mm would be close enough, mark out the interior profile and cut out the shape of the rib. Paper is useless for this kind of fitting test so transfer the profile to a peice of card, cut that out and try it:
It seems to work!!! But - and with this Mil there is always a but - it raises another issue!!
I estimated the number of ribs from the interior at 20 which gives roughly a 15mm spacing, the photo below indicates the nature of the problem raised by the "but":
At least half the interior is out of reach from either end!
So - next plan to try is make up a short section of liner, fit it inside loose, fit the floor temporarily and then fit a couple of ribs cut from 0.25mm sheet. Remove the floor and then see if the section with the ribs now attached can be removed. If it can then the plan is to assemble the ribs to the liner and then fit it. The crunch will be whether or not the lower edges can be squeezed in by about 3mm to 5mm a side to get through the "necking" where the cockpit section attaches.
If it won't - then its a much bigger problem.....
On the board now:
Airfix 1/35 Alvis Stalwart Mk2 FV622
Hobby Boss 1/350 Surcouf
Hobby Boss 1/350 Soviet Alfa class
Hobby Boss 1/350 USN Los Angeles
Mikro Mir 1/350 HMS M1
Scalemates stash info
=58417&fkSTASHSTATUS[]=58417-Stash&page=stash]Scalemates Stash manager
-
DRUMS01
- Chief Warrant Officer 3
- Posts: 2251
- Joined: Wed Jun 08, 2016 1:48 am
- Location: Ohio, USA
Re: Mil Mi-V-12 - the BIG one!!
The progress and ideas are moving forward. I like the method you created for the ribs. I am curious though on how your going to space each rib all the way through and ensure they are uniformly and consistently flush against the inside walls while simultaneously being able to slide the sleeve into the already built "tube" of a fuselage while keeping everything tight.
If you may, I propose this alternate and hopefully easier option. Considering the scale (1/72) the ribs inside the fuselage would not be real pronounced, after all... what is a 6 inch rib in 1/72 scale (?). So perhaps you could insert the sleeve and floor, mark the location on the sleeve where the floor meets the walls (front and back) then draw a line from the marked lines of the front and rear for the center floor location on the wall sleeve. Next you could use narrow strips of sheet plastic the same thickness of the wall to replicate the ribbing, attaching them flat and in equal spacing from one mark on the floor above and across to the other mark of the floor. Then repeat the strips for the necessary ribbing. In theory the thin strips can still be rolled with the sleeve and inserted into the fuselage. To make the ribs stand out you could paint them a lighter shade of the wall color prior to inserting the sleeve into the fuselage. The extra details above the windows could easily be added before inserting the fuselage too. That would ensure the size, spacing, tightness, and colors of the wall while still allowing you to roll the sleeve and insert it. The extra thin plastic strips would also provide tension to help you reinforce or keep pressure (contact) outward between the sleeve and the inner wall too. The extra bulk items shown in your photograph inside the fuselage near the floor, around the doors can be then added to the floor so it could be slid in just under the ribs to be uniform and tight against the sleeved wall and ribs. Finally the small details on the top of the storage area can be added using another plastic sheet glued to the roof after everything is installed.
I hope what I'm trying to say makes sense to you, and as I said, it is not what I would say is the only way, it is only a suggestion of perhaps a much easier way of achieving a similar result. Rest assured that I will be watching and more than likely learning something about this process from you....
Ben
On the table or recently completed:
1/18 AV8-B Harrier - WIP
1/35 Churchill AVRE with SBG Bridge Diorama - DONE
75mm BMW R75 WW2 motorcycle with rider - DONE
1/18 AV8-B Harrier - WIP
1/35 Churchill AVRE with SBG Bridge Diorama - DONE
75mm BMW R75 WW2 motorcycle with rider - DONE
-
digger303
- General
- Posts: 16305
- Joined: Mon Mar 16, 2015 10:01 am
- Location: Western Australia
Re: Mil Mi-V-12 - the BIG one!!
Painting down the middle of this thing is going to be a problem too. So maybe as Ben says attach the flat strips then paint before inserting for the finial time. Use epoxy to hold it in place for the hole drilling and hope it doesn't get messy.
-
RangerNeil
- Captain
- Posts: 4584
- Joined: Fri Jul 12, 2019 9:42 pm
- Location: Dagenham
- Contact:
Re: Mil Mi-V-12 - the BIG one!!
Cheers guys. Much appreciated.
I like the idea of the strips. A lot.
What I had planned to do was lightly mark the liner using a set square for the divisions and a rule for the centre line. Mark the centres of the ribs, align the two and then wrap the liners around the ribs. But the strip idea sounds easier and cleaner.
And deffo priming and painting before inserting.
I will have a play with some scrap tomorrow (today now?).
Something I saw late tonight was UV setting adhesive - need to have a dig into that to see (a) how it works and (b) whether its suitable....
On the board now:
Airfix 1/35 Alvis Stalwart Mk2 FV622
Hobby Boss 1/350 Surcouf
Hobby Boss 1/350 Soviet Alfa class
Hobby Boss 1/350 USN Los Angeles
Mikro Mir 1/350 HMS M1
Scalemates stash info
=58417&fkSTASHSTATUS[]=58417-Stash&page=stash]Scalemates Stash manager
-
DRUMS01
- Chief Warrant Officer 3
- Posts: 2251
- Joined: Wed Jun 08, 2016 1:48 am
- Location: Ohio, USA
Re: Mil Mi-V-12 - the BIG one!!
Another great benefit of the UV adhesive is that it will allow you to manipulate the sleeve and then the floor into place before you cure it with the UV light.
As for the hole drilling, why not remove the areas creating the "holes" in the fuselage prior to adding the sleeve. Once the holes are removed, slide in the sleeve and mark the location of the holes. Take out the sleeve and remove the holes within the sleeve. Then you can begin the ribs, detail, and painting of the sleeve. Afterward, re-insert the sleeve and , in theory, the holes should align. Of course, you can test and fit until your desired alignment is perfect before the ribs, details, and paint are even applied. Perhaps you could create some alignment marks on the resin and sleeve to ensure the orientation is consistent too.
Any way you choose, I'm sure you got this...
On the table or recently completed:
1/18 AV8-B Harrier - WIP
1/35 Churchill AVRE with SBG Bridge Diorama - DONE
75mm BMW R75 WW2 motorcycle with rider - DONE
1/18 AV8-B Harrier - WIP
1/35 Churchill AVRE with SBG Bridge Diorama - DONE
75mm BMW R75 WW2 motorcycle with rider - DONE
-
digger303
- General
- Posts: 16305
- Joined: Mon Mar 16, 2015 10:01 am
- Location: Western Australia
Re: Mil Mi-V-12 - the BIG one!!
I'm not sure the UV adhesive will work if the glue is between the fuselage and the liner......how will the light penetrate.DRUMS01 wrote: Mon Oct 02, 2023 5:02 am Another great benefit of the UV adhesive is that it will allow you to manipulate the sleeve and then the floor into place before you cure it with the UV light.
As for the hole drilling, why not remove the areas creating the "holes" in the fuselage prior to adding the sleeve. Once the holes are removed, slide in the sleeve and mark the location of the holes. Take out the sleeve and remove the holes within the sleeve. Then you can begin the ribs, detail, and painting of the sleeve. Afterward, re-insert the sleeve and , in theory, the holes should align. Of course, you can test and fit until your desired alignment is perfect before the ribs, details, and paint are even applied. Perhaps you could create some alignment marks on the resin and sleeve to ensure the orientation is consistent too.
Any way you choose, I'm sure you got this...
-
RangerNeil
- Captain
- Posts: 4584
- Joined: Fri Jul 12, 2019 9:42 pm
- Location: Dagenham
- Contact:
Re: Mil Mi-V-12 - the BIG one!!
One of the joys of the 0.25mm sheet is its very translucent so the UV light could penetrate. That said - the sheet will be painted so possibly (probably!) that will negate the translucence. So back to the drawing board as regards adhesive. Ammo do a slow dry CA that they say is 125% slower than normal CA which sounds a lot - till you think if normal CA takes 20 seconds this stuff will take 12.5 seconds..... Still not long enough.digger303 wrote: Mon Oct 02, 2023 5:53 amI'm not sure the UV adhesive will work if the glue is between the fuselage and the liner......how will the light penetrate.DRUMS01 wrote: Mon Oct 02, 2023 5:02 am Another great benefit of the UV adhesive is that it will allow you to manipulate the sleeve and then the floor into place before you cure it with the UV light.
As for the hole drilling, why not remove the areas creating the "holes" in the fuselage prior to adding the sleeve. Once the holes are removed, slide in the sleeve and mark the location of the holes. Take out the sleeve and remove the holes within the sleeve. Then you can begin the ribs, detail, and painting of the sleeve. Afterward, re-insert the sleeve and , in theory, the holes should align. Of course, you can test and fit until your desired alignment is perfect before the ribs, details, and paint are even applied. Perhaps you could create some alignment marks on the resin and sleeve to ensure the orientation is consistent too.
Any way you choose, I'm sure you got this...
But enough not-good news lets have some good news!!
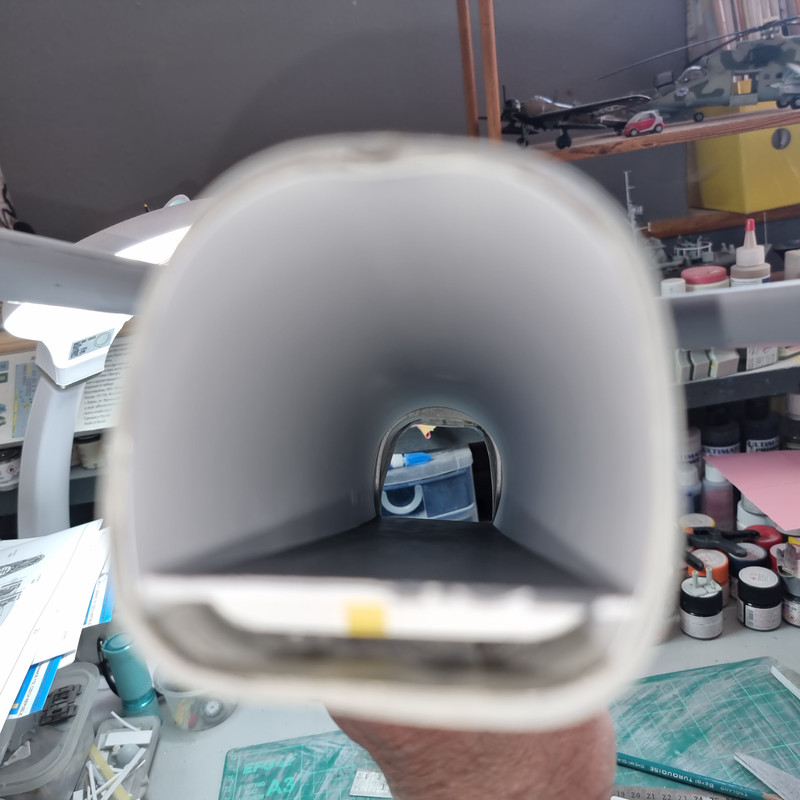
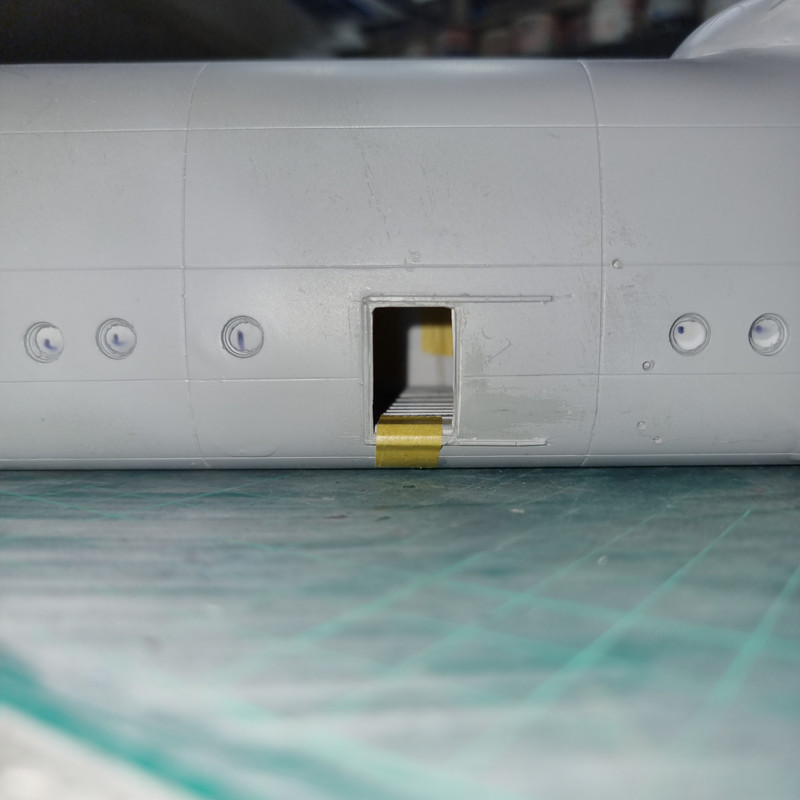
Today saw some fairly drastic surgery take place on the main fuselage. All the cabin windows are opened AND one of the front personnel doors. The windows were - relatively - easy, I put a 2mm dril through the centre of each, opened it out roughly with a rotary file, finished them off first with a file then by hand twisting a 4.5mm drill through to give a round hole.
The door was more of a problem - that involved drill a hole, getting a razor saw inan cutting the centre out befor taking the bulk of the waste material out with the rotary file and finishing off with a hand file & sanding sticks.
Then the liner was fitted followed by the floor to get the lines for the ribs and the window positions:
The liner laid flat, exterior upper most, with the window postions marked by black dots and the pencilled marker lines for the "ribs":
Tomorrow is make the window holes in the liner - probably with a 5mm drill - then flip it over and transfer the rib lines....... Progress!
EDIT
Someone in a FB group.recommended this:
https://modelshop.co.uk/Shop/Adhesives/ ... ml/ITM5112
Any thoughts anyone???
On the board now:
Airfix 1/35 Alvis Stalwart Mk2 FV622
Hobby Boss 1/350 Surcouf
Hobby Boss 1/350 Soviet Alfa class
Hobby Boss 1/350 USN Los Angeles
Mikro Mir 1/350 HMS M1
Scalemates stash info
=58417&fkSTASHSTATUS[]=58417-Stash&page=stash]Scalemates Stash manager
-
DRUMS01
- Chief Warrant Officer 3
- Posts: 2251
- Joined: Wed Jun 08, 2016 1:48 am
- Location: Ohio, USA
Re: Mil Mi-V-12 - the BIG one!!
And that's how it's done... good job so far. I like your work on the windows and door.
Looks like the door opening might need a little step or vertical piece to seal the hole below the cargo bay floor (?).
Are you going to add any bracing under the floor? Perhaps the beneath the floor bracing could help level out the floor too. If not, perhaps some strips laid down the sides just beneath the floor to pace it on would help keep the twisting and flexing to a minimum.
I really like the direction your build it going, keep it up!
On the table or recently completed:
1/18 AV8-B Harrier - WIP
1/35 Churchill AVRE with SBG Bridge Diorama - DONE
75mm BMW R75 WW2 motorcycle with rider - DONE
1/18 AV8-B Harrier - WIP
1/35 Churchill AVRE with SBG Bridge Diorama - DONE
75mm BMW R75 WW2 motorcycle with rider - DONE
-
RangerNeil
- Captain
- Posts: 4584
- Joined: Fri Jul 12, 2019 9:42 pm
- Location: Dagenham
- Contact:
Re: Mil Mi-V-12 - the BIG one!!
Thanks for the kind words!DRUMS01 wrote: Tue Oct 03, 2023 3:47 am And that's how it's done... good job so far. I like your work on the windows and door.
Looks like the door opening might need a little step or vertical piece to seal the hole below the cargo bay floor (?).
Are you going to add any bracing under the floor? Perhaps the beneath the floor bracing could help level out the floor too. If not, perhaps some strips laid down the sides just beneath the floor to pace it on would help keep the twisting and flexing to a minimum.
I really like the direction your build it going, keep it up!
In the photos the floor has bowed slightly due to the pressure of the tape holding the nose in place. Normally it sits just level with the base of the door. At the back its supported by a step on the rear bulkhead so it sits flush with the "floor" of the bulkhead* and I made up a support that sits just back out of shot of the camera - this is why its bowed slightly. So when the floor actually goes in it will be flush the entire length.
It occured to me last night that, adding the ribs to the liner before fitring it will mean the floor having to be slid in under them instead of dropped as the 2mm sheet its made from won't flex to let it drop under. And if I add the trunking too that makes it worse. So I'm going to cut the material for the ribs a fraction short - maybe 1mm so thats a 0.5mm gap either side. Not enough to be noticeable but enough to let the floor slide in easily.
* That step on the inside of the rear bulkhead plus the instructions on opening the passenger doors and the otherwise unnecessary detailing on the rear of the cockpit bulkhead says to me this kit was originally intended to have an interior in the main fuselage. Why it was not included we can only guess at. Personally I think it was the cost factor. The kit as it is was just over €220.
On the board now:
Airfix 1/35 Alvis Stalwart Mk2 FV622
Hobby Boss 1/350 Surcouf
Hobby Boss 1/350 Soviet Alfa class
Hobby Boss 1/350 USN Los Angeles
Mikro Mir 1/350 HMS M1
Scalemates stash info
=58417&fkSTASHSTATUS[]=58417-Stash&page=stash]Scalemates Stash manager
-
RangerNeil
- Captain
- Posts: 4584
- Joined: Fri Jul 12, 2019 9:42 pm
- Location: Dagenham
- Contact:
Re: Mil Mi-V-12 - the BIG one!!
Put a good few hours in today and I think I've broken the back of the interior!
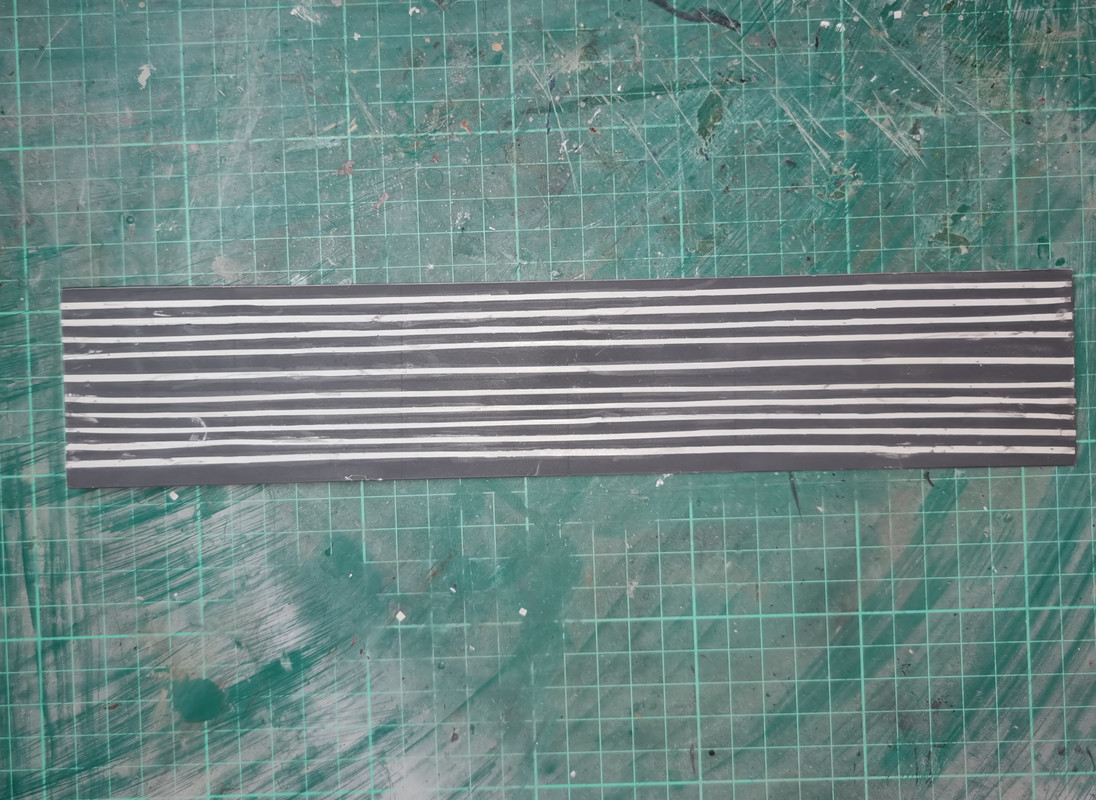
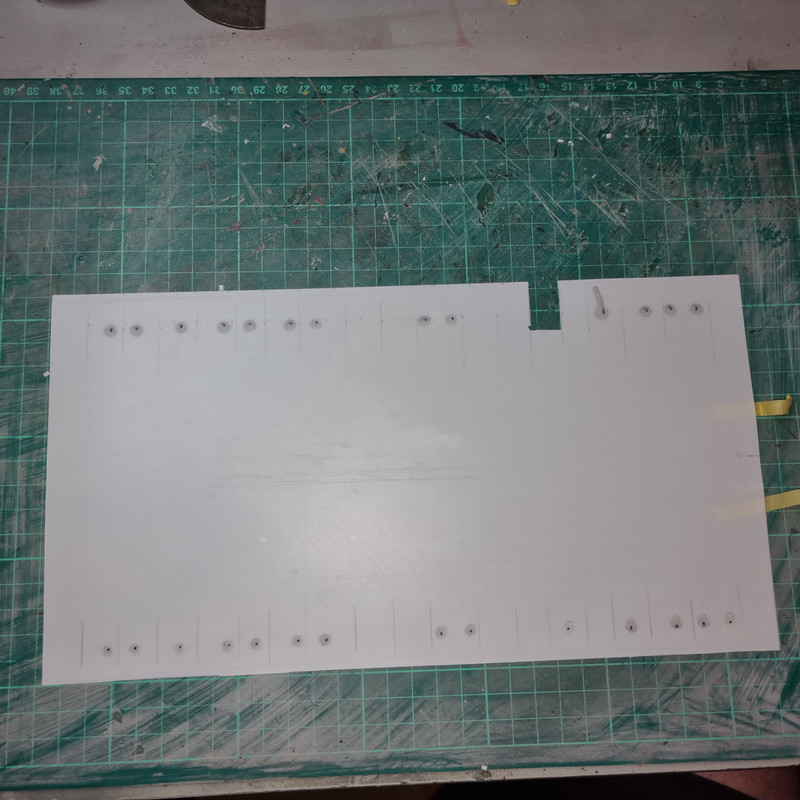
First off - spent a long while cutting 1mm wide strips x 305mm for the loadbed runners. Of all the jobs in this build I can honestly say this was the worst. For every useable one I cut there were 2 or 3 failures - eother the strip snapped on the final cut or, for some reason known only the God and the knife blade, the blade would suddenly veer off part way through and sever the strip. Got the best result from clamping the ruler to the table but there MUST be a better way of cutting long fine strips from thin plastic sheet!!
The photo is freaky because they are dead parallel @3mm spacing apart from the central one as the deck tapers towards the front. Thinking about it I should probably have put the central one in first and then spaced them from that....
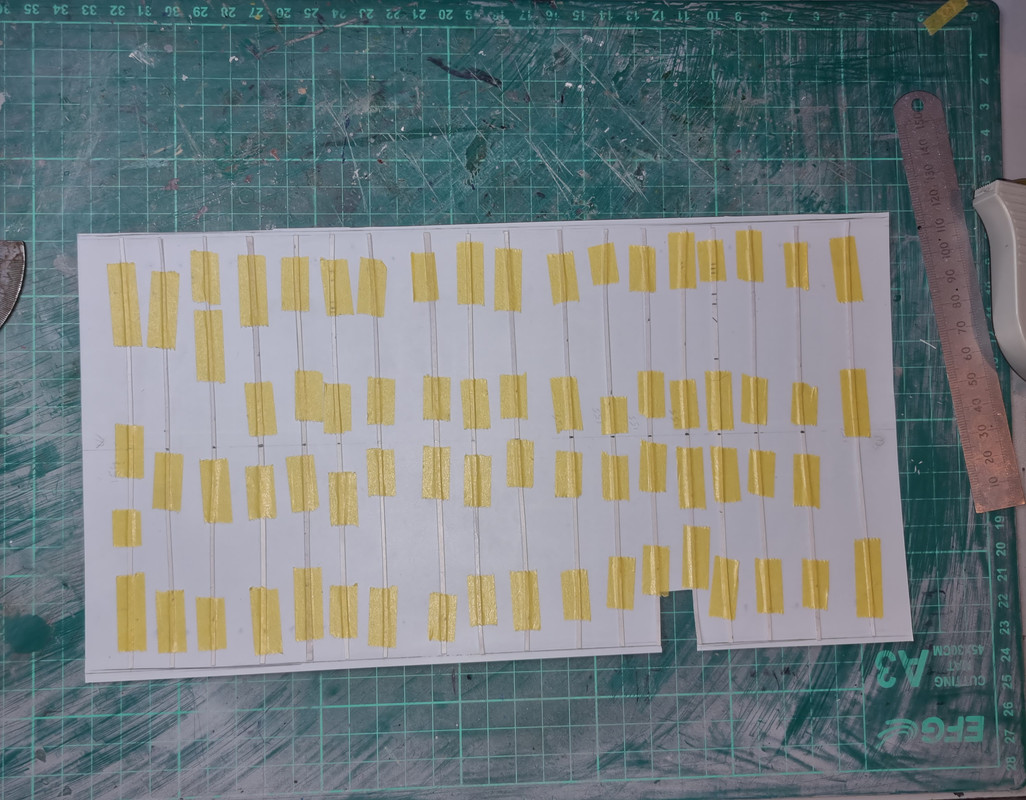
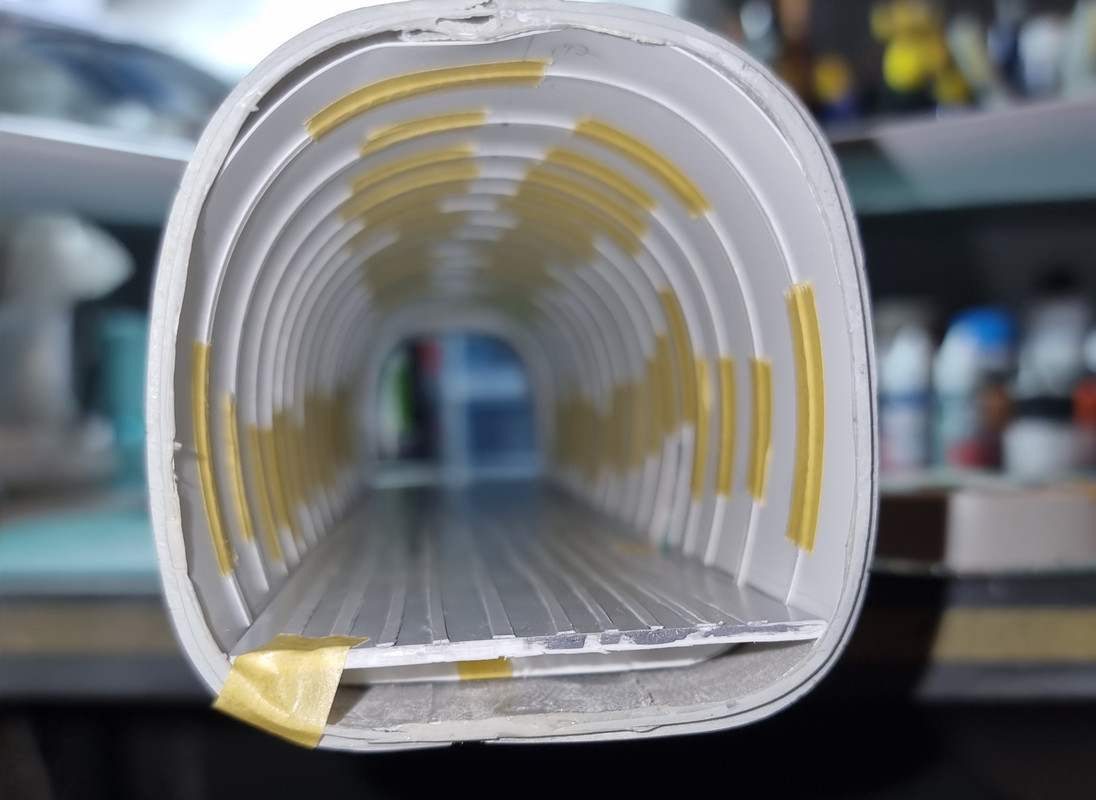
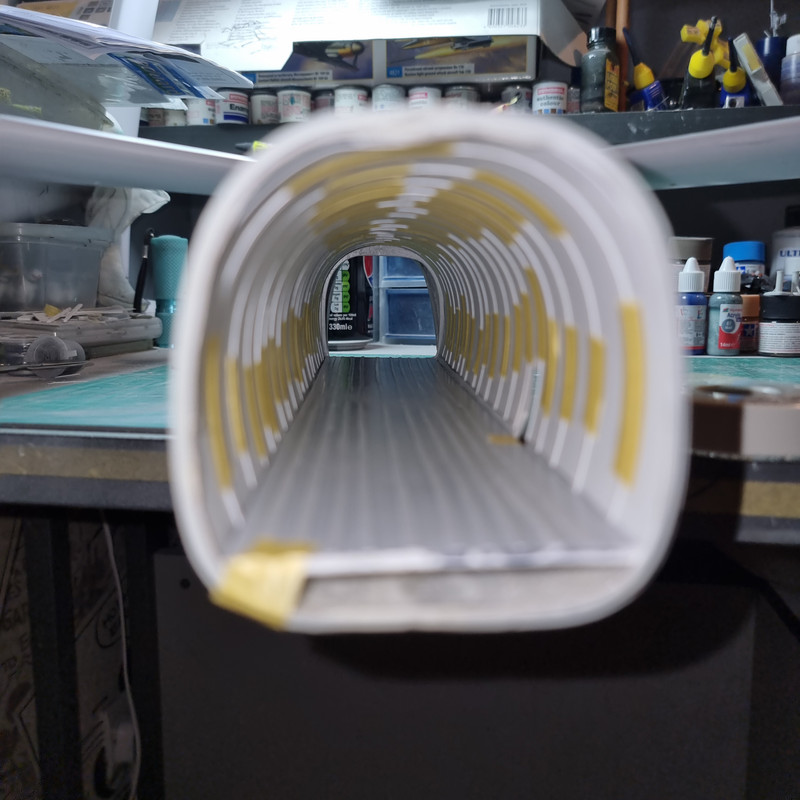
Next job was cutting 154mm long strips of the same width for the ribs. This was a lot easier - I had to cut 15 of them and only had 2 failures, both due to the wandering blade again. As a test I taped them to the liner and fitted it:
It seems to work!! So next job is to stick the rib strips to the liner, give it a coat of primer then top coat. Images look like either a zinc chromate colour, yellowy green or light grey walls and dark green flooring/runners.
Still undecided whether to make the widow holes in the liner now or wait till its stuck in place. Leaning towards the stuck in at the moment as that guarantees they will line up.AND reduces the faffing about lining things up time. Just in case though I had a brainwave and gave the sides a quick waft of primer and hey presto - windows marked....
Trial fit of the seat assembly - got quite a few of these so I might put some folded down around the passenger door and some others folded up.against the sides.
Last but not least - the tailfin and rudder went on as, like everything else, its going to need filler in the join to the fuselage.
First off - spent a long while cutting 1mm wide strips x 305mm for the loadbed runners. Of all the jobs in this build I can honestly say this was the worst. For every useable one I cut there were 2 or 3 failures - eother the strip snapped on the final cut or, for some reason known only the God and the knife blade, the blade would suddenly veer off part way through and sever the strip. Got the best result from clamping the ruler to the table but there MUST be a better way of cutting long fine strips from thin plastic sheet!!
The photo is freaky because they are dead parallel @3mm spacing apart from the central one as the deck tapers towards the front. Thinking about it I should probably have put the central one in first and then spaced them from that....
Next job was cutting 154mm long strips of the same width for the ribs. This was a lot easier - I had to cut 15 of them and only had 2 failures, both due to the wandering blade again. As a test I taped them to the liner and fitted it:
It seems to work!! So next job is to stick the rib strips to the liner, give it a coat of primer then top coat. Images look like either a zinc chromate colour, yellowy green or light grey walls and dark green flooring/runners.
Still undecided whether to make the widow holes in the liner now or wait till its stuck in place. Leaning towards the stuck in at the moment as that guarantees they will line up.AND reduces the faffing about lining things up time. Just in case though I had a brainwave and gave the sides a quick waft of primer and hey presto - windows marked....
Trial fit of the seat assembly - got quite a few of these so I might put some folded down around the passenger door and some others folded up.against the sides.
Last but not least - the tailfin and rudder went on as, like everything else, its going to need filler in the join to the fuselage.
On the board now:
Airfix 1/35 Alvis Stalwart Mk2 FV622
Hobby Boss 1/350 Surcouf
Hobby Boss 1/350 Soviet Alfa class
Hobby Boss 1/350 USN Los Angeles
Mikro Mir 1/350 HMS M1
Scalemates stash info
=58417&fkSTASHSTATUS[]=58417-Stash&page=stash]Scalemates Stash manager
-
BigWall
- Chief Warrant Officer 5
- Posts: 2961
- Joined: Sun Mar 15, 2020 11:44 pm
- Location: Denver, Colorado
