Revell 1/72 F-16 Tigermeet 2009

Post Reply
User avatar
ToddS
Sergeant
Sergeant
Posts: 137
Joined: Tue Aug 05, 2014 1:15 pm
Location: Oshkosh, Wisconsin USA
United States of America

Revell 1/72 F-16 Tigermeet 2009

Post by ToddS »

Morning folks;
This will be my entry to the F-16 SIG.

Image

The box is ok, but it would be nice if Revell had made it just a bit larger! :scratch:: The decal sheet comes out of the box with a bend. A 2nd sheet for decals would also solve the problem. Hoping that the bend wont create a cracking problem later..

Image

The spru all come in one plastic package. The canopy clear parts are in a separate bag, look clear and no mold seem. The kit parts are clean with very little flash. The panel lines look awesome and with the proper care, decals should lay down nicely.

Image

Image

The instructions are typical Revell, clear and bold print outs. The decal application pages will require some study! Might have to google this kit, as to whom as built it, for input on where to start with the application.

Image

Image

Image

Image

Very much looking forward to the first of the year to break into this build.. Don't do the jet thing to often so this will be a nice change of pace and a new challenge.

can't wait to watch the other builds progress as the SIG moves along.
thanks for looking 8-)
No one said it would be easy, only that it would be worth it..
User avatar
Liamcraven666
Sergeant First Class
Posts: 331
Joined: Tue Aug 25, 2015 8:59 pm
Location: Great Britain
Contact:
Great Britain

Re: Revell 1/72 F-16 Tigermeet 2009

Post by Liamcraven666 »

I was looking at this kit the other day ... looks intresting :pop:
Hello :hi:
User avatar
ToddS
Sergeant
Sergeant
Posts: 137
Joined: Tue Aug 05, 2014 1:15 pm
Location: Oshkosh, Wisconsin USA
United States of America

Re: Revell 1/72 F-16 Tigermeet 2009

Post by ToddS »

The build looks straight fwd. Its the decal work that has me sweating a bit. Oh well, one step at a time :th:
No one said it would be easy, only that it would be worth it..
User avatar
MarkVerploeg
Major
Major
Posts: 4837
Joined: Wed Oct 16, 2013 12:21 am
Location: Oss, Noord Braband The Netherlands
Netherlands

Re: Revell 1/72 F-16 Tigermeet 2009

Post by MarkVerploeg »

That looks very similar to the kit that i will be building
except for the decals and the paint (different version) but the kit itself should be about the same
have fun building it
On the bench
GB builds
1/35 Trumpeter M1132 ESV

Personal builds
1/35 Hobby Boss M1070 tractor with M1000 semi trailer and Meng M1A2 TUSK II Abrams
1/35 Takom V2 rocket with the Meillerwagen and SS100 tractor
Dragon64
Corporal
Corporal
Posts: 55
Joined: Mon Feb 03, 2014 8:45 pm
Scotland

Re: Revell 1/72 F-16 Tigermeet 2009

Post by Dragon64 »

Have this kit in my stash as well, Seen a couple of reviews for it and its meant to be a good fit. The decals are the same in my box i have flattened them between two books hopefully this will help. The reviews say follow the instructions carefully when applying the decals as its easy to get lost. i will try and find the reviews again and post the links.

nice looking kit

Tommy
User avatar
ToddS
Sergeant
Sergeant
Posts: 137
Joined: Tue Aug 05, 2014 1:15 pm
Location: Oshkosh, Wisconsin USA
United States of America

Re: Revell 1/72 F-16 Tigermeet 2009

Post by ToddS »

I also looked at a couple of reviews. One I saw said to start in the front working back from there and yes, follow the instructions. Looking forward to the build.
No one said it would be easy, only that it would be worth it..
User avatar
ToddS
Sergeant
Sergeant
Posts: 137
Joined: Tue Aug 05, 2014 1:15 pm
Location: Oshkosh, Wisconsin USA
United States of America

Re: Revell 1/72 F-16 Tigermeet 2009

Post by ToddS »

Morin

Didn't get a whole bunch accomplished on the build yesterday! The Walking Dead Marathon kept getting in the way. :crazy:

I did manage to get the cockpit tub sub assembled and dry fitted. It is ready for paint and then final assembly.

Other than that, today is another day..

The part at the end of the pencil?? The control stick.. Gotta start building bigger.. :ooops:

Image

The cockpit tub dry fit ready for paint.

Image

Image

Well, down to the bench and spray booth, gonna make some progress today. :P

Thanks for looking, and as always, any comments welcome.. :th:
No one said it would be easy, only that it would be worth it..
User avatar
ToddS
Sergeant
Sergeant
Posts: 137
Joined: Tue Aug 05, 2014 1:15 pm
Location: Oshkosh, Wisconsin USA
United States of America

Re: Revell 1/72 F-16 Tigermeet 2009

Post by ToddS »

Howdy folks;

made some good progress over the weekend! For me anyway :lol:

Got the cockpit all built up and painted. Not goin with a pilot! This guy be TINY :o
Gonna have the canopy open so at least a little of the detail will show..

Image

Image

Prepped the top part of the fuse and got the pit tub installed.

Image

Image

Got the gear bays painted and installed. Dry fit the intake assembly. Don't want to install that permanent until after paint. Also wanna study the decal layout and see how this unit affects their application. The inlet had a little filling needed anyway so the wait is no big deal.

Image

Image

Image

Image

Image

Also made a stop at the local hobby shop looking for the paints needed for the canopy tint. Got the copper, gotta order the smoke... Oh well, should be here mid week..

Anyway, thanks for looking and I am enjoying watching the builds. Thanks
No one said it would be easy, only that it would be worth it..
User avatar
ToddS
Sergeant
Sergeant
Posts: 137
Joined: Tue Aug 05, 2014 1:15 pm
Location: Oshkosh, Wisconsin USA
United States of America

Re: Revell 1/72 F-16 Tigermeet 2009

Post by ToddS »

hey guys

Well, got the paint that I am going to use to tint the canopy. Below are the links to the process I am going to "attempt" to replicate.

Part 1:

Part 2:

Even tho he does say in the video to share, I want to give a shout out to

Fox thre3 custom models :banana:

for the tutorial video and passing on the knowledge. Thank You :th:

I hope to try this on the spares canopy that I have tonight. Will post updates and photos as soon as I try it..
No one said it would be easy, only that it would be worth it..
User avatar
ToddS
Sergeant
Sergeant
Posts: 137
Joined: Tue Aug 05, 2014 1:15 pm
Location: Oshkosh, Wisconsin USA
United States of America

Re: Revell 1/72 F-16 Tigermeet 2009

Post by ToddS »

Howdy gents

It seems to have worked ok :banana:

Supplies at the ready
Image

I put about 1/4 paint cup full of 70% IPA in the brush. Not sure what % it should be but the 70 worked ok. I mixed in .5 mill of the Tamiya copper. To that, I used my stir stick spoon end, I added 7 dips of the Tamiya Smoke.
Image

Image

Then I just did what the dude in the video said, real light coats and built up to what I thought looked right. I started with the canopy that I had played with before. I didn't like the way it was looking! kinda globby I guess you could say. I took the other and it worked well enough.
Image

Image

I slowly built up layers till I thought it looked right. Then to take just a bit more of the copper tone off I applied several layers of THINNED smoke. It really didn't do much but it took the edge off the color.
Image

Image

Didn't look to bad against the box.
Seen as I still had paint left in the brush I figured what the hey, I shot the small cowl piece right away. I am going to let it sit over night, clear coat it tomorrow.
Image

Image

Image

If you look closely, the color does come of as "grainy" looking. I might have been better served to use my 3mm brush over the 2. I thought that the smaller needle would give me better control to avoid applying to much paint and having it run or pool up. I am hopeful that once the clear coat is applied it wont show at all. But, for a first attempt at something like that I am ok with the result. If you look at the canopies from a short distance, they look fine.

Hope to get more accomplished tomorrow

Thanks for looking guys
No one said it would be easy, only that it would be worth it..
User avatar
gaz45
Chief Warrant Officer 3
Posts: 1971
Joined: Mon Jan 06, 2014 3:35 pm
Location: Nottingham uk
Great Britain

Re: Revell 1/72 F-16 Tigermeet 2009

Post by gaz45 »

Nice work mate
User avatar
ToddS
Sergeant
Sergeant
Posts: 137
Joined: Tue Aug 05, 2014 1:15 pm
Location: Oshkosh, Wisconsin USA
United States of America

Re: Revell 1/72 F-16 Tigermeet 2009

Post by ToddS »

Thank You Sir!
No one said it would be easy, only that it would be worth it..
peppie
Sergeant Major
Sergeant Major
Posts: 629
Joined: Mon Feb 17, 2014 6:10 pm
Location: Boskoop Holland
Netherlands

Re: Revell 1/72 F-16 Tigermeet 2009

Post by peppie »

Omg, I can't believe you guys can do this quality work in this scale. :jd:
I certainly can not, not with my eyes... :crazy:
Joined this forum to become a better modell builder. Now, if I can just put away my laptop and start building..

On the Bench:

Piper PA-18-150
Ford GPA
GMC cckw 1947
Ford V3000 "Bello"
User avatar
ToddS
Sergeant
Sergeant
Posts: 137
Joined: Tue Aug 05, 2014 1:15 pm
Location: Oshkosh, Wisconsin USA
United States of America

Re: Revell 1/72 F-16 Tigermeet 2009

Post by ToddS »

Ha, I hear ya bout the eyes :lol:
No one said it would be easy, only that it would be worth it..
User avatar
ToddS
Sergeant
Sergeant
Posts: 137
Joined: Tue Aug 05, 2014 1:15 pm
Location: Oshkosh, Wisconsin USA
United States of America

Re: Revell 1/72 F-16 Tigermeet 2009

Post by ToddS »

Evening folks;
Just an update on the build:

First, if you are going to paint a canopy. USE EXTREME CARE. I put 3 coats of Klear over the copper/smoke paint on the small canopy section after the paint had dried for 3 days, and today was day 3 for the klear. While masking off the canopy, to paint the frame, I noticed that there looks to be a small piece that has "detached" from the canopy. :wall: I noticed it looking at the inside of the canopy. Not sure what is going to happen when I take the mask off at the end, but I will post results.....

Made good progress on the project today! The airframe is almost ready for primer, inspect for any filling that needs to be done and paint. I am looking forward to getting to the decal application. (Ha, I say that now...) :crazy:

Got the tail mounted, along with the winglets on the underside.
Image

Image

Have the intake filling done, don't look to bad, and the nave lights mounted. this is ready to prime and paint.
Image

Image

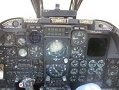
As mentioned above, I masked the entire canopy and mounted the rear portion. I did find that the 2 canopy pieces don't fit tight, by any means. If you look light can be seen between the sections. This isn't going to cause any problem as I plan to pose the canopy open, the slight miss fit will not be seen. (the main canopy is taped in place for now. Will TEMP install for paint and decal work.)
Image

Image

Also have the burner can and exhaust prepped to paint. The inside is done in light grey with a black oil wash. I will try and get better pics of this once I have the Metal Color on and buffed out.

Image

Image

Well, that's it for now. Hope to spend a few nights at the bench this week. Also, I really commend the builds that are going on! Lots of excellent work/results and I am enjoying reading the posts.

Thanks for looking, and, enjoy the build...
No one said it would be easy, only that it would be worth it..
Smiffy
Sergeant Major
Sergeant Major
Posts: 647
Joined: Sun Dec 20, 2015 11:45 am

Re: Revell 1/72 F-16 Tigermeet 2009

Post by Smiffy »

Great work so far, really like the tinting on the rear cowl of the canopy :th:
User avatar
DBMiller
Chief Warrant Officer 3
Posts: 2264
Joined: Mon Jan 06, 2014 8:10 pm
Location: Guilford, Vermont, USA
United States of America

Re: Revell 1/72 F-16 Tigermeet 2009

Post by DBMiller »

I love that Tiger Meet paint job but it would scare me to death! Another thing, that 1/72 scale kit has far more detail than my 1/48 scale from Academy! This should be a pretty thing when done. Good luck with those decals! :th:
ON THE BENCH: Do I have to say? :(
User avatar
ToddS
Sergeant
Sergeant
Posts: 137
Joined: Tue Aug 05, 2014 1:15 pm
Location: Oshkosh, Wisconsin USA
United States of America

Re: Revell 1/72 F-16 Tigermeet 2009

Post by ToddS »

Yes, this airframe does afford a tun of detail! All the panel lines are recessed and the fit, for the most part, is fantastic.

I am hoping that with micro set/sol the decals will lay down into the panel lines. I have decided not to weather this much at all! A light pin wash in/on the gear and gear bays, wheels and tires, and thats about it. Might try and scratch buildan entry ladder. We shall see.

I am hoping to get all the assemblies together (ext fuel tanks, weapons......) tonight and ready to prime so I can get the filling done if it needs any.

As for the decals, I will post a pic of the cut sheet tonight! It is going to be a one at a time affair for sure. There are decals that go on top of decals! Gonna be interesting. :scratch::

Thanks for the feedback guys! Much appreciated
No one said it would be easy, only that it would be worth it..
User avatar
ToddS
Sergeant
Sergeant
Posts: 137
Joined: Tue Aug 05, 2014 1:15 pm
Location: Oshkosh, Wisconsin USA
United States of America

Re: Revell 1/72 F-16 Tigermeet 2009

Post by ToddS »

Howdy

As promised, the cut sheet.
Near as I count, there is just over 100 decals on the sheet. (4 of which went into the cockpit)
The bold #'s are decals and where they are supposed to go.
There looks to be 26 that make up the main airframe scheme. Some look like they should be easy as they are just one piece. the others, not so much. Not gonna get any build time in! Working late takes care of that...

The small decals on the upper right in the first photo and left in the second, all get applied to the main airframe decals, the large ones.

Image

Image

Image

The cut sheet is typical, but, complex. Bold # equal decals, letters equal paint color call out.

Image

Image

To be honest, I am actually looking forward to attempting this! It is going to be fun! Time consuming, but fun..
No one said it would be easy, only that it would be worth it..
User avatar
ToddS
Sergeant
Sergeant
Posts: 137
Joined: Tue Aug 05, 2014 1:15 pm
Location: Oshkosh, Wisconsin USA
United States of America

Re: Revell 1/72 F-16 Tigermeet 2009

Post by ToddS »

Hey guys
Having a bit of troubble with photo hub so pics later.

I got everything primed and ready for paint. To my surprise, not a lot of filler needed. The jet exhaust turned out ok! Might have been a bit aggressive buffung the Mr Metal.

More later when I get photos uploaded.
No one said it would be easy, only that it would be worth it..
User avatar
ToddS
Sergeant
Sergeant
Posts: 137
Joined: Tue Aug 05, 2014 1:15 pm
Location: Oshkosh, Wisconsin USA
United States of America

Re: Revell 1/72 F-16 Tigermeet 2009

Post by ToddS »

Afternoon folks

Finally got around to getting my photo bucket to working again.. All's well that ends well.. :th:

Image

Image

Image

Not a whole lot of filler needed!! there were some spots but they turned out ok. The exhaust fitment to the fuselage was/is a bit of a fiddly doing. I am hoping that with the dark paint to be applied and the decal work the small gap will not be an issue.. we shall see

Image

Image

Image

The exhaust end looks good. Might hit it with just a bit of black pastel to knock some of the shine down. I do believe I was a bit over zealous in buffing process.

Image
Nose and belly painted in the final color. Going to give them another go! There are dark areas in the paint that I want to try and even out. Also, in this photo, I have filled the holes in the underside for the other munitions mounts that will not be used. I figured that, yes they will be covered by decals, but that the decals would want to sink into the open holes. Just trying to avoid unwanted surprises...

Ok, that's it for now. Going down to spray some color coat. Update when I get that far.

Thanks for looking :thumb2:
No one said it would be easy, only that it would be worth it..
User avatar
ToddS
Sergeant
Sergeant
Posts: 137
Joined: Tue Aug 05, 2014 1:15 pm
Location: Oshkosh, Wisconsin USA
United States of America

Re: Revell 1/72 F-16 Tigermeet 2009

Post by ToddS »

Hey guys;
Making some good progress on the build. Should be all set to clear coat tomorrow or Friday and get on with the decal applications.. Kinda looking forward to that.. (I say that now :wtf: )

Image
Image
Image

Got the gear assembled this last weekend. There are 6 pieces per side on the mains and 5 that make up the nose. Yes, the parts were that tiny.. :crazy: I had the bays painted ahead of time, but, with the color coats that bled thru around the gear door edges it made assembly a bit easier! I masked and painted everything white after it was all together and it turned out ok. A good clear coat and a little bit of a dark oil wash and they should be rockin.

Image
Image
Image
Image

The two tone paint scheme isn't much! It does contrast but it was nothing to mask. I was worried that I had gotten a bit aggressive when I buffed the exhaust. Now that it is all together and painted I think I will leave it alone. There are some things that I would like to try with different colors and shading but I will do that on some scrap plastic another time. I finished all the paint up tonight. Gonna let it dry till probably Friday and then clear coat it. I do have some small parts, I.E. Pitot tube off the nose, landing lights and canopy attachment bracket, that need to be painted and installed but will wait till the very end so I don't brake them off.

Image
Image
Image
Image

As I had to paint the back part of the canopy in the gold/smoke mixture I coated that with several coats of clear prior to masking. When I masked the airframe to paint the gear assy, I pulled the tape off, yep some paint came with it. As soon as that happened I was worried about what was going to happen to the painted canopy. As soon as I got all the painting done, I took the mask off. NO ISSUES.. It even looks half way decent. I think it will be just fine when I get the other mask off and it is next to the clear canopy. The off color where the 2 canopies come together is mask! I put it on the inside to seal the gap between the two to protect the cockpit.

All there is for now. I will post more when I get some of the decals in place. Probably first part of next week..

Thanks for looking and I am enjoying watching the builds!! SOME VERY AWESOME WORK BEING DONE. :clap: :clap: :clap:
No one said it would be easy, only that it would be worth it..
User avatar
MarkVerploeg
Major
Major
Posts: 4837
Joined: Wed Oct 16, 2013 12:21 am
Location: Oss, Noord Braband The Netherlands
Netherlands

Re: Revell 1/72 F-16 Tigermeet 2009

Post by MarkVerploeg »

Nice work so far
keep it up
On the bench
GB builds
1/35 Trumpeter M1132 ESV

Personal builds
1/35 Hobby Boss M1070 tractor with M1000 semi trailer and Meng M1A2 TUSK II Abrams
1/35 Takom V2 rocket with the Meillerwagen and SS100 tractor
User avatar
ToddS
Sergeant
Sergeant
Posts: 137
Joined: Tue Aug 05, 2014 1:15 pm
Location: Oshkosh, Wisconsin USA
United States of America

Re: Revell 1/72 F-16 Tigermeet 2009

Post by ToddS »

Started the decal process this weekend. 12 each on the drop tanks. The only thing with them is the backing is thick and they seem a bit on the brittle side. Will post picks probably tomorrow..
No one said it would be easy, only that it would be worth it..
User avatar
Avgas
Chief Warrant Officer 5
Posts: 2819
Joined: Mon May 18, 2015 8:45 pm
Location: Englandshire
Equatorial Guinea

Re: Revell 1/72 F-16 Tigermeet 2009

Post by Avgas »

Looking good Todd.
Regards, Dave.
User avatar
Spook
Master Sergeant
Master Sergeant
Posts: 419
Joined: Thu Mar 20, 2014 10:32 pm
Location: Lancaster uk
England

Re: Revell 1/72 F-16 Tigermeet 2009

Post by Spook »

Looking good pal. I don't envy you with those decals though
simon

On the bench

In the stash
Lots and lots of phantoms
User avatar
ToddS
Sergeant
Sergeant
Posts: 137
Joined: Tue Aug 05, 2014 1:15 pm
Location: Oshkosh, Wisconsin USA
United States of America

Re: Revell 1/72 F-16 Tigermeet 2009

Post by ToddS »

Hey guys, been a while. Time for an update on Tigermeet..

I work with a guy that has the patients of nothing. He makes a big deal out of small work, so, I took the following to show him small.

Image
I did have another that was shot through a mag glass, he called me warped..

Image
After I did the 2 drop tanks I started in the front on top. looking at the decals it just seemed to flow. For the first 2 I had to tape the canopy in place as the stripe covers the lower frame. there are also decals for the bolt pattern on the back side of the canopy and fillet canopy.

Image
Image

From there, I just progressed back to the tail.

Image
Image
Image

The top half, large decal application, is complete. I will get the bottom done maybe tonight and then start on all the small stencil decals.

Image
A bit of the panel lines showing through the decals can be seen in this photo.

Image
Image

The large decals are a bit on the thick side and brittle. I added a another cap full of Micro set to the water and let them soak until they almost floated off the backing paper. With an extra added application of Micro Sol, applied as the decal looked almost dry, they are laying into the panel lines nicely. (I will try and get pics of that next round) The small stencil ones are working great and laying down really good.
I do know that I needed to find out why I am ending up with such a rough surface finish in my paints. The Tamyia XF colors look great but I am getting a finish like sand paper. This roughness, even after 5 coats of Klear is still evident up close but I don't think it will show in the end! not from a few feet away.

Anyway, as always, thanks for looking and any comments welcome. Some really good builds going on in this SIG!! Looking forward to the reveal..
No one said it would be easy, only that it would be worth it..
Post Reply

Return to “Builds”