Page 1 of 1
Some help please
Posted: Tue Apr 05, 2016 8:49 am
by Kevthemodeller
Hi all I'm doing PE for the first time although I'm happy with how to work with it I'm having a little trouble interpreting the instructions.

This is an Aber kit 35A 34 for the Sherman HVSS fenders [M4A1 M4A2] (designed to be used with Dragon, Italeri and Tamiya kits) my kit is Tamiya.
The attached picture below shows you the bit I'm having trouble with:

1. Parts 14, 1, 2 & 3. 1 goes over 14 and 14 goes under the hull, I'm assuming 14 is only half stuck to 1 and half to the hull is that right do you think?
2. Parts 2 and 3 it gives you a choice:
a. Part 2 (ben) is half bent to the same radius as 1 stuck to the inside of 1 and up under the hull?
b. Part 2 and 3 are glued to form a right angled bracket under the side of 1,glued under the hull?
If some one out there has fitted this PE kit or Aber 350 32 or 35A32 M1919 to a M4A3E8 Sherman any tips would be gratefully received
Re: Some help please
Posted: Tue Apr 05, 2016 9:12 am
by MarkVerploeg
I haven't used this set so i am not 100% certain but here is my point of view on it
For point 1 i think you are right
Part 14 should only be half under part 1 so you have a little bit of it left to glue it to the hull
Point 2
You actually are right again
I think the choise has to do with production periods
But if you choose to use paarts 2 and 3 you can make a board out of some balsa wood or something like that and place it on the bracket so you can put stowage on the agled front of the tank
So i assume that the parts 2 and 3 option is for later vehicles as such a bracket was easier to make and allows you the stowage option
But in the end it doesn't really matter wich one you choose to make as both can be right
It depends more on wich version you like more because Shermans came from many different factories and 1 factory could have used the option with just part 2 and another factory could have used the option with parts 2 and 3
Aber instructions aren't always that easy to follow because of the way they show you the options they have
Like you have here but like i said before your interpetation is correct as far as i can tell
So all you need to do is choose a ootion and build it
I hope this helps
Re: Some help please
Posted: Tue Apr 05, 2016 9:21 am
by Kevthemodeller
Hi Mark
Yes it does help greatly thank you, I dare say I'll be back with a few more questions as like you say the instructions aren't the easiest.
Re: Some help please
Posted: Tue Apr 05, 2016 9:26 am
by ForbesHutton
As luck would have it, QDC just posted a video where he builds a Sherman. It's a Dragon with the kit's photo etch, but it would be very similar to what you are doing and there are some good close-ups. Around 7:05 onward is the PE fender:
[youtube]_XhJgM3FEPw[/youtube]
Re: Some help please
Posted: Tue Apr 05, 2016 9:40 am
by MarkVerploeg
Kevthemodeller wrote:Hi Mark
Yes it does help greatly thank you, I dare say I'll be back with a few more questions as like you say the instructions aren't the easiest.
Personally i prefer the Eduard instructions
They still have room for improvement but they sure are easier to follow
What also helps is to have a look at someones build of the same vehicle
Often you can get a idea on how it should look
But in some cases photo etch adds details and parts that are not in a kit when you build it out of the box so it doesn't always help
Reference photo's can be a huge help as they can show you the how something should look
But aksing is a good option aswell and there is always someone around here that can help
Re: Some help please
Posted: Tue Apr 05, 2016 9:47 am
by Vleugelmoer
HI there Kev,
I've also used various Aber PE upgrade sets and have therefore gotten use to their sometimes ambiguous instructions.
I think the fenders on your project should be assembled in the following manner:
Part 14 is a re-enforcing peace for part 1 and is glued to the underside (track-side) of this part.
as for parts 2 and 3 is where the option comes into play:
Option 1(early):
This looks to be the field modification version. It is therefore a bit crude in appearance when finished. I contains of both parts 2 and three which should remain straight. They are positioned on the hull side of the fender. The seem to be the stiffeners / attachment straps of the fender and stopped it from shacking on the real thing.
Option 2 (late):
During the war some of the field modifications got back to the oem's of various afv's which in their turned them into factory updates on the newer model being released. Because this version was done at the manufacturing stage it looks a bit more fancy and proper. For this option part 2 should be rolled or bent in such a manner that in conforms to the shape of the side of the fender itself.
If there is photographic material available of the internet or in reference books it's best to build the version that's in the photo. This wil bring it into play the realism factor as I call it.
Hope this has shed some light into the darkness of ambiguous instructions and the best on the build mate
Re: Some help please
Posted: Tue Apr 05, 2016 9:56 am
by Vleugelmoer
MarkVerploeg wrote: " Personally i prefer the Eduard instructions "
I hear ya, I have both the Eduard and Aber detail set for the 1/35th scale Tamiya Willys jeep man o man did they ever over engineer the Aber kit. Even comes with working windshield tilt

. As the Tamiya will have the windshield in the stowed and covered position for the current build think those parts will be used on the old Italeri kit in the stash.
groetjes en blijven plakken

Re: Some help please
Posted: Tue Apr 05, 2016 10:25 am
by MarkVerploeg
Vleugelmoer wrote:MarkVerploeg wrote: " Personally i prefer the Eduard instructions "
I hear ya, I have both the Eduard and Aber detail set for the 1/35th scale Tamiya Willys jeep man o man did they ever over engineer the Aber kit. Even comes with working windshield tilt
. As the Tamiya will have the windshield in the stowed and covered position for the current build think those parts will be used on the old Italeri kit in the stash.
groetjes en blijven plakken
I wouldn't say that Aber is over engineered but they give you parts for a certain object like as a example the tool clamps
They are made with 3 parts
The bracket , arch wich locks on the bracket and a handle
Eduard gives the same piece as 1 part
So much less chance to loose anything but it does require you to figure out how to bend it
But i use several brands and at the moment i have Eduard ,ET Model ,Voyager, Lion roar and Aber
If you really wat a in depth build try getting all the Voyager stuff for a kit
I did that once and i still have it on the shelf but that is a Marder and it really has a lot of parts
Once it is done and if i include the tracks it will be 40% styrene and 60% metal
Or even more i'm not sure
But i have multiple kits that i bought a lot of PE for and after a while you will get used to crappy instructions and insane amounts of parts
Re: Some help please
Posted: Tue Apr 05, 2016 10:59 am
by Vleugelmoer
Okey.. with that amount of PE your only one step away from doing one of those I believe Hassa Moray complete skelletonised 1/32 kits the do.
I find that good reference material like books, photos and online searching helps in taking most of the ambiguity out of the equation. The addition of PE and thus super detailing does bring them into a hole new category in my opinion. I also think that it just warrants to use it on larger scale projects as these sometimes seem to lack the detail found on some smaller scale versions of the same subject. Fore some reason I can't see myself putting PE on a 72nd or 75th scale model.
Re: Some help please
Posted: Tue Apr 05, 2016 11:32 am
by MarkVerploeg
I don't know of those kits but i do know that Eduard makes a few of them with WWI subjects
But that is not something i would build
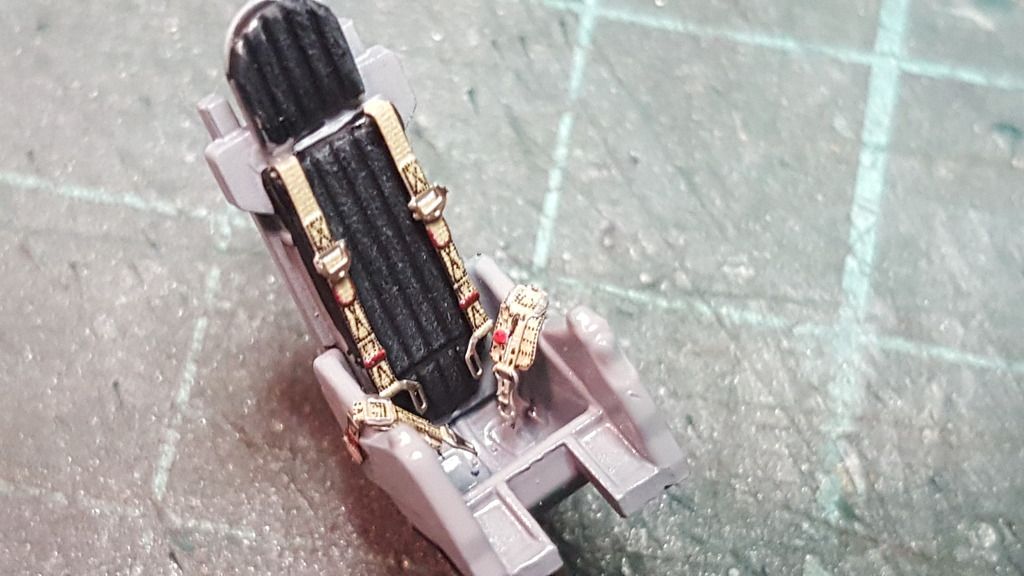
PE can be usefull on small scales too and it is not impossible to work with
Allthough harder then with 1/48 and 1/35 scale like i usually use
I used pe seatbelts on my collection of MiG-15's and i like the look that they offer
As you can see here
Re: Some help please
Posted: Tue Apr 05, 2016 2:00 pm
by Kevthemodeller
ForbesHutton wrote:As luck would have it, QDC just posted a video where he builds a Sherman. It's a Dragon with the kit's photo etch, but it would be very similar to what you are doing and there are some good close-ups. Around 7:05 onward is the PE fender:
[youtube]_XhJgM3FEPw[/youtube]
And then there was light

Cheers mate that's just what I need.
Re: Some help please
Posted: Tue Apr 05, 2016 2:06 pm
by Kevthemodeller

