Dragon 1:350 Battleship Scharnhorst 1943

Post Reply
User avatar
d6mst0
Sergeant First Class
Posts: 347
Joined: Wed Jul 29, 2015 2:54 am
United States of America

Dragon 1:350 Battleship Scharnhorst 1943

Post by d6mst0 »

I would like to enter ....

Image

I seen a youtube video review on this kit and just had to have it. I needed an excuse to get started on it so now I have one.

Image

I was hoping this would be OOB build but for some reason this kit only came with railings for certain areas of the superstructure. Looks likes I will be adding more railings, anchor chains and most likely ladders and possibly a few portholes.

Image

Image

One of the reasons I wanted this ship, is its history. She fought a few good fights at the start of the war until she was sunk by the battleship HMS Duke of York the day after Christmas 1943 during the Battle of North Cape. Less than 40 sailors were pulled from the icy waters of 1900 + crew.

Here is a little information about the Scharnhorst and a couple of pictures of her. Thank You WIKIPEDIA!

Image

Scharnhorst firing at the HMS Glorious.

Image


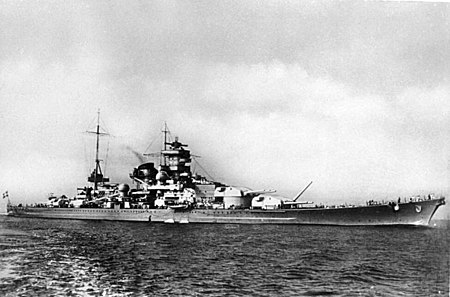
Scharnhorst displaced 32,100 long tons (32,600 t) as built and 38,100 long tons (38,700 t) fully loaded, with a length of 234.9 m (771 ft), a beam of 30 m (98 ft) and a maximum draft of 9.9 m (32 ft). She was powered by three Brown, Boveri & Cie geared steam turbines, which developed a total of 159,551 shp; 118,977 kW and yielded a maximum speed of 31.5 knots (58.3 km/h; 36.2 mph) on speed trials.[3] Her standard crew numbered 56 officers and 1,613 enlisted men, augmented during the war to 60 officers and 1,780 men. While serving as a squadron flagship, Scharnhorst carried an additional ten officers and 61 enlisted men.[4]

She was armed with nine 28 cm (11.1 in) L/54.5 guns arranged in three triple gun turrets: two turrets forward, one superfiring—Anton and Bruno—and one aft—Caesar. The design also enabled the ship to be up-gunned with six 15 inch guns which never took place. Her secondary armament consisted of twelve 15 cm (5.9 in) L/55 guns, fourteen 10.5 cm L/65 and sixteen 3.7 cm (1.5 in) L/83, and initially ten 2 cm (0.79 in) anti-aircraft guns. The number of 2 cm guns was eventually increased to thirty-eight. Six 53.3 cm (21.0 in) above-water torpedo tubes, taken from the light cruisers Nürnberg and Leipzig, were installed in 1942.

Time to clear the work bench.
User avatar
d6mst0
Sergeant First Class
Posts: 347
Joined: Wed Jul 29, 2015 2:54 am
United States of America

Re: Dragon 1:350 Battleship Scharnhorst 1943

Post by d6mst0 »

Finished washing all of the parts and PE.
User avatar
d6mst0
Sergeant First Class
Posts: 347
Joined: Wed Jul 29, 2015 2:54 am
United States of America

Re: Dragon 1:350 Battleship Scharnhorst 1943

Post by d6mst0 »

Quick update.

Worked mostly on the anti-aircraft weapons. Lots of PE to add to each weapon. Dragon's PE for this ship model is really fragile. It is very easy to bend or break it while cutting it off the PE sheets. I ended up using some leftover PE from Gold Medal Models as I was unable to remove the shoulder harness pieces for the 20mm weapons without breaking them.

For a week of work, it really doesn't look like I done much.

Here are a few photos I took with my I-pad. Sorry, they are not very good, Next time I will use a camera.

Started on the ship auxiliary boats, cable reels, AAA weapons, and hull.

Image

Image

Image

The hull came in two pieces, lower and upper. I was impress about how well the two pieces fitted together. Compare to Trumpeters hulls this Dragon hull was a breeze to fit together and putty to hid the seam. I drilled out the portholes so they will stand out after painting, which will be this week.

Image

I am hoping they barrels I ordered show up this week. Really like to get a start on the main and secondary weapons but there is still a lot of ship to put together.

This week's goal is to paint the hull and deck and start on the superstructure.

Marcus
User avatar
EricM
Staff Sergeant
Staff Sergeant
Posts: 226
Joined: Sun Jun 07, 2015 7:14 am
Location: Spokane,Washington
Contact:
United States of America

Re: Dragon 1:350 Battleship Scharnhorst 1943

Post by EricM »

Looking Good Keep it up!
On The Bench
1/72 Finemolds ME410/A-1
1/48 Eduard MiG 21R "Cuban Airforce" Buddy SIG
Image
User avatar
Jan01
First Sergeant
First Sergeant
Posts: 561
Joined: Sun Oct 06, 2013 10:28 am
Location: Roermond, Netherlands

Re: Dragon 1:350 Battleship Scharnhorst 1943

Post by Jan01 »

Looking good so far.
On the worktop
Too much :bash:
User avatar
AdamLuscombe
First Sergeant
First Sergeant
Posts: 523
Joined: Mon Oct 13, 2014 6:57 pm
Location: texas
United States of America

Re: Dragon 1:350 Battleship Scharnhorst 1943

Post by AdamLuscombe »

Looks like a nice kit, good luck with the build
On the bench:
Dragon
1/35 Jagdpanzer IV L/48
Italeri
1/24 Ford Escort Mk. II
User avatar
d6mst0
Sergeant First Class
Posts: 347
Joined: Wed Jul 29, 2015 2:54 am
United States of America

Re: Dragon 1:350 Battleship Scharnhorst 1943

Post by d6mst0 »

Time for an update on my progress with this kit.

The brass barrels from Master Model arrived this past week so I had to stop what I was working on and get them installed.

Image

I bent one of the barrels while installing it on to the blast bag. The opening for the barrel on the bag wasn't deep enough and the barrel stopped but I didn't. Ended up using one of the plastic barrels from the kit.

Image

Image

Started in the search lights. I still need to install the lenses.

Image

This range finder housing the front wall is clear plastic. I masked the windows and installed it using white glue.

Image

Here is a picture of the same housing but the backside. See the indent on the left side. The instructions show only a portion of the piece and there isn't any information in the instructions as to what the part number is that goes there. Looking at other builds on the internet, they show it to be a platform with a ladder attached to it. The kit has over 15 platform pieces of various sizes. I was hoping the piece was on the sprue that the housing parts were on, but atlas it wasn't so. I open a post of the model chat forum hoping someone may know the answer. No luck so far. My plan now is to install all of the other platforms and what platform is left will be installed on that housing.

Image

These are that guns (I believe 20mm) that the P.E. shoulder harnesses were a pain in the a... The P.E. was so thin I could not remove the harnesses from the P.E. sheet without breaking them or twisting them in such wild shapes, that they would come apart while trying to straighten them. I ended up using leftover Gold Metal Model P.E.. I really love G.M.M Photo Etch, it is a little thicker and stronger than the others and I find it easier to work with.

Midships superstructure.

Image

Another ranger finder housing I started on.

Image

Started on some of the other watercraft. They all have clear plastic windscreens so I haven't progress any further until I take the time to mask them for painting.

Image

Here is the hull along with some of the superstructure and weapons. I plan on priming the hull tomorrow....wait just checked the time, tomorrow is now today. So after I wake up sometime today a coat of black Vallejo primer and masking for its primary colors.

Image

A closeup of the bow 11 inch guns and part of the superstructure. I drilled out all of the portholes on the hull and superstructure.

Image

Image

Stern area.

Image

Starboard side.

Image

Image

Closeups of the deck. I am very pleased that the deck fitted so well with very few gaps which only required a little amount of putty to close. In the pictures the white lines is the putty I had to installed. Compared to a ICM kit I built which required a whole lot of putty to close up the deck and superstructure this was nothing. I was singing a happy tune instead of swearing like a sailor.

Image

Image

Image

Image

Well that is all for now. This is my first Dragon ship kit and I must say (outside of the P.E. issues) I am really pleased with how well everything is fitting together. The instructions could really be better (so far I found four unidentified parts, but was able to figure out three of them) really, really better.

My goal now is to paint the hull and deck and while they are drying to build as many sub-assemblies as possible. Then start building up and then out.

Good night, I mean good morning.

Marcus.
mick
First Sergeant
First Sergeant
Posts: 569
Joined: Mon Feb 03, 2014 2:02 pm
Wales

Re: Dragon 1:350 Battleship Scharnhorst 1943

Post by mick »

good progress :thumb2:
User avatar
d6mst0
Sergeant First Class
Posts: 347
Joined: Wed Jul 29, 2015 2:54 am
United States of America

Re: Dragon 1:350 Battleship Scharnhorst 1943

Post by d6mst0 »

Made some progress since the last post. I have more sub assemblies and the hull has been painted and covered in a clear coat. I did manage to knock off both rudders while preparing the hull for painting. I am going to leave them off until she is almost finish.

Image

Image

Image

Image

The PE in this kit is leading me to a stroke. Much of it is so thin that just breathing on it distorts it. The PE you think is going to give you fits goes together just fine and glues right on. Like the radar for this gun directory.

Image

Image

And a simple ladder would just refuse to attach it self to the wall.

Image

Image

Image

Airplane catapult.

Image

Image

I have completed many of the parts that will go onto the superstructures, but am holding off attaching them until I get all of the decks painted. Once those decks are completed it will be just of matter attaching everything, painting and building up the superstructures.

Until the next report, Marcus
User avatar
d6mst0
Sergeant First Class
Posts: 347
Joined: Wed Jul 29, 2015 2:54 am
United States of America

Re: Dragon 1:350 Battleship Scharnhorst 1943

Post by d6mst0 »

Time for another update to my build.

I spent the week working on the deck adding layers of paint and tape to simulate age planking. After five layers of seven different paints and around 500 strips of tape of various lengths (18, 10 & 5mm) and widths (.75 & .5mm) this what what the finished deck looks like after a wood aging wash from MIG products. I don't know if I left the wash on to long or what but the excess wash didn't come off like it did on the last ship I did this with. The deck looks dirtier than I think it should be, but I was unable to remove anymore of the wash.

Image

Image

The orange color strips are from strips of tape I failed to remove before adding the final coat of paint and a coat of Future. I discovered six of them while I was removing the wash. I double, tripled check looking for tape strips I missed and thought I got them all. I haven't decided yet to dried bush them to match the rest of the deck or leave them that way to teach me a lesson.

Anyway, here a few more pictures of the process.

Image

Image

Image

[URL=http://s982.photobucket.com/user/d6mst0 ... l.jpg.html]Image


Image

Image

This is the deck before the wash was added.

Image

Once the clear coat has dried I will mask the deck and get started with assembling the superstructure.

Marcus
Post Reply

Return to “Builds”