SkyPainter303's Sunbeam Tiger 1/25 AMT

Post progress of your builds here

Moderator: T3hGuppy

Post Reply
SkyPainter303
First Sergeant
First Sergeant
Posts: 611
Joined: Mon Aug 31, 2015 5:02 pm
Location: Rock Hill, South Carolina USA
Contact:
United States of America

SkyPainter303's Sunbeam Tiger 1/25 AMT

Post by SkyPainter303 »

Hello again. I felt like doing another car and figured there was just enough time left in this GB.

This is the Round 2 re-pop of the old AMT kit.

Image
tiger-1 by Michael Keogh, on Flickr

Image
tiger-3 by Michael Keogh, on Flickr

Image
tiger-2 by Michael Keogh, on Flickr


I forgot to take the sprue shots before I glued the engine halves together
Image
tiger-4 by Michael Keogh, on Flickr
SkyPainter303
First Sergeant
First Sergeant
Posts: 611
Joined: Mon Aug 31, 2015 5:02 pm
Location: Rock Hill, South Carolina USA
Contact:
United States of America

Re: SkyPainter303's Sunbeam Tiger 1/25 AMT

Post by SkyPainter303 »

As usual, step one is the engine.
Image
tiger-6 by Michael Keogh, on Flickr

Here she is.
Image
tiger-7 by Michael Keogh, on Flickr

The instructions call for blue valve covers. Time to strip off the plating on the valve covers. A few minutes in over cleaner takes care of that.
Image
tiger-5 by Michael Keogh, on Flickr

Make sure to wash the stripped parts and brush off any residue.
Image
tiger-9 by Michael Keogh, on Flickr

Here is the engine and transmission assembly painted with Model Master Acryl Gray Primer
Image
tiger-11 by Michael Keogh, on Flickr

There is an extreme amount of flash in this kit.
Image
tiger-10 by Michael Keogh, on Flickr

Another update later when I have the engine completed.
User avatar
Lysus
Captain
Captain
Posts: 4562
Joined: Fri Dec 18, 2015 11:37 pm
Location: Seattle, US
United States of America

Re: SkyPainter303's Sunbeam Tiger 1/25 AMT

Post by Lysus »

Great little car! Love seeing all the ways to take of chrome, etc.

:pop:
Backlog Progress: |||||||||||||||-------|----------|----------| 26/80
On the bench: Hasegawa 1/72 Tatiana's Vanship
Last Completed: Bandai HGUC Geara Zulu // Hasegawa 1/48 J2M3Raiden Prisoner of War
SkyPainter303
First Sergeant
First Sergeant
Posts: 611
Joined: Mon Aug 31, 2015 5:02 pm
Location: Rock Hill, South Carolina USA
Contact:
United States of America

Re: SkyPainter303's Sunbeam Tiger 1/25 AMT

Post by SkyPainter303 »

The painted engine and some parts.
Image
tiger-12 by Michael Keogh, on Flickr


Next to build is the interior. Note the steering column. It is marked as 33 but in actuality is number 8. Also the actual column is just a stub.
Image
tiger-14 by Michael Keogh, on Flickr

Image
tiger-13 by Michael Keogh, on Flickr


The seats had enormous mold seams which needed to be sanded down. The seat on the left is ready for paint. The seat on the right still has those sharp edges.
Image
tiger-16 by Michael Keogh, on Flickr
SkyPainter303
First Sergeant
First Sergeant
Posts: 611
Joined: Mon Aug 31, 2015 5:02 pm
Location: Rock Hill, South Carolina USA
Contact:
United States of America

Re: SkyPainter303's Sunbeam Tiger 1/25 AMT

Post by SkyPainter303 »

Here is the assembled Ford 260 ci V8 engine. I used various Testors and Model Masters enamels and acrylics. Once the paint is cured, I'll put on a black oil wash to create some contrast and emphasize the recessed areas.
Image
tiger-17 by Michael Keogh, on Flickr


I airbrushed the interior with Testors (square bottle) Semi Gloss Black enamel. The interior is on hold for now since this enamel takes a long time to cure.
When it is ready, I'll brush matte varnish onto the carpeted areas.
Image
tiger-18 by Michael Keogh, on Flickr
User avatar
Twokidsnosleep
General
General
Posts: 18289
Joined: Thu Aug 07, 2014 4:07 pm
Location: BC,Canada
Canada

Re: SkyPainter303's Sunbeam Tiger 1/25 AMT

Post by Twokidsnosleep »

Maxwell Smart used to drive one of these in the Get Smart TV series...I have that theme song in my head now, thank you
Cool kit :cheers2:
Scott

On, Under or near the desk
Brewster Buffalo ..buddy build
Rockford Firebird
1/72 Black Pearl Pirate Ship in dry dock
SkyPainter303
First Sergeant
First Sergeant
Posts: 611
Joined: Mon Aug 31, 2015 5:02 pm
Location: Rock Hill, South Carolina USA
Contact:
United States of America

Re: SkyPainter303's Sunbeam Tiger 1/25 AMT

Post by SkyPainter303 »

I hope I make the deadline. I just read that Testors enamels take 72 hours to fully cure. Luckily, the local Hobby Lobby franchise carries a few Vallejo acrylics. After the interior is cured, I may continue.
SkyPainter303
First Sergeant
First Sergeant
Posts: 611
Joined: Mon Aug 31, 2015 5:02 pm
Location: Rock Hill, South Carolina USA
Contact:
United States of America

Re: SkyPainter303's Sunbeam Tiger 1/25 AMT

Post by SkyPainter303 »

I got tired of waiting for the Testors black to cure so I used some Testors ELO (Easy Lift Off) to strip the paint. I then primed the interior pieces with Model Master Acrylic Primer. It isn't the best primer but it is what I had on hand. It leaves a latex kinda feel. I need to order something better.

Image
tiger-19 by Michael Keogh, on Flickr

Image
tiger-20 by Michael Keogh, on Flickr


I finally learned my enamel lesson. For the color coat, I will spray on Vallejo Gloss Black, then matte coat the non-vinyl areas. These old AMT kits with their basic tub interiors leave a lot to be desired.

I applied an oil wash to the engine and will post a picture tomorrow.
SkyPainter303
First Sergeant
First Sergeant
Posts: 611
Joined: Mon Aug 31, 2015 5:02 pm
Location: Rock Hill, South Carolina USA
Contact:
United States of America

Re: SkyPainter303's Sunbeam Tiger 1/25 AMT

Post by SkyPainter303 »

Count me among the converted to quality acrylic paints. I repainted the interior with Vallejo Gloss Black. Once you get the mix right, it sprays beautifully. The gloss still takes some time to dry compared to matte colors, but I think it will be fine.

Image
tiger-21 by Michael Keogh, on Flickr


While the black paint dries, I assembled the front suspension onto the chassis. This classic AMT kit doesn't have the most precise fit. Hopefully the car sits level when finished.

Image
tiger-22 by Michael Keogh, on Flickr
SkyPainter303
First Sergeant
First Sergeant
Posts: 611
Joined: Mon Aug 31, 2015 5:02 pm
Location: Rock Hill, South Carolina USA
Contact:
United States of America

Re: SkyPainter303's Sunbeam Tiger 1/25 AMT

Post by SkyPainter303 »

I finished off the engine with an oil wash and matte coat.
Image
tiger-23 by Michael Keogh, on Flickr


I assembled the rear end which required a bit of putty. This was sanded off before I installed it and the rest of the rear suspension.
Image
tiger-24 by Michael Keogh, on Flickr

Image
tiger-25 by Michael Keogh, on Flickr


I also worked on the interior installing the chrome plated instruments. I dabbed on some black paint to the dials using a tooth pick.
Image
tiger-27 by Michael Keogh, on Flickr

Image
tiger-26 by Michael Keogh, on Flickr


Here is the completed interior. It is somewhat plain being all black, but there isn't much detail to work with. This AMT is vintage after all.
Image
tiger-28 by Michael Keogh, on Flickr
SkyPainter303
First Sergeant
First Sergeant
Posts: 611
Joined: Mon Aug 31, 2015 5:02 pm
Location: Rock Hill, South Carolina USA
Contact:
United States of America

Re: SkyPainter303's Sunbeam Tiger 1/25 AMT

Post by SkyPainter303 »

I painted the chassis last night. The first picture shows the base Vallejo Gloss Black. The second is after a wash of Ultimate Weathering Wash Dark Dirt.

Image
tiger-29 by Michael Keogh, on Flickr

Image
tiger-30 by Michael Keogh, on Flickr
SkyPainter303
First Sergeant
First Sergeant
Posts: 611
Joined: Mon Aug 31, 2015 5:02 pm
Location: Rock Hill, South Carolina USA
Contact:
United States of America

Re: SkyPainter303's Sunbeam Tiger 1/25 AMT

Post by SkyPainter303 »

I am making some slow progress on the Tiger. Here are some more pieces for the undercarriage. They are painted in Vallejo Natural Steel. There is two exhaust pipes and mufflers, the driveshaft, and the rear brake drums. All of these pieces had heavy seam lines that needed to be sanded off.
Image
tiger-31 by Michael Keogh, on Flickr


Because the kit instructions said to paint the firewall in the body color, I had to do a three step process. First I painted it in Model Master Acrylic gray primer.
Image
tiger-32 by Michael Keogh, on Flickr

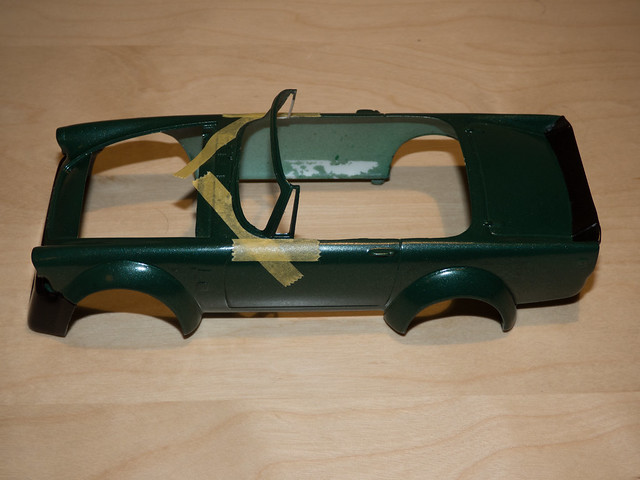
I decided that my Sunbeam Tiger would be green, so I painted on a base coat of Dunklegrun RLM 82; also a Model Master Acrylic paint.
Image
tiger-33 by Michael Keogh, on Flickr

Then I airbrushed on five light coats of Model Master Dark Green Pearl acrylic.
Image
tiger-34 by Michael Keogh, on Flickr

Finally, I painted the raised detail flat black and steel (for the brake master cylinder). Because engine compartments are dirty, I gave it a wash of Ultimate Dark Dirt.
Image
tiger-35 by Michael Keogh, on Flickr


Over all I pleased with the way the green came out. It is like a metallic British Racing Green.
SkyPainter303
First Sergeant
First Sergeant
Posts: 611
Joined: Mon Aug 31, 2015 5:02 pm
Location: Rock Hill, South Carolina USA
Contact:
United States of America

Re: SkyPainter303's Sunbeam Tiger 1/25 AMT

Post by SkyPainter303 »

It looks like I'll finish this build on time. The firewall was glued to the interior tub which in turn was superglued to the chassis. The engine was also installed.
Image
tiger-36 by Michael Keogh, on Flickr


On the underside, the exhaust system, driveshaft, and brake drums were attached. I can't emphasize anymore how imprecise this kit is designed. The exhaust was superglued to the chassis at the manifolds and contact points on the mufflers. It is interesting to note how this classic car's exhaust lacks a crossover pipe that would be found on a modern dual exhaust system. There are optional side pipes for the racing version of this kit, but they are quite cheesy looking so I opted for the stock pipes. That being said, I do intend to build the race car body. The instructions say to add the exhaust tips now, but I will wait until the body is installed. That way I avoid the possibility of them getting knocked off.
Image
tiger-38 by Michael Keogh, on Flickr


Here is the radiator hose glued to the radiator ready for paint. This old kit omits the lower radiator hose.
Image
tiger-37 by Michael Keogh, on Flickr


After this stage of building, I'll need to do some touch up painting.
SkyPainter303
First Sergeant
First Sergeant
Posts: 611
Joined: Mon Aug 31, 2015 5:02 pm
Location: Rock Hill, South Carolina USA
Contact:
United States of America

Re: SkyPainter303's Sunbeam Tiger 1/25 AMT

Post by SkyPainter303 »

I assembled the racing wheels. Keeping in the spirit of a vintage, imprecise kit, the lug nuts are randomly arranged around the center hub.
Image
tiger-42 by Michael Keogh, on Flickr


I also have been working on preparing the body for primer and paint. There were heavy mold seams to be scraped and sanded off.
Image
tiger-40 by Michael Keogh, on Flickr

Image
tiger-39 by Michael Keogh, on Flickr


I also broke, mended, and re-broke the windshield frame. I still need to fix it again.
Image
tiger-41 by Michael Keogh, on Flickr


Finally, I added the rear spoiler and front airdam. Then I worked on the racing fender flares. The flares go on like a universal set that almost fits the car. I suppose I'll add some filler to make them look nicer. Although, this being a race car, the bodywork doesn't necessarily need to be perfect.
Image
tiger-43 by Michael Keogh, on Flickr
SkyPainter303
First Sergeant
First Sergeant
Posts: 611
Joined: Mon Aug 31, 2015 5:02 pm
Location: Rock Hill, South Carolina USA
Contact:
United States of America

Re: SkyPainter303's Sunbeam Tiger 1/25 AMT

Post by SkyPainter303 »

I filled the fender flare gaps with Tamiya Putty Basic Type thinned with lacquer thinner.

Image
tiger-45 by Michael Keogh, on Flickr

Image
tiger-44 by Michael Keogh, on Flickr


I'll sand the filler to shape.
SkyPainter303
First Sergeant
First Sergeant
Posts: 611
Joined: Mon Aug 31, 2015 5:02 pm
Location: Rock Hill, South Carolina USA
Contact:
United States of America

Re: SkyPainter303's Sunbeam Tiger 1/25 AMT

Post by SkyPainter303 »

I had a setback today. As I was sanding the putty, the passenger side flares popped loose. I glued them back on and now must wait to finish off the body.

A more positive mounting system is needed on this kit.

Image
tiger-46 by Michael Keogh, on Flickr

Image
tiger-47 by Michael Keogh, on Flickr
SkyPainter303
First Sergeant
First Sergeant
Posts: 611
Joined: Mon Aug 31, 2015 5:02 pm
Location: Rock Hill, South Carolina USA
Contact:
United States of America

Re: SkyPainter303's Sunbeam Tiger 1/25 AMT

Post by SkyPainter303 »

I got the fender flares attached and the joints fixed up nicely.
Image
tiger-48 by Michael Keogh, on Flickr

Here is the body in primer. Earlier in the body prep, I shaved off the chrome body molding. I left the emblems in place. I'll be printing some decals to place on the emblems.
Image
tiger-49 by Michael Keogh, on Flickr

Here is the body after I sprayed on two coats of the green base which I sanded between.
Image
tiger-51 by Michael Keogh, on Flickr
User avatar
Lysus
Captain
Captain
Posts: 4562
Joined: Fri Dec 18, 2015 11:37 pm
Location: Seattle, US
United States of America

Re: SkyPainter303's Sunbeam Tiger 1/25 AMT

Post by Lysus »

Nice save!
Backlog Progress: |||||||||||||||-------|----------|----------| 26/80
On the bench: Hasegawa 1/72 Tatiana's Vanship
Last Completed: Bandai HGUC Geara Zulu // Hasegawa 1/48 J2M3Raiden Prisoner of War
SkyPainter303
First Sergeant
First Sergeant
Posts: 611
Joined: Mon Aug 31, 2015 5:02 pm
Location: Rock Hill, South Carolina USA
Contact:
United States of America

Re: SkyPainter303's Sunbeam Tiger 1/25 AMT

Post by SkyPainter303 »

This kit is kicking me in the butt. This evening, I've been spraying on the green pearl acrylic. My airbrush clogged a couple of times and spurted out some ugly bubbles. I cleaned up the brush and shot a thinner coat. That fixed things pretty good. I decided I need to do one last coat. I shot a thinned wet coat; it looked great! Until one minute later it flashed to a slightly mottled matte. I am at wit's end. Maybe some clear gloss will fix it tomorrow.

Image
tiger-52 by Michael Keogh, on Flickr

It is about as shiny as an emerald colored cough drop that has stuck to the wrapper.
SkyPainter303
First Sergeant
First Sergeant
Posts: 611
Joined: Mon Aug 31, 2015 5:02 pm
Location: Rock Hill, South Carolina USA
Contact:
United States of America

Re: SkyPainter303's Sunbeam Tiger 1/25 AMT

Post by SkyPainter303 »

I rescued my green paint job with a clear coat of Model Master Acryl Clear Gloss mixed with some pearl flakes. After that pearly coat, I sprayed on another straight clear coat.
Image
tiger-53 by Michael Keogh, on Flickr

Image
tiger-56 by Michael Keogh, on Flickr


Once this paint was dry, I masked off for the black parts.
Image
tiger-54 by Michael Keogh, on Flickr


Here is that body as it is now. Once the black paint has cured, I'll spray another clear gloss coat in preparation for decals.
Image
tiger-55 by Michael Keogh, on Flickr
PrivateMansoor
Master Sergeant
Master Sergeant
Posts: 374
Joined: Sun Dec 13, 2015 4:20 am
Location: Australia
Australia

Re: SkyPainter303's Sunbeam Tiger 1/25 AMT

Post by PrivateMansoor »

I really like the colour there. It has come on very smooth too. Good job mate.
Fear Nothing, Build Everything.
SkyPainter303
First Sergeant
First Sergeant
Posts: 611
Joined: Mon Aug 31, 2015 5:02 pm
Location: Rock Hill, South Carolina USA
Contact:
United States of America

Re: SkyPainter303's Sunbeam Tiger 1/25 AMT

Post by SkyPainter303 »

PrivateMansoor wrote:I really like the colour there. It has come on very smooth too. Good job mate.
Thanks for the encouragement. The paint could use some polishing, but I am not sure I have enough time to make the deadline.
SkyPainter303
First Sergeant
First Sergeant
Posts: 611
Joined: Mon Aug 31, 2015 5:02 pm
Location: Rock Hill, South Carolina USA
Contact:
United States of America

Re: SkyPainter303's Sunbeam Tiger 1/25 AMT

Post by SkyPainter303 »

It is getting down to the wire. I masked off for the chrome windshield frame. I also painted the other chrome pieces. I would have used Bare Metal Foil but I don't have the time or the patience.

I do not recommend Model Master Acryl Primer. Where I cut the masking tape, the paint wanted to peel all the way down to the bare plastic. Even though I cleaned the plastic before I started work, the primer just didn't adhere well. I will need to order some Stynylrez next time.

You may be able to see where the paint has chipped off the back edge of the passenger compartment just in front of the trunk (boot) lid.

Image
tiger-57 by Michael Keogh, on Flickr

Image
tiger-58 by Michael Keogh, on Flickr
SkyPainter303
First Sergeant
First Sergeant
Posts: 611
Joined: Mon Aug 31, 2015 5:02 pm
Location: Rock Hill, South Carolina USA
Contact:
United States of America

Re: SkyPainter303's Sunbeam Tiger 1/25 AMT

Post by SkyPainter303 »

Today is the day. I hope I can finish because I was called into work this afternoon earlier than expected. I got the wheels painted and the body finished. I just need to put everything together and add the finishing details.

Image
tiger-59 by Michael Keogh, on Flickr

Image
tiger-60 by Michael Keogh, on Flickr
SkyPainter303
First Sergeant
First Sergeant
Posts: 611
Joined: Mon Aug 31, 2015 5:02 pm
Location: Rock Hill, South Carolina USA
Contact:
United States of America

Re: SkyPainter303's Sunbeam Tiger 1/25 AMT

Post by SkyPainter303 »

I hate to say it, but my Sunbeam has landed on the shelf of doom. During final assembly parts started popping off. Half of the exhaust system came off, the windshield frame broke again, the interior tub came loose and so I put it away. I won't be seduced by the cool, retro box art from Round 2 models again.

Right now I'm working on my German destroyer from Trumpeter. I'll also pick up my Interstellar Ranger to finish it off.

- Michael
User avatar
Twokidsnosleep
General
General
Posts: 18289
Joined: Thu Aug 07, 2014 4:07 pm
Location: BC,Canada
Canada

Re: SkyPainter303's Sunbeam Tiger 1/25 AMT

Post by Twokidsnosleep »

Sorry to hear that, she had promise and you were doing great
Sometimes they just don't wanna go together it seems
Scott

On, Under or near the desk
Brewster Buffalo ..buddy build
Rockford Firebird
1/72 Black Pearl Pirate Ship in dry dock
User avatar
Lysus
Captain
Captain
Posts: 4562
Joined: Fri Dec 18, 2015 11:37 pm
Location: Seattle, US
United States of America

Re: SkyPainter303's Sunbeam Tiger 1/25 AMT

Post by Lysus »

Just hung up my hat on my wheelie, too. I feel your pain.

Onward! :cheers2:
Backlog Progress: |||||||||||||||-------|----------|----------| 26/80
On the bench: Hasegawa 1/72 Tatiana's Vanship
Last Completed: Bandai HGUC Geara Zulu // Hasegawa 1/48 J2M3Raiden Prisoner of War
Post Reply

Return to “Build threads”