Hello everyone, this is my vert first build and already i have run into problems!! my original choice was for an Avro Lancaster but that had parts missing , i had no other kits that qualified as multi engine bombers and those that presented themselves did not appeal to me, that was until the beauty that is the Revell B-17G appeared on a web page, the box art made it look majestic and colorful, half matte camoflauge and half bare metal it must of looked futuristic and imposing in its day it looked magnificent. As i looked at the info blurb on it i got that feeling we modelers get where your just itching to get cracking with it, so i finally had my kit.
I decided to start with a video review of the Flying Fortress
[youtube]Be6owaYl0aY[/youtube]
My very first group build is Revells B-17G "Flying Fortress"
Moderator: T3hGuppy
-
SprueSurgeon
- Sergeant

- Posts: 142
- Joined: Thu Sep 15, 2016 12:15 pm
-
SprueSurgeon
- Sergeant
- Posts: 142
- Joined: Thu Sep 15, 2016 12:15 pm
Re: My very first group build is Revells B-17G "Flying Fortress"
As you can see from the video this is a superb kit, for those who do not have the time to watch the video i have taken some images to help portray just what a great kit this is in terms of the mouldings.
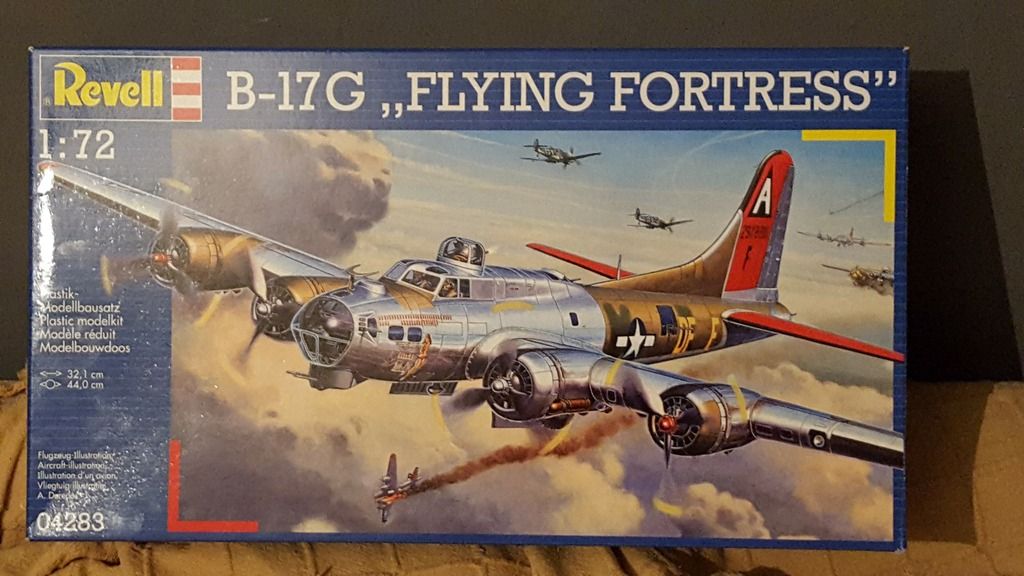
Look at that awesome box art, dont you just want to build her now!

The styrene talks to me..... gulp!
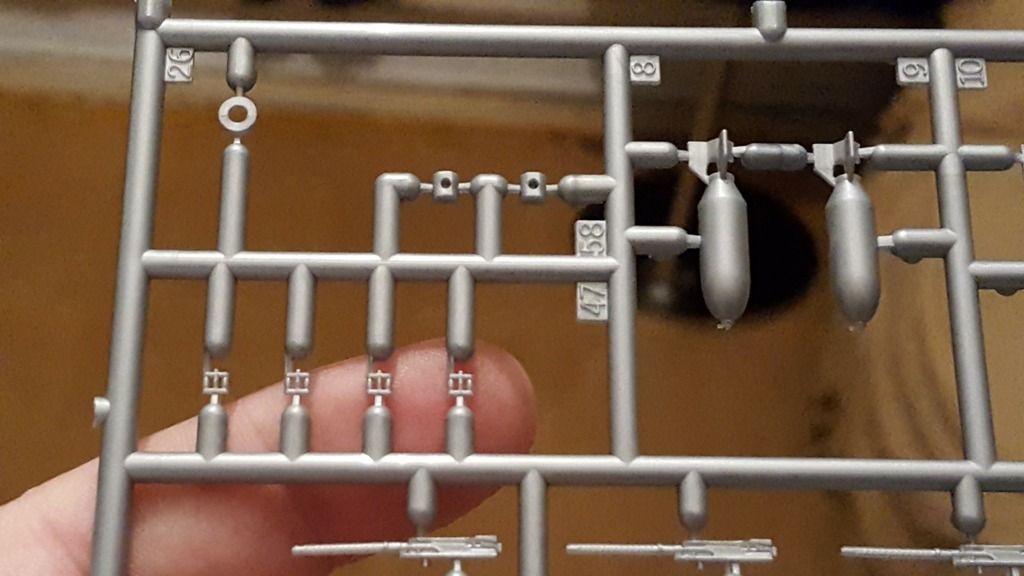
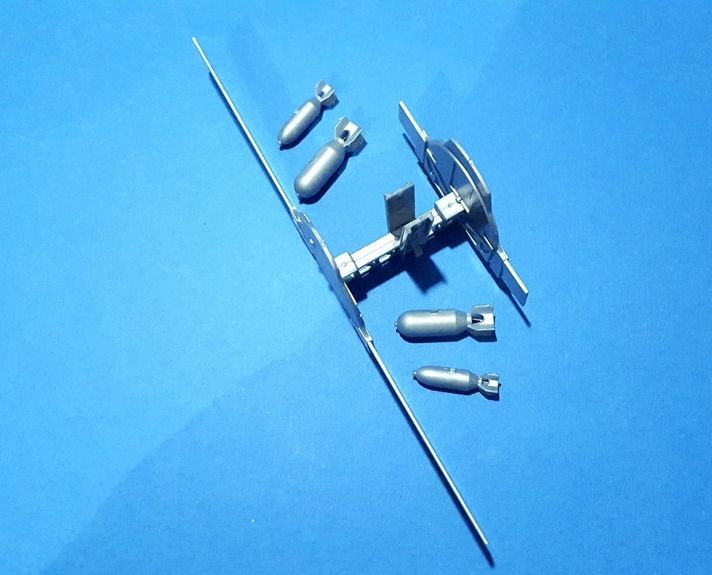
Look how clean these small components are, fantastic.
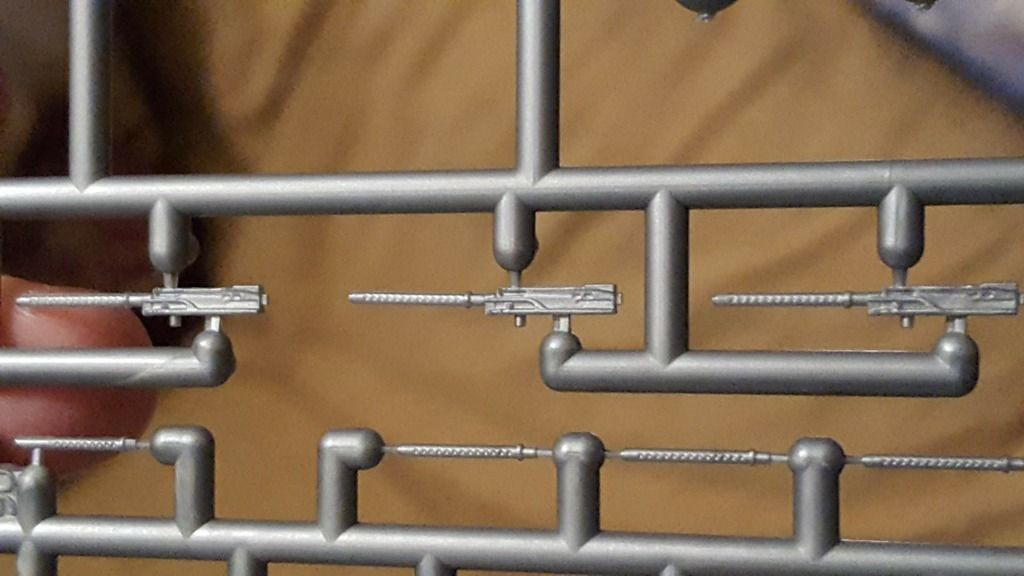
The detail on these guns is good, theyre not hollowed out or anything, but for those on a budget they are more than adequate.

Look at that awesome box art, dont you just want to build her now!

The styrene talks to me..... gulp!

Look how clean these small components are, fantastic.

The detail on these guns is good, theyre not hollowed out or anything, but for those on a budget they are more than adequate.

Deuteronomy 32:35
-
SprueSurgeon
- Sergeant
- Posts: 142
- Joined: Thu Sep 15, 2016 12:15 pm
Re: My very first group build is Revells B-17G "Flying Fortress"

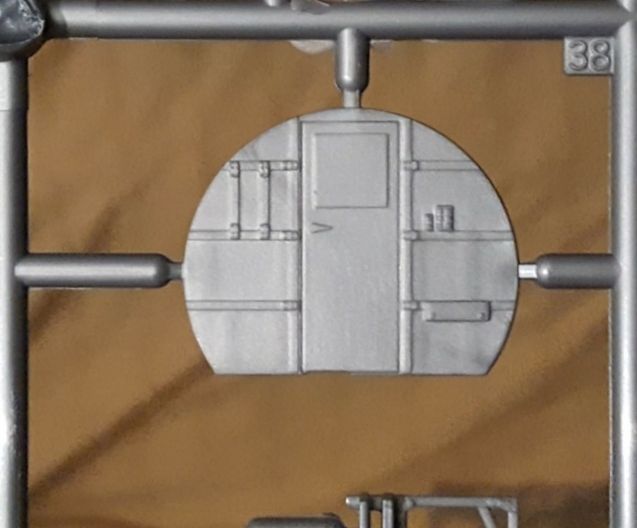
Here is a shot of the fuselage, crisp clean panel lines, this will look so good when its finished.

Detail is not lost on the smaller pieces either, look at the tyre tread at the bottom left too, only let down by the seam line that will certainly need dealing with when the two wheel halves come together, which will probably erase the tread

The panel lines on the wings are equally superb, did i mention i love this kit!

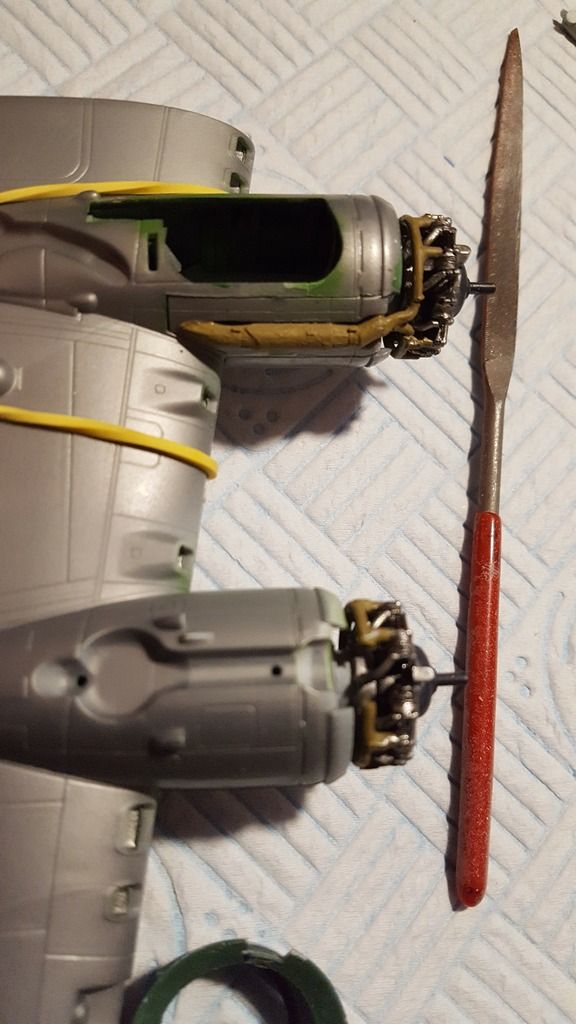
Propellers, which i normally finf are not great or damaged are clean, nice straight lines, no burring or flash.

Tiny blades on the turbines!!!

The only negative part of the kit, the canopies are ok, but there is quite a bit of flash on them which seems odd seing as the rest of the kit is so good, i think i will dip the canopies to improve the clarity, those with extra income may be able to buy an upgraded set.
Deuteronomy 32:35
-
SprueSurgeon
- Sergeant
- Posts: 142
- Joined: Thu Sep 15, 2016 12:15 pm
Re: My very first group build is Revells B-17G "Flying Fortress"
The B-17G "Flying Fortress" what do we know?
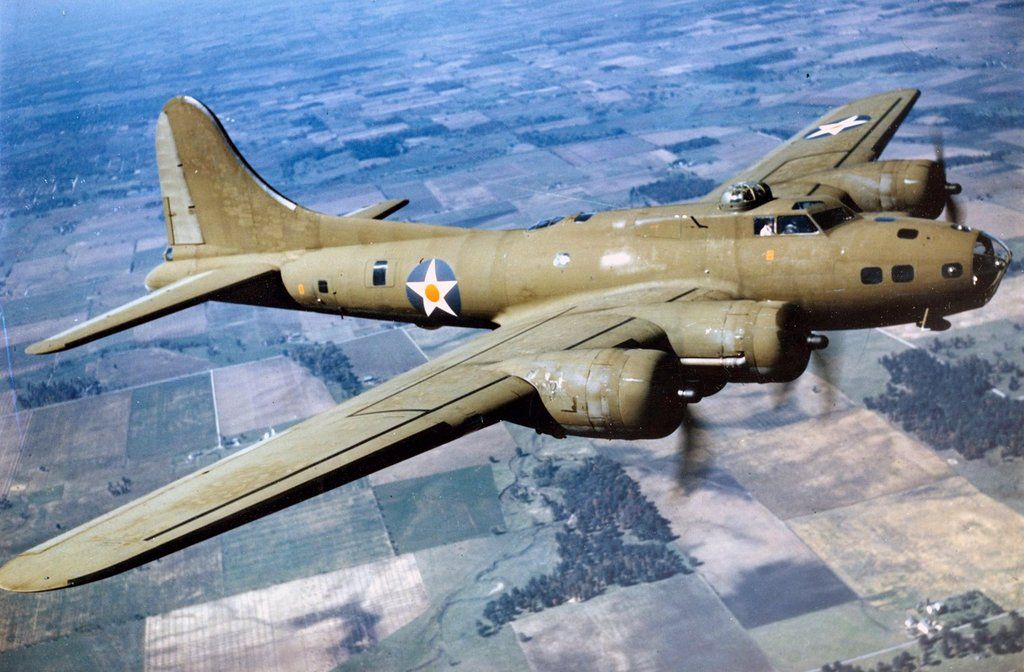
The B17G was the last "Flying Fortress" to be produced in significant numbers, Its development began in 1934 with Boeing building a strategic long range bomber, Based on Boeings B-299, its maiden flight was in 1935 and was credited with the title 'largest land based aircraft in the USA.
On January 11th 1936 the first pre-production Y1B-17 Fortress was delivered to the 2nd Bombardment Group, Langley Field, Virginia; the first production B-17B was delivered on 29 March 1939 also to the 2nd Bombardment Group. By the end of August 1944 production ceased and a total of 12,677 production Fortresses had been built.
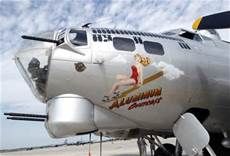
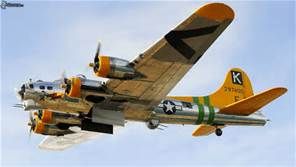
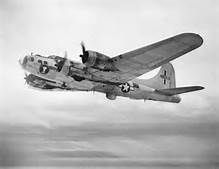
I sourced a few images from around the web showing this beauty in flight.
copyrights owned by respective photographers/Clients
copyrights owned by respective photographers/Clients
copyrights owned by respective photographers/Clients
copyrights owned by respective photographers/Clients
The Build Instruction Steps 1-5
Finally the build is underway, i have been so excited to start this build, more so than usual, i also have my first set of Xuron sprue cutters which work fantastically and i highly recommend buying them if anyone is considering it, they are expensive at £12.99, but the first moment you use them you will forget all of that. The first steps have gone together well and were then primed with Vallejo Acrylic-Polyurethane Grey, unfortunately after spraying the primer i realized i had not removed the seem around the bombs

Bomb Bay/Rack started Steps 1-5 in instruction manual
Bomb Bay/Rack with bombs
The B17G was the last "Flying Fortress" to be produced in significant numbers, Its development began in 1934 with Boeing building a strategic long range bomber, Based on Boeings B-299, its maiden flight was in 1935 and was credited with the title 'largest land based aircraft in the USA.
On January 11th 1936 the first pre-production Y1B-17 Fortress was delivered to the 2nd Bombardment Group, Langley Field, Virginia; the first production B-17B was delivered on 29 March 1939 also to the 2nd Bombardment Group. By the end of August 1944 production ceased and a total of 12,677 production Fortresses had been built.
I sourced a few images from around the web showing this beauty in flight.

copyrights owned by respective photographers/Clients

copyrights owned by respective photographers/Clients

copyrights owned by respective photographers/Clients

copyrights owned by respective photographers/Clients
The Build Instruction Steps 1-5
Finally the build is underway, i have been so excited to start this build, more so than usual, i also have my first set of Xuron sprue cutters which work fantastically and i highly recommend buying them if anyone is considering it, they are expensive at £12.99, but the first moment you use them you will forget all of that. The first steps have gone together well and were then primed with Vallejo Acrylic-Polyurethane Grey, unfortunately after spraying the primer i realized i had not removed the seem around the bombs

Bomb Bay/Rack started Steps 1-5 in instruction manual

Bomb Bay/Rack with bombs
Deuteronomy 32:35
-
SprueSurgeon
- Sergeant
- Posts: 142
- Joined: Thu Sep 15, 2016 12:15 pm
Re: My very first group build is Revells B-17G "Flying Fortress"
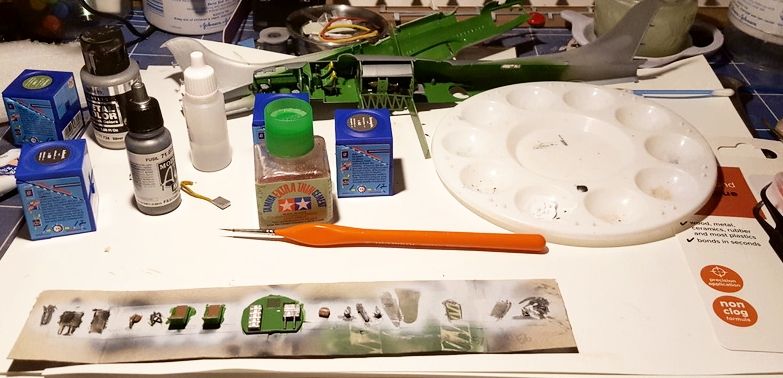
After the seams had been dealt with i turned my attention to paint, i have a fair collection of Revell paints and i have some from other ranges, the paint shedule for the B-17 G is quite lengthy with 27 different colours plus your primers and clear coats/varnishes! My funds were limited so initially i set off attempting to reproduce Revells colour with one of any number of other types, in the end i still had to buy 11.
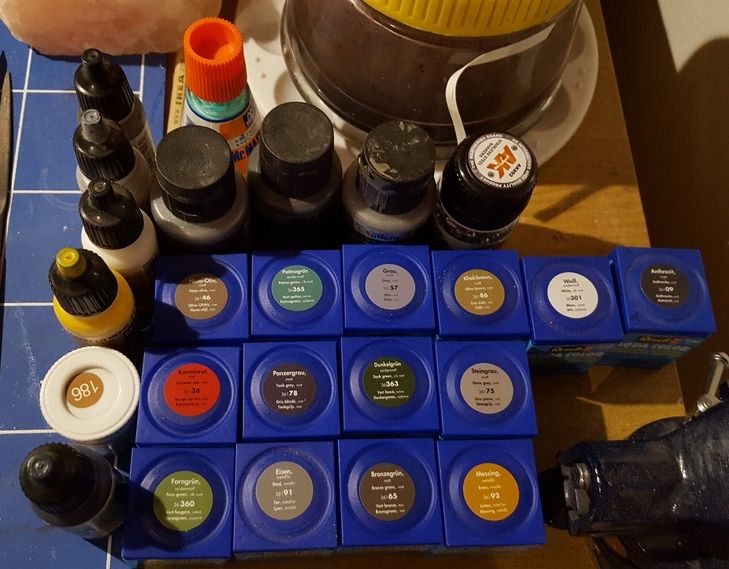
Just some of the paints required for Revells B-17G Flying Fortress!
Armed with these new paints it was time for me to begin airbrushing the bomb bay/rack area and all along the insides of the fuselage, (which i might add had some superb internal details) As per instructions i had already inserted three of the fuselage windows, these clicked into place and i just added a tiny amount of Microscales Kristal Klear around the inside, as these were installed it took me no time to quickly drop a small amount of Mr Hobby Mr Masking Sol Neo, with that done i airbrushed all areas previously mentioned and once dry a coat of Gauzy was added to help decal placement and protect paintwork, this will be dulled back down before all sections come together
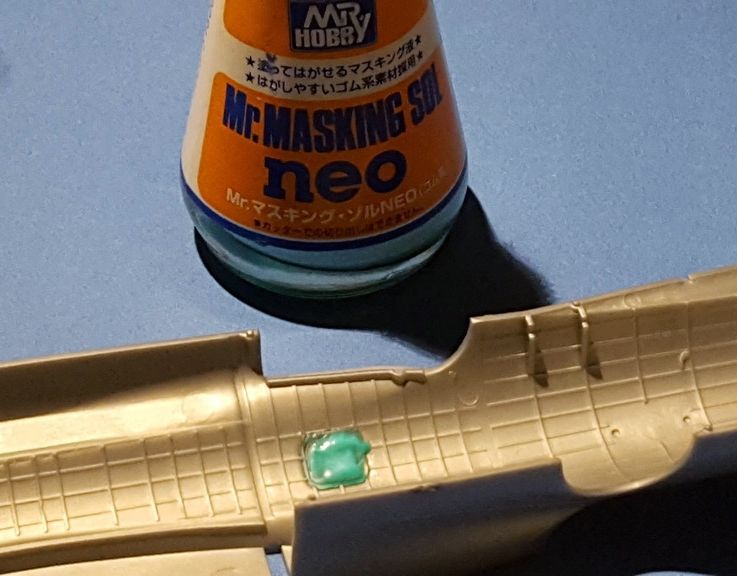
Mr Hobby Mr Masking Sol Neo protects the clear parts while we work on the rest of the model.
Deuteronomy 32:35
-
haxorb
- Private First Class

- Posts: 44
- Joined: Thu Jul 07, 2016 9:52 am
- Location: Netherlands
- Contact:

Re: My very first group build is Revells B-17G "Flying Fortress"
Awesome beginning! Because this is also the first kit i've ever made i'm really looking forward to this one. Unfortunately i didn't have paint nor the tools to properly build everything then 
-
SprueSurgeon
- Sergeant
- Posts: 142
- Joined: Thu Sep 15, 2016 12:15 pm
Re: My very first group build is Revells B-17G "Flying Fortress"
Thanks haxorb, you don't need to paint it in all the colours that i have chosen, you could go for a two tone camoflague, most internal parts are green and dark green, thanks for your kind words i will try to live up to your expectations.haxorb wrote:Awesome beginning! Because this is also the first kit i've ever made i'm really looking forward to this one. Unfortunately i didn't have paint nor the tools to properly build everything then
ATB
Mark
aka Sprue Surgeon, PhotoMorph
Deuteronomy 32:35
-
SprueSurgeon
- Sergeant
- Posts: 142
- Joined: Thu Sep 15, 2016 12:15 pm
Re: My very first group build is Revells B-17G "Flying Fortress"
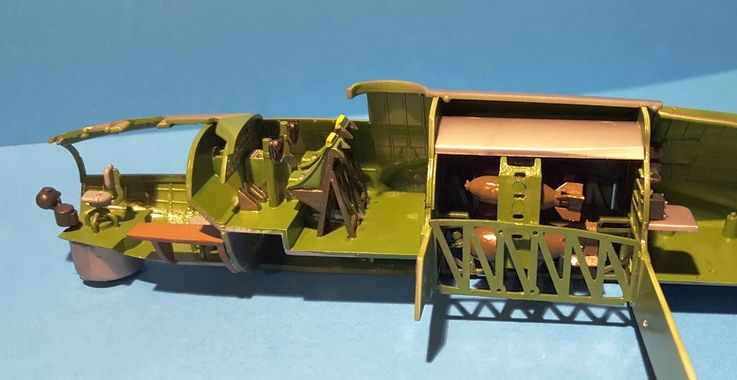
Steps 6-11 finishing off the bomb bay rack
After all the bombs had there seams dealt with they then were glued in position onto the rack, careful attention was needed here to make sure the rack sides are orientated in the correct position and direction, even with the instructions it was all too easy to position items incorrectly and only find out upon assembly, and yes i did have to unglue a couple of parts that had gone in wrongly, my advice particularly here would be to check, check and check again before committing to glue. Its also important to remember to detail the bulkhead/compartment seals now once these sub assemblies are mated to the fuselage access to them will become much more difficult, the instructions do tell you in step 1 by way of a paintbrush pointing to 94, which i missed completely but was thankfully made aware of by Guy Mac of the ISM forum, before i had gone too far.
The finished sub assembly which is the bomb rack from above
Some of the paintwork required on both sides of the bulkheads
Bomb racks with fuselage ready to bring together.
After all the bombs had there seams dealt with they then were glued in position onto the rack, careful attention was needed here to make sure the rack sides are orientated in the correct position and direction, even with the instructions it was all too easy to position items incorrectly and only find out upon assembly, and yes i did have to unglue a couple of parts that had gone in wrongly, my advice particularly here would be to check, check and check again before committing to glue. Its also important to remember to detail the bulkhead/compartment seals now once these sub assemblies are mated to the fuselage access to them will become much more difficult, the instructions do tell you in step 1 by way of a paintbrush pointing to 94, which i missed completely but was thankfully made aware of by Guy Mac of the ISM forum, before i had gone too far.

The finished sub assembly which is the bomb rack from above

Some of the paintwork required on both sides of the bulkheads

Bomb racks with fuselage ready to bring together.
Deuteronomy 32:35
-
SprueSurgeon
- Sergeant
- Posts: 142
- Joined: Thu Sep 15, 2016 12:15 pm
Re: My very first group build is Revells B-17G "Flying Fortress"
Steps 12 - main cockpit18
The cockpit area is always my favouriyte part of any aircraft build, this is where i spend a lot of time, i began by cutting all the parts required for the cockpit and then attaching them to either cocktail sticks, (or tooth picks as some call them) with CA glue or blue tack or if they are too small for that affix to a piece off thick card with some double sided sticky tape, they were then given a dusting of vallejo 74.601 grey surface primer, these were then left to dry overnight and then thoroughly checked for any errors or mistakes. Items were then detailed and affixed as per the instructions and again left to dry. i feel that i should perhaps tell you that a small amount of artistic creativity was used when detailing, for example i have placed a red light/button on the left hand side of the instrument panel and the centre console, i felt this added a great deal to the build and helped break up all the green!! After 12 hours the whole sub assembly was given a coat of Gauzy shine enhancer ready for the decals which would be fitted, at least to the cockpit next.
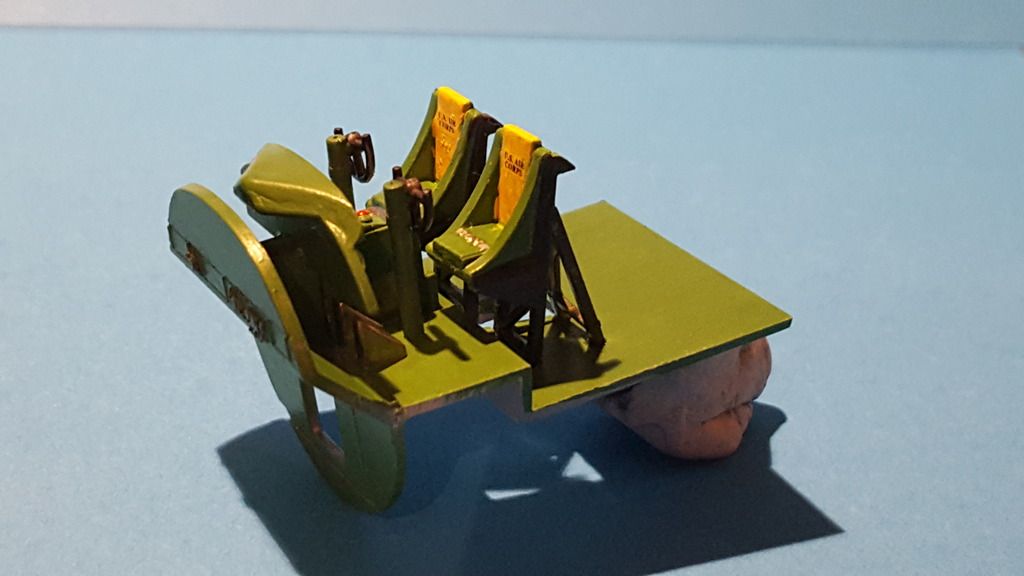
The Cockpit sub assembly
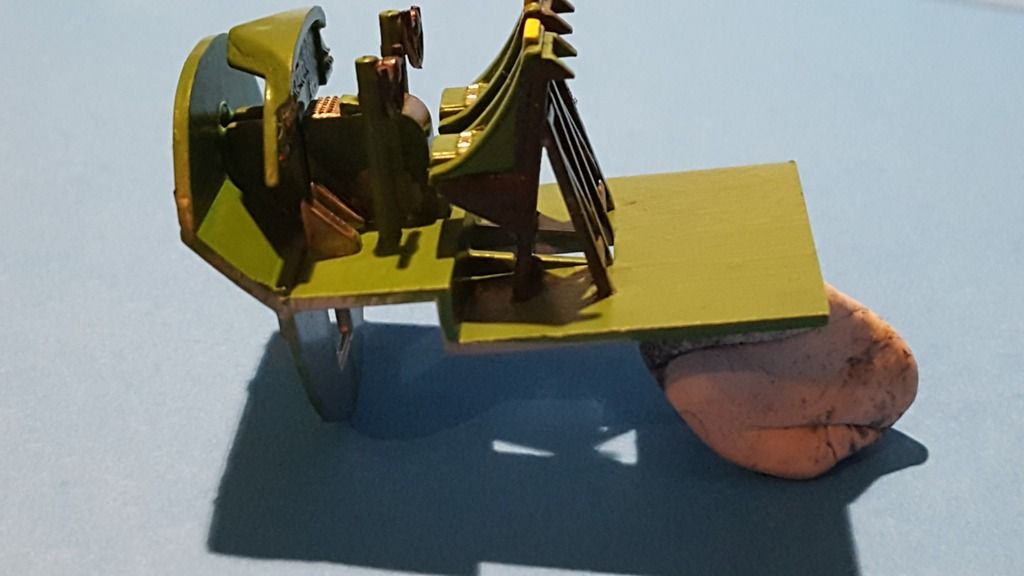
And from the side
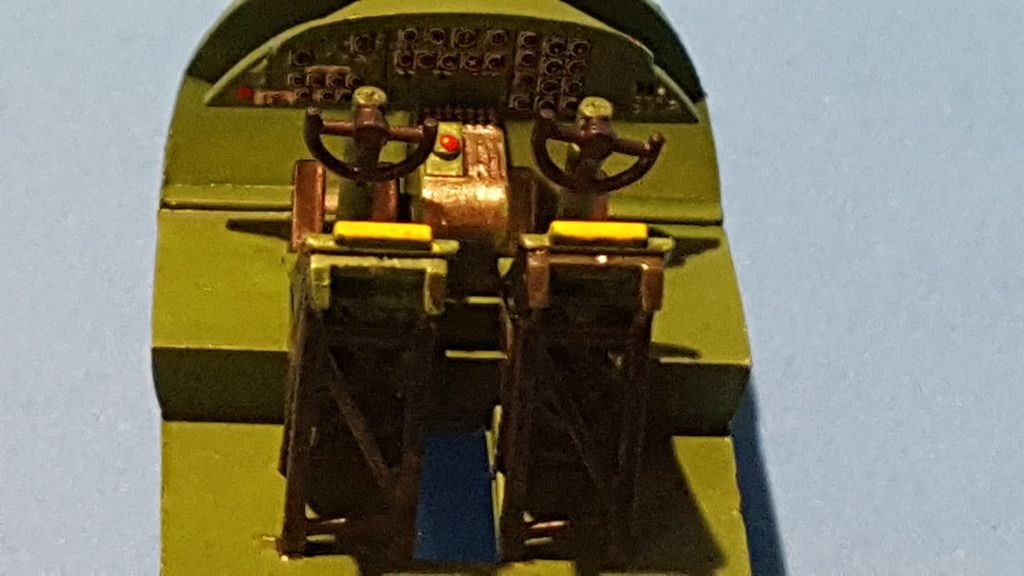
The instrument panel from behind in the main cockpit
Deuteronomy 32:35
-
haxorb
- Private First Class
- Posts: 44
- Joined: Thu Jul 07, 2016 9:52 am
- Location: Netherlands
- Contact:
Re: My very first group build is Revells B-17G "Flying Fortress"
Haha, im not going to paint itSprueSurgeon wrote:Thanks haxorb, you don't need to paint it in all the colours that i have chosen, you could go for a two tone camoflague, most internal parts are green and dark green, thanks for your kind words i will try to live up to your expectations.haxorb wrote:Awesome beginning! Because this is also the first kit i've ever made i'm really looking forward to this one. Unfortunately i didn't have paint nor the tools to properly build everything then
ATB
Mark
aka Sprue Surgeon, PhotoMorph
haxorb (Toon)
-
SprueSurgeon
- Sergeant
- Posts: 142
- Joined: Thu Sep 15, 2016 12:15 pm
Re: My very first group build is Revells B-17G "Flying Fortress"
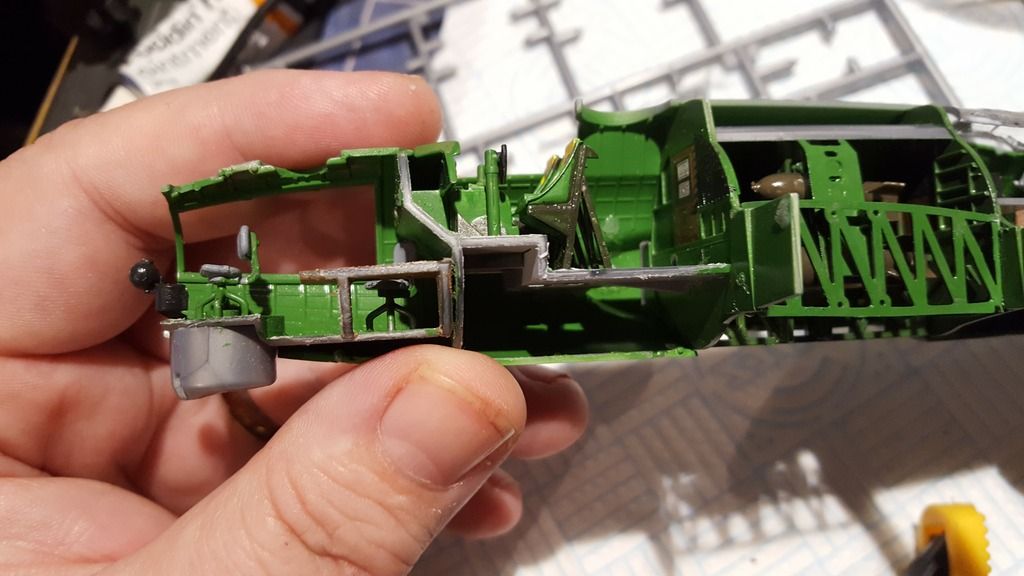
Steps 19 - 23 Front navigation area
The decals were added to the cockpit without any major problems, i did find that the decal dial positions were out, so if you matched up one side of the dials the opposing side would not match, but given that they shall not be seen and given the limited time and funds i have available i just accepted it as is, after all only i will know.... and now the trillions that are on t'internet! also
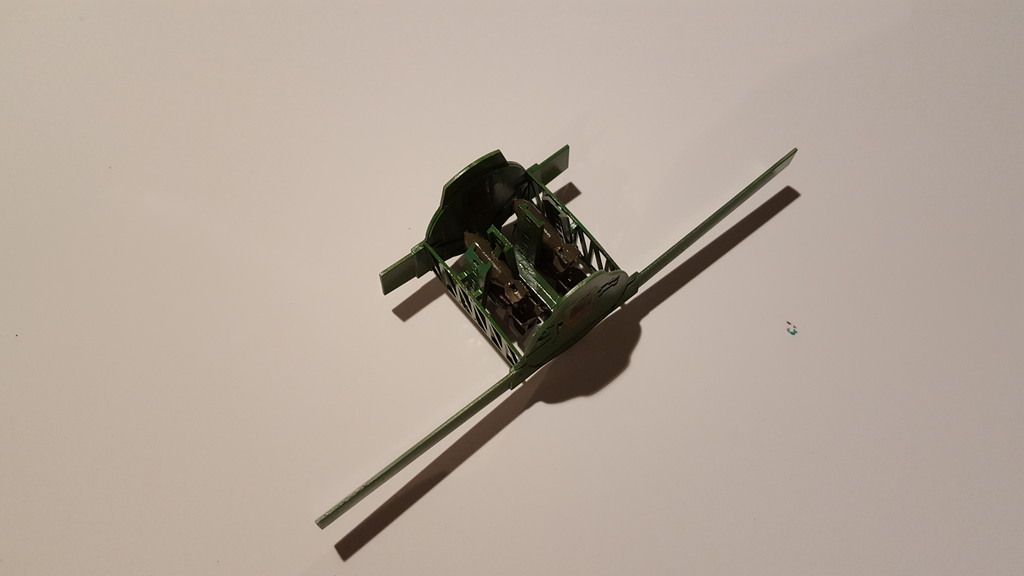
The front navigation area went together with ease and really only consisted of two chairs and the swivel turret where i'm assuming a gunner would sit at the front of the nose cone beneath which some of the B17's formidable armorments would be, at 1/72 scale these pieces are tiny and require a steady hand to paint, alternatively you can close your eyes, murmur a prayer and hope your miracle is granted, if not you end up with a version like mine is below
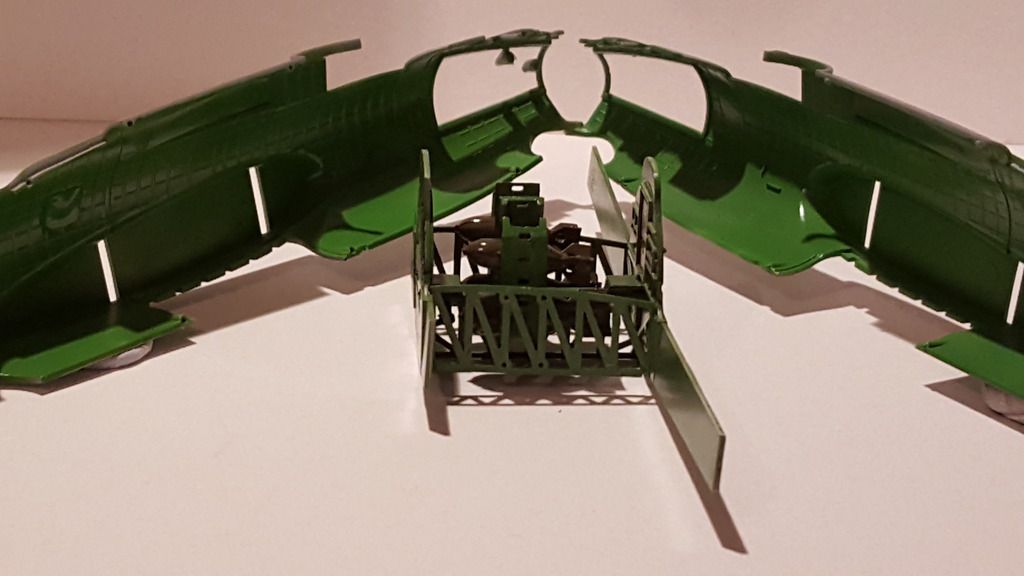
The front three sections are now complete and fitted into one half of the fuselage.
Steps 24 - 29 Electronics compartment
This compartment has a lot of equipment in it, the instructions were very busy with lots of parts and paint call outs, i decided to treat these steps as one large step. Firstly i went through steps 24-29 and removed from the sprue all parts i required and then treated each seperate piece to a clean up to get rid of any remaining burrs, flash or sprue gate remnants, as these were all small pieces i cut some card from an old model box (any card will do) at about a length of 300mm/30cm and along one side i put down a strip of double sided tape, i then removed the paper from the double sided tape exposing the sticky tape beneath and proceeded to add each piece to the tape, most pieces only required painting on one side because the other surface would be cemented to something, with that done i primed along the components with vallejo grey primer and left it to cure overnight.
in the middle of detail painting, it does get a bit unorganised and chaotic at times!
The following morning i began detail painting all these small components, i always brush these parts by hand when they get this small, i detracted only once from the paint schedule and that was to add small red lights to the front of the electronics equipment, some of the parts shown in the picture above have been assembled already, after a couple of coats i left the paint to cure. Note when it comes to removing the parts sometimes it is important to just very lightly score around the edges of each piece as the paint can bleed onto the card and leave puckered edges on the component when removed from the card.
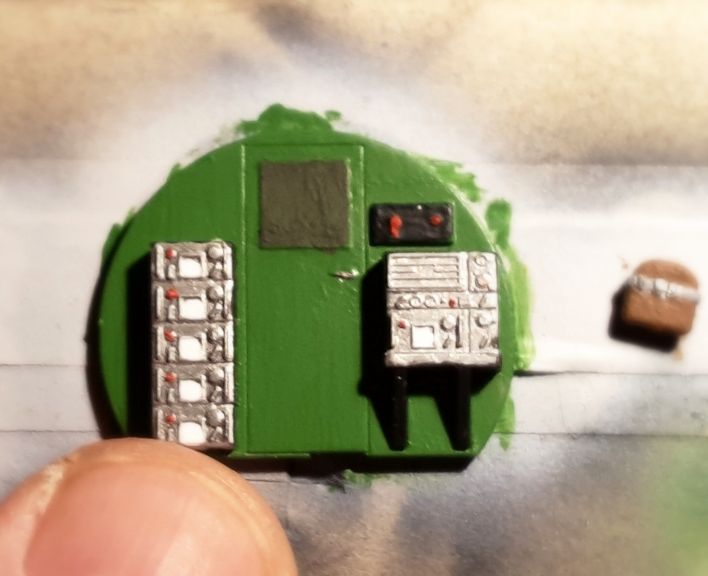
Look how small some of the parts are compared to the tip of my finger, there are four components that make up the bulkhead seal shown above.
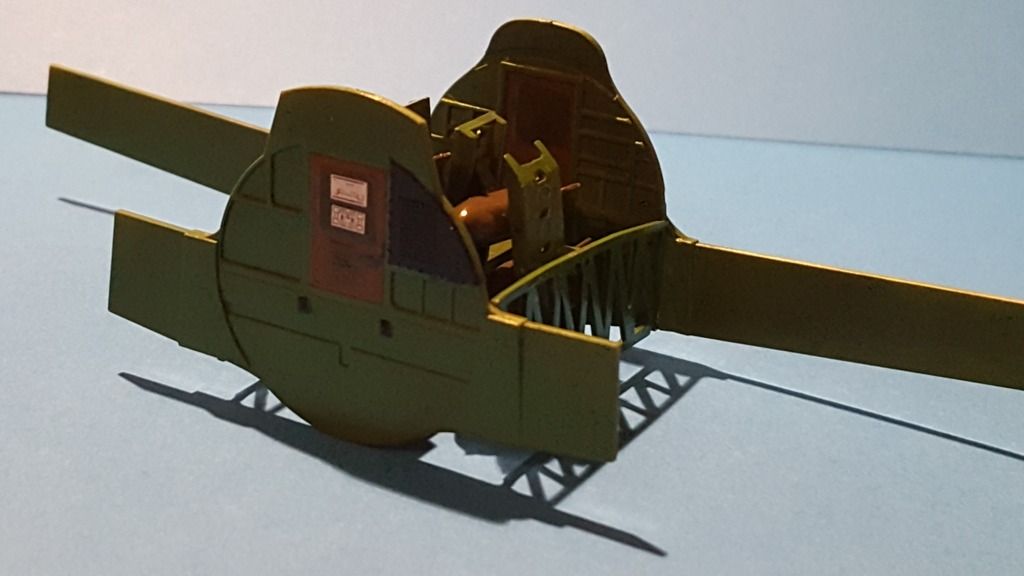
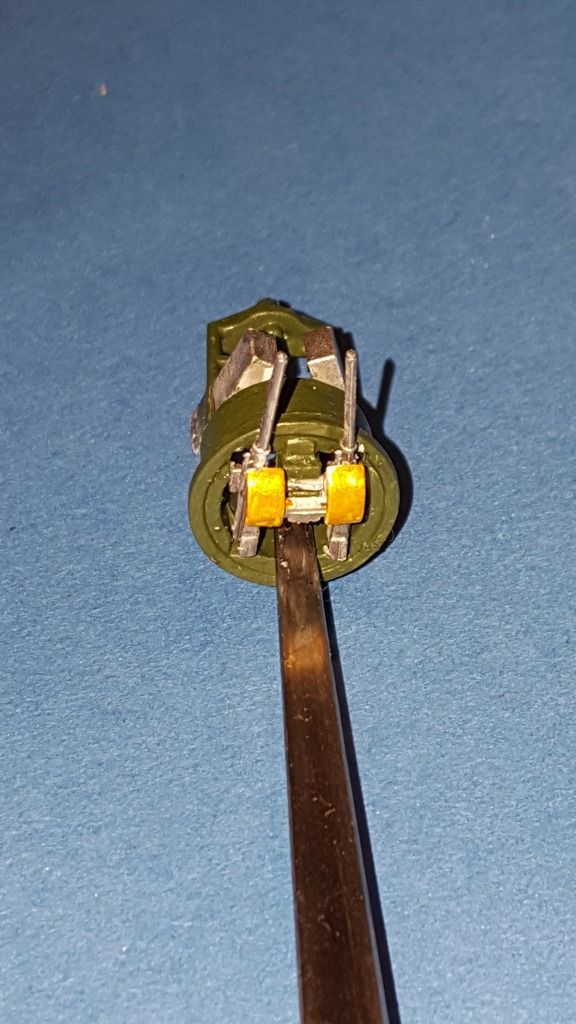
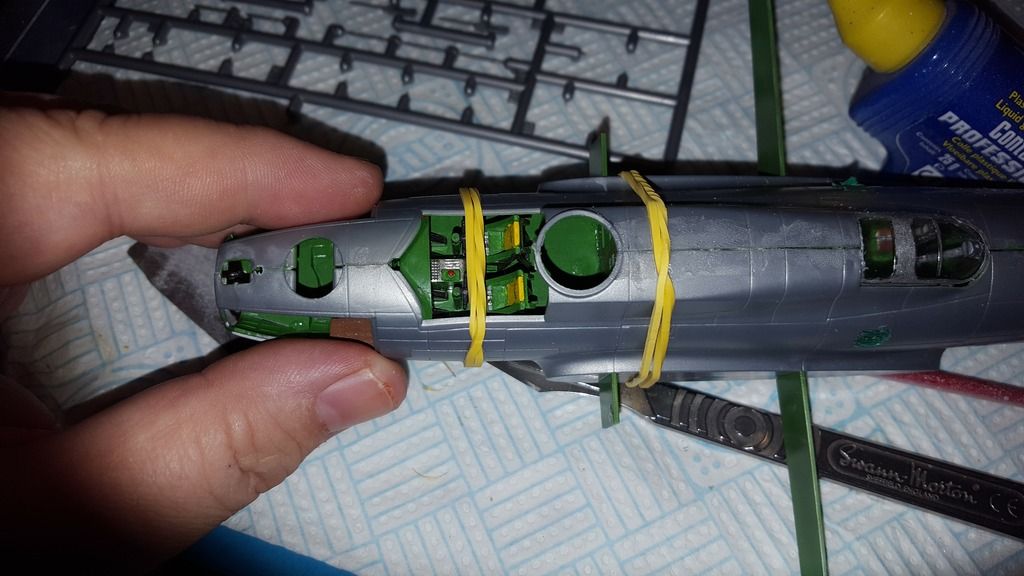
Once all the parts were painted i gave a quick brush over with Gauzy to help protect the paint, i also removed the masking fluid from the inside of the window just behind where the two chairs would go and using a good pair of tweezers i placed the seats in and then the bulkhead seal once this was finished i then had to install another window so i swithched to microset kristal klear and set the window in place and then positioned the rear parts of the general purpose machine guns and the mechanism that held them, i found it much easier to attach the gun part to the bracket and let that dry properly before mounting it onto the fuselage and then connecting it to the window. It really is looking great and i hope i'm managing to convey what a great build this is turning into.
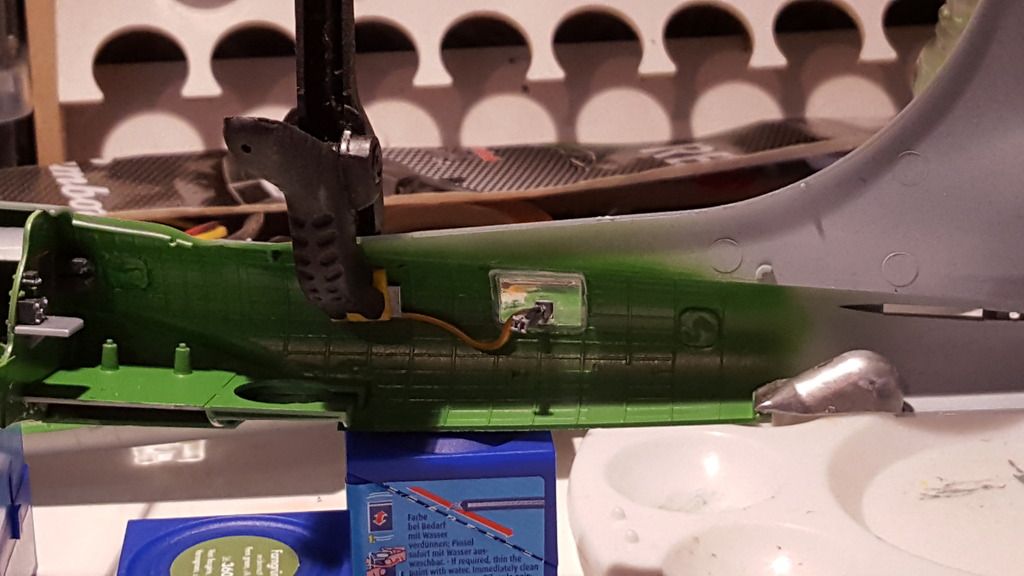
one of the rear guns clamped in posistion
and after glue has set.
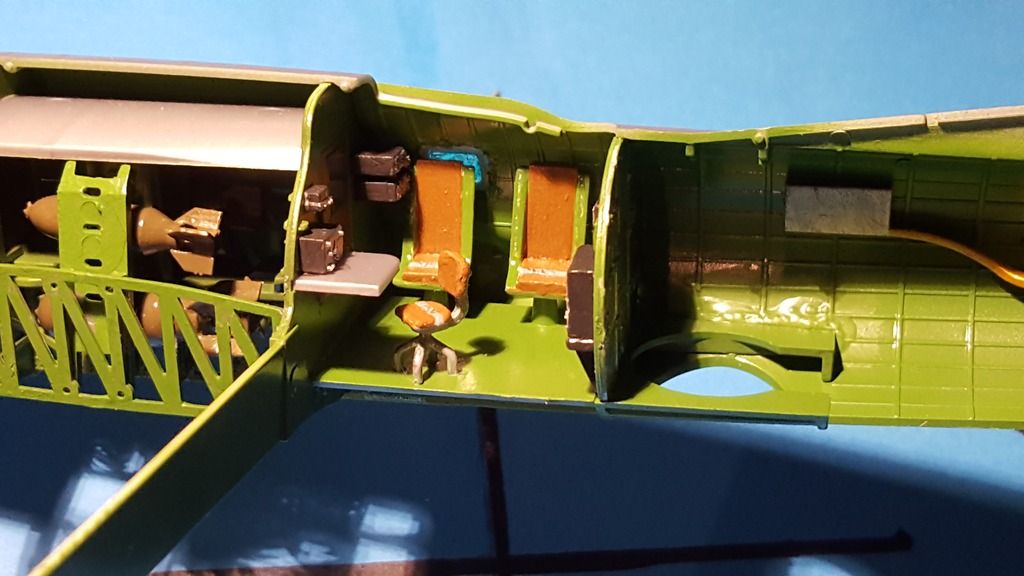
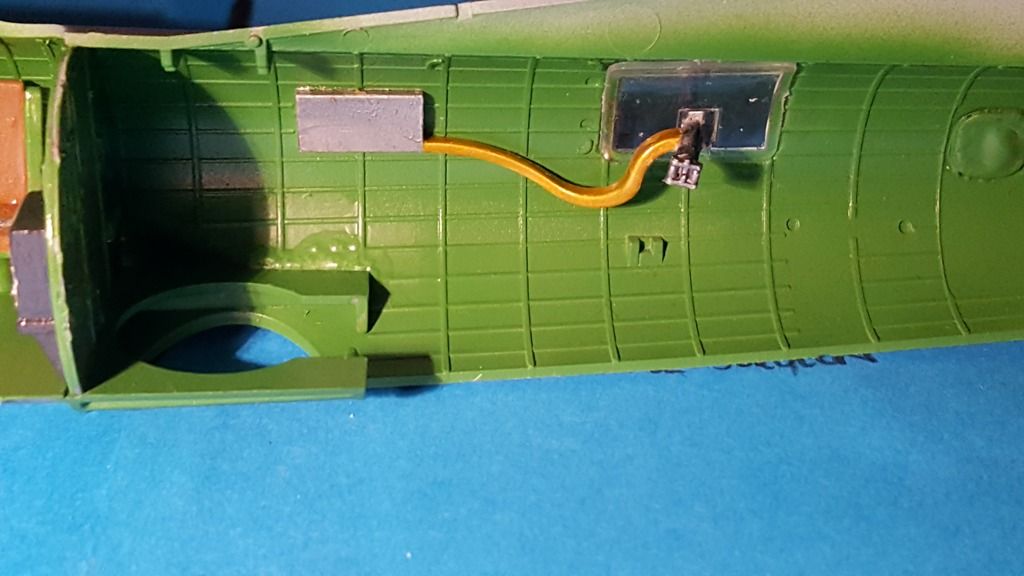
The electronics bay
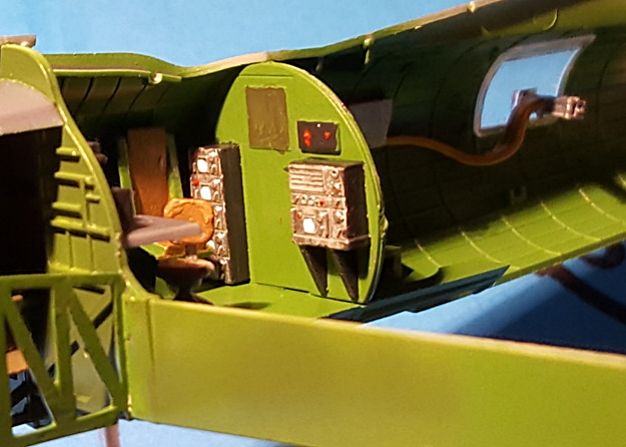
The electronics bay and GPMG arm in background
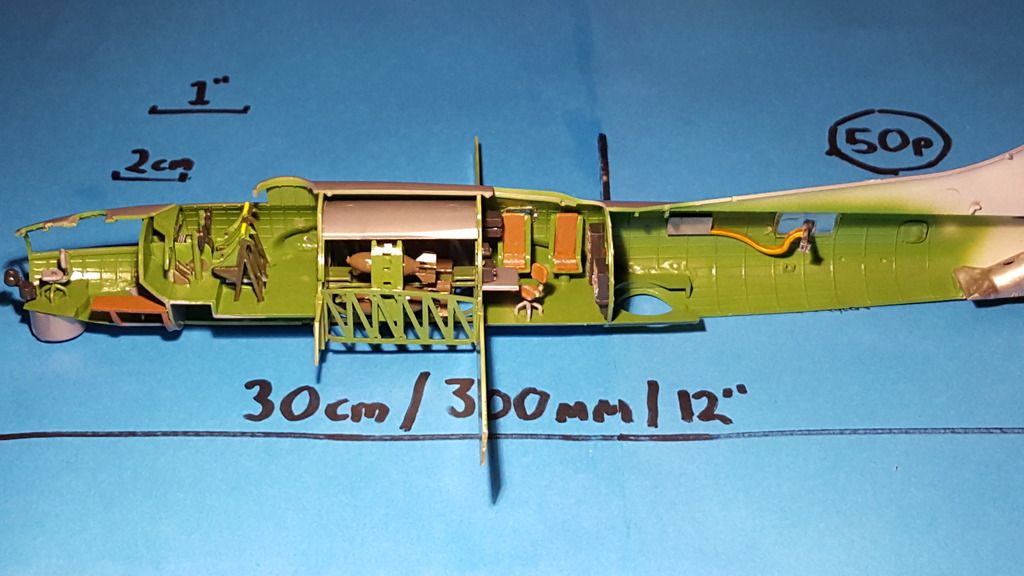
Where the build is up to as of this moment Tuesday 25th October 2016 @ 17.05pm
The decals were added to the cockpit without any major problems, i did find that the decal dial positions were out, so if you matched up one side of the dials the opposing side would not match, but given that they shall not be seen and given the limited time and funds i have available i just accepted it as is, after all only i will know.... and now the trillions that are on t'internet! also
The front navigation area went together with ease and really only consisted of two chairs and the swivel turret where i'm assuming a gunner would sit at the front of the nose cone beneath which some of the B17's formidable armorments would be, at 1/72 scale these pieces are tiny and require a steady hand to paint, alternatively you can close your eyes, murmur a prayer and hope your miracle is granted, if not you end up with a version like mine is below

The front three sections are now complete and fitted into one half of the fuselage.
Steps 24 - 29 Electronics compartment
This compartment has a lot of equipment in it, the instructions were very busy with lots of parts and paint call outs, i decided to treat these steps as one large step. Firstly i went through steps 24-29 and removed from the sprue all parts i required and then treated each seperate piece to a clean up to get rid of any remaining burrs, flash or sprue gate remnants, as these were all small pieces i cut some card from an old model box (any card will do) at about a length of 300mm/30cm and along one side i put down a strip of double sided tape, i then removed the paper from the double sided tape exposing the sticky tape beneath and proceeded to add each piece to the tape, most pieces only required painting on one side because the other surface would be cemented to something, with that done i primed along the components with vallejo grey primer and left it to cure overnight.

in the middle of detail painting, it does get a bit unorganised and chaotic at times!
The following morning i began detail painting all these small components, i always brush these parts by hand when they get this small, i detracted only once from the paint schedule and that was to add small red lights to the front of the electronics equipment, some of the parts shown in the picture above have been assembled already, after a couple of coats i left the paint to cure. Note when it comes to removing the parts sometimes it is important to just very lightly score around the edges of each piece as the paint can bleed onto the card and leave puckered edges on the component when removed from the card.

Look how small some of the parts are compared to the tip of my finger, there are four components that make up the bulkhead seal shown above.
Once all the parts were painted i gave a quick brush over with Gauzy to help protect the paint, i also removed the masking fluid from the inside of the window just behind where the two chairs would go and using a good pair of tweezers i placed the seats in and then the bulkhead seal once this was finished i then had to install another window so i swithched to microset kristal klear and set the window in place and then positioned the rear parts of the general purpose machine guns and the mechanism that held them, i found it much easier to attach the gun part to the bracket and let that dry properly before mounting it onto the fuselage and then connecting it to the window. It really is looking great and i hope i'm managing to convey what a great build this is turning into.

one of the rear guns clamped in posistion

and after glue has set.

The electronics bay

The electronics bay and GPMG arm in background

Where the build is up to as of this moment Tuesday 25th October 2016 @ 17.05pm
Deuteronomy 32:35
-
Paul

- Site Admin

- Posts: 12622
- Joined: Thu May 23, 2013 4:47 pm
- Location: Merseyside, England, UK
- Contact:

Re: My very first group build is Revells B-17G "Flying Fortress"
Going well mate, you've made good progress, look forward to seeing how the rest comes together 
Products I use in my builds viewtopic.php?f=192&t=27234
My Paul-Ism page https://www.facebook.com/thebenchwithpaul/
Friday Live show here https://www.facebook.com/groups/120548821977514/

My Paul-Ism page https://www.facebook.com/thebenchwithpaul/
Friday Live show here https://www.facebook.com/groups/120548821977514/

-
Lysus

- Captain

- Posts: 4562
- Joined: Fri Dec 18, 2015 11:37 pm
- Location: Seattle, US

Re: My very first group build is Revells B-17G "Flying Fortress"
My favorite plane ever. Splendid start, while I wait for the bid count down on the B-17 I want for this GB I'll watch yours
Backlog Progress: |||||||||||||||-------|----------|----------| 26/80
On the bench: Hasegawa 1/72 Tatiana's Vanship
Last Completed: Bandai HGUC Geara Zulu // Hasegawa 1/48 J2M3Raiden Prisoner of War
On the bench: Hasegawa 1/72 Tatiana's Vanship
Last Completed: Bandai HGUC Geara Zulu // Hasegawa 1/48 J2M3Raiden Prisoner of War

-
phippster123
- Private

- Posts: 21
- Joined: Sat Sep 17, 2016 6:46 pm
- Location: St. Louis, Missouri, USA
Re: My very first group build is Revells B-17G "Flying Fortress"
Great job with the tiny details
-
SkyPainter303
- First Sergeant

- Posts: 611
- Joined: Mon Aug 31, 2015 5:02 pm
- Location: Rock Hill, South Carolina USA
- Contact:
Re: My very first group build is Revells B-17G "Flying Fortress"
That model certainly is something.

-
SprueSurgeon
- Sergeant
- Posts: 142
- Joined: Thu Sep 15, 2016 12:15 pm
Re: My very first group build is Revells B-17G "Flying Fortress"
Thankyou Skypainter and Phippster for your comments, its slow progress but im getting there, ive just been sat at my desk for half an hour deciding if i should paint the next few pieces!!! if i'd just done it i'd be finished now! 
Deuteronomy 32:35
-
exmoor
- First Sergeant
- Posts: 583
- Joined: Wed Jul 20, 2016 9:08 pm
Re: My very first group build is Revells B-17G "Flying Fortress"
Hi sprue i havent been into planes but you have got me hooked love the build and your post i wait to see more
paul shapland
-
SprueSurgeon
- Sergeant
- Posts: 142
- Joined: Thu Sep 15, 2016 12:15 pm
Re: My very first group build is Revells B-17G "Flying Fortress"
Thank you very much Exmoor, that's a very nice comment and i am so greatful to you and everyone else who comments on my work i have only been modelling for a year and consider myself a novice at best, my you tube channel and builds are all about showing a novice building incluyding all my mistakes and cock ups, i hope they help both me and subscribers to improve.
ATB
PhotoMorph, SprueSurgeon, Mark
ATB
PhotoMorph, SprueSurgeon, Mark
Deuteronomy 32:35
-
demarcation

- Command Sergeant Major

- Posts: 960
- Joined: Wed May 13, 2015 11:34 pm
- Location: Denmark

Re: My very first group build is Revells B-17G "Flying Fortress"
Fantastic work so far mate!! 
 I've got this one in my stash too so from now on I'll follow your build with great interest!!
//Anders
-
SprueSurgeon
- Sergeant
- Posts: 142
- Joined: Thu Sep 15, 2016 12:15 pm
Re: My very first group build is Revells B-17G "Flying Fortress"
Video Build Update
Its just a quick video to let you know where i'm at in the build, the written progress will be continued shortly, I just wanted to make sure some progress was reported, i also ask the group for assistance, so click the link below and see if you can help, and dont forget to click like and subscribe.
https://youtu.be/HqelHmmNyIc
ATB
Mark
MJLDPS
PhotoMorph
Sprue Surgeon
Deuteronomy 32:35
-
SprueSurgeon
- Sergeant
- Posts: 142
- Joined: Thu Sep 15, 2016 12:15 pm
Re: My very first group build is Revells B-17G "Flying Fortress"
Steps 30-44 Adding turrets and guns
If like me you suffer from Sausage fingers and shake like a naked eskimo in the middle of winter then you will realise how i felt about the next section, while i love detail in models i can and do struggle with it at times, however saying that it still is something that gives me a great feeling of accomplishment when finished, the turrets and guns were exactly like this. Again i started by completing each turret in turn, for example i isolated all the pieces required for the top centre turret attatched them to card and primed them with Vallejo grey, the detailing throughout the turrets was very thorough and was fairly easy to put together requiring only some Tamiya extra thin cement, a steady... ish hand, and a pair of decent tweezers.
Many of the turret and gun areas are encased in clear parts which require painting, i dislike masking a great deal and tried several times without success to mask as required (there are many options and configurations and the clear parts particularly are painted differently depending on which variant you are making) after a few unsuccessful attempts i resorted to cheating slightly and purchased a uniPAINT MARKER extra fine, at a price of £5.35 they are expensive but for mne they offer a level of control i cannot get with a brush, air or otherwise! i used this to go arounfd the areas required and once dry i went over main areas with a vallejo metal finish
NOTE: It is worth mentioning that in my opinion Step 31 parts 179 should actually read 59 and in Step 38 parts 59 should read 179, this has not been corroborated at this point, but maybe someone reading this that has this model could cast their eye over it and comment below.
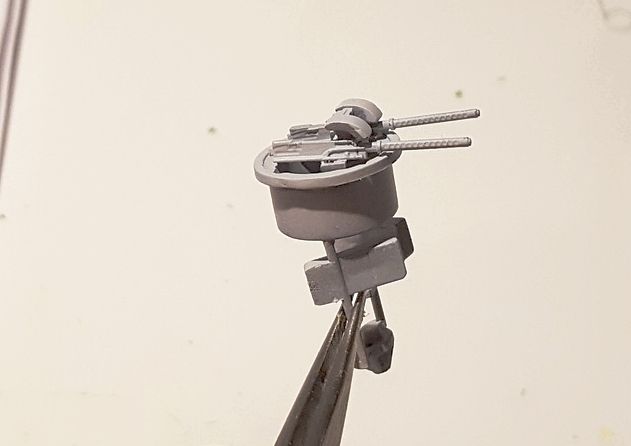
Top centre turret after priming and assembly.
Top centre turret after painting.
I then turned my attention to the rear guns, with Revells kit there are a myriad of possibilities with different layouts and painting of the rear guns so at this point i highly advise stopping after step 37 and reading steps 38 to 47 and deciding how you wish to proceed, unfortunately it was too late for me and i carried out steps 38 to 41 before realising there was an option to have all the gun detail exposed in the remaining steps, these steps cover not only the rear guns but also the mid section glass ceiling behind which a GPMG is placed
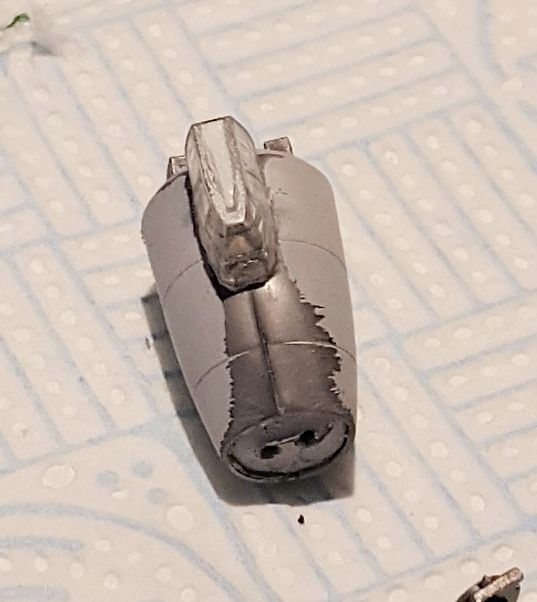
The rear guns
If like me you suffer from Sausage fingers and shake like a naked eskimo in the middle of winter then you will realise how i felt about the next section, while i love detail in models i can and do struggle with it at times, however saying that it still is something that gives me a great feeling of accomplishment when finished, the turrets and guns were exactly like this. Again i started by completing each turret in turn, for example i isolated all the pieces required for the top centre turret attatched them to card and primed them with Vallejo grey, the detailing throughout the turrets was very thorough and was fairly easy to put together requiring only some Tamiya extra thin cement, a steady... ish hand, and a pair of decent tweezers.
Many of the turret and gun areas are encased in clear parts which require painting, i dislike masking a great deal and tried several times without success to mask as required (there are many options and configurations and the clear parts particularly are painted differently depending on which variant you are making) after a few unsuccessful attempts i resorted to cheating slightly and purchased a uniPAINT MARKER extra fine, at a price of £5.35 they are expensive but for mne they offer a level of control i cannot get with a brush, air or otherwise! i used this to go arounfd the areas required and once dry i went over main areas with a vallejo metal finish
NOTE: It is worth mentioning that in my opinion Step 31 parts 179 should actually read 59 and in Step 38 parts 59 should read 179, this has not been corroborated at this point, but maybe someone reading this that has this model could cast their eye over it and comment below.

Top centre turret after priming and assembly.

Top centre turret after painting.
I then turned my attention to the rear guns, with Revells kit there are a myriad of possibilities with different layouts and painting of the rear guns so at this point i highly advise stopping after step 37 and reading steps 38 to 47 and deciding how you wish to proceed, unfortunately it was too late for me and i carried out steps 38 to 41 before realising there was an option to have all the gun detail exposed in the remaining steps, these steps cover not only the rear guns but also the mid section glass ceiling behind which a GPMG is placed

The rear guns
Deuteronomy 32:35
-
SprueSurgeon
- Sergeant
- Posts: 142
- Joined: Thu Sep 15, 2016 12:15 pm
Re: My very first group build is Revells B-17G "Flying Fortress"
Steps 45-53 Canopy treatment and Joining fuselage halves
After creating gun and turret parts they are all left to one side until required, there are again different choices to be made depending on what your after, a decision or choice is represented with a question mark (?) in the instruction manual. After choosing the canopies you wish and the paint pattern required you can start by cleaning any remnants of the sprue gates and then mask with your chosen method, i decided to follow the same method as earlier and used the silver paint pen with a 0.4mm tip around the edges and then filled in with Vallejo acrylic metal color these were then left to dry.
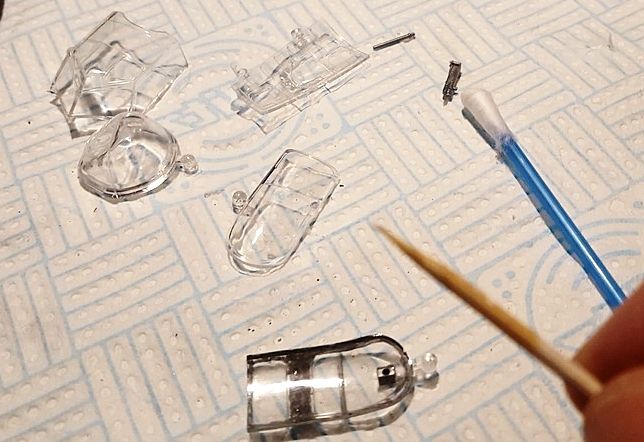
Clear canopies ready for work
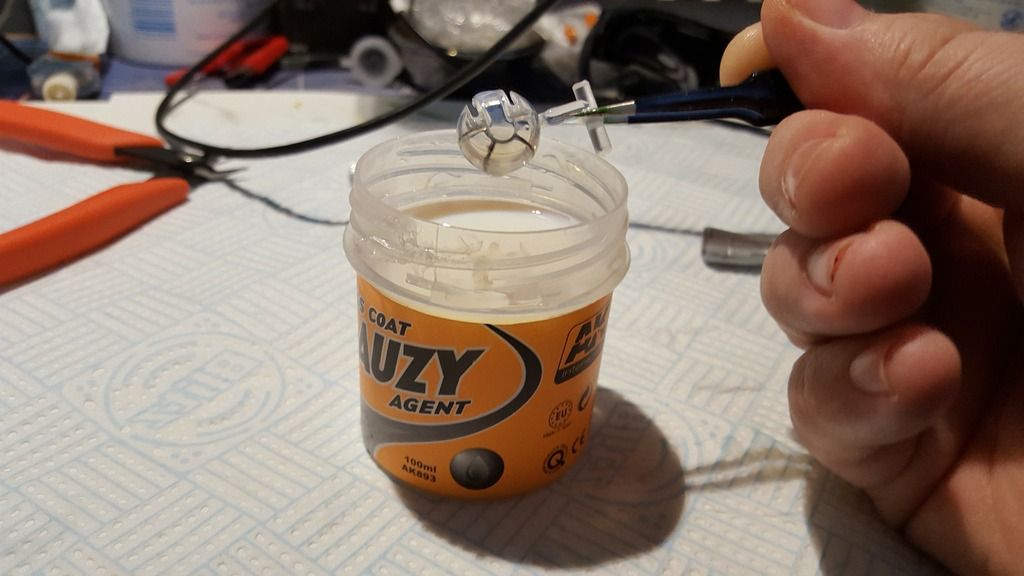
After the canopies had been left to dry for a suitable amount of time (in this case 12 hours) i then dipped each piece to give it a better finish with a cearer more appealing finish, i achieved this with AK Interactives Glass coat GAUZY agent with the wide mouth, i find this to be a very efficient solution, just be careful to follow the steps below carefully to get the best from it. Once dipped the glass was then masked with either a paper or a fluid mask and then after attaching any weapons such as the front left and right machine guns on the corresponding panels were then placed in their positions and glued in with a touch of Micro Kristal Klear or left off for attachment at a later time.
Clear parts ready for dipping.
Steps for dipping Canopies in GAUZY
You will need:
A clean sheet of kitchen roll
An empty tupperware box slightly larger tghan the piece you are dipping
A clean pair of tweezers
1. Approx half an hour before dipping shake Gauzy to mix thoroghly, then set down and do not move it again
2 After bubbles have dissappeared from the surface you can begin, a few bubbles or a small amount of froth at the edge should not be a problem
3. Pick each piece up with tweezers and fully submerge the piece in the solution for about 10 seconds, lift out and gently shake excess Gauzy from the piece.
4. Any areas where Gauzy is collecting due to run off can be problematic if left, so gently touch this area on a clean piece of kitchen roll which will absorb the excess
5. After ten minutes re position tweezers and 'dip' again, after draining place on a clean sheet and cover with a box or place gently in a container and replace lid, this will stop dust and debris from settling on the clear parts and then giving a poor finish.
After all of that it was finally time to bring the two halves together, unfortunately this proved problematic as a gap of around 2-3mm which had to be dealt with by sanding the corresponding mating surface from within the fuselage, this was easier to communicate this through a video which is linked to my you tube site below, this link will open a new page.
https://youtu.be/HqelHmmNyIc
You can see from this picture the surfaces that were sanded to help the fuselage halves fit together.
Here is a picture of the mess the Revell contacta special made
Here i have managed to reduce the gapage considerably.
Once the two halves were togther they were then treated to Citadels Liquid Green Stuff which is a filler of sorts this was applied over several layers , larger gaps were filled in slowly with a poly cement a small amount at a time, as i sit here i have had to build up one half of a canopy which is not sitting correctly, unfortunately to take it out and reseat it would mean seperating the two halves again.... NOT A CHANCE!!!
As of now 11 Nov 2016 @ 21.30pm i am still filling very thin layers and sanding others, you can see the seam line at the moment but cannot feel it, so my plan is to prime very soon and see if all my work has been worth it!
ATB
Sprue Surgeon
PhotoMorph
Mark
After creating gun and turret parts they are all left to one side until required, there are again different choices to be made depending on what your after, a decision or choice is represented with a question mark (?) in the instruction manual. After choosing the canopies you wish and the paint pattern required you can start by cleaning any remnants of the sprue gates and then mask with your chosen method, i decided to follow the same method as earlier and used the silver paint pen with a 0.4mm tip around the edges and then filled in with Vallejo acrylic metal color these were then left to dry.

Clear canopies ready for work
After the canopies had been left to dry for a suitable amount of time (in this case 12 hours) i then dipped each piece to give it a better finish with a cearer more appealing finish, i achieved this with AK Interactives Glass coat GAUZY agent with the wide mouth, i find this to be a very efficient solution, just be careful to follow the steps below carefully to get the best from it. Once dipped the glass was then masked with either a paper or a fluid mask and then after attaching any weapons such as the front left and right machine guns on the corresponding panels were then placed in their positions and glued in with a touch of Micro Kristal Klear or left off for attachment at a later time.

Clear parts ready for dipping.
Steps for dipping Canopies in GAUZY
You will need:
A clean sheet of kitchen roll
An empty tupperware box slightly larger tghan the piece you are dipping
A clean pair of tweezers
1. Approx half an hour before dipping shake Gauzy to mix thoroghly, then set down and do not move it again
2 After bubbles have dissappeared from the surface you can begin, a few bubbles or a small amount of froth at the edge should not be a problem
3. Pick each piece up with tweezers and fully submerge the piece in the solution for about 10 seconds, lift out and gently shake excess Gauzy from the piece.
4. Any areas where Gauzy is collecting due to run off can be problematic if left, so gently touch this area on a clean piece of kitchen roll which will absorb the excess
5. After ten minutes re position tweezers and 'dip' again, after draining place on a clean sheet and cover with a box or place gently in a container and replace lid, this will stop dust and debris from settling on the clear parts and then giving a poor finish.
After all of that it was finally time to bring the two halves together, unfortunately this proved problematic as a gap of around 2-3mm which had to be dealt with by sanding the corresponding mating surface from within the fuselage, this was easier to communicate this through a video which is linked to my you tube site below, this link will open a new page.
https://youtu.be/HqelHmmNyIc

You can see from this picture the surfaces that were sanded to help the fuselage halves fit together.

Here is a picture of the mess the Revell contacta special made

Here i have managed to reduce the gapage considerably.
Once the two halves were togther they were then treated to Citadels Liquid Green Stuff which is a filler of sorts this was applied over several layers , larger gaps were filled in slowly with a poly cement a small amount at a time, as i sit here i have had to build up one half of a canopy which is not sitting correctly, unfortunately to take it out and reseat it would mean seperating the two halves again.... NOT A CHANCE!!!
As of now 11 Nov 2016 @ 21.30pm i am still filling very thin layers and sanding others, you can see the seam line at the moment but cannot feel it, so my plan is to prime very soon and see if all my work has been worth it!
ATB
Sprue Surgeon
PhotoMorph
Mark
Deuteronomy 32:35
-
SprueSurgeon
- Sergeant
- Posts: 142
- Joined: Thu Sep 15, 2016 12:15 pm
Re: My very first group build is Revells B-17G "Flying Fortress"
A fantastic look around a real Flying Fortress 
I have not figured out how to add a you tube link on here yet so for now accept my apologies this link will have to suffice.
The link will take you to a 57 minute talk and walk round a REAL B17-G with interesting information saturated throughout, in it you will be led round by the current captain of the Flying Fortress, it really is an awesome aircraft so put the kettleon get your biscuits out and click the link.
Many Thanks
Sprue Surgeon
PhotoMorph
Mark
Deuteronomy 32:35
-
SprueSurgeon
- Sergeant
- Posts: 142
- Joined: Thu Sep 15, 2016 12:15 pm
Re: My very first group build is Revells B-17G "Flying Fortress"
Thankyou fellow builder, i appreciate your comments, i look forward to seeing yours toodemarcation wrote:Fantastic work so far mate!!
ATB
Sprue Surgeon
PhotoMorph
Mark
Deuteronomy 32:35
-
SprueSurgeon
- Sergeant
- Posts: 142
- Joined: Thu Sep 15, 2016 12:15 pm
Re: My very first group build is Revells B-17G "Flying Fortress"
A quick note/correction
I just need to make a quick mention to anyone that may be following the build with a copy of the Revell building manual on them, you may of noticed that i have omitted certain steps and only partially completed others, such as steps 48 partially completed, 49,50,51 there are bound to be a few more, why? you ask, well simply put i felt it would be better to leave certain steps until the very end, for example i'm not going to add all the Browning machine gun barells when the manual says as they will almost certainly get damaged, likewise canopies will not be added until the end to keep them as clean as possible, neither will the wheels so i can prime and paint the wings and fuselage without having to mask the delicate structure of the landing gears. Nobody has mentioned anything i just noticed it may look odd if someone were to follow along.
Now for the correction, my knowledge of aircraft is woefully inadequate, up until just before this post, during the build i have incorrectly referred to the weapons on board as GPMGs this comes from my short time in the army (medical discharge due to RTA) and the fact that the mouldings look very similar to the General Purpose Machine Gun, i have since been told the weapons on board would have been Browning .50 calibre machine guns, my sincere apologies for this oversight.
Many Thanks
Sprue Surgeon
PhotoMorph
Mark
Deuteronomy 32:35
-
SprueSurgeon
- Sergeant
- Posts: 142
- Joined: Thu Sep 15, 2016 12:15 pm
Re: My very first group build is Revells B-17G "Flying Fortress"
Steps 54-60 All things Wingy!
We come to the wing sections now, and another significant decision needs to be made, inner flaps open or shut, unfortunately for me i did not quite understand the instructions and also do not own a saw, so i opted to leave my inner flaps closed, in retrospect its a lot easier than i thougfht but i did not realise this until significant steps had been taken that were non reversable.
However i feel the Revell manual does need a few pointers, so while i myself did not complete these steps i shall include them for those of you who wish to have flaps open.
Firstly pay very close attention to the component numbers, do not do what i done which is see a picture of a wing and then go and chop everything of the sprue wing shaped. Step 54 refers to the lower wing sections part nos 98 & 112 while the manual calls for a saw to cut this flap away you will need to reattach this flap so you need to be as neat as possible, if i were to do it i would scribe a line with a new blade carefully, slowly and lightly until the flap comes away, it then tells you to go to steps 85 & 86 and reattach the flap to some supports beneath them that open and close the flaps on the real plane, again if i were doing it i would just carry on with the build and finish those steps as and when i reach them.
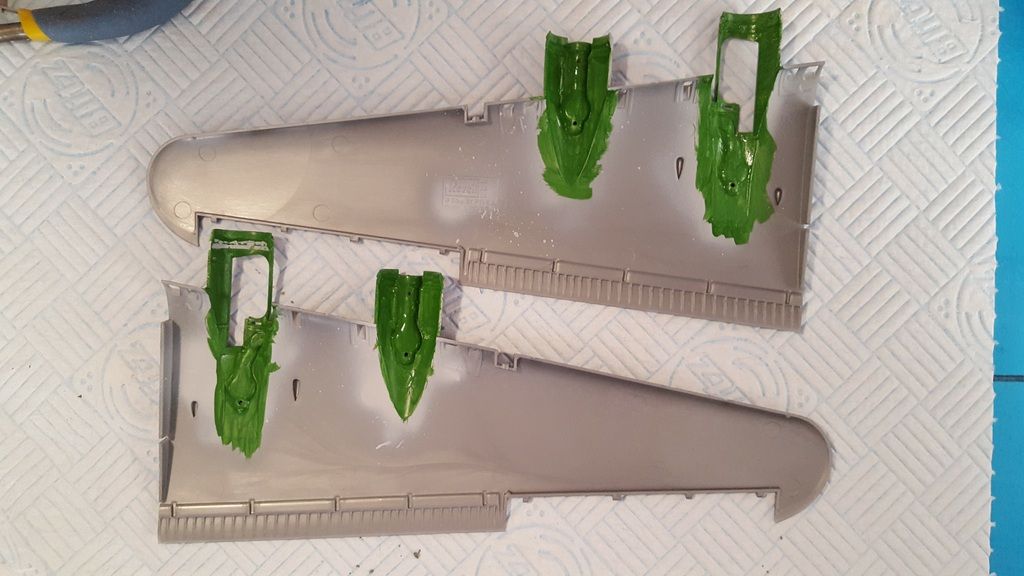
Some of the wing surfaces, which retained there closed flap positioning due to me being a bit thick!
The internal wing surfaces where visible were painted with Revell 360 Green silky matt, in the image below you can see the first elements of the engine components being added, they have been picked from the sprue cleaned up and then built into the wing where they were then primed in situ, for ease i attatched all the parts un-primed as all the components were the same as the internal surfaces 360 green which i airbrushed over the top after priming.
Engine components are added to the wing structures and then primed before painting with Revell 360 Green Silky Matt
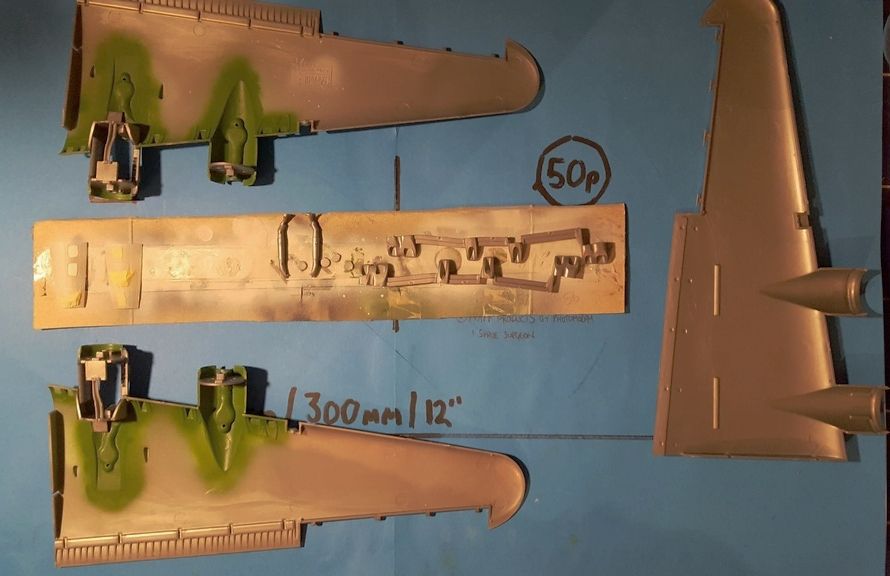
Some more internal wing structures going in.
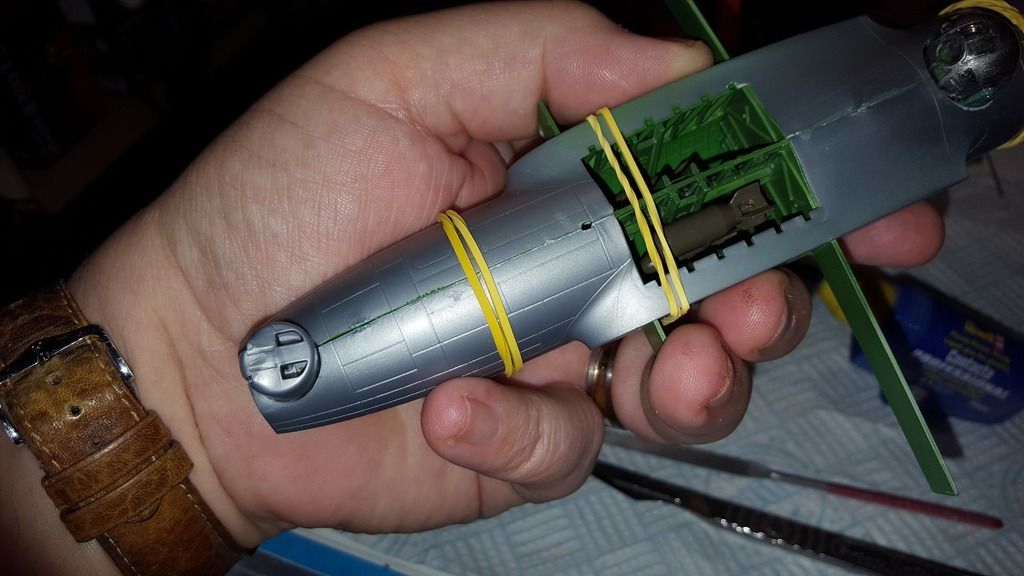
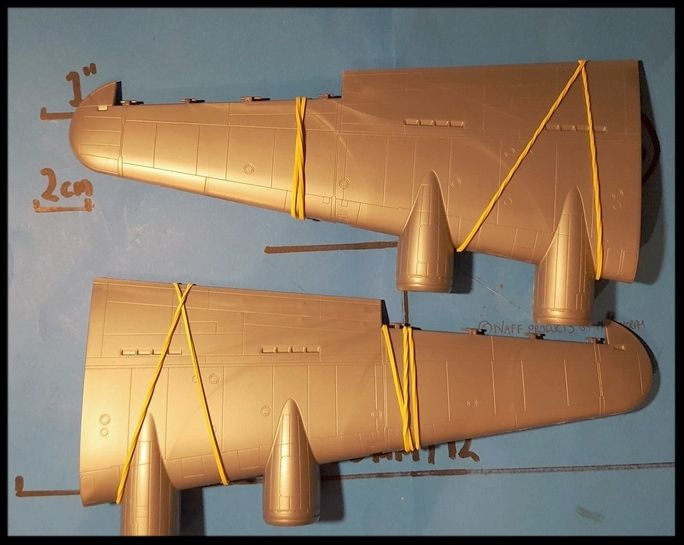
Once all the internal wing components were installed and painted (which went in flawlessly i might add) it was time to join the wings together, again clamping proved to be extremely difficult due to the shape of the wings, i liberally coated the main location points and quickly attached the two halves, i then used two standard elastic bands as shown in the image below, with those in place i went around touching the joins with Tamiya extra thin cement and allowed it to do its thing! the bands were left on for two days while i worked on the engines, overkill? almost certainly but i wanted to make sure they had cured fully.
We come to the wing sections now, and another significant decision needs to be made, inner flaps open or shut, unfortunately for me i did not quite understand the instructions and also do not own a saw, so i opted to leave my inner flaps closed, in retrospect its a lot easier than i thougfht but i did not realise this until significant steps had been taken that were non reversable.
However i feel the Revell manual does need a few pointers, so while i myself did not complete these steps i shall include them for those of you who wish to have flaps open.
Firstly pay very close attention to the component numbers, do not do what i done which is see a picture of a wing and then go and chop everything of the sprue wing shaped. Step 54 refers to the lower wing sections part nos 98 & 112 while the manual calls for a saw to cut this flap away you will need to reattach this flap so you need to be as neat as possible, if i were to do it i would scribe a line with a new blade carefully, slowly and lightly until the flap comes away, it then tells you to go to steps 85 & 86 and reattach the flap to some supports beneath them that open and close the flaps on the real plane, again if i were doing it i would just carry on with the build and finish those steps as and when i reach them.

Some of the wing surfaces, which retained there closed flap positioning due to me being a bit thick!
The internal wing surfaces where visible were painted with Revell 360 Green silky matt, in the image below you can see the first elements of the engine components being added, they have been picked from the sprue cleaned up and then built into the wing where they were then primed in situ, for ease i attatched all the parts un-primed as all the components were the same as the internal surfaces 360 green which i airbrushed over the top after priming.

Engine components are added to the wing structures and then primed before painting with Revell 360 Green Silky Matt

Some more internal wing structures going in.
Once all the internal wing components were installed and painted (which went in flawlessly i might add) it was time to join the wings together, again clamping proved to be extremely difficult due to the shape of the wings, i liberally coated the main location points and quickly attached the two halves, i then used two standard elastic bands as shown in the image below, with those in place i went around touching the joins with Tamiya extra thin cement and allowed it to do its thing! the bands were left on for two days while i worked on the engines, overkill? almost certainly but i wanted to make sure they had cured fully.

Deuteronomy 32:35
-
SprueSurgeon
- Sergeant
- Posts: 142
- Joined: Thu Sep 15, 2016 12:15 pm
Re: My very first group build is Revells B-17G "Flying Fortress"
Sigh! i feel useless at this
This is just a quick update there are no pictures at the moment as there has not been much progress, we have arrived at my nemesis in modelling but probably one of the most important steps, i'm talking about masking & priming the model and canopies, ( cue violins ) my masking resembles a big steaming pile of squirrel s**t, i just cannot do it, and i know its due to my inept, fumbling and poor modelling skills that its going to turn out the way it is. This time i used a masking solution, its irrelevant which one ive tried them all, anyway, as i applied it on one of the rear fuselage windows, the window in question fell away inside the model, i almost flung the model in rage so now i have to create a window using the trick with kristal klear or humbrols clear fix, i have zero confidence at the moment, so for now i am signing off, i'm going to rest for a bit and see if i can rekindle my interest in the kit, the kit itself is great, the modeller sadly is below average at best, ATB see you all soon.
This is just a quick update there are no pictures at the moment as there has not been much progress, we have arrived at my nemesis in modelling but probably one of the most important steps, i'm talking about masking & priming the model and canopies, ( cue violins
Deuteronomy 32:35
-
CraigPetterson
- Corporal

- Posts: 98
- Joined: Sat Aug 27, 2016 12:13 am
- Contact:

Re: My very first group build is Revells B-17G "Flying Fortress"
Your anything but 'below average'. I have learned so much reading your build progress, I look forward to seeing your return to the build. If it's any solace you spurred me on to get deeper into the hobby.
I look forward to your return.
I look forward to your return.
On the Bench
Still deciding....
Stash
Eduard 1/48 Bf 109E-4
Still deciding....
Stash
Eduard 1/48 Bf 109E-4
-
SprueSurgeon
- Sergeant
- Posts: 142
- Joined: Thu Sep 15, 2016 12:15 pm
Re: My very first group build is Revells B-17G "Flying Fortress"
Thankyou Craig for your kind words, have just had a hard time with my depression which is never pleasant, I have made small steps and have made improvements, details will be coming soon. so get your ready!
Deuteronomy 32:35
-
SprueSurgeon
- Sergeant
- Posts: 142
- Joined: Thu Sep 15, 2016 12:15 pm
Re: My very first group build is Revells B-17G "Flying Fortress"
Step 61 to 74 Engines and flaps
The build is really picking up pace now, so our next step according to the instructions is to install the main wing flaps and the rear tail wing flaps, however due to the paint scheme i am taking i have opted instead to keep these items separate as there are a multitude of differing colours that need spraying from left to right, and upper and lower flap surfaces, they were primed and sprayed and assembled where it was required, be warned that the control flaps in steps 61 & 62 must be assembled on the wing they are designated to go on, they cannot be glued together and added later.
I once again fell back to my tried and tested method of trimming all the engine parts and mounting them on cardboard for priming and painting where required before assembly

Engine components trimmed of the sprues.
The building itself was very easy and only required a modicum of common sense, the parts themselves were very fragile and one or two probably could of done with a few less sprue contact points, cleaning up the parts had to be done with great care. There are also a few steps in which they require you to not glue parts together, this is so the propellers turn and in other steps flaps move, wheels turn and so on, this is normally denoted by a glue tube with a cross through the centre
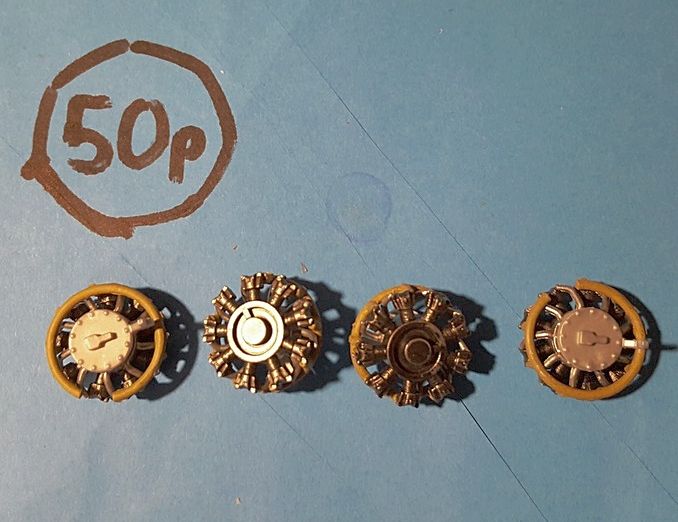
The 4 Curtiss Wright Radial Engines represented here partially built.
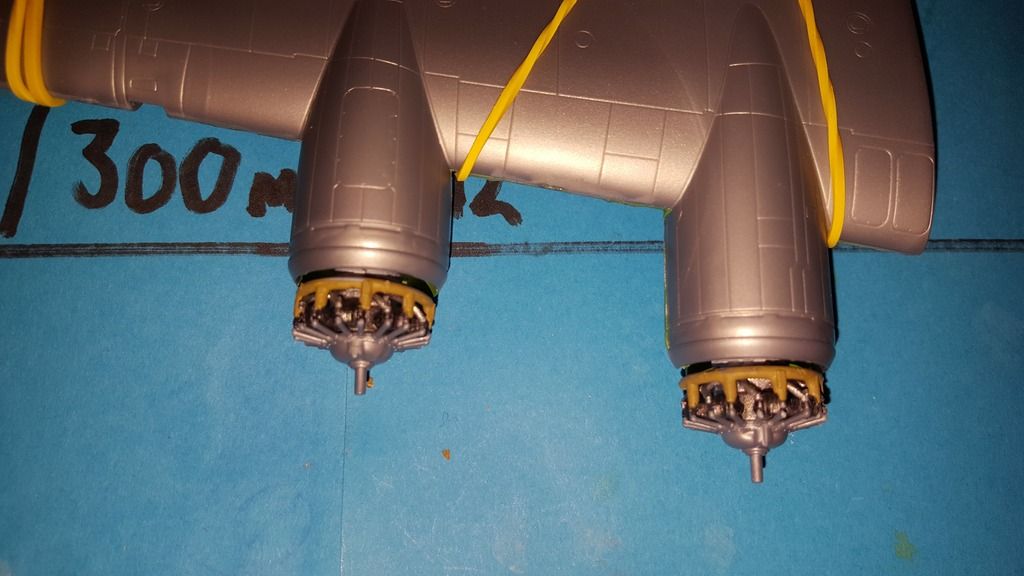
And here they are built up in there housings, the cowlings are next to go on.
Its during the next few steps that we come to another choice and its a cowling choice, the instructions present you with either a flat cowling or you can opt to have a flared cowling mid section, for my build i have opted for a flared mid section, the other pieces i placed in a small brown money envelope and labelled with the planes details, once the kit has been built any spare parts will be placed in this bag and stored away, with that job done it was time to start building up the landing gears.
Deuteronomy 32:35
-
Lysus
- Captain
- Posts: 4562
- Joined: Fri Dec 18, 2015 11:37 pm
- Location: Seattle, US
Re: My very first group build is Revells B-17G "Flying Fortress"
You're doing some outstanding work on this one. I might have mentioned that the old Monogram 1/48 B-17G was my first ever kit, I was 12 and made a right mess of it. You're inspiring me to add this to my 2017 wish list.
I think the flared cowling is an excellent choice, look forward to seeing it done.
I think the flared cowling is an excellent choice, look forward to seeing it done.
Backlog Progress: |||||||||||||||-------|----------|----------| 26/80
On the bench: Hasegawa 1/72 Tatiana's Vanship
Last Completed: Bandai HGUC Geara Zulu // Hasegawa 1/48 J2M3Raiden Prisoner of War
On the bench: Hasegawa 1/72 Tatiana's Vanship
Last Completed: Bandai HGUC Geara Zulu // Hasegawa 1/48 J2M3Raiden Prisoner of War
-
SprueSurgeon
- Sergeant
- Posts: 142
- Joined: Thu Sep 15, 2016 12:15 pm
Re: My very first group build is Revells B-17G "Flying Fortress"
Steps 75-80 Landing Gears and Wheels
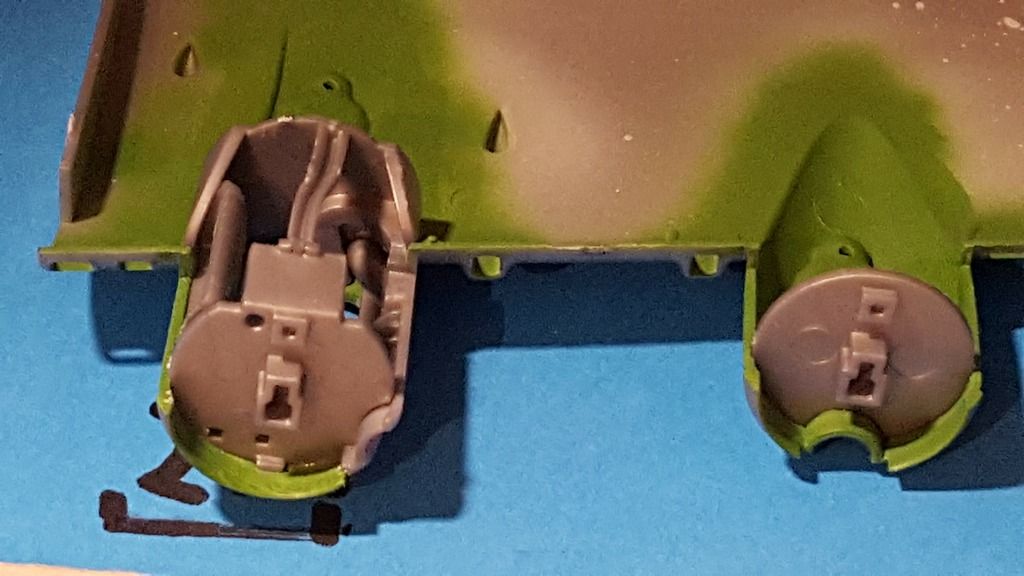
There were no real issues here that were not the fault of my own making the wheels come in two halves so there is little point in painting them prior to assembly (as i did!) as you end up removing half the paint and primer while you remove the wheel seam line, the landing gear assembles out of two pieces and fits into pre determined holes inside the wheel well, the landing gear was painted with a combination of Vallejos Alluminum and Revells Patina Green 365, Note its best to NOT stand the plane on its newly fitted landing gear as the weight of the plane can alter the setting of the wheels giving them an odd appearance, having said that i left mine on its roof so to speak and one wheel still went wonky as spotted by Paul Bretland from Ultimate/ISM, Paul was also gracious enough to guide me through a quick repair, thankyou for that Paul. I also inserted the exhaust at this stage, although i would not paint them yet as they get sprayed over when spraying the wings, as i sit here i'm thinking back and it may even be better to leave them out until the end and spray them just before assembling.... isnt hind sight a wonderful thing! why cant i be this intelligent while i'm building
The empty wheel well ready to receive its gubbins!
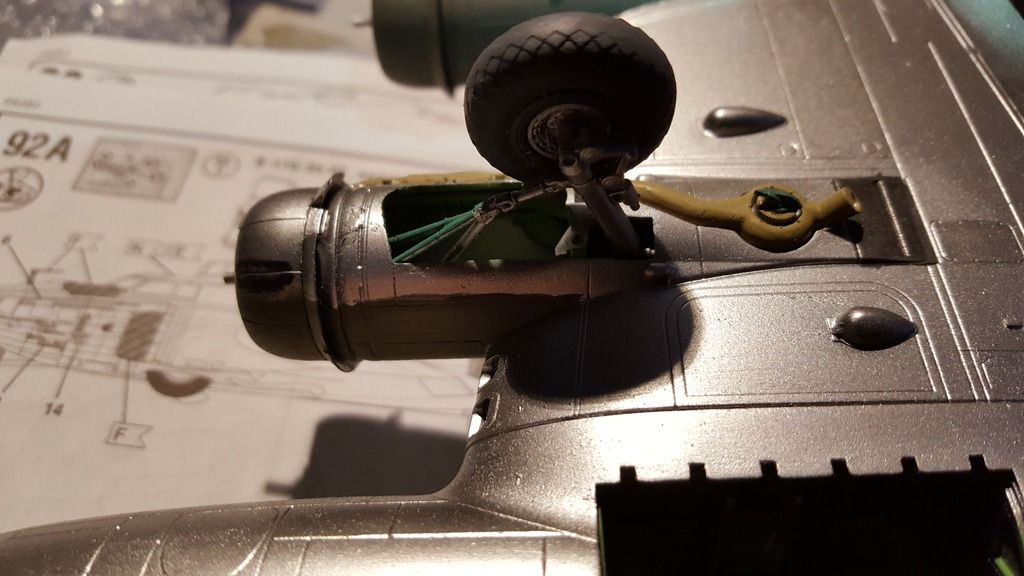
Landing Gear Assembly in situ
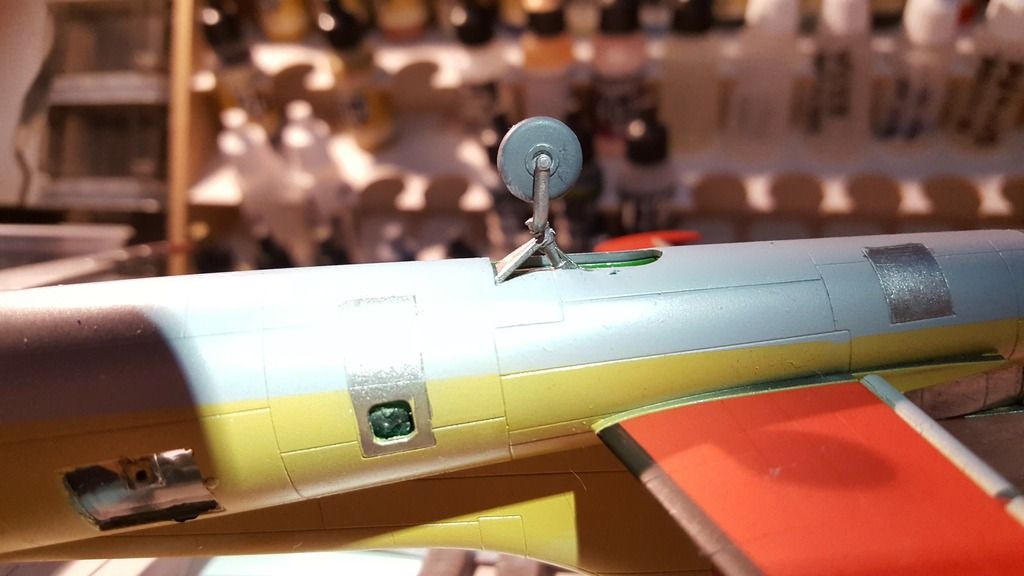
Rear wheel assembly!
There were no real issues here that were not the fault of my own making the wheels come in two halves so there is little point in painting them prior to assembly (as i did!) as you end up removing half the paint and primer while you remove the wheel seam line, the landing gear assembles out of two pieces and fits into pre determined holes inside the wheel well, the landing gear was painted with a combination of Vallejos Alluminum and Revells Patina Green 365, Note its best to NOT stand the plane on its newly fitted landing gear as the weight of the plane can alter the setting of the wheels giving them an odd appearance, having said that i left mine on its roof so to speak and one wheel still went wonky as spotted by Paul Bretland from Ultimate/ISM, Paul was also gracious enough to guide me through a quick repair, thankyou for that Paul. I also inserted the exhaust at this stage, although i would not paint them yet as they get sprayed over when spraying the wings, as i sit here i'm thinking back and it may even be better to leave them out until the end and spray them just before assembling.... isnt hind sight a wonderful thing! why cant i be this intelligent while i'm building

The empty wheel well ready to receive its gubbins!

Landing Gear Assembly in situ

Rear wheel assembly!
-
SprueSurgeon
- Sergeant
- Posts: 142
- Joined: Thu Sep 15, 2016 12:15 pm
Re: My very first group build is Revells B-17G "Flying Fortress"
Steps 81-91 Adding Wing assemblies and final touches
So ive finally made it too the final build stages, the wings were added with a conventional cement rather than Tamiya cement and these were then clamped and left overnight to set, many of the other steps from 82-91 which included bomb bay doors (which i am setting open), gun barrels, ariel, propellors and some items from earlier in the build like the clear canopies at the front would be painted and detailed as required and added after the plane has been painted itself, some the flaps from step 61 would also be added after the plane has been sprayed. For now i had to fill all openings with sponge, masking tape and/or a masking solution. Time to get spraying
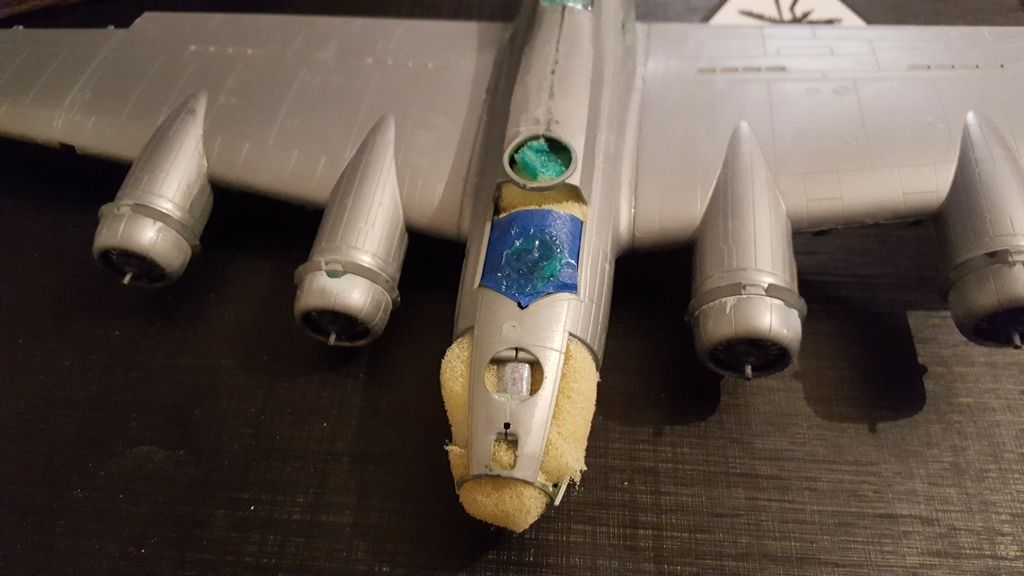
Sponges blocking the front compartments from paint
Deuteronomy 32:35
-
CraigPetterson
- Corporal
- Posts: 98
- Joined: Sat Aug 27, 2016 12:13 am
- Contact:
Re: My very first group build is Revells B-17G "Flying Fortress"
Looking forward to the painting well done.
On the Bench
Still deciding....
Stash
Eduard 1/48 Bf 109E-4
Still deciding....
Stash
Eduard 1/48 Bf 109E-4
-
SprueSurgeon
- Sergeant
- Posts: 142
- Joined: Thu Sep 15, 2016 12:15 pm
Re: My very first group build is Revells B-17G "Flying Fortress"
Final Painting, Decal and Weathering
Ive got to say the painting was an absolute nightmare, all of my own doing, initally the prime coat went down ok, i primed with Vallejo Gloss Black 77.660 which is Vallejos primer for there Metal Colour range, the two colours i would be using from that range would be Silver and Alluminium.
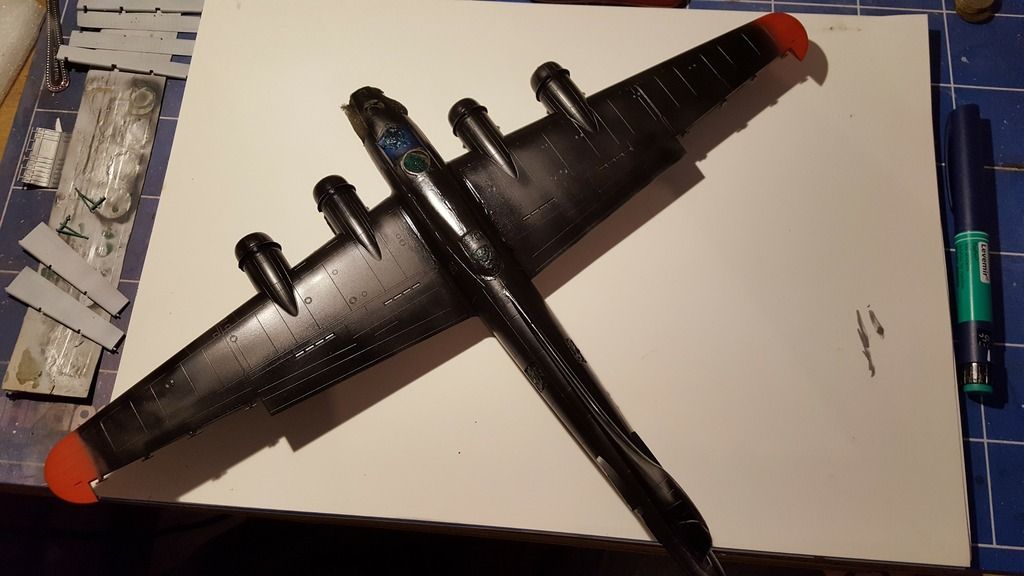
The B17G has been primed Gloss Black 77.660
When i first purchased the metal colour paints i placed 1 small metal ball in each container, over time i became sloppy i started removing the lid when brush painting small parts and replacing it when i finished, so i shook the silver to agitate the mix and poured into my colour cup, spraying was dreadful, coughing and sputtering, no spray at all and then suddenly a flood of paint would launch out, upon stripping the airbrush i found it to be awfully blocked with small flakes of metal, i cleaned and reassembled and re attempted spraying.... same result, i looked in the colour cup and sure enough it was full of bits It turned out that all them times i had the bottle open the paint inside had dried to the inside walls of the bottles everytime i shook the bottle my little ball would tear little flakes of the inside wall resulting in my problems, the plane looked dreadful an absolute mess, i'd reached the area of modelling where all mojo evapourates, i had no paint to finish the plane and no money to buy any
As a last ditch attempt i posted a request for help on the ISM forum, i recieved a reply from Gazmat who offered to send me some humbrol enamels of which silver was one, it was the paint i needed, thank you very much Gazmat, Spraying re commenced without incident, an d i followed the schedule on the back pages very carefully, masking off areas and spraying the differing colours was a challenge as masking is not my strong point after spraying the plane i left the plane to dry overnight and the following morning i sprayed the entire plane with Gauzy shine enhancer and again left it to dry for a few hours, the next stage was to add the decals which i completed over 2.5 days, completing one wing/side at a time and then the bottom, after that another coat of Gauzy to protect everything i left everything to settle and dry over 24 hours
I then went on to complete the panel lines, i decided to use Humbrol dark grey wash and covered the panel lines, my only problem was that due to all the paint troubles i had some panel lines were hardly there, so the solution did not take as well as it should of, i then used a mix of AK interactive exhaust wash and AK interactive smoke to make the dark areas behind the exhaust ports, finally i added AK interactives exhaust wash on the exhaust and also added a dry rust powder to the wet surface of each exhaust, i finished off with a coat of Gauzy to seal it all and then a Matt Coat made by Vallejo to dull it all down, you can see the finished results in the finished build section of this group, my thanks to all who followed along with me and for all your comments.
ATB Mark
SprueSurgeon
PhotoMorph
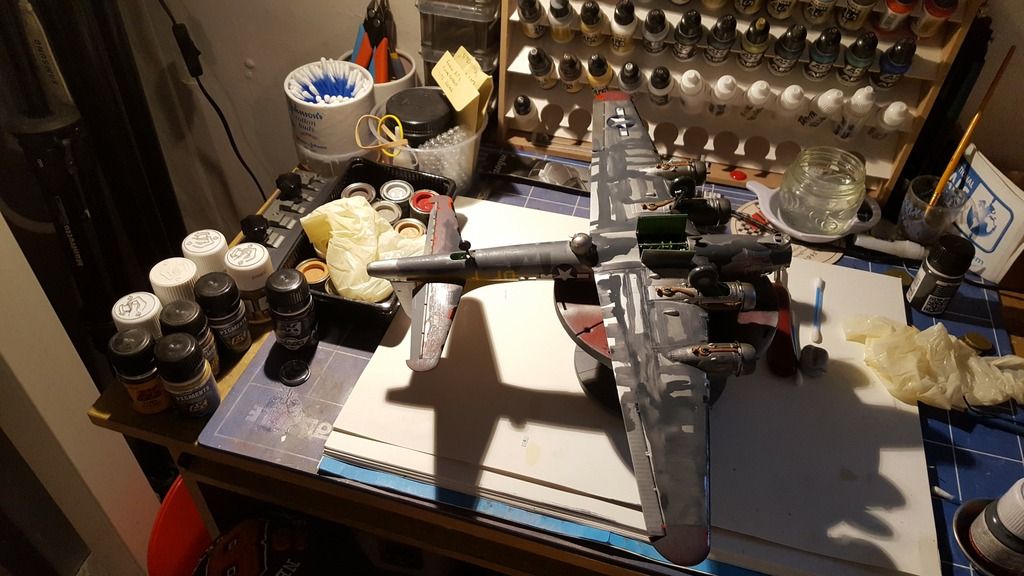
The panel lines never took as well as i had hoped.
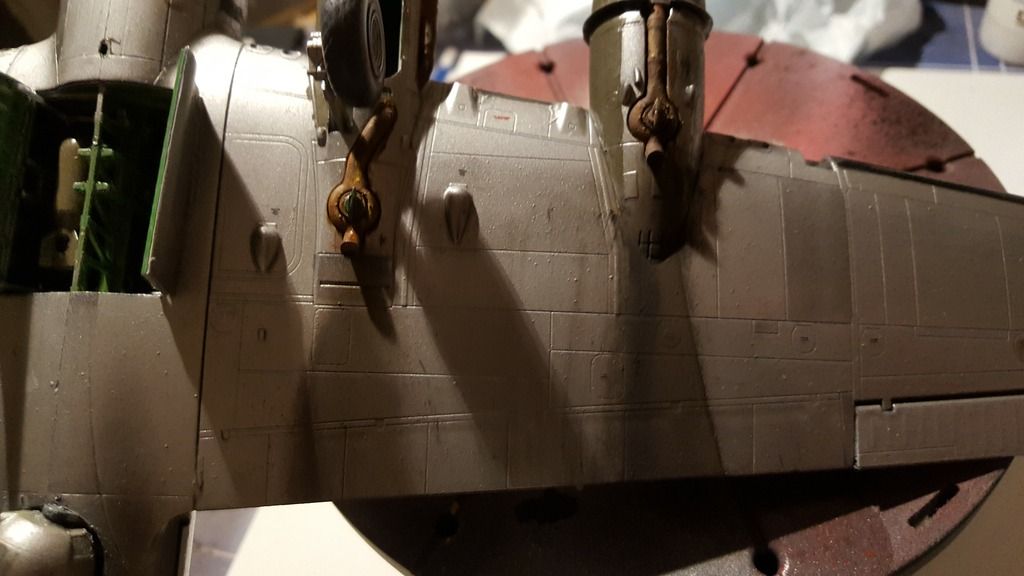
The exhausts and staining.
Ive got to say the painting was an absolute

The B17G has been primed Gloss Black 77.660
When i first purchased the metal colour paints i placed 1 small metal ball in each container, over time i became sloppy i started removing the lid when brush painting small parts and replacing it when i finished, so i shook the silver to agitate the mix and poured into my colour cup, spraying was dreadful, coughing and sputtering, no spray at all and then suddenly a flood of paint would launch out, upon stripping the airbrush i found it to be awfully blocked with small flakes of metal, i cleaned and reassembled and re attempted spraying.... same result, i looked in the colour cup and sure enough it was full of bits
As a last ditch attempt i posted a request for help on the ISM forum, i recieved a reply from Gazmat who offered to send me some humbrol enamels of which silver was one, it was the paint i needed, thank you very much Gazmat, Spraying re commenced without incident, an d i followed the schedule on the back pages very carefully, masking off areas and spraying the differing colours was a challenge as masking is not my strong point after spraying the plane i left the plane to dry overnight and the following morning i sprayed the entire plane with Gauzy shine enhancer and again left it to dry for a few hours, the next stage was to add the decals which i completed over 2.5 days, completing one wing/side at a time and then the bottom, after that another coat of Gauzy to protect everything i left everything to settle and dry over 24 hours
I then went on to complete the panel lines, i decided to use Humbrol dark grey wash and covered the panel lines, my only problem was that due to all the paint troubles i had some panel lines were hardly there, so the solution did not take as well as it should of, i then used a mix of AK interactive exhaust wash and AK interactive smoke to make the dark areas behind the exhaust ports, finally i added AK interactives exhaust wash on the exhaust and also added a dry rust powder to the wet surface of each exhaust, i finished off with a coat of Gauzy to seal it all and then a Matt Coat made by Vallejo to dull it all down, you can see the finished results in the finished build section of this group, my thanks to all who followed along with me and for all your comments.
ATB Mark
SprueSurgeon
PhotoMorph

The panel lines never took as well as i had hoped.

The exhausts and staining.
Deuteronomy 32:35
-
Garion77
- Warrant Officer

- Posts: 1379
- Joined: Fri Jul 08, 2016 2:15 pm
- Location: Terrebonne, QC, Canada

Re: My very first group build is Revells B-17G "Flying Fortress"
Wow ! Fantastic ! I have the f version on my shelves. I'm waiting for all my aftermakets to arrive from Hannants. I bought the bid ed kit from eduard. It s been a month i've been waiting dor it. I will continue to follow to get inspiration ! Keep up the good work
Francis

At the bench
Tamiya's 1/72 F-16 and 1/48 Skyraider
At the bench
Tamiya's 1/72 F-16 and 1/48 Skyraider
