Page 1 of 1
Mark's Gouf custom master grade
Posted: Sat Dec 24, 2016 2:34 pm
by MarkVerploeg
Hi guys so as promised i will be joining this build
And i will be building this kit
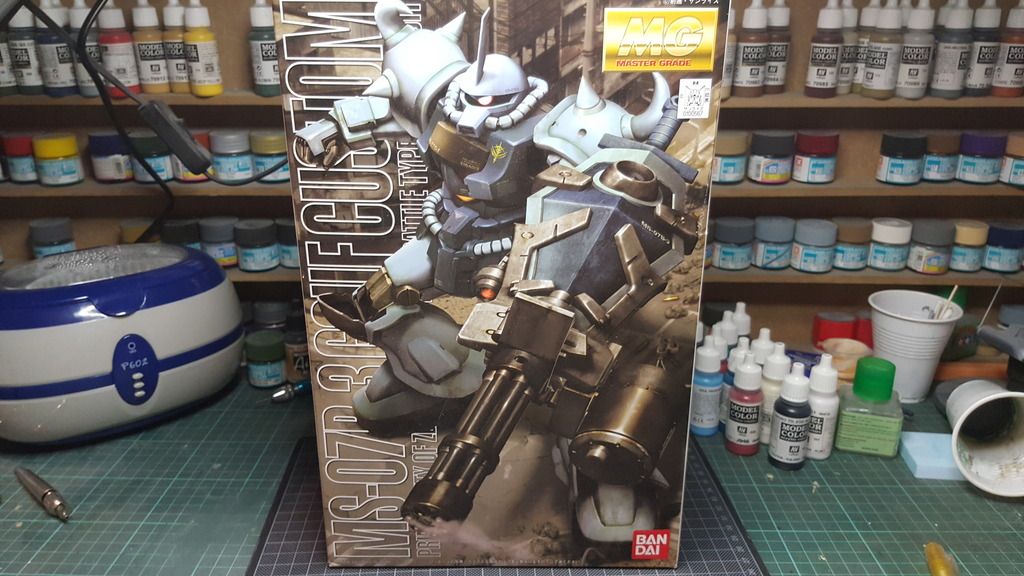
To be honest i have absolutely no knowledge about these kits and the gundam genre at all
But i wanted to build a couple just to see if i like it
So i ordered a couple a while ago and have one build waiting for painting
But i want to build this one first and paint the 2 at the same time
So what is in the box
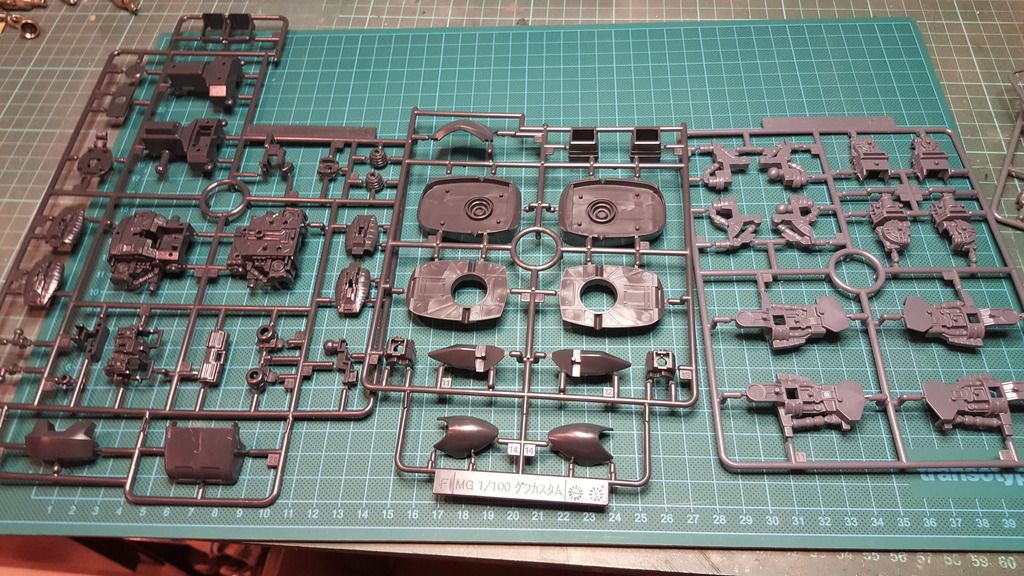
I think these are the body parts or atleast the internal ones
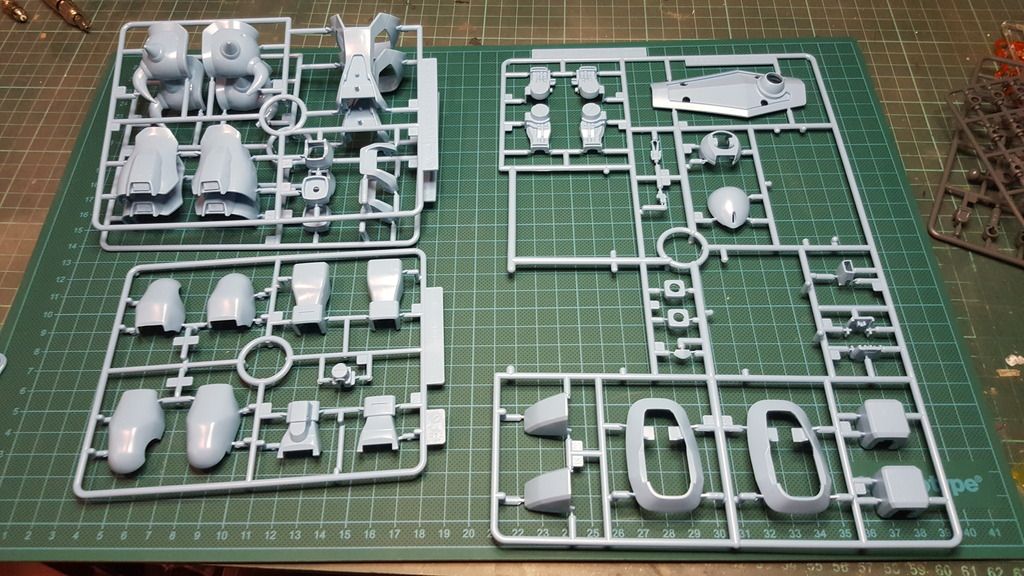
The more colorfull armor parts
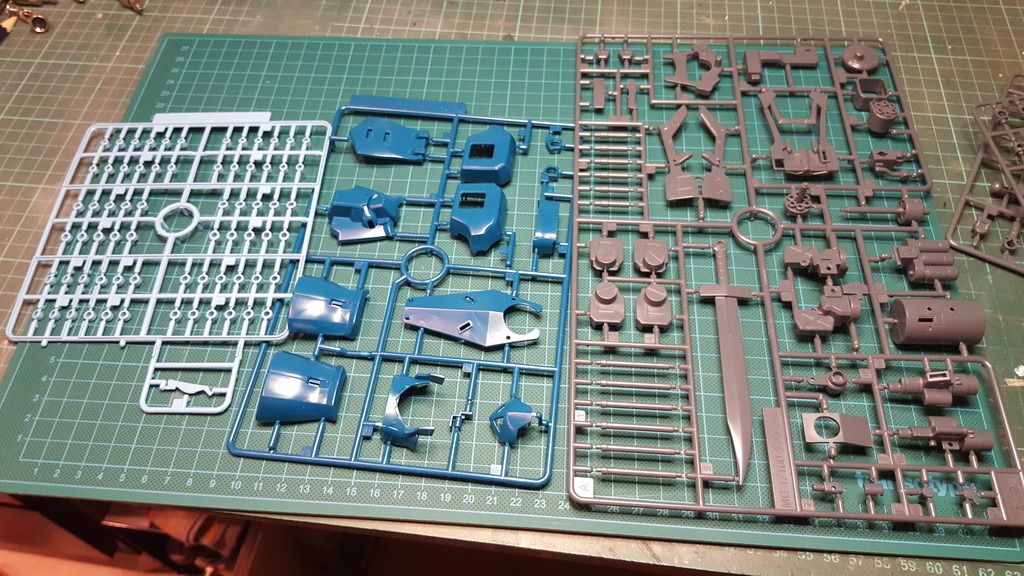
Parts for the gun and various other stuff
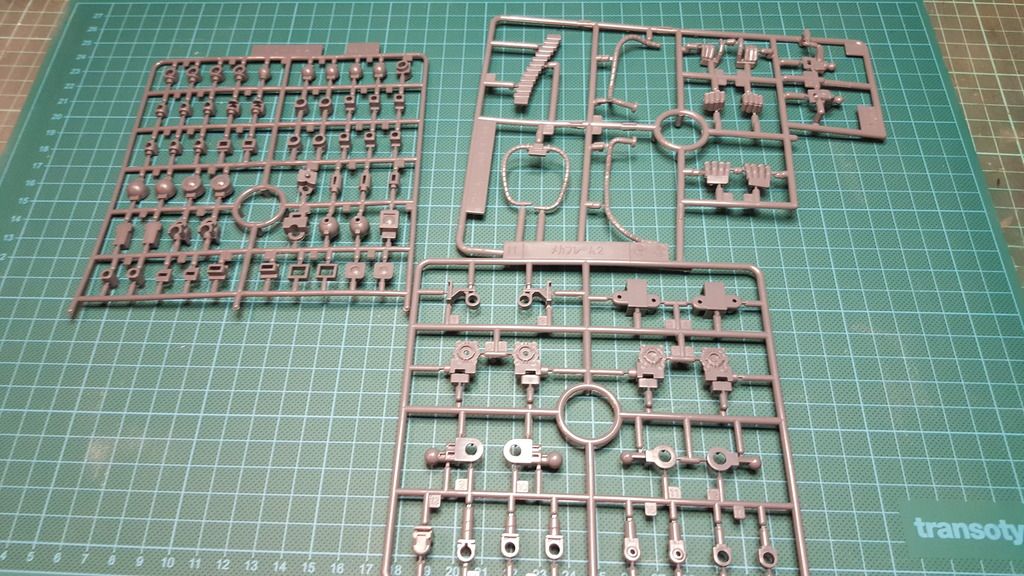
All the joints and other flexible parts

Some clear parts ,screws and a figure of the pilot

The instruction book
A bit of a hard read as my Japanese is basicly non existing
So that is all of the stuff in the box
My plan is to basicly build it up and break it down again for painting
I don't plan on keeping the original colors but i want to give it a custom paint job ,not sure how that will go
Some may know the camouflage scheme i am after
It is one of the serpent scheme's from the Division (videogame) and it combines a cream white,light green and dark green and i have that scheme on all my guns in the game
I'm not sure if i am able to make the scales (snakeskin) in this scheme but i can do without if it is too hard to reproduce
While looking through the instructions i noticed all the guns are on the left hand so i may want to move the multi barreled wristgun to the right if that is possible without too much cutting
Other then that i think i will keep it fairly easy
And that is all i have for now
I have 1 build i want to finish before i start building this kit and that should be finished today or tomorrow depending on how much time i have to build
Thanks for stopping by and having a look
Take care and untill next time
Cheers
Mark
Ps merry Christmas to all you guys
Re: Mark's Gouf custom master grade
Posted: Sat Dec 24, 2016 2:51 pm
by privatepete
Hi Mark some kit you have there

,will be watching your progress with interest

it's my first too

Happy Christmas to you.
Pete

Re: Mark's Gouf custom master grade
Posted: Sat Dec 24, 2016 3:08 pm
by MarkVerploeg
Thanks Pete
It is actually my second
The other one i have is a Aile strike but that is build already
I still refer to it as the big toy as these things really look like a kid's toy when you build them straight from the box
That one was pretty easy to build but i haven't found the motivation to take it apart again and prep it for painting ...well not yet anyway
And a merry christmas to you
Re: Mark's Gouf custom master grade
Posted: Thu Dec 29, 2016 6:22 am
by Lysus
I do love a Gouf, and the gun on this one is just rockin'
Excited to see what you make of it!
Re: Mark's Gouf custom master grade
Posted: Thu Dec 29, 2016 7:42 am
by MarkVerploeg
Well i noticed the engineering isn't as good as the Aile strike
I actually had to use filler on the shoulder parts
I have the right arm build up at the moment and then got in the way
But i hope to get back to it in the next couple of days
Re: Mark's Gouf custom master grade
Posted: Wed Jan 04, 2017 11:04 pm
by MarkVerploeg
Hi guys
So i think it is time for the first update
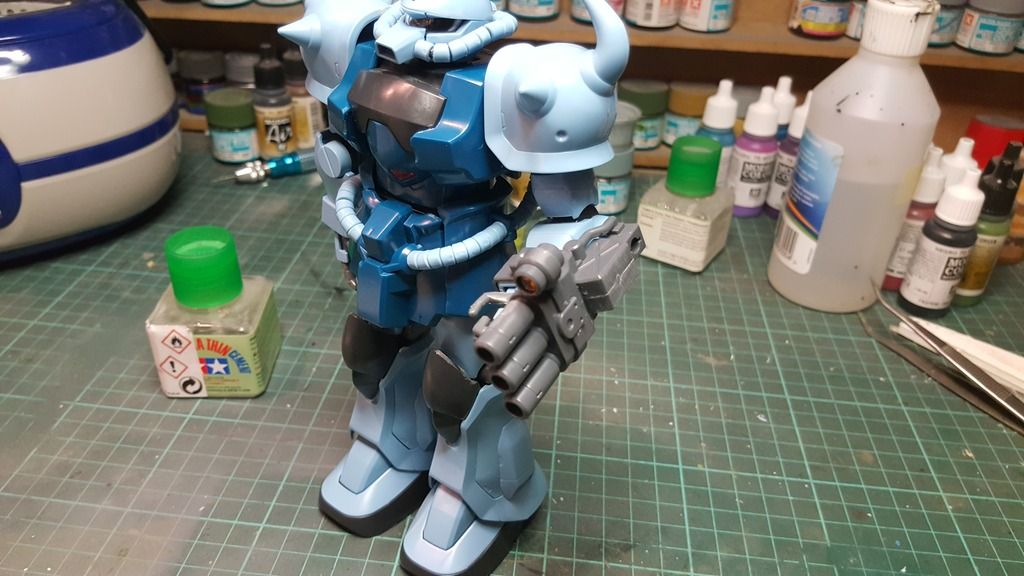
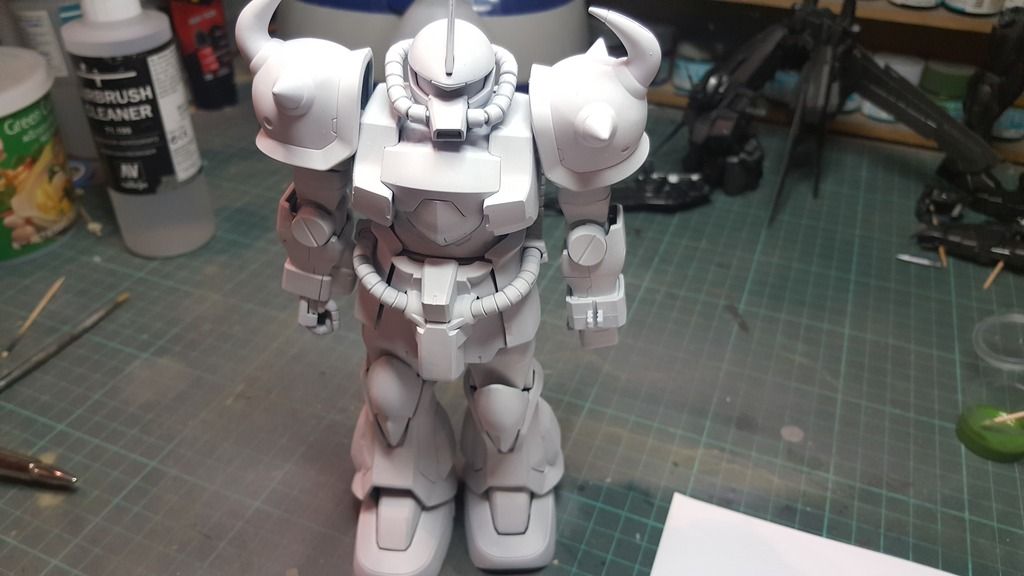
By now the Gouf is build and just about ready for painting
I only need to mask a few clear parts and remove the gatling shield and sword
A complete breakdown is not really needed i think because most panels and parts will be in the camo scheme i want to paint it in and the only parts that get a different color will be fairly easy to reach or mask
So here are all the parts for the build
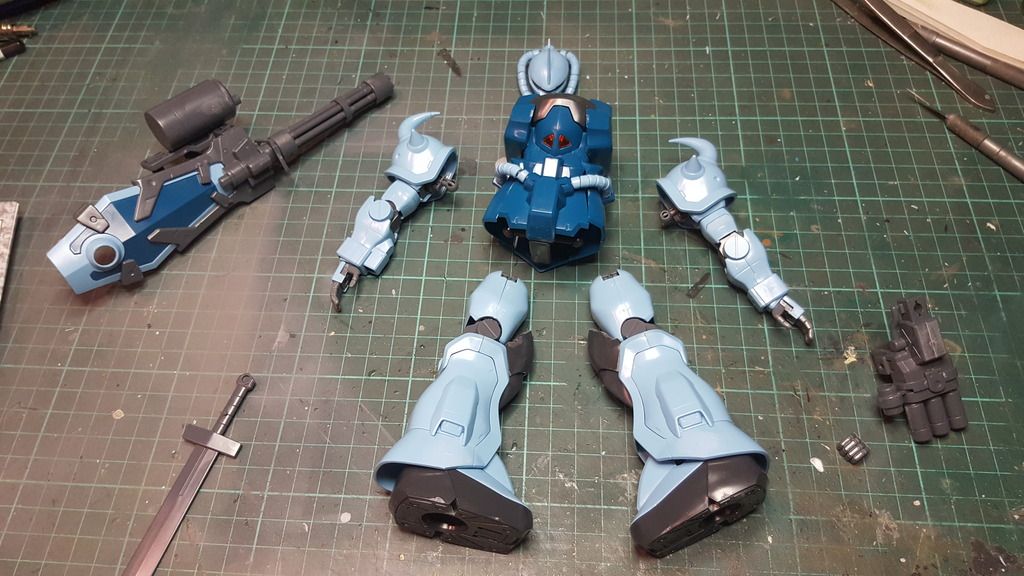
Probably like all other gundams the Gouf is build up in segments
All the parts like the arms ,legs and body are build up and then the instructions move on to the next segment
But these are all the parts together
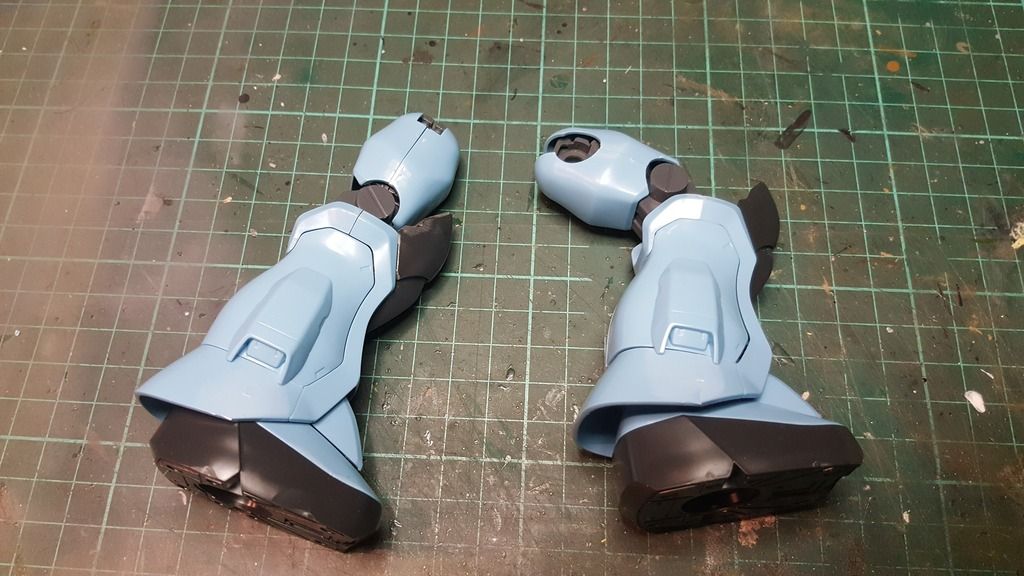
The legs
The body with the hoses on the sides
Those where a bit of a pain to put together as they are made up from a flexible core and a bunch of rings
Construction wise pretty easy but those rings where hard to hold in between my fingers and sand them
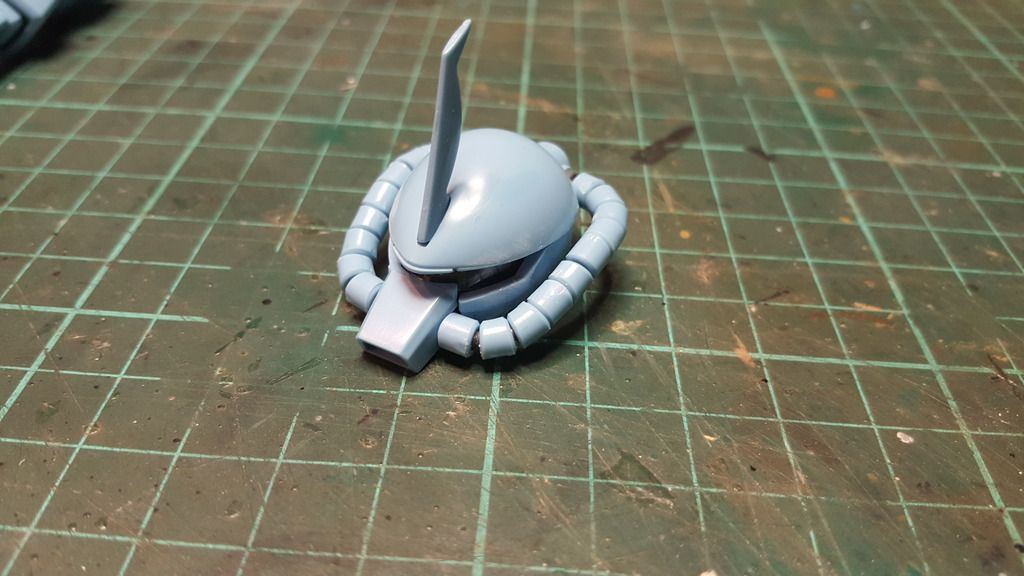
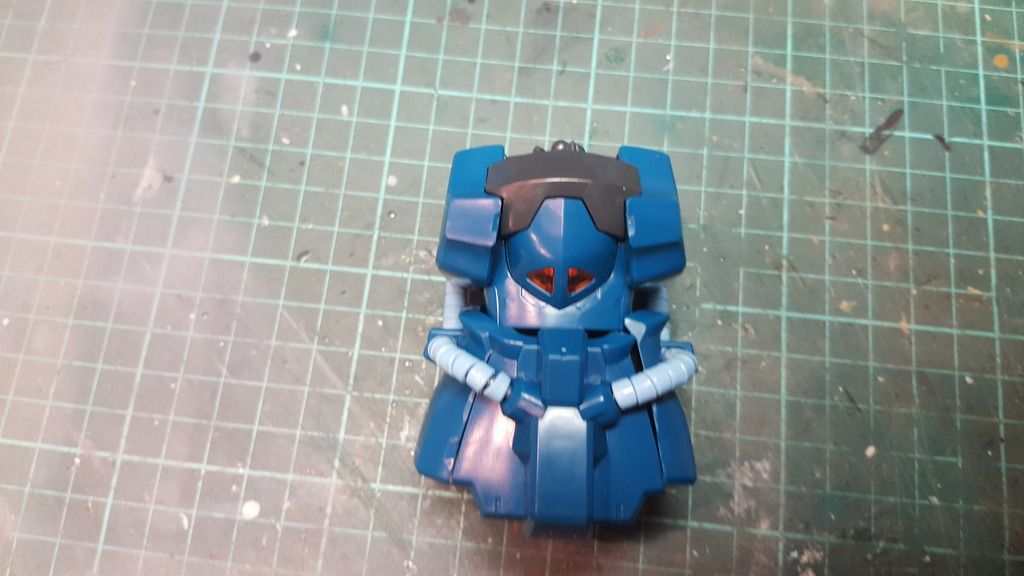
The head unit
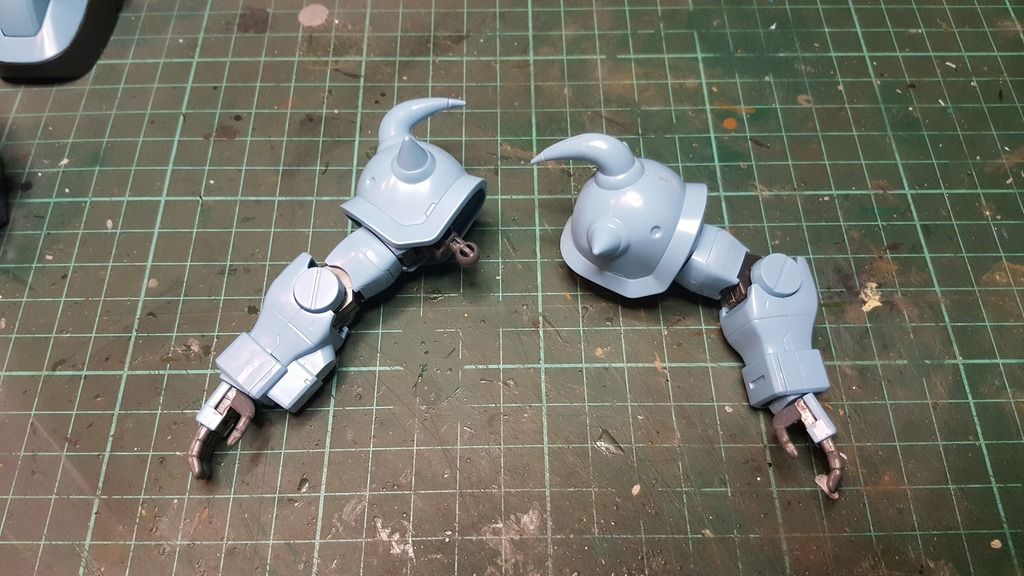
The arms
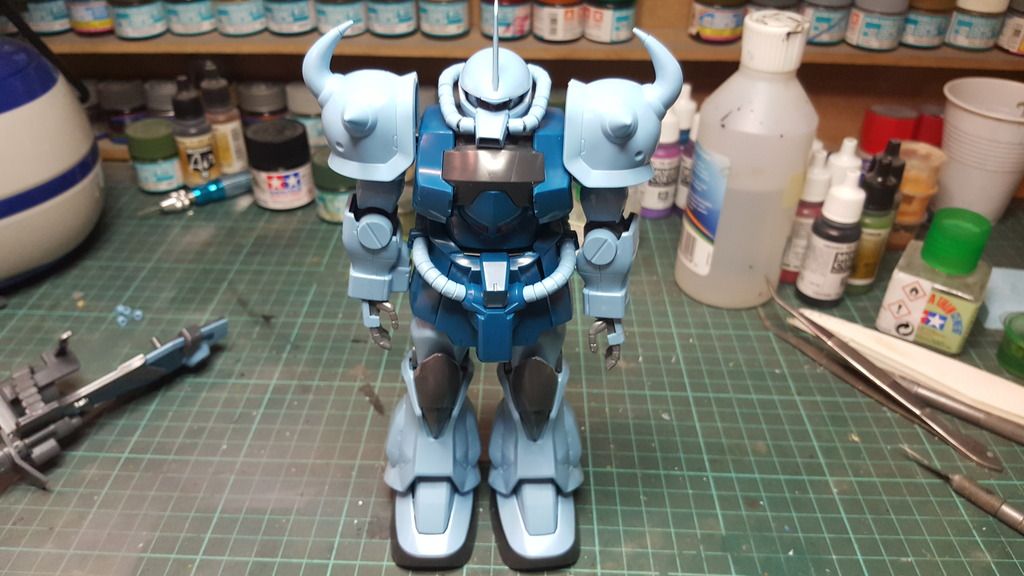
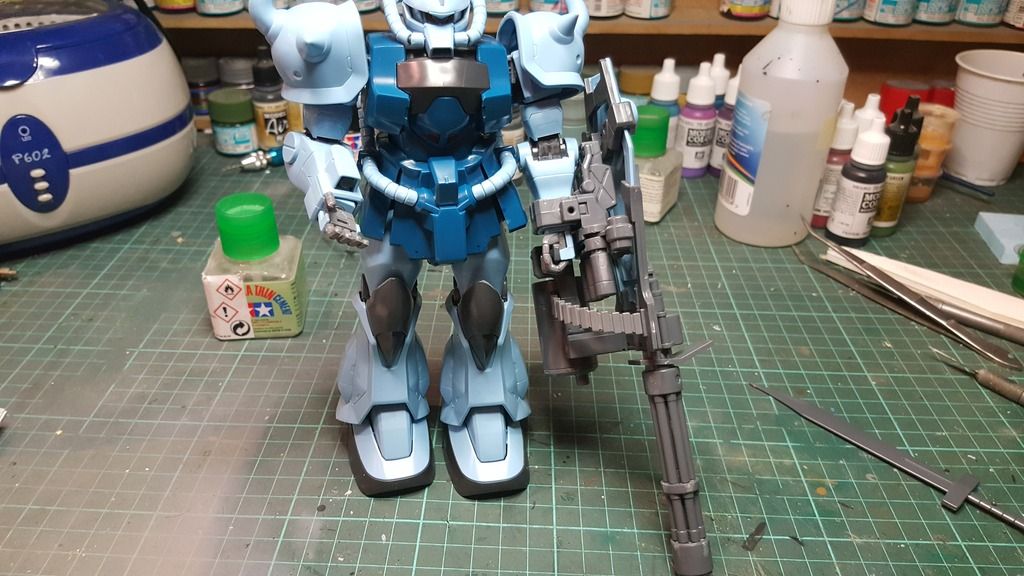
The basic Gouf was put together
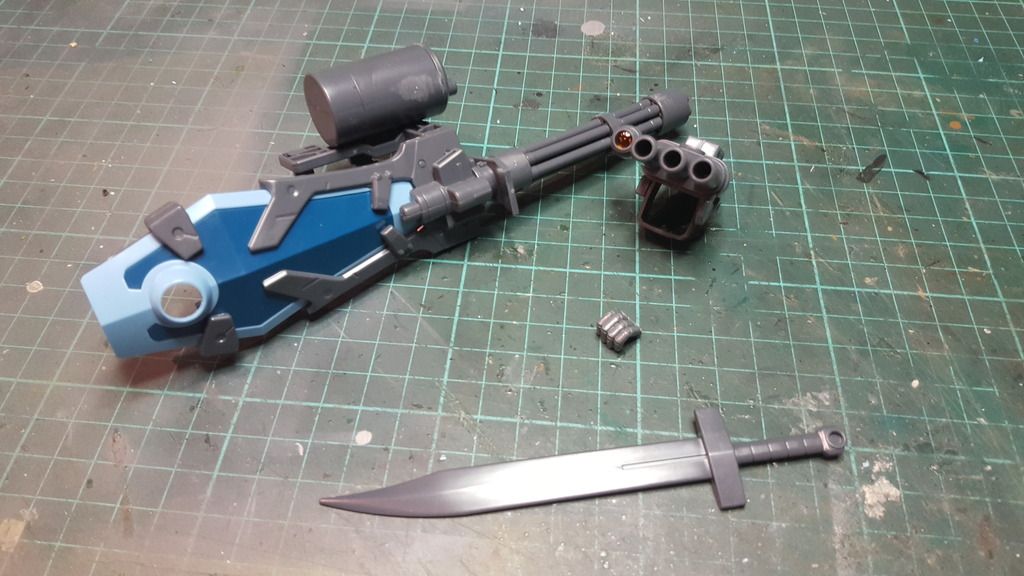
The weapons
I wanted to put the triple barreled gun on the right arm instead of the left
The conversion should have been pretty easy but i noticed that this weapon is the support of the bigger 6 barreled gatling gun
That connects to it so i couldn't move it to the other arm
The first weapon was placed
The pretty huge and heavy gatling shield was next
A bit hard to see but when you look at the back of the triple barreled gun you can see the gatling shield is attached to it
The sword was placed along with another hand option to keep it in place
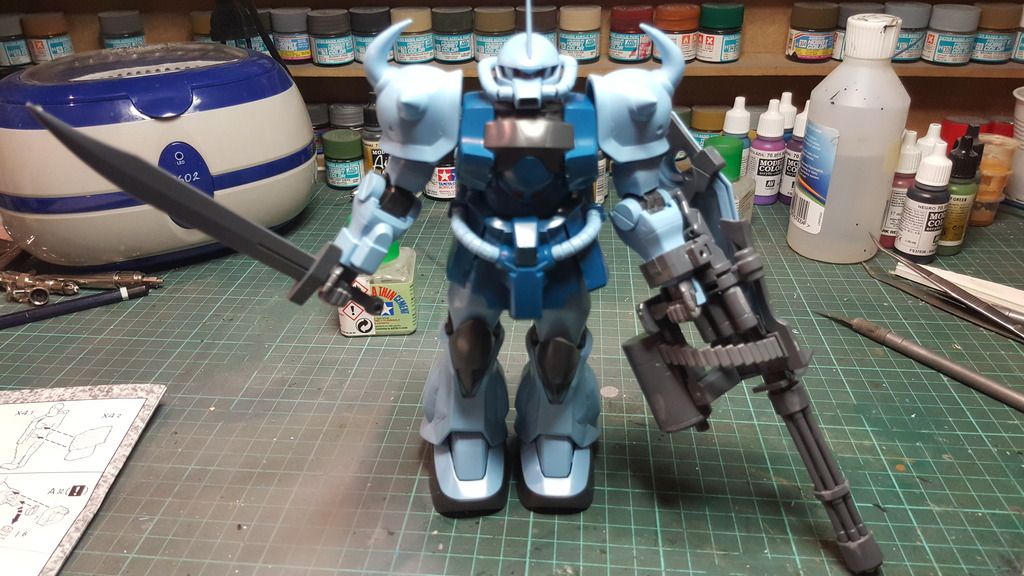
As a kit this is okay
It is a couple of years old by now (2000) and in some places that shows
The fit wasn't always that good but overall it isn't bad either
The gun is a bit of a problem area aswell
But that is because of the parts weight
It causes the entire gundam to tip over
But other there is nothing special to mention
And that is all i have for now
Thanks for stopping by and having a look
Take care and untill next time
Cheers
Mark
Re: Mark's Gouf custom master grade
Posted: Wed Jan 04, 2017 11:16 pm
by privatepete
Hi Mark, you have been a very busy boy, it looks great, are you staying with the original colours or a custom paint job ?
Re: Mark's Gouf custom master grade
Posted: Wed Jan 04, 2017 11:19 pm
by Astaroth
That is a very cool looking figure. I'm looking forward to seeing it painted.
And I love the look of that sword. I would fit perfectly to my own project.

I might just have to make one myself.
Re: Mark's Gouf custom master grade
Posted: Thu Jan 05, 2017 1:01 am
by MarkVerploeg
Thanks guys
It will get a custom paintjob Pete
I don't care much for the colors it has now
And to be honest i don't like the sword either
Maybe because i have a bunch of figures with a sword but this thing looks very plain
There is barely any detail on the thing and that little bit of detail it has on the grip is hidden by the hand
By i like the (sort of) military look that it has and i think that a camouflage paint scheme and a nice amount of weathering can make it look nice
Re: Mark's Gouf custom master grade
Posted: Thu Jan 05, 2017 9:14 am
by Nev
Cool I love the names of these things

what does master grade mean ?

Re: Mark's Gouf custom master grade
Posted: Thu Jan 05, 2017 12:00 pm
by MarkVerploeg
Master grade is indication of the difficulty and detail level of the kit
Atleast i think so
The high grade kits look easier and less detailed while the perfect grades look very detailed
Re: Mark's Gouf custom master grade
Posted: Thu Jan 05, 2017 12:56 pm
by Nev
MarkVerploeg wrote:Master grade is indication of the difficulty and detail level of the kit
Atleast i think so
The high grade kits look easier and less detailed while the perfect grades look very detailed
Makes sense cheers
thought it was some weird Japanese grading system on how tough it was

Re: Mark's Gouf custom master grade
Posted: Thu Jan 05, 2017 1:07 pm
by MarkVerploeg
Nev wrote:MarkVerploeg wrote:Master grade is indication of the difficulty and detail level of the kit
Atleast i think so
The high grade kits look easier and less detailed while the perfect grades look very detailed
Makes sense cheers
thought it was some weird Japanese grading system on how tough it was
No but it could have been
They are very unique over there
Well do things different from the Europeans anyway
Re: Mark's Gouf custom master grade
Posted: Fri Jan 13, 2017 3:27 am
by Stront75
I have a few Gouf's in 1/144. The older MGs do have some problems with parts fit and balance.
Grading wise with Gunpla ( Gundam Plastic Model ) it goes from No Grade, most of these were made in the 80s and 90s and can be 1/220, 1/144, 1/100 and 1/60. High Grade is better detailed versions of most suits in 1/144.
Master Grade is the most popular with Gunpla builders and is very detailed 1/100.
Next is Real Grade, which is super detailed versions of 1/144 kits with similar detail to MG but smaller.
Lastly is Perfect Grade which is the huge mega detailed and expensive super kits.
Sorry about that lol but there are a lot
hope that helps you out.
Re: Mark's Gouf custom master grade
Posted: Fri Jan 13, 2017 9:11 am
by MarkVerploeg
I see
Thanks for explaining
Well i haven't looked for a lot of information
The only ones i found at the shop that sold them where MG's so not a lot of choise there
Re: Mark's Gouf custom master grade
Posted: Sat Apr 01, 2017 6:55 pm
by Lysus
Hi there, just a reminder that one month remains to complete your build in order to qualify for the prize draw! Hope all is well and we all look forward to seeing your work!
Re: Mark's Gouf custom master grade
Posted: Sat Apr 01, 2017 7:58 pm
by MarkVerploeg
Lysus wrote: Sat Apr 01, 2017 6:55 pm
Hi there, just a reminder that one month remains to complete your build in order to qualify for the prize draw! Hope all is well and we all look forward to seeing your work!
Oohw .......

Forgot about it (just a little)
I have been quite busy at work the last week but it should be finished fairly soon
I have been base coating it but the white isn't really white yet
Nearly there
But i have a couple of days off next week
It will be finished in time ,you can count on it
Re: Mark's Gouf custom master grade
Posted: Sat Apr 15, 2017 9:00 pm
by MarkVerploeg
Alrighty then
Back to this thing
As i mentionned before i wanted to replicate a camoscheme from a videogame
Wich has 3 colors
White ,light green and dark green
Basicly the colors that can be seen on a tree python (not always with the dark green)
And so i got started
First up the white
Takes ages ofcourse as you need quite a bunch of layers for a even coat
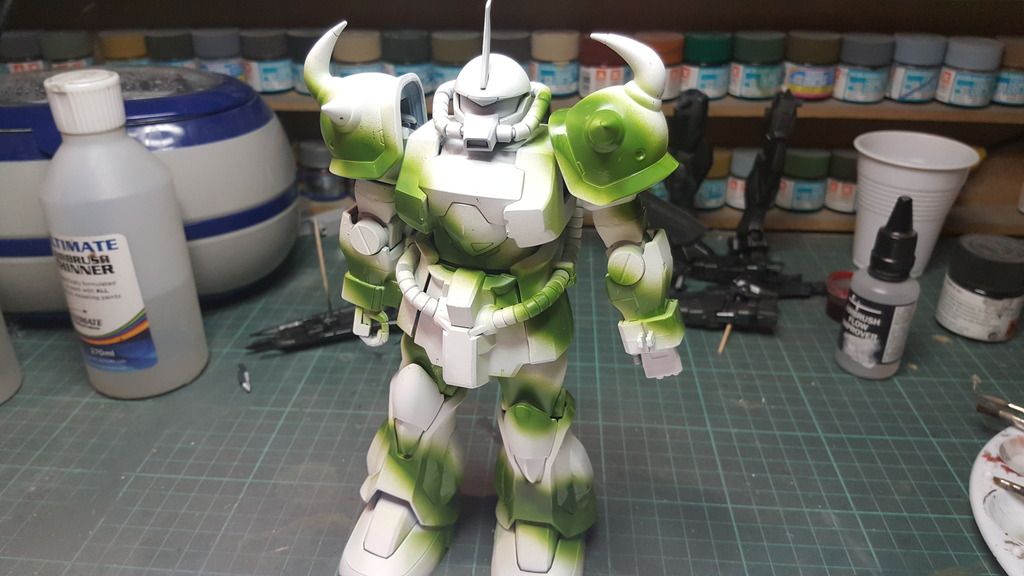
Next the light green
And then i had a real chance of heart
I thought i would like it but i really don't like where this is going
So at the moment i am trying to find a new look
The idea that comes to mind is a 2 tone german WWII scheme of dark yellow and red brown
Because i already managed to loose the decals it also allows me to use some decals from the spares box and make it look more like something that i am used to
And hopefully that new scheme can be finished today
So stay tuned for more
See you soon
Cheers
Mark
Re: Mark's Gouf custom master grade
Posted: Mon Apr 17, 2017 7:51 am
by MarkVerploeg
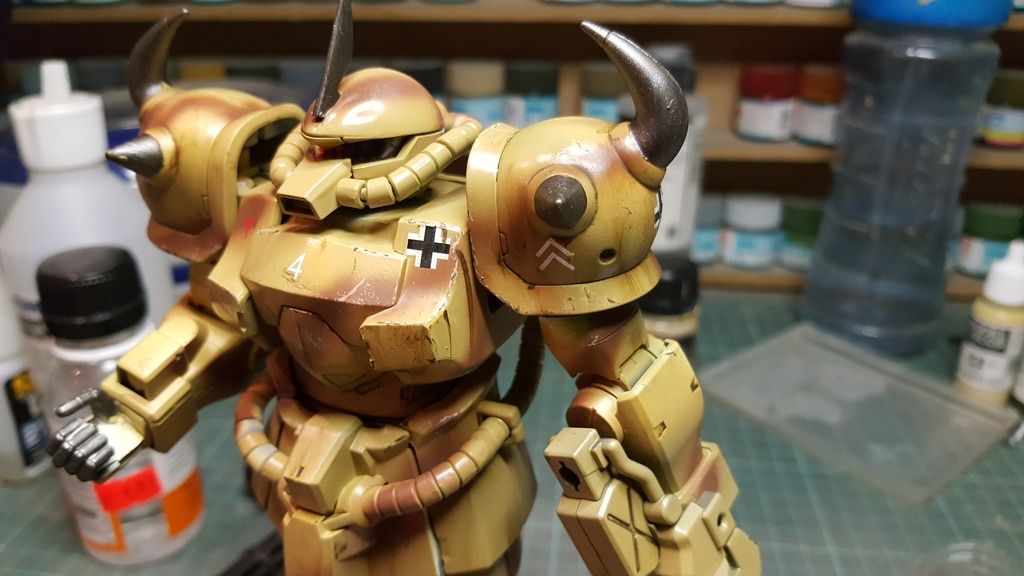
Hi guys
Time for another little update
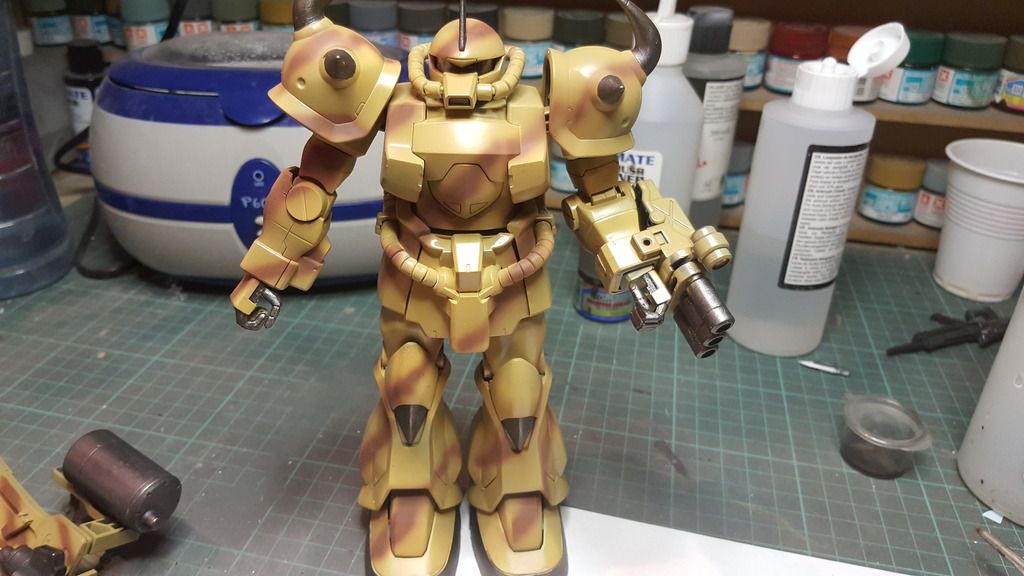
After the first attempt of painting the camo ,i had a second go at it yesterday
This time using some colors from WWII german armor
I like the 2 tone camoschemes more then 3 tones so i pucked a dark yellow base with red brown stripes this time
Also some parts where painted in a dark metal color from Andrea paints to break up the camo scheme a bit
The colors are Tamiya i think
I pre mixed a couple of bottles a while ago so i am not sure
It could be that they are Aqueous paints instead
The spikes/horns and the knee pads lower halfs are painted in lead color from Andrea
The visor was cleaned up and the "eye" was painted in clear red
But that is nearly impossible to see in the puctures
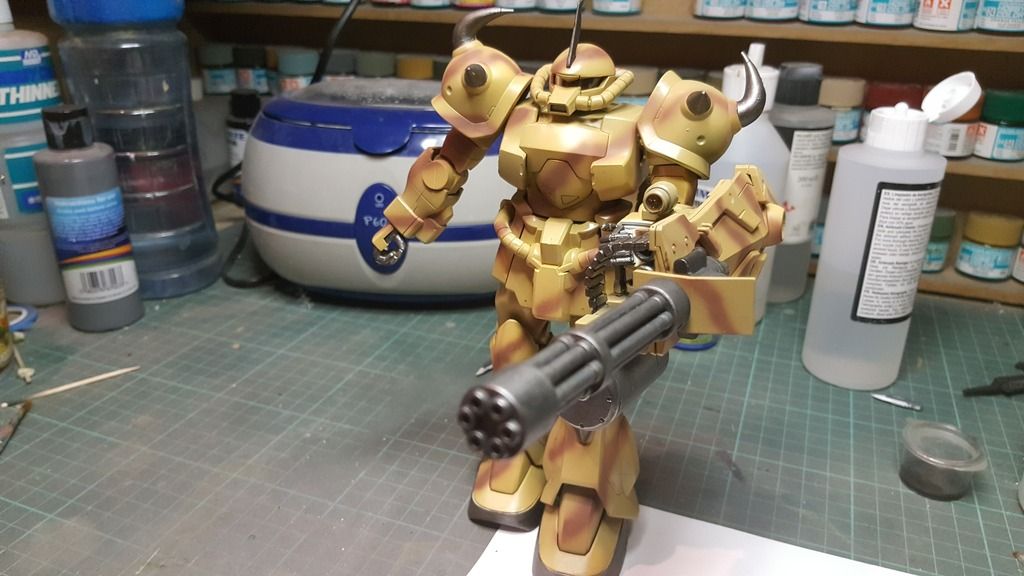
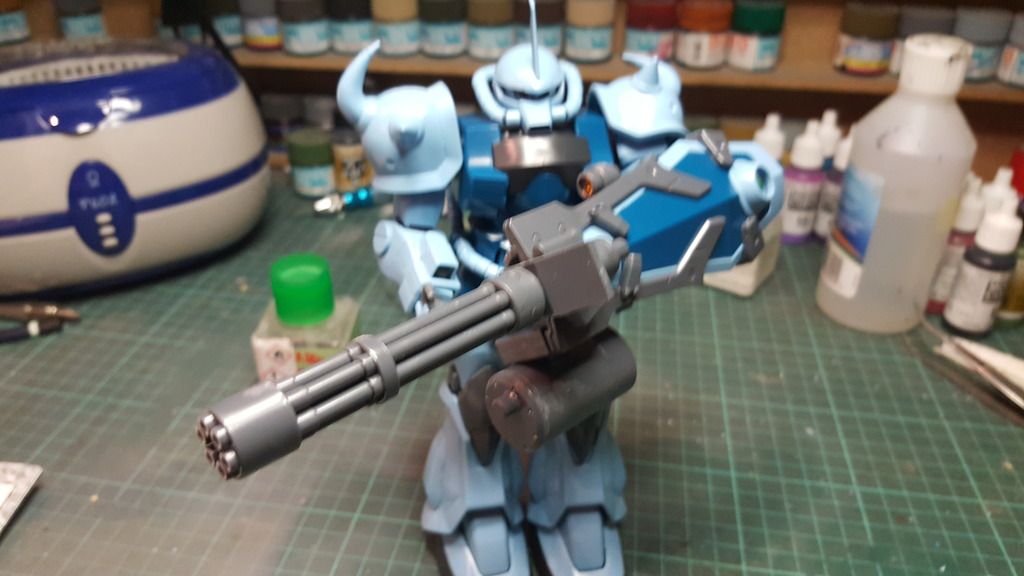
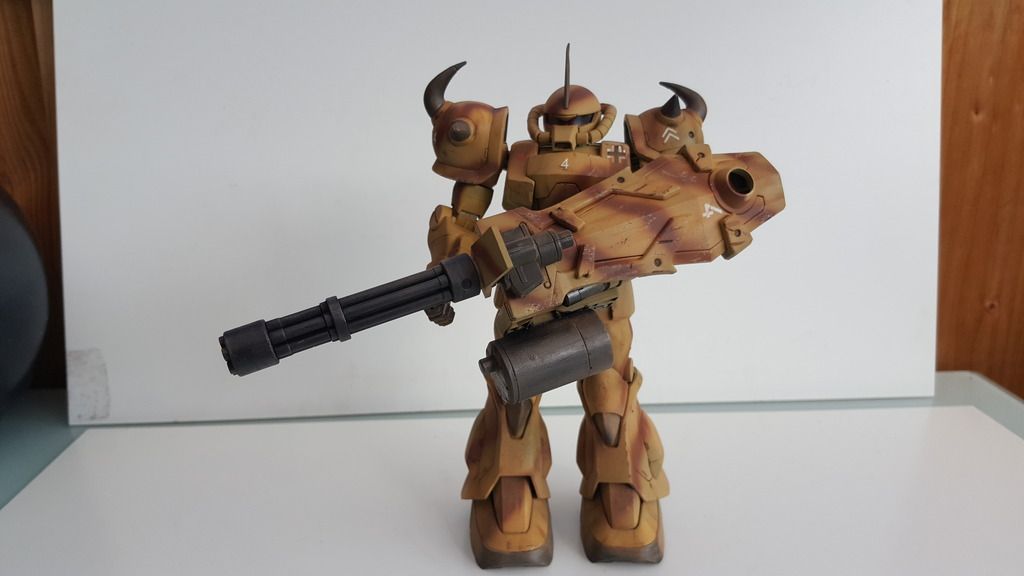
The gatling gun was painted with mr metal color dark iron and slightly buffed

A better view of the gun
Next step was clear coating it and later today when i get back home from work i will apply some decals from the spares box and clear coat it again
And then i can use my days off to weather it
And that is all i have for now
Thanks for stopping by and having a look
Take care and see you next time
Cheers
Mark
Re: Mark's Gouf custom master grade
Posted: Mon Apr 17, 2017 11:07 am
by Stokesy44
Not sure that gun's big enough!

Re: Mark's Gouf custom master grade
Posted: Mon Apr 17, 2017 11:23 am
by MarkVerploeg
Stokesy44 wrote: Mon Apr 17, 2017 11:07 am
Not sure that gun's big enough!
Never
It does make for some balance issues though but with guns the golden rule is that bigger equals better
Re: Mark's Gouf custom master grade
Posted: Mon Apr 17, 2017 2:56 pm
by Lysus
Camo looks great on this Gouf!
Re: Mark's Gouf custom master grade
Posted: Mon Apr 17, 2017 5:19 pm
by MarkVerploeg
Lysus wrote: Mon Apr 17, 2017 2:56 pm
Camo looks great on this Gouf!
Thanks Lysus
Re: Mark's Gouf custom master grade
Posted: Mon Apr 24, 2017 8:57 am
by MarkVerploeg
Hi guys
Time for the final update on this build
I finished it last week so it is about time to finish the build thread aswell
Last time it was painted so this time it is only about the decals and a little bit of weathering
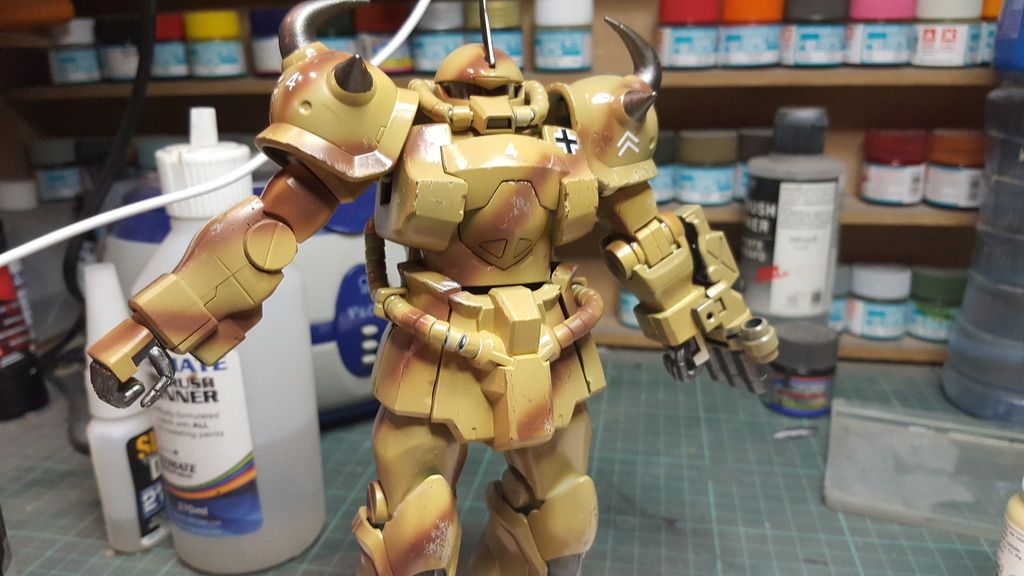
After the first gloss coat i applied a bunch of decals from the spares box
The rank insignia was done by cutting up a balkenkreuz
After the decals another gloss coat was applied
And some chipping was added with Vallejo Buff for the outline and german camo black brown for the dark rusty inside
Then i added a wash and some streaking using the wash and streaking effects for dark yellow vehicles from AK
after that had some time to dry i applied a matt coat
Usually i would use AK Ultra matte varnish but for some reason it didn't want to work with me so i ended up using Vallejo's matt varnish instead
And thenn it looked like this
I added some pigments in the end to add a bit of dust on the lower parts and then i called it finished
The rest of the pics will be posted in the reveal section of this sig
I hooe you like it
Take care and happy modelling
Cheers
Mark


