From Russia with 152 mm of High Explosive Love

Post Reply
User avatar
Gav0909
Chief Warrant Officer 5
Posts: 2927
Joined: Tue May 28, 2013 11:56 am
Location: Fife, Scotland
Contact:

From Russia with 152 mm of High Explosive Love

Post by Gav0909 »

From Russia with 152 mm of High Explosive Love

Update 1

Welcome to my build log for this GB. I will be building the 2S19 MSTA-S self-propelled howitzer in 1/35 scale from Trumpeter.

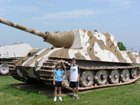
Before we get into the kit itself, lets have a look at what exactly is a 2S19.

Well, its one of these beasts!
Image

The 2S19 is a domestically designed and produced 152 mm self-propelled howizter in use with the Russian Armed Forces. The 152 mm 2S19 MSTA-S self propelled howitzer is designed to defeat unsheltered and covered manpower, weapons and materiel to division level. The 2S19 was accepted for service with the former Soviet Army in 1989. Initial production was undertaken by the Uraltransmash facility before being transferred to the Sterlitamak Machine Construction Factory in Bashkiriya. First production systems were completed in 1989. This vehicle was developed under the codename MSTA-S from the 1980s at the Uraltransmash facility, as the replacement for the older 152 mm 2S3 and 152 mm 2S5 self-propelled artillery systems. In the Russian Army the 2S19 is normally deployed in batteries of six guns. Each regiment would normally have three batteries to give a total strength of 18 2S19 systems. The 2S19 is also called MSTA-S, with the S standing for Samokhodnyj, or self-propelled.

The Gun
The Main armament of 2S19 comprises a long-barreled 152 mm gun, the 2A64, fitted with a fume extractor and a muzzle brake. The 152 mm 2A64 main armament of the 2S19 is manufactured by the Barrikady State Production Association. The 152 mm 2A64 gun fires an HE-FRAG (high-explosive fragmentation) round designated OF-45 to a maximum range of 24.7 km. When the 2S19 is traveling the ordnance is held in position by a traveling lock mounted on the glacis plate. A NSVT machine gun 12,7 mm is mounted to the vehicle commander hatches, which can be remotely controlled, with a searchlight, which can be remotely controlled from under full armor protection.

Design and Construction
The hull and turret is of all-welded steel armor construction which provides protection from small arms fire, shell splinters and mines. The chassis of the 2S19 is based on MBT assemblies, with the suspension and running gear from the T-80 MBT and the power pack from the T-72 MBT, but the 2S19 had a distinct exhaust outlet on the left side that is not on the T-80 which is powered by a gas-turbine engine.

Propulsion
The 2S19 is powered by a diesel engine with direct injection and mixed supercharge. It is a high-speed, four-cycle, multi-fuel, liquid-cooled engine. The suspension is of the torsion bar type with six road wheels, idler at the front, drive sprocket at the rear and track-return rollers with the upper part of the track being covered by armor plates.

Accessories
Standard equipment for the 2S19 includes the 1V116 intercom system, R-173 radio set and PPO three-way automatic fire extinguishing system, passive night vision equipment for the driver, NBC filter and ventilation systems and the ability to lay a smoke screen by injecting diesel fuel into the exhaust outlet on the left side of the hull.


Armament
One 152 mm gun, one 12.7 mm machine gun

Producer country
Russia

Country users
Russia (550), Belarus (13), Ukraine (40), Ethiopia (10), Georgia (1), India (?)

Crew
5 soldiers

Accessories
Night vision, NBC protection system,

Armor
The hull and turret is of all-welded steel armour, protection from small arms fire, shell splinters and
mines.

Weight
42,000 kg

Speed
60 km/h on road

Range
500 km

Dimensions
Length, 7,15 m; Width, 3,38 m; Height, 2,99 m

So that's the vehicle itself, now lets see the kit.

I did a review of this kit quite a while ago, and this can be seen in the video below.
[youtube]HgYyjjktkNQ[/youtube]

And so here is the kit as it was the other night when I started it and the progress thus far. Enjoy.

Boxart
Image

Box contents
Image

Full Colour marking guide, with options for two schemes included (although there are quite a few references available online for alternatives).
Image

So as with most armour builds, it starts with the wheels. The roadwheels are 3 piece, two "wheels" and a hub cap. There are no poly caps included in this kit, which is a shame, but not the end of the world as I glue the wheels on anyway. Sprockets are nicely detailed.
Image

Rear hull plate is next. Not much on here, just some towing points and the brackets for the unditching log. The instructions say not to glue the towing hooks in, and I assume this is so you can loop the towing eye of the tow cables in there later in the build.
Image

Lower hull mostly complete. The suspension on this kit is not workable, so no torsion bars, like in the Meng T-90 kit. However you do have to build up the springs and shocks so there is quite a bit of work involved here. I will be doing mine as on flat terrain so no suspension movement is not an issue.
Image
Image
Image

Next was the entrenching spade on the front lower hull. This is very nicely done, albeit a bit fiddly. The "arms" and their mounting brackets are all separate bits which require clean up, so quite a tedious task. However, it does allow the spade to be posed open or stowed. A comparison to the Meng kit shows the Meng offering to be just as detailed, but much simpler, with the mount brackets already part of the actuator arms.
Image
Image

So that's the progress to date, quite slow as there are numerous small parts which are a bit of pain for my gorilla hands to clean up. But its enjoyable. I just started the upper hull detailing last night, so will update with that when I have a bit more to show.

Thanks for looking, please leave any comments, and see you in the next update. :th:
User avatar
NonProlificModeler
Master Sergeant
Master Sergeant
Posts: 393
Joined: Sat Dec 19, 2015 12:48 pm
Location: Konstanz, Germany

Re: Trumpeter 1/35 152 mm 2S19 MSTA-S

Post by NonProlificModeler »

Wow, that's an impressive and very beautifully detailed kit, mate. Good luck with the build. Greetz from Germany. Jens
Jens

My YouTube channel: https://www.youtube.com/channel/UCmhxv6 ... 6zm2jQPD8g

On my bench:
Dio "Vidette Is Coming To Town", Normandy -Day + 2, Tamiya Brit. Centaur and scratch built farm wall
Italeri GMC CCKW 2.5 ton "Water Tank Truck to Fuel Tanker conversion" - scratch built
User avatar
Gav0909
Chief Warrant Officer 5
Posts: 2927
Joined: Tue May 28, 2013 11:56 am
Location: Fife, Scotland
Contact:

Re: Trumpeter 1/35 152 mm 2S19 MSTA-S

Post by Gav0909 »

Update 2

Yesterday and today I managed to get some good bench time in and made some good progress on the 2S19. Let me show you through my progress.

The build continues in a standard manner, with attention now switching to the upper hull plate. This comes as a single piece, onto which various detail parts are added, all pretty straightforward. The first few bits (of quite a decent amount) of PE are used here as well. The various "bars" and things around the rear of the upper hull are all quite flimsy, but I got away with no breakages.
Image
Image

Next job was the headlights. Now these were a pain in the ass. The light attaches to the guard via one tiny small part (a separate part which is attached to the light body). Here is the instructions for this bit, completely unecessary engineering in my opinion.
Image
Image
Image
Image

More tiny PE parts here on the rear engine deck.
Image

The following is a series of pictures documenting the process of building the large travel lock which sits on the front of the hull. This was quite an involved step in the process, but not an overly complicated one, and the final part looks nice.
Image
Image
Image
Image
Image
Image
Image

Once installed on the hull, the lock can be positioned up or down.
Image
Image

The complete upper hull, with PE engine grilles in place.
Image

And glued to the lower hull.
Image

Then I moved on to the fenders. These are quite involved parts as well, with each stowage box made up of 4-5 parts, and there being 5 or so each side. I have built both sides, but they are very similar so no point showing both. There are tiny PE handles to attach to most boxes around 4-6 for each, but I won't add those until I am ready to paint, otherwise most will just get knocked off and lost.
Image
Image
Image

And that's all for this update. Next job is to add the remaining few parts to the rear upper hull then I can move on onto the turret. Or I may consider tackling the indy link tracks. I am not looking forward to these really and may still opt for some AM ones if I can summon the cash. If I knew the Meng T-90 tracks would fit, and I could buy a set separately I would, they were awesome!

Until next time, see ya. :th:
User avatar
TheSmoo
Sergeant First Class
Posts: 270
Joined: Mon Dec 07, 2015 11:01 pm
Location: Bonnie Scotland
Contact:

Re: From Russia with 152 mm of High Explosive Love

Post by TheSmoo »

enjoying watching the progress on this build, lots of PE which I havent really worked with as yet and my kit doesn't have any, I love that front moving arm thing, looking forwards to your next update

regards

Terry
User avatar
gustavlekstal
Command Sergeant Major
Posts: 966
Joined: Tue Dec 03, 2013 3:02 pm
Location: Sweden

Re: From Russia with 152 mm of High Explosive Love

Post by gustavlekstal »

That kit looks like a lot fun and full of detail. :banana:

The camo looks coooooool :eeek: Good luck!!!
Regards Gustav

Dragon t-34/85 premium mod 44
Done! viewtopic.php?f=46&t=15153&p=189978#p189978

Dragon 15cm sig33 auf pz.kpfw Ib
viewtopic.php?f=29&t=10747

Jsu-152 tamiya with et modelling pe
viewtopic.php?f=29&t=12313
PrivateMansoor
Master Sergeant
Master Sergeant
Posts: 374
Joined: Sun Dec 13, 2015 4:20 am
Location: Australia
Australia

Re: From Russia with 152 mm of High Explosive Love

Post by PrivateMansoor »

Great Kit, Ive never seen it before, but WOW it looks good. Love the PE and your building skills with it!
Fear Nothing, Build Everything.
User avatar
Gav0909
Chief Warrant Officer 5
Posts: 2927
Joined: Tue May 28, 2013 11:56 am
Location: Fife, Scotland
Contact:

Re: From Russia with 152 mm of High Explosive Love

Post by Gav0909 »

PrivateMansoor wrote:Great Kit, Ive never seen it before, but WOW it looks good. Love the PE and your building skills with it!
Cheers mate.
TheSmoo wrote:enjoying watching the progress on this build, lots of PE which I havent really worked with as yet and my kit doesn't have any, I love that front moving arm thing, looking forwards to your next update

regards

Terry

Cheers Terry. I am not a huge fan of PE, but this stuff is quite thick, which makes it a bit easier to work with. I tend to not have much issue folding it etc, its more getting it glued in place, without getting glue everywhere!
gustavlekstal wrote:That kit looks like a lot fun and full of detail. :banana:

The camo looks coooooool :eeek: Good luck!!!
Cheers mate. Painted this camo on my T-90 recently, so looking forward to giving it another go, although I think I might go for a darker green than last time.
Smiffy
Sergeant Major
Sergeant Major
Posts: 647
Joined: Sun Dec 20, 2015 11:45 am

Re: From Russia with 152 mm of High Explosive Love

Post by Smiffy »

Looking very good so far and I'm liking your choice of camouflage :cheers2:
User avatar
NonProlificModeler
Master Sergeant
Master Sergeant
Posts: 393
Joined: Sat Dec 19, 2015 12:48 pm
Location: Konstanz, Germany

Re: From Russia with 152 mm of High Explosive Love

Post by NonProlificModeler »

Man, these kits nowadays are incredible. I took a break of six years and so much changed since back then. Beautiful. Great progress, Gav. Jens :th:
Jens

My YouTube channel: https://www.youtube.com/channel/UCmhxv6 ... 6zm2jQPD8g

On my bench:
Dio "Vidette Is Coming To Town", Normandy -Day + 2, Tamiya Brit. Centaur and scratch built farm wall
Italeri GMC CCKW 2.5 ton "Water Tank Truck to Fuel Tanker conversion" - scratch built
User avatar
fly1ngdutchm4n
First Lieutenant
First Lieutenant
Posts: 3554
Joined: Fri Aug 09, 2013 11:17 pm
Location: Hoogerheide The Netherlands
Netherlands

Re: From Russia with 152 mm of High Explosive Love

Post by fly1ngdutchm4n »

It's a monster! Love it!
Really great job on the photo etch parts :th: :th:
Love PE! Keep it up! :cheers2:
Build what you love, Love what you build
User avatar
Skullfish
First Sergeant
First Sergeant
Posts: 536
Joined: Thu Apr 16, 2015 2:49 pm
Location: Clydebank, Scotland.
Contact:
Scotland

Re: From Russia with 152 mm of High Explosive Love

Post by Skullfish »

looks like a beast of a machine and an excellent kit. Good modelling with the rest of the build.
Jase
On the bench.
stuff i forget to update here.
User avatar
Gav0909
Chief Warrant Officer 5
Posts: 2927
Joined: Tue May 28, 2013 11:56 am
Location: Fife, Scotland
Contact:

Re: From Russia with 152 mm of High Explosive Love

Post by Gav0909 »

Thanks for the kind comments.

I managed to finish the hull last night, bar the addition of the unditching log and tow ropes, as they will just get in the way of painting, so will add them later.

That meant I had to make a decision. Do the tracks now, or move onto the turret. So I opted to build the turret. I will update with pictures etc. later tonight as I will do some more work on it later anyway.

Cheers
User avatar
Kingdan
Warrant Officer
Warrant Officer
Posts: 1407
Joined: Thu Jun 05, 2014 11:42 pm
Location: Sutton in Ashfield nr Mansfield Nottinghamshire
Contact:
England

Re: From Russia with 152 mm of High Explosive Love

Post by Kingdan »

Looks awesome gav Jon bellos gave me a tip with the pe well gluing it in place he uses a tiny dot of sprue glue just enough to hold it let it dry and can sand it if needed and it fuses it all together so too speak :th: :th: :th: :th:


Dan
User avatar
martin57
Command Sergeant Major
Posts: 897
Joined: Tue Apr 01, 2014 8:44 pm
Location: oundle, east northants.

Re: From Russia with 152 mm of High Explosive Love

Post by martin57 »

That is a nice looking kit gav, you got yourself some fidly pe going on .
like the good finger prints on the blue tack , :lol: :cheers2:
User avatar
Gav0909
Chief Warrant Officer 5
Posts: 2927
Joined: Tue May 28, 2013 11:56 am
Location: Fife, Scotland
Contact:

Re: From Russia with 152 mm of High Explosive Love

Post by Gav0909 »

Update 3

Kingdan wrote:Looks awesome gav Jon bellos gave me a tip with the pe well gluing it in place he uses a tiny dot of sprue glue just enough to hold it let it dry and can sand it if needed and it fuses it all together so too speak :th: :th: :th: :th:

Dan
Dan, this time round I seem to be getting on better with the PE. I dunno whether its just experience that's helping, but I seem to be getting bits where I want them, getting them to stay securely, and without getting glue all over the place!

The last few nights have been spent putting the last few bits on the upper hull and then moving on with the turret.

Before I started the turret I put togethr a short run of the tracks just to see how they do go together, and I think that really it won't be too bad a job.

Anyway, lets get on with the main content of this update!

As I said I finished off the upper hull. This involved attaching the two fenders, and then a few parts round the front of the hull as can be seen in the following photos. The PE hull-fender "plates" are quite nice, and look good in PE.
Image
Image

Then it was turret time! I had made the gun elevation section and installed it before I remembered to take some pics. There was a big PE part to put onto the front of the curved section. The instructions would have the two sides of this part (with the bolt detail on) marry up to some tabs along the edges of the big PE rectangle. However this obiously stops the gun elevating! I quit like being able to pose the gun up, its an artillery piece afterall! So I had to prise the curved bit out, remove the tabs on the PE and re-install. Sorted!
Image

A few parts needed installed on this rear upper panel. I replaced the kit handles with ones made from wire. Further round the turret I had to use the kit bits as I had ran out of the right gauge wire.
Image

More parts on the rear, including mounts which will eventually hold the shell loading mechanism.
Image

Then it was time for PE fun. This storage "box" had to be made up, but was quite straightforward and looks good.
Image
Image

Also installed now are the first of the roof anti slip panels. These are really nice, as the edge of each "circle" is raised, like on the real stuff. Very nice!
Image

That's it for now. Next in the instructions is one or two small bits for the turret rear, then onto the handles etc. for the other side, as well as the other anti-slip panels. Then hatches and AA MG.

Cheers for looking.
User avatar
TommyKillander
Chief Warrant Officer 5
Posts: 2776
Joined: Sat Dec 27, 2014 1:59 pm
Location: Gothenburg, Sweden
Sweden

Re: From Russia with 152 mm of High Explosive Love

Post by TommyKillander »

Great job sofar with all those small details....

:cheers2:
Tommy
User avatar
Gav0909
Chief Warrant Officer 5
Posts: 2927
Joined: Tue May 28, 2013 11:56 am
Location: Fife, Scotland
Contact:

Re: From Russia with 152 mm of High Explosive Love

Post by Gav0909 »

I managed to get a lot of work done on this over the last few days, and the kit is now almost ready for paint. There are still a number of things to do, but the majority of the build is now complete.

I have a load of pictures to update with, and so will post that update this evening, and explain whats been done, whats still to do, and my thoughts on the kit so far.

Cheers
User avatar
Timplastic
Sergeant Major
Sergeant Major
Posts: 648
Joined: Thu Oct 09, 2014 7:29 am
Location: French quarter
Contact:
UN

Re: From Russia with 152 mm of High Explosive Love

Post by Timplastic »

Livening the work so far gav
You really do get a lot in the kit
Shame there is no interior for that turret, you would have enjoyed that

Tim
I like to know what you think even if it is critique , If you spotted it let me know
Trying to finish what I started, and take part

My youtube channel that needs some updates
https://www.youtube.com/channel/UCjQvLz ... subscriberImage
User avatar
fly1ngdutchm4n
First Lieutenant
First Lieutenant
Posts: 3554
Joined: Fri Aug 09, 2013 11:17 pm
Location: Hoogerheide The Netherlands
Netherlands

Re: From Russia with 152 mm of High Explosive Love

Post by fly1ngdutchm4n »

Awesome mate!
Love the bling! :thumb2:
Build what you love, Love what you build
User avatar
Gav0909
Chief Warrant Officer 5
Posts: 2927
Joined: Tue May 28, 2013 11:56 am
Location: Fife, Scotland
Contact:

Re: From Russia with 152 mm of High Explosive Love

Post by Gav0909 »

Update 4

Welcome to he next update on this build, as promised.

Progress has been good since the last update, and I can now say that bar a few small bits, the main build is now complete, ready for paint. :banana: :banana:

So lets get on with the update!

The build carries on with the addition of the rest of the turret roof anti-slip panels. As I said before, these are really nice, and each circle is raised like on the real thing.
Image

Various other parts were then added around the front, rear and left hand sides of the turret. These included the left and side air-con ducting (or fume extraction, not 100% what it is), barrel cleaning rod container, smoke launchers, spare tracks, odds n ends on the turret roof.
Image
Image
Image
Image
Image
Image
Image
Image
Image
Image
Image

The base of the barrel with the recoil cylinders was then built and installed.
Image

And then fitted with the gun. Took some work to get rid of the seams. Also adding the PE bits was a PITA and I nearly just left them off.
Image
Image
Image
Image

So up til this point the build had been relatively straight forward. Lots of parts, over-engineered for the sake of it in places I felt, but generally ok. However at this point I had no choice but to start on the two bits I was least looking forward too. Those being the shell loading mechanism at the rear of the turret, and the commanders hatch with its AA MG. And I was right to be worried, as I shall explain.

FIrst up, the shell loader (which had almost 2/3 of an A4 page to itself!)
Image
Image
Image
Image
Image
Image

So that's it built. There was quite a bit of swearing involved, mainly at the frankly silly parts breakdown involved. I think Trumpeter has made this part in so many bits for their own amusement, as I did not enjoy this at all. And the same will be said of the AA MG as well. Anywho, once it was built it looked ok, and so I am relatively happy with the result, if not the process!
Image
Image
Image

And onto the aforementioned AA MG construction. Same issues as the shell loader, parts just being too fiddly for my fat fingers, and the usual parts pinging off tweezers. Again, once finished it was acceptable. I have to say that the Meng version on their T-90 is just as detailed (if not more so in some ways) but was built from around half the parts. As you will see in one of the pics, the ammo tin was hollow, with an insert, which left a huge gap, stupid design.
Image
Image
Image
Image
Image

One the AA MG hatch was installed, that is the main build about done. There are side skirts which will be temporarily fixed during painting, and the unditching, again to be added afte painting. I will also built up the tow cables separately and install later.
Image
Image
Image
Image
Image
Image

Other than that, there are just loads of tiny PE handles to add to the storage boxes on the fenders, but that's a job for just prior to painting, otherwise I will break most of them off. I also need to put the tracks together, but did a run of 5 links as a test in around 5 mins or less, so may not be too bad a job!

Hope that this was an interesting update, and thanks for looking!

:th:
User avatar
panzerman
Sergeant
Sergeant
Posts: 151
Joined: Sat Jun 01, 2013 3:31 am
Location: Glen Burnie, Maryland

Re: From Russia with 152 mm of High Explosive Love

Post by panzerman »

Great looking SPG. Nice work adding all that P.E.
It really adds a lot of visual interest. Top marks.
Keep having fun.
Bill.
Image
User avatar
Gav0909
Chief Warrant Officer 5
Posts: 2927
Joined: Tue May 28, 2013 11:56 am
Location: Fife, Scotland
Contact:

Re: From Russia with 152 mm of High Explosive Love

Post by Gav0909 »

With the main build finished all that's left is to start getting some primer on this monster.

I wanted to prime in black this time to give the overall colours a darker tone than on my T-90 which was primed in grey. That meant I had to order some paint in, so until that arrives priming is on hold. Also we are having frankly crap weather here, if its not freezing cold (since I have to airbrush in the garage, this is a no no when its cold), its lubricating the flower beds with rain and stuff gets wet as I carry it to and from said garage for painting.


Since the last few bits of the build (shell loader and MG) were so fiddly they put me off this a little as well. I will crack on with the tracks until my primer arrives, and brave the huge amounts of tiny PE handles! Hopefully the weather may settle a bit, allowing me to get out and get the model primed.

Cheers for bearing with me, please do let me know your thoughts on the build so far.

I will do some more research into the 2S19 and pop some more background/info up as well.

Cheers
User avatar
Gav0909
Chief Warrant Officer 5
Posts: 2927
Joined: Tue May 28, 2013 11:56 am
Location: Fife, Scotland
Contact:

Re: From Russia with 152 mm of High Explosive Love

Post by Gav0909 »

This should have been an update which included pics of the 2S19 in primer......but its not.

And here is why. I have to airbrush in the garage as my Dad won't let me spray indoors. At the weekend there Dad was out in the garage using the table saw, and so there was lots of dust/sawdust in the air, so I wasn't going to paint then. Left it a while, and went out when Dad was done, did my spraying and was just about to tidy up when Dad comes in and proceeds to cut up more wood on the saw, spewing loads of sawdust into the air, and before I could do anything about it, my freshly primed (and still wet) model was covered in sawdust. To say I was :boom: was an understatement. But what could I say, its his garage, his rules.

So that's why there is no pics as I am going to have to go and sand back the affected parts and re-prime them. And since I am still irritated about the whole thing, chances are that won't happen anytime soon haha.

Cheers
User avatar
NonProlificModeler
Master Sergeant
Master Sergeant
Posts: 393
Joined: Sat Dec 19, 2015 12:48 pm
Location: Konstanz, Germany

Re: From Russia with 152 mm of High Explosive Love

Post by NonProlificModeler »

Man, that's tough! Yesterday I painted the ruin for my dio and while still wet it fell over, on the floor and "collected" some dog's hair! I was so angry, but it was my fault! Should've kept the area tidy. Your case is a bit different. And you're right - you can't do anything about it. Better luck next time, Gav!
:wtf:
Jens

My YouTube channel: https://www.youtube.com/channel/UCmhxv6 ... 6zm2jQPD8g

On my bench:
Dio "Vidette Is Coming To Town", Normandy -Day + 2, Tamiya Brit. Centaur and scratch built farm wall
Italeri GMC CCKW 2.5 ton "Water Tank Truck to Fuel Tanker conversion" - scratch built
User avatar
Gav0909
Chief Warrant Officer 5
Posts: 2927
Joined: Tue May 28, 2013 11:56 am
Location: Fife, Scotland
Contact:

Re: From Russia with 152 mm of High Explosive Love

Post by Gav0909 »

Small update. The "damage" to the primer caused by my inconsiderate Father was not as bad as first thought, and for the most part the dust impregnated paint is on places it won't be seen anyway.

To this end I managed to start putting some Russian Green down on the roadwheels, idlers, and sprockets last night. I am using Vallejo Model Air Russian Green for this. I find its quite bright, and perhaps not the best colour, but I intend to weather it down a bit, so should be ok when all is done.

Hoping to get some more done this evening, so will update with some pics of the base coating done later or tomorrow.

Cheers
User avatar
Gav0909
Chief Warrant Officer 5
Posts: 2927
Joined: Tue May 28, 2013 11:56 am
Location: Fife, Scotland
Contact:

Re: From Russia with 152 mm of High Explosive Love

Post by Gav0909 »

Update 5

Aha! A well overdue update with actual pictures of an actual model! With paint on it no less!

So with the parents away, the airbrush is once again the house and progress is being made at a good pace. I fixed the priming issue on the 2S19, as I mentioned in the last update, it wasn't as bad as I thought it was, so this didn't take long. I then started base coating in Vallejo Model Air Russian Green. I left this coat a bit thinner in places to try and get some tonal variation from the outset.

I then lightened the base colour with some Vallejo Model Air Hemp, and added this to raised areas, insides of panels etc. This was lightened further with more Hemp and more highlights applied. The results can be seen below.

Wheels, sprockets etc. given a base coat.
Image
Image
Image

Comparison of the base coat only (hull) and the first layer of highlights (turret)
Image

Side skirts and shell loader all finished.
Image
Image

Vehicle itself
Image
Image
Image
Image

I know that the green looks really light just now, but once the camo is on and a filter or two are added, along with later weathering this should tone down somewhat.

Your thoughts are welcome on this. I am just glad to be making some good progress on this. If I can get the camo done before the parents get back at the end of the week then I think I will have broken the back of this model.

Cheers :th:
User avatar
NonProlificModeler
Master Sergeant
Master Sergeant
Posts: 393
Joined: Sat Dec 19, 2015 12:48 pm
Location: Konstanz, Germany

Re: From Russia with 152 mm of High Explosive Love

Post by NonProlificModeler »

She really looks the business, Gav! What could we do to keep your parents away for a little longer, let's say one more week, hehehe! I really got the feeling she'll be a beauty once she's finished, mate! :D Jens
Jens

My YouTube channel: https://www.youtube.com/channel/UCmhxv6 ... 6zm2jQPD8g

On my bench:
Dio "Vidette Is Coming To Town", Normandy -Day + 2, Tamiya Brit. Centaur and scratch built farm wall
Italeri GMC CCKW 2.5 ton "Water Tank Truck to Fuel Tanker conversion" - scratch built
User avatar
Gav0909
Chief Warrant Officer 5
Posts: 2927
Joined: Tue May 28, 2013 11:56 am
Location: Fife, Scotland
Contact:

Re: From Russia with 152 mm of High Explosive Love

Post by Gav0909 »

NonProlificModeler wrote:She really looks the business, Gav! What could we do to keep your parents away for a little longer, let's say one more week, hehehe! I really got the feeling she'll be a beauty once she's finished, mate! :D Jens

Cheers Jens. The 2S19 now has her camo on, and has had any overspray tidied up. I also painted in the few details there are, such as the MG and spare track links. Other than that there isn't any details which can't be painted later on (windows etc.).

This is where I need some advice. I would like to put some filters on this, but I am not 100% on which tone will be best. I want to darken the overall effect a bit, so does anyone have any suggestions as to the best way to achieve this? Also should I gloss the model and pin wash now, then add chipping etc. then matt coat it and add a filter? Or should I add the filter over the base paint work now, then seal that with a gloss before washes, chipping etc.?

I am uploading a progress video on this just now, but its taking ages due to the crap internet here. I will post the video here once its uploaded, and after the next few steps I will add another picture update here as well.

Cheers for now. Comments are most welcome, I would really like to hear peoples thoughts on the build so far.

Thanks
User avatar
Gav0909
Chief Warrant Officer 5
Posts: 2927
Joined: Tue May 28, 2013 11:56 am
Location: Fife, Scotland
Contact:

Re: From Russia with 152 mm of High Explosive Love

Post by Gav0909 »

Find below an update video for this build.

Enjoy.

[youtube]-FKDhjZh2MQ[/youtube]
User avatar
NonProlificModeler
Master Sergeant
Master Sergeant
Posts: 393
Joined: Sat Dec 19, 2015 12:48 pm
Location: Konstanz, Germany

Re: From Russia with 152 mm of High Explosive Love

Post by NonProlificModeler »

Wow, Gav! Cool video! Your T-90 is a beauty and so is your 152 mm SPG!!! I NEED an airbrush! Thanks god, my stash is rather full for my speed of working, so I can save some money to buy one. For the time being I wouldn't be able to do such beautiful paint jobs like yours on these to tanks. Big "thumbs up", mate. And now I'll watch it again on YT, 'cause I want to give you a like! Have a nice Sunday! :) Jens
Jens

My YouTube channel: https://www.youtube.com/channel/UCmhxv6 ... 6zm2jQPD8g

On my bench:
Dio "Vidette Is Coming To Town", Normandy -Day + 2, Tamiya Brit. Centaur and scratch built farm wall
Italeri GMC CCKW 2.5 ton "Water Tank Truck to Fuel Tanker conversion" - scratch built
User avatar
Rodney
First Sergeant
First Sergeant
Posts: 480
Joined: Thu Oct 31, 2013 4:22 pm
Location: Newfoundland, Canada

Re: From Russia with 152 mm of High Explosive Love

Post by Rodney »

:jd: look at all the shiny PE :thumb1: looks like a great build and i like the paint looks good :th:
wookiee76
Command Sergeant Major
Posts: 864
Joined: Sun May 17, 2015 12:57 pm

Re: From Russia with 152 mm of High Explosive Love

Post by wookiee76 »

Looking good so far gav, something i have found (and andreas it seems) is that if you apply a dark dirt wash all over before the gloss has totally cured it sort of impregnates or stains the finish and darkens things down in a similar way to a filter. I did it on the su76 i built for this gb, for what is still visible of the original vallejo russian green paint if you want a looksie its in the completed builds section.
John, whats on my bench? Usually a mess and a couple of different models a week.
My motto? I'm not lazy, just energy efficient.
User avatar
Gav0909
Chief Warrant Officer 5
Posts: 2927
Joined: Tue May 28, 2013 11:56 am
Location: Fife, Scotland
Contact:

Re: From Russia with 152 mm of High Explosive Love

Post by Gav0909 »

Update 6

Ok so lets take a look at some more work on the 2S19.

First lets have a look at some daylight pics I took of the 2S19 in its camo, as it currently stands.

Image
Image
Image
Image

I then decided it was time to crack on with the tracks. I am going to cheat a bit here and not bother putting the top run of tracks on as this will be hidden with the track guards and frankly I don't like these tracks much so the less I have to work with them the better!

How the tracks come. Separate guide horns and links, with a jig to get them lined up etc. The links are quite nicely detailed, and will do for this model.

Image
Image

The left hand track is done, I held it in place with the drive sprocket and some tape until it dried. I will then paint the tracks off the model and install later. I have the right hand side to do still.

Image

That's it for this update. I will be back when the tracks are built, and hopefully soon I will get some gloss down on the 2S19 so I can start washes etc.

Cheers for looking. As always, your comments and feedback are much appreciated!
User avatar
NonProlificModeler
Master Sergeant
Master Sergeant
Posts: 393
Joined: Sat Dec 19, 2015 12:48 pm
Location: Konstanz, Germany

Re: From Russia with 152 mm of High Explosive Love

Post by NonProlificModeler »

Brilliant paint job, Gavin! Daylight is not very forgiving, so it's clear to see, that you did a great job there (although your dad did all to f*ck it up! :D)! And a very good decision to build only the visible part of the tracks! I think I would've done the same, 'cause I hate unnecessary work. :th:
Jens

My YouTube channel: https://www.youtube.com/channel/UCmhxv6 ... 6zm2jQPD8g

On my bench:
Dio "Vidette Is Coming To Town", Normandy -Day + 2, Tamiya Brit. Centaur and scratch built farm wall
Italeri GMC CCKW 2.5 ton "Water Tank Truck to Fuel Tanker conversion" - scratch built
User avatar
OliveDrab
Command Sergeant Major
Posts: 823
Joined: Thu Dec 25, 2014 4:48 am
Location: Missouri, USA
United States of America

Re: From Russia with 152 mm of High Explosive Love

Post by OliveDrab »

Wonderful work building this beast and the camo job looks great too :th: :th:
Curt :cheers2:
User avatar
felisbarcinonensis
Command Sergeant Major
Posts: 860
Joined: Tue Jun 10, 2014 9:42 pm
Location: BCN

Re: From Russia with 152 mm of High Explosive Love

Post by felisbarcinonensis »

The tank looks awesome! love the camo pattern!! :th: :th: :th:
User avatar
TommyKillander
Chief Warrant Officer 5
Posts: 2776
Joined: Sat Dec 27, 2014 1:59 pm
Location: Gothenburg, Sweden
Sweden

Re: From Russia with 152 mm of High Explosive Love

Post by TommyKillander »

It looks fantastic! :thumb2:

Good job sofar

:cheers2:
Tommy
User avatar
Gav0909
Chief Warrant Officer 5
Posts: 2927
Joined: Tue May 28, 2013 11:56 am
Location: Fife, Scotland
Contact:

Re: From Russia with 152 mm of High Explosive Love

Post by Gav0909 »

Update 7

Here we go then, another update!

Last time out we got the tracks built and at that point the model was ready for a gloss coat. So lets see whats been done since then!

First of all the second track was built in the same manner as the first, with the top run missing to save on construction and painting time.

Image

The tyres on the wheels were painted as well.
Image

The model was then gloss coated with Alclad Aqua Gloss. And once that had dried for a few days, I gave the model a pin wash using AK Interactive NATO Wash. First on the wheels...
Image

Then on the rest of the model.
Image

The tracks were primed with Badger Stynylrez Black primer.
Image

The wash was removed using some odourless thinners and cotton buds (Q-tips) and paper towel. I also added the massive amount of decals.....a whole two.... I just went with a simple number on each side of the turret which was the suggested markings for the vehicle painted in this scheme in the instructions. The other one which had a crest on each side of the turret as well is an all over green parade version.
Image
Image
Image

I don't know if you can see in the pics, but I have added some subtle chipping using a lighter shade of the green. Later in the weathering I will add a touch more in places using some darker colour. Although I may have this as a "newer" vehicle with just some dirt and dust rather than any rust/worn paint etc.

That's it for this update. Hopefully your still watching this thread and apologies for the slow updates. Usual excuses of not being able to airbrush as and when I would like does really make a difference to progress.

Cheers for watching.
User avatar
Gav0909
Chief Warrant Officer 5
Posts: 2927
Joined: Tue May 28, 2013 11:56 am
Location: Fife, Scotland
Contact:

Re: From Russia with 152 mm of High Explosive Love

Post by Gav0909 »

Update 8

Little bit more progress was made on the 2S19 over the last few nights. The model has had a matt coat ready for further weathering.

I got the tracks painted and then installed on the model. I added some more chipping in places and also some streaking with some rust and dark streaking tones. The sideskirts were installed as well as the wheels.

I also took a quick pic of the 2S19 next to my T-90 to check how the camo looked on each. Pretty good I think!

Your thoughts are welcome, someone must have something to say lol.

Image
Image
Image

:th:
User avatar
NonProlificModeler
Master Sergeant
Master Sergeant
Posts: 393
Joined: Sat Dec 19, 2015 12:48 pm
Location: Konstanz, Germany

Re: From Russia with 152 mm of High Explosive Love

Post by NonProlificModeler »

Hi, Gavin! First time on ISM since my return from visiting my family and I see, that a lot of things happened since then. Man, she's looking gorgeous! She's a stunner! :) Jens
Jens

My YouTube channel: https://www.youtube.com/channel/UCmhxv6 ... 6zm2jQPD8g

On my bench:
Dio "Vidette Is Coming To Town", Normandy -Day + 2, Tamiya Brit. Centaur and scratch built farm wall
Italeri GMC CCKW 2.5 ton "Water Tank Truck to Fuel Tanker conversion" - scratch built
User avatar
Gav0909
Chief Warrant Officer 5
Posts: 2927
Joined: Tue May 28, 2013 11:56 am
Location: Fife, Scotland
Contact:

Re: From Russia with 152 mm of High Explosive Love

Post by Gav0909 »

Final Update

The time has come to call an end to this thread, and not for a bad reason. But I finished the model! Finally I complete a GB entry again, on time!

Its a bit of a shame that my build didn't generate much interest, I guess that's the downside of the GBs getting bigger is that less people stop by each log, and even less take the time to comment.

Thanks to those of you who did take the time to comment, its much appreciated. I guess the tiny length of this thread will probably mean I have no chance of placing for a prize in this GB, but I had fun taking part and I am pleased with the model I ended up with at the end, and that's the most important thing of course. :th:

Thanks again, and please do go and check out the reveal thread at the link below.

Thanks :banana:
User avatar
NonProlificModeler
Master Sergeant
Master Sergeant
Posts: 393
Joined: Sat Dec 19, 2015 12:48 pm
Location: Konstanz, Germany

Re: From Russia with 152 mm of High Explosive Love

Post by NonProlificModeler »

Hi, Gav! I think you deserve a prize! This is an outstanding build and I remember the problems you had while painting the model in your garage. Since I'm rather new to ISM - this GB is my first contribution! - I don't know what it's usually like. Are there more entries than usual? People seem to love Russian military stuff. :) I found it impossible to take a look at each build thread, because there are so many, and I feel somewhat guilty, now that you mentioned it. I just didn't have the time.
Good luck when it's time for the jury to do their job. Take care. :) Jens
Jens

My YouTube channel: https://www.youtube.com/channel/UCmhxv6 ... 6zm2jQPD8g

On my bench:
Dio "Vidette Is Coming To Town", Normandy -Day + 2, Tamiya Brit. Centaur and scratch built farm wall
Italeri GMC CCKW 2.5 ton "Water Tank Truck to Fuel Tanker conversion" - scratch built
Post Reply

Return to “Builds”