

Alternatively find it on my WW1 Snipe thread on this site by following the link (9th post down)
http://intscalemodeller.com/viewtopic.p ... 1&start=30
Here is my technique for producing wood with acrylics. Hope it's okay Nigel and of use to others
Paints used:
Lifecolor Weathered Wood Set - 5 of the 6 colours used... UA-718, UA-717, UA-716, UA-715, UA-714
Vallejo Model color Foundation White
Vallejo Gloss Varnish


This is a simple technique but it does require some time, concentration and a very steady hand WARNING do not do large areas in one go, break them up into manageable stages
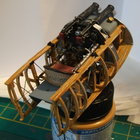
The test part before painting

First step after cleaning the part is to apply a watered down (25%) basecoat of Vallejo Foundation White, don't worry about a smooth coat as texture at this point will add to the final wood grain - you will need to look closely I'm afraid.

Add the first layer of UA-716 Warm Light Shade 2 (Lifecolor paints are very thin straight from the pot so only one or two coats would be needed with other brands - also only the basecoat and gloss where thinned in any way).

Apply the second layer of UthA-716, I didn't dab the paint brush on tissue because I want to achieve a thick finish to give the part texture.


A final coat of the same colour.

This should produce a nice wood base with subtle textures as some of the basecoat texture shows through, be sure to water the paint from other companies, applying it in thick brush strokes.
Now the detailing begins to achieve the required wood grain density. The first shade needs to be a neutral colour which complements the main wood colour giving a shadow. - in this case UA-717 Cold Base Colour. The strokes in this stage will create the main wood grain pattern - in this example thin stripes and a swirl to break up the piece.
It is important to note that the pattern won't be very clear after this stage, it is the job of the highlighting to bring the pattern to life.

Carefully go over one edge of each stroke from the previous stage with the lightest colour - for me this was UA-718 Cold Light Shade.

The piece should now come to life with the shadow and highlighting complementing each other.
From now on I am simply adding further interest and grains. It is really up to artistic licence or reference pics where the next dark colours are applied.
After strokes of UA-715 Warm Light Shade.

Finally UA - 714 Warm Base Colour was used to break up some of the highlights and make the swirl clearer/ increase it's definition.

The example I am attempting to depict used treated wood which was varnished but not stained. For this I simply added some UA-716 to a watered down gloss varnish which was applied with smooth strokes.

The final effect - Not as in scale as the oil paint technique but for lighter woods I think it gives more interest.


Hope this has been useful.
The same process can be used to achieve any colour and type of wood, simple change the tones and pattern for instance darker wood would contain more strokes of darker colours and less highlighting.